
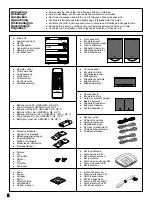


5
5
5
1
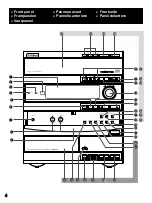
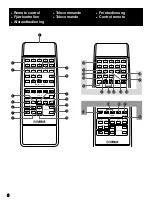
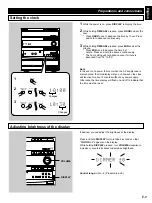
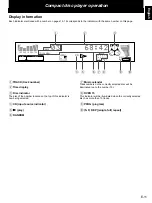
Display panel
Panneau d’affichage
Anzeigefeld
Display
Quadrante delle indicazioni
Visualizador
Displaypaneel
2
Remote control sensor
Capteur de télécommande
Fernbedienungssensor
Fjärrkontrollsensor
Sensore del telecomando
Sensor del control remoto
Afstandbedieningsensor
3
TIMER
4
STANDBY [p. 12]
5
B. BOOST [p. 34]
6
PROGRAM [p. 10, 37]
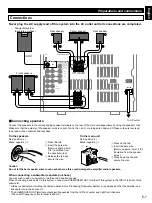
Amplifier/tuner
Amplificateur/tuner
Verstärker/Tuner
Förstärkare/tuner
Amplificatore/sintonizzatore
Amplificador/sintonizador
Versterker/tuner
7
PHONES [p. 35]
8
BASS/TREBLE [p. 34]
9
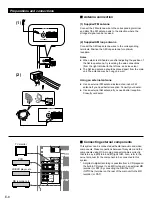
Front cover
Couvercle avant
Reglerfachabdeckung
Frontluckan
Sportello anteriore
Cubierta delantera
Voorklepje
0
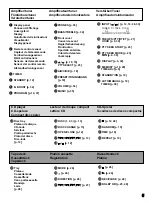
/
[p. 18, 19]
PTY SELECT [p. 23]
A
A/B/C/D/E [p. 19]
B
PRESET/TUNING/BAND
[p. 18]
C
VOLUME [p. 34]
D
MUSIC [p. 35]
E
INPUT (
/
) [p. 12, 18, 26, 33]
F
FREQ PS/PTY/RT/CT [p. 21]
HOUR [p. 9, 39]
G
PTY SEEK START [p. 23]
H
PTY SEEK MODE [p. 23]
MIN
[p. 9, 39]
I
DISPLAY [p. 9, 39]
J
MEMORY [p. 19, 20]
TIME ADJ [p. 9]
K
STANDBY/ON [p. 10]
L
AUTO/MANUAL [p. 18]
TIMER [p. 39]
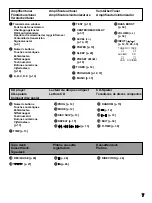
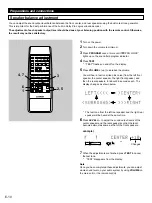
Tape deck
Platine cassette
Kassettendeck
Kassettdäck
Registratore
Platina
Tapedeck
CD player
Lecteur de disque compact
CD-Spieler
CD-spelare
Lettore CD
Tocadiscos de discos compactos
Compact disc speler
M
Disc tray
Plateau de disque
CD-Lade
Skivfack
Piatto portadischi
Plato del disco
Disc-lade
[p. 12]
N
DISC (1, 2, 3) [p. 13]
O
DISC CHANGE [p. 13]
P
OPEN/CLOSE [p. 12]
Q
(
)/
(
) [p. 13]
R
/ [p. 12]
S
[p. 12, 29]
T
RANDOM [p. 15]
U
TIME [p. 16]
V
REPEAT [p. 15]
W
Tray
Plateau
Cassettenlade
Kassettfack
Vano portacassette
Bandeja
Lade
[p. 26]
X
MODE [p. 26]
Y
[p. 26]
Z
DIRECTION [p. 26]
[
(
)/
(
) [p. 27]
\
[p. 26]
]
[p. 26]
`
REC/PAUSE [p. 28]
a
DOLBY NR [p. 25, 28]
TUNER
→
TAPE
→
CD
AUX/MD
←
VCR
←
VIDEO
↑
↓


