background image

SERVICE MANUAL

This manual has been provided for the use of authorized YAMAHA Retailers and their service personnel.
It has been assumed that basic service procedures inherent to the industry, and more specifically YAMAHA Products, are already
known and understood by the users, and have therefore not been restated.

WARNING:

Failure to follow appropriate service and safety procedures when servicing this product  may result in personal
injury, destruction of expensive components, and failure of the  product to perform as specified. For these reasons,
we advise all YAMAHA product owners that any service required should be performed by an authorized YAMAHA
Retailer or the appointed service representative.

IMPORTANT:

The presentation or sale of this manual to any individual or firm does not constitute authorization,  certification  or
recognition  of  any  applicable  technical  capabilities,  or establish a principle-agent relationship of any form.

The data provided is believed to be accurate and applicable to the unit(s) indicated on the cover.  The research, engineering, and service
departments of YAMAHA are continually striving  to improve YAMAHA products. Modifications are, therefore, inevitable and
specifications are subject to change without notice or obligation to retrofit. Should any discrepancy appear to exist, please contact the
distributor's Service Division.

WARNING:

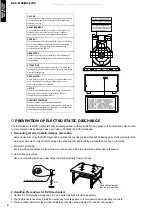
Static discharges can destroy expensive components. Discharge any static electricity your body may have
accumulated by grounding yourself to the ground buss in the unit (heavy gauge black wires connect to this buss).

IMPORTANT:

Turn the unit OFF during disassembly and part replacement. Recheck all work before you apply power to the unit.

IMPORTANT NOTICE

SERVICE MANUAL

TRAY LOCK MODE / 

トレーロックモード  . . . . . . . . .

12

FACTORY RESET / 

ファクトリーリセット  . . . . . . . . .

12

PRINTED CIRCUIT BOARD  . . . . . . . . . . . . . . . . 13–16
BLOCK DIAGRAM  . . . . . . . . . . . . . . . . . . . . . . . . . . . 17
SCHEMATIC DIAGRAM  . . . . . . . . . . . . . . . . . . . 18–23
RDX-E700 EXPLODED VIEW  . . . . . . . . . . . . . . . . . . 24
RDX-E700 MECHANICAL PARTS  . . . . . . . . . . . 25–26
NX-E700  . . . . . . . . . . . . . . . . . . . . . . . . . . . . . . . . . . . 27
REMOTE CONTROL  . . . . . . . . . . . . . . . . . . . . . . 28–29

■ 

CONTENTS

TO SERVICE PERSONNEL  . . . . . . . . . . . . . . . . . . 2–4
PREVENTION OF ELECTRO STATIC DISCHARGE  . . . . . . 4
LOCALE MANAGEMENT INFORMATION  . . . . . . . . 5
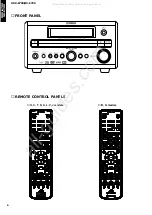
FRONT PANEL  . . . . . . . . . . . . . . . . . . . . . . . . . . . . . . 6
REMOTE CONTROL PANELS  . . . . . . . . . . . . . . . . . . 6
REAR PANELS  . . . . . . . . . . . . . . . . . . . . . . . . . . . . . . 7
SPECIFICATIONS / 

参考仕様

 . . . . . . . . . . . . . . . . . . 8–9

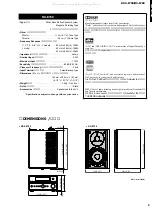
DIMENSIONS / 

寸法図

 . . . . . . . . . . . . . . . . . . . . . . . . . 9

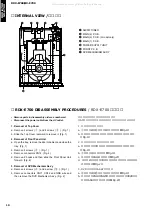
INTERNAL VIEW / 

各部名称

 . . . . . . . . . . . . . . . . . . . . 10

RDX-E700 DISASSEMBLY PROCEDURES /

RDX-E700分解手順

 . . . . . . . . . . . . . . . . . . . . . . . 10–11

1 0 0 9 9 1

© 2005 YAMAHA CORPORATION. All rights reseved.
This manual is copyrighted by YAMAHA and may not be copied or
redistributed either in print or electronically without permission.

     ’05.11

RDX-E700/

NX-E700

MICRO COMPONENT SYSTEM 

MCR-E700

RDX-E700

NX-E700

The MCR-E700 consists of the RDX-E700 and the NX-E700.

MCR-E700 は RDX-E700 と NX-E700 で構成されています。

All manuals and user guides at all-guides.com

all-guides.com

Summary of Contents for MCR-E700

Page 1: ... to change without notice or obligation to retrofit Should any discrepancy appear to exist please contact the distributor s Service Division WARNING Static discharges can destroy expensive components Discharge any static electricity your body may have accumulated by grounding yourself to the ground buss in the unit heavy gauge black wires connect to this buss IMPORTANT Turn the unit OFF during dis...

Page 2: ...ANY REASON WHATSOEVER Avoid prolonged unprotected contact between solder and your skin When soldering do not inhale solder fumes or expose eyes to solder flux vapor If you come in contact with solder or components located inside the enclosure of this product wash your hands before handling food About Lead Free Solder 無鉛ハンダについて The P C B s installed in this unit are soldered using the fol lowing so...

Page 3: ...this laser level control unless instruction is provided elsewhere in this manual Adjustment of this control can increase the laser emission level from the device 警告 レーザーの安全対策 本機はレーザー光線を放射する部品を搭載しています こ の部品が放射するレーザー光線は目に損傷を起こします このレーザー光線から目及び肌を保護するために 本機の 修理作業中は下記の注意を厳守してください 1 テスト時または修理時 目及び肌を光ピックアップか ら30cm以上離してください いかなる場合もレーザー 光線を見つめないでください 2 光ピックアップの再調整及び分解はしないでください 3 このマニュアル上で指定されている以外の制御 調整 手順...

Page 4: ...iation exposure AVERTISSEMENT L utilisation de commandes et l emploi de réglages ou de méthodes autres que ceux décrits ci dessous peuvent entraîner une exposition à un rayonnement dangereux VORSICHT Die Verwendung von Bedienelementen oder die Einstellung bzw die Ausführung von anderen als in dieser Anleitung beschriebenen Vorgängen kann zu Gefährdung durch gefährliche Strahlung führen OBSERVERA A...

Page 5: ...ction technology that is protected by method claims of certain U S patents and other intellectual property rights owned by Macrovision Corporation and other rights owners Use of this copyright protection technology must be authorized by Macrovision Corporation and is intended for home and other limited viewing uses only unless otherwise authorized by Macrovision Corporation Reverse engineering or ...

Page 6: ...6 RDX E700 NX E700 RDX E700 NX E700 FRONT PANEL REMOTE CONTROL PANELS U C T K A L V J models B G models All manuals and user guides at all guides com a l l g u i d e s c o m ...

Page 7: ...7 RDX E700 NX E700 NX E700 V model REAR PANELS U C models A model T model K model B G models L model J model All manuals and user guides at all guides com ...

Page 8: ...B Sensitivity S N 20 dB 感度 S N 20dB 700 µV CD DVD PLAYER SECTION CD DVD レシーバー部 Signal to Noise ratio S N 比 95 dB Total Harmonic Distortion 全高調波歪率 0 007 Separation セパレーション 90 dB AUDIO FORMAT オーディオ部 Dolby Digital MPEG decode not decode DTS ドルビーデジタル MPEG DTS を除く PCM DATA 16 bit LPCM DATA 20 24 bit Fs 44 1 48 kHz support 88 2 96 kHz downmix support Fs 44 1 48 kHz 対応 88 2 96 kHz ダウンミック対応 MP3 32 kbps to...

Page 9: ...to change without prior notice Manufactured under license from Dolby Laboratories Dolby and the double D symbol are trademarks of Dolby Laboratories ドルビーラボラトリーズからの実施権により製造されています ドルビー 及びダブルD 記号は ドルビーラボラトリーズの商標 です DTS and DTS DIGITAL OUT are trademarks of Digital Theater Sys tems Inc DTS および DTS Digital Out はデジタルシアターシステムズの登録 商標です DivX DivX Certified and associated logos are trademarks of DivXNetwork...

Page 10: ...rのネジ4本 tのネジ1本を外します Fig 1 b コネクターCN11 CN12 及びアース線を外し DVDメカ ニズムASSYを取り外します Fig 2 1 Removal of Top Cover a Remove 2 screws q and 4 screws w Fig 1 b Slide the Top Cover rearward to remove it Fig 1 2 Removal of Front Panel Unit a Open the tray remove the door ornament and close the tray Fig 1 b Remove 4 screws e Fig 1 c Remove connectors CN14 Fig 2 d Remove 2 hooks and then slide the Front Panel Unit f...

Page 11: ... 2 手動でトレーを開く方法 a 本機を上下反転します b トレーが出てくるまで ドライバーでローディングギア を図に示す矢印の方向に回転します c トレーをそっと引き出します HOW TO MANUALLY EJECT THE TRAY a Turn the unit bottom up b Turn the Loading Gear in the direction indicated with a screwdriver until the tray is ejected c Gently pull the tray out Tray トレー Screwdriver ドライバー Loading Gear ローディングギア Tray トレー Fig 3 All manuals and user guides at all guides com a l l g u i d e s c o...

Page 12: ...display NOTE 1 Even after the Tray Lock mode is set all functions remain the same as usual except the open close key NOTE 2 If no disc is loaded in the tray the Tray Lock mode is cancelled automatically Canceling Tray Lock mode 1 With the power turned off while pressing the TIMER key and MODE key keep pressing the STANDBY ON key for 4 seconds or longer 2 When the Tray Lock mode is cancelled TRADE ...

Page 13: ...ON ONLY NO REPLACEMENT COMPONENT PARTS WILL BE AVAILABLE MPEG P C B Side B Lead Free Solder Used MAIN 1 CN12 MAIN 1 CN11 DVD MECHANISM SPINDOLE SLED DVD MECHANISM OPEN CLOSE MPEG P C B Side A Lead Free Solder Used DVD MECHANISM PICK UP All manuals and user guides at all guides com ...

Page 14: ...M TUNER MPEG CN35 MPEG CN36 SPEAKERS SUBWOOFER OUT AV B G models Y VIDEO PB PR VIDEO OUT AUX OUT AUX IN TV IN L R B G models PRINTED CIRCUIT BOARD MAIN 1 P C B Side A Lead Free Solder Used MAIN 3 P C B Side A MAIN 2 P C B Side A Lead Free Solder Used J model FOR INFORMATION ONLY NO REPLACEMENT COMPONENT PARTS WILL BE AVAILABLE All manuals and user guides at all guides com ...

Page 15: ...UIT BOARD MAIN 1 P C B Side B Lead Free Solder Used MAIN 2 P C B Side B Lead Free Solder Used MAIN 3 P C B Side B Lead Free Solder Used J model FOR INFORMATION ONLY NO REPLACEMENT COMPONENT PARTS WILL BE AVAILABLE All manuals and user guides at all guides com ...

Page 16: ...POWER CABLE MAIN 1 CN93 MAIN 1 CN92 MAIN 1 CN91 POWER SUPPLY UNIT Side A FRONT P C B Side A MAIN 1 CN14 VOLUME MODE SOUND DISPLAY TIMER PHONES STANDBY ON FOR INFORMATION ONLY NO REPLACEMENT COMPONENT PARTS WILL BE AVAILABLE All manuals and user guides at all guides com a l l g u i d e s c o m ...

Page 17: ...JM4556AL IC63 M2068MD FILTER L C FILTER AUDIO EQ 1A 1B 2A 2B L L R R L L CH R CH RELAY RY51 IC52 IC51 RELAY L R R 3A 3B PWDN 3 3V MPEG_LRCK MPEG_BICK MPEG_MCLK H P OUT AUX IN AUX OUT TV IN OPTICAL OUT J model only D1 D2 COMPONENT SUBWOOFER PREOUT B G models only SCART OUT SDATA AMP VCC VKK FL FL FUN 12V FUN 12V AMP VCC FL VKK FL STBY 5 6V PWR ON FL ON DVD 5V MD 5 2V 100V 250V SCLK MIX APO_LRCK APO...

Page 18: ...ing special characteristics are marked Z and must be replaced with parts having specifications equal to those originally installed Schematic diagram is subject to change without notice Z印のある部品は 安全性確保部品を示しています 部品の交換が必要な場合 パーツリストに記載されている部品を使用してください 本回路図は 標準回路図です 改良のため予告なく変更することがございます FOR INFORMATION ONLY NO REPLACEMENT COMPONENT PARTS WILL BE AVAILABLE All manuals and user guides at all guides com ...

Page 19: ...Z and must be replaced with parts having specifications equal to those originally installed Schematic diagram is subject to change without notice Z印のある部品は 安全性確保部品を示しています 部品の交換が必要な場合 パーツリストに記載されている部品を使用してください 本回路図は 標準回路図です 改良のため予告なく変更することがございます FOR INFORMATION ONLY NO REPLACEMENT COMPONENT PARTS WILL BE AVAILABLE All manuals and user guides at all guides com ...

Page 20: ... FLASH Mircroprocessor MAIN 2 MAIN 1 MAIN 3 Components having special characteristics are marked Z and must be replaced with parts having specifications equal to those originally installed Schematic diagram is subject to change without notice Z印のある部品は 安全性確保部品を示しています 部品の交換が必要な場 合 パーツリストに記載されている部品を使用してください 本回路図は 標準回路図です 改良のため予告なく変更することがございま す FOR INFORMATION ONLY NO REPLACEMENT COMPONENT PARTS WILL ...

Page 21: ...must be replaced with parts having specifications equal to those originally installed Schematic diagram is subject to change without notice Z印のある部品は 安全性確保部品を示していま す 部品の交換が必要な場合 パーツリストに記載 されている部品を使用してください 本回路図は 標準回路図です 改良のため予告なく 変更することがございます FOR INFORMATION ONLY NO REPLACEMENT COMPONENT PARTS WILL BE AVAILABLE All manuals and user guides at all guides com a l l g u i d e s c o m ...

Page 22: ... Z and must be replaced with parts having specifications equal to those originally installed Schematic diagram is subject to change without notice Z印のある部品は 安全性確保部品を示しています 部品の交換が必要な場合 パーツリストに記載されている部品を使用してください 本回路図は 標準回路図です 改良のため予告なく変更することがございます FOR INFORMATION ONLY NO REPLACEMENT COMPONENT PARTS WILL BE AVAILABLE All manuals and user guides at all guides com ...

Page 23: ...special characteristics are marked Z and must be replaced with parts having specifications equal to those originally installed Schematic diagram is subject to change without notice Z印のある部品は 安全性確保部品を示しています 部品の交換が必要な場合 パーツリストに記載されている部品を使用してください 本回路図は 標準回路図です 改良のため予告なく変更することがございます FOR INFORMATION ONLY NO REPLACEMENT COMPONENT PARTS WILL BE AVAILABLE All manuals and user guides at all guides com ...

Page 24: ...0 104 106 104 51 1 51 2 51 2 51 4 40 8 1 5 9 9 9 39 39 55 37 13 60 8 8 8 42 58 9 10 11 41 51 35 33 4 3 4 7 42 57 5 2 32 31 6 J model J model Other models A model B model U C V J T models G L K models G B models only J model except J model 1 55 70 72 53 2 55 3 58 1 58 2 55 11 55 12 200 1 55 13 58 3 51 3 51 3 51 3 51 3 51 5 RDX E700 EXPLODED VIEW All manuals and user guides at all guides com ...

Page 25: ...L CKF3A302Y UC リアパネル 37 AAX74220 REAR PANEL CKF3A302U T リアパネル 37 AAX74230 REAR PANEL CKF3A302V K リアパネル 37 AAX74270 REAR PANEL CKF3A302Z A リアパネル 37 AAX74200 REAR PANEL CKF1A302Z BG リアパネル 37 AAX74250 REAR PANEL CKF3A302X L リアパネル 37 AAX74240 REAR PANEL CKF3A302W V リアパネル 39 AAX73920 BRACKET PCB CMD1A574 ブラケット PCB 40 AAX74050 TOP COVER GD CKC1A167GD7 トップカバー 40 AAX74040 TOP COVER SI CKC1A167G33 トップカバー 4...

Page 26: ...72 AAX74730 FLEXIBLE FLAT CABLE 13P 100mm P 1 25 CWC1B2A13B100B カード電線 101 AAX73520 FLAT HEAD B TIGHT SCREW 3x8 MFZN2W3 CTS3 8G 皿Bタイトネジ 102 AAX73540 BIND HEAD P TIGHT SCREW 3x10 MFZN2W3 CTB3 10G バインドPタイトネジ 103 AAX73930 PW HEAD B TIGHT SCREW 3x8 8 MFZN2W3 CTW3 8J PWヘッドBタイトネジ 104 AAX74110 BIND HEAD B TIGHT SCREW 3x6 MFZN2W3 CTB3 6J バインドBタイトネジ 106 AAX74100 BIND HEAD B TIGHT SCREW 3x12 MFZN2W3 CTB3 12J...

Page 27: ... 2uF 63V BPケミコン 04 7 2 V6367500 ELECTROLYTIC CAP 3 3uF 63V BPケミコン 7 3 V9507500 CEMENT RESISTOR 2 7Ω 5W セメント抵抗 01 12 V5361400 TERMINAL CAP S06E RED ターミナルキャップ 13 V5361500 TERMINAL CAP S06E BLACK ターミナルキャップ 21 WE963200 FLAT HEAD WOOD SCREW 3 5x20 MFZN2B3 皿木ネジ 22 V9506100 HEXAGON HEAD WOOD SCREW 4x25 MFZN2BL 6角穴付き木ネジ ACCESSORIES 付属品 30 V9826900 SPEAKER CABLE 4m 1pc スピーカーケーブル NX E700 22 21 7 1 7 2 1 12 ...

Page 28: ... 20 19 18 17 16 29 28 27 26 30 R1 2Ω 1 4W D1 MIE 554A2 Q1 2SD1781K Q T1 T2 T3 C1 47µF 3 0V C2 0 1µF R2 27Ω C3 0 1µF X1 4MHz 3 11 19 27 35 43 51 2 10 18 26 34 42 17 25 33 41 50 4 12 20 28 36 44 5 13 21 29 37 6 14 22 30 38 46 47 45 7 15 23 31 39 1 9 49 8 16 24 32 40 48 1 2 3 4 5 6 7 8 9 10 11 15 16 17 18 19 20 21 22 23 24 27 31 35 34 33 32 28 29 30 25 26 36 38 40 37 39 41 42 46 43 44 45 47 12 13 14 ...

Page 29: ...E ZOOM AUDIO TUNER 78 11 78 12 78 13 78 14 78 15 78 16 78 17 78 18 78 19 78 10 N A N A N A 78 81 78 82 78 83 78 1C N A 78 1B N A N A N A N A N A N A N A N A N A N A N A N A N A TV MBR TV 1 50 0D MBR TV 2 50 0E MBR TV 3 50 0F MBR TV 4 50 1C MBR TV 5 50 1D MBR TV 6 50 1E MBR TV 7 50 1F MBR TV 8 50 04 MBR TV 9 50 05 MBR TV 0 50 0C N A N A N A N A N A N A N A N A N A N A N A N A N A N A N A N A N A N ...

Page 30: ...RDX E700 NX E700 RDX E700 NX E700 All manuals and user guides at all guides com ...

Reviews: