
TROUBLESHOOTING
24
En
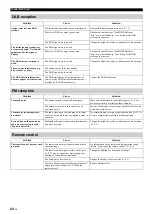
DAB reception
Problem
Cause
Solution
Cannot tune into any DAB
stations.
The initial scan operations were not performed.
Perform the initial scan operations (
There is no DAB coverage in your area.
Check with your dealer or WorldDMB Online at
“http://www.worlddab.org” for a listing of the DAB
coverage in your area.
The DAB signals are too weak.
Change the height, direction, or placement of the antenna.
The initial scan operations are
not successful and “Not Found”
appears on the front panel
display.
The DAB signals are too weak.
There is no DAB coverage in your area.
Check with your dealer or WorldDMB Online at
“http://www.worlddab.org” for a listing of the DAB
coverage in your area.
The DAB station reception is
weak.
The DAB signals are too weak.
Change the height, direction, or placement of the antenna.
There is noise interference (e.g.
hiss, crackle, or jitter).
The antenna needs to be repositioned.
The DAB signals are too weak.
The DAB station information
does not appear or is inaccurate.
The DAB station may be temporarily out of
service, or the DAB station information is not
provided by the DAB broadcaster.
Contact the DAB broadcaster.
FM reception
Problem
Cause
Solution
Too much noise.
The antenna may be connected improperly.
Make sure the antenna is connected properly (
P. 4) or
use a commercially available outdoor antenna.
The antenna is too close to the unit or to an
electronic device.
Position the antenna as far away as possible from the unit
or the electronic device.
Too much noise during stereo
broadcast.
The radio station you selected may be far from
your area, or the radio wave reception is weak in
your area.
Try manual tuning to improve the signal quality (
or use a commercially available outdoor antenna.
Even with an outdoor antenna,
radio wave reception is weak.
(Sound is distorted.)
Multipath reflection or other radio interferences
may have occurred.
Change the height, direction, or placement of the antenna
(
P. 4).
Remote control
Problem
Cause
Solution
The remote control does not work
properly.
The remote control may be operated outside its
operation range.
For information on the remote control operation range,
refer to “How to use the remote control” (
The remote control signal receiver on the unit
(
P. 2) may be exposed to direct sunlight or
lighting (inverted fluorescent lamps).
Change the lighting or orientation of the unit.
The battery may be worn out.
Replace the battery with a new one (
P. 1).
There are obstacles between the remote control
signal receiver on the unit (
P. 2) and the
remote control.
Remove the obstacles.


