background image

DIC183

Read this manual carefully before operating this vehicle.

4C9-F8199-E1

AL115S(C)

OWNER’S MANUAL

E_4C9E1.book  Page 1  Thursday, January 15, 2009  3:03 PM

Summary of Contents for MIO AL115S

Page 1: ...DIC183 Read this manual carefully before operating this vehicle 4C9 F8199 E1 AL115S C OWNER S MANUAL E_4C9E1 book Page 1 Thursday January 15 2009 3 03 PM ...

Page 2: ...Read this manual carefully before operating this vehicle This manual should stay with this vehicle if it is sold E_4C9E1 book Page 1 Thursday January 15 2009 3 03 PM ...

Page 3: ...jury In addition the many tips given in this manual will help keep your motorcycle in the best possible condition If you have any further questions do not hesitate to contact your Yamaha dealer The Yamaha team wishes you many safe and pleasant rides So remember to put safety first Yamaha continually seeks advancements in product design and quality Therefore while this manual contains the most curr...

Page 4: ...y all safety messages that follow this symbol to avoid possible injury or death A WARNING indicates a hazardous situation which if not avoided could result in death or serious injury A NOTICE indicates special precautions that must be taken to avoid damage to the vehicle or other property A TIP provides key information to make procedures easier or clearer WARNING NOTICE TIP E_4C9E1 book Page 1 Thu...

Page 5: ...2008 by Thai Yamaha Motor Co Ltd 1st edition October 2008 All rights reserved Any reprinting or unauthorized use without the written permission of Thai Yamaha Motor Co Ltd is expressly prohibited Printed in Thailand E_4C9E1 book Page 2 Thursday January 15 2009 3 03 PM ...

Page 6: ...c maintenance chart for the emission control system 7 2 General maintenance and lubrication chart 7 3 Removing and installing cowlings and panels 7 6 Checking the spark plug 7 7 Engine oil and oil strainer 7 9 Final transmission oil 7 11 Air filter and V belt case air filter elements 7 12 Adjusting the carburetor 7 15 Adjusting the engine idling speed 7 15 Adjusting the throttle cable free play 7 ...

Page 7: ...l brake light bulb or a rear turn signal light bulb 7 31 Troubleshooting 7 33 Troubleshooting chart 7 34 MOTORCYCLE CARE AND STORAGE 8 1 Care 8 1 Storage 8 3 SPECIFICATIONS 9 1 CONSUMER INFORMATION 10 1 Identification numbers 10 1 E_4C9E1 book Page 2 Thursday January 15 2009 3 03 PM ...

Page 8: ... on your vehicle They contain important information for safe and proper operation of your vehicle Never remove any labels from your vehicle If a label becomes difficult to read or comes off a replacement label is available from your Yamaha dealer 2 3 1 ZAUU0263 E_4C9E1 book Page 1 Thursday January 15 2009 3 03 PM ...

Page 9: ... the operator and a passen ger The failure of motorists to detect and recognize motorcycles in traf fic is the predominating cause of automobile motorcycle accidents Many accidents have been caused by an automobile driver who did not see the motorcycle Making yourself conspicuous ap pears to be very effective in reduc ing the chance of this type of accident Therefore Wear a brightly colored jacket...

Page 10: ...e shield or goggles Wind in your unprotected eyes could contribute to an impairment of vision that could delay seeing a hazard The use of a jacket heavy boots trousers gloves etc is effective in preventing or reducing abra sions or lacerations Never wear loose fitting clothes otherwise they could catch on the control levers footrests or wheels and cause injury or an accident Always wear protective...

Page 11: ...ng within this weight limit keep the following in mind Cargo and accessory weight should be kept as low and close to the motorcycle as possible Se curely pack your heaviest items as close to the center of the vehi cle as possible and make sure to distribute the weight as evenly as possible on both sides of the mo torcycle to minimize imbalance or instability Shifting weights can create a sud den i...

Page 12: ...would impair the perfor mance of your motorcycle Care fully inspect the accessory before using it to make sure that it does not in any way reduce ground clearance or cornering clearance limit suspension travel steering travel or control operation or ob scure lights or reflectors Accessories fitted to the han dlebar or the front fork area can create instability due to improp er weight distribution ...

Page 13: ...celerate slowly Be careful when passing parked cars A driver might not see you and open a door in your path Railroad crossings streetcar rails iron plates on road construc tion sites and manhole covers become extremely slippery when wet Slow down and cross them with caution Keep the scooter upright otherwise it could slide out from under you The brake pads could get wet when you wash the scooter A...

Page 14: ... choosing a motorcycle helmet The helmet must meet the safety standard TIS The helmet size must match the size of the rider s head Never subject a helmet to heavy shocks Wearing the helmet correctly Always connect the chin strap In the case of an accident the helmet has a much less chance of coming off if the chin strap is connected Types of helmets and their usage Half type use only for riding at...

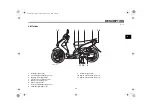
Page 15: ...e stop screw page 7 15 5 Owner s tool kit page 7 1 6 Seat lock page 4 8 7 Rear turn signal lights page 7 31 8 Tail brake light page 7 31 9 Kickstarter page 4 8 10 Engine oil drain bolt A page 7 9 11 Engine oil drain bolt B page 7 9 1 2 3 11 10 9 4 5 6 7 8 ZAUU0106 1 DESCRIPTION E_4C9E1 book Page 1 Thursday January 15 2009 3 03 PM ...

Page 16: ... page 4 5 2 Air filter element page 7 12 3 Dry battery page 7 27 4 Fuse page 7 29 5 Helmet holder page 4 8 6 Front brake fluid reservoir page 7 22 7 Engine oil filler cap page 7 9 ZAUU0107 7 1 2 3 4 5 6 E_4C9E1 book Page 2 Thursday January 15 2009 3 03 PM ...

Page 17: ...Starter choke lever page 4 7 3 Left handlebar switches page 4 3 4 Speedometer unit page 4 3 5 Right handlebar switches page 4 3 6 Throttle grip page 7 16 7 Front brake lever page 4 4 8 Main switch page 4 1 ZAUU0108 1 2 3 4 5 6 7 8 E_4C9E1 book Page 3 Thursday January 15 2009 3 03 PM ...

Page 18: ...y when the engine is started _ EAU10661 OFF All electrical systems are off The key can be removed EWA10061 WARNING _ Never turn the key to OFF or LOCK while the vehicle is moving Otherwise the electrical systems will be switched off which may result in loss of control or an accident _ EAU10701 LOCK The steering is locked and all electri cal systems are off The key can be re moved To lock the steer...

Page 19: ...head into the keyhole cover receptacle as shown and then turn the key to the left to open the cov er To close the keyhole cover Insert the key head into the keyhole cover receptacle as shown and then turn the key to the right to close the cover ZAUU0014 1 Ignition key 2 Safety key ZAUU0015 ZAUU0016 ZAUU0017 E_4C9E1 book Page 2 Thursday January 15 2009 3 03 PM ...

Page 20: ...eter unit The speedometer unit is equipped with a speedometer an odometer and a fuel meter The speedometer shows riding speed The odometer shows the total distance traveled The fuel meter indicates the amount of fuel in the fuel tank EAU12347 Handlebar switches Left Right 1 Turn signal indicator light 2 High beam indicator light ZAUU0110 1 Speedometer 2 Odometer 3 Fuel meter ZAUU0111 1 Dimmer swit...

Page 21: ...his switch to sound the horn EAUM1132 Start switch Push this switch while applying the front or rear brake to crank the engine with the starter See page 6 1 for start ing instructions prior to starting the en gine EAU12900 Front brake lever The front brake lever is located on the right handlebar grip To apply the front brake pull this lever toward the han dlebar grip EAU12950 Rear brake lever The ...

Page 22: ...ed after filling fuel Leaking fuel is a fire hazard _ EAU13212 Fuel Make sure there is sufficient gasoline in the tank EWA10881 WARNING _ Gasoline and gasoline vapors are extremely flammable To avoid fires and explosions and to reduce the risk of injury when refueling follow these instructions _ 1 Before refueling turn off the en gine and be sure that no one is sitting on the vehicle Never refuel ...

Page 23: ... immediately If gasoline spills on your skin wash with soap and water If gasoline spills on your clothing change your clothes _ EAUU0040 ECA11400 NOTICE _ Use only unleaded gasoline The use of leaded gasoline will cause severe damage to internal engine parts such as the valves and pis ton rings as well as to the exhaust system _ Gasohol fuel Gasohol is mixture of unleaded gaso line and ethanol Now...

Page 24: ...ake sure that the exhaust system has cooled down be fore doing any maintenance work Do not allow the engine to idle more than a few minutes Long idling can cause a build up of heat _ ECA10701 NOTICE _ Use only unleaded gasoline The use of leaded gasoline will cause unrepairable damage to the catalyt ic converter _ EAU13590 Starter choke lever Starting a cold engine requires a rich er air fuel mixt...

Page 25: ... the seat down and then push it down to lock it in place 2 Remove the key TIP _ Make sure that the seat is properly se cured before riding _ EAU37481 Helmet holders The helmet holders are located under the seat To secure a helmet to a helmet holder 1 Open the seat See page 4 8 2 Attach a helmet to a helmet hold er and then securely close the seat WARNING Never ride with a helmet attached to the he...

Page 26: ...ing the storage compart ment Since the storage compartment accumulates heat when ex posed to the sun do not store anything susceptible to heat in side it To avoid humidity from spread ing through the storage com partment wrap wet articles in a plastic bag before storing them in the compartment Since the storage compartment may get wet while the scooter is being washed wrap any arti cles stored in ...

Page 27: ...1072 Luggage hook EWAT1031 WARNING _ Do not exceed the load limit of 1 kg 2 2 lb for the luggage hook Do not exceed the maximum load of 163 kg 359 lb for the vehicle _ 1 Luggage hook ZAUU0120 E_4C9E1 book Page 10 Thursday January 15 2009 3 03 PM ...

Page 28: ...e check the following points ITEM CHECKS PAGE Fuel Check fuel level in fuel tank Refuel if necessary Check fuel line for leakage 4 5 Engine oil Check oil level in engine If necessary add recommended oil to specified level Check vehicle for oil leakage 7 9 Final transmission oil Check vehicle for oil leakage 7 11 Front brake Check operation If soft or spongy have Yamaha dealer bleed hydraulic syste...

Page 29: ...e Check tire condition and tread depth Check air pressure Correct if necessary 7 17 7 19 Brake levers Make sure that operation is smooth Lubricate lever pivoting points if necessary 7 20 Centerstand sidestand Make sure that operation is smooth Lubricate pivots if necessary 7 25 Chassis fasteners Make sure that all nuts bolts and screws are properly tightened Tighten if necessary Instruments lights...

Page 30: ...e key to ON 2 Turn on the starter choke and completely close the throttle grip See page 4 7 3 Start the engine by pushing the start switch while applying the front or rear brake or by pushing the kickstarter lever down If the engine fails to start release the start switch wait a few sec onds and then try again Each starting attempt should be as short as possible to preserve the battery Do not cran...

Page 31: ...hat the starter choke is not re quired when the engine is warm EAU16761 Starting off TIP _ Before starting off allow the engine to warm up _ 1 While pulling the rear brake lever with your left hand and holding the grab bar with your right hand push the scooter off the center stand 2 Sit astride the seat and then ad just the rear view mirrors 3 Switch the turn signals on 4 Check for oncoming traffi...

Page 32: ...rwise the scooter may skid or overturn Railroad crossings streetcar rails iron plates on road con struction sites and manhole covers become extremely slip pery when wet Therefore slow down when approaching such areas and cross them with cau tion Keep in mind that braking on a wet road is much more difficult Ride slowly down a hill as braking downhill can be very difficult _ 1 Close the throttle co...

Page 33: ...an the period between 0 and 1000 km 600 mi For this reason you should read the following material carefully Since the engine is brand new do not put an excessive load on it for the first 1000 km 600 mi The various parts in the engine wear and polish them selves to the correct operating clear ances During this period prolonged full throttle operation or any condition that might result in engine ove...

Page 34: ...ve 3 4 throttle 1000 km 600 mi and beyond Avoid prolonged full throttle operation Vary the engine speed occasionally NOTICE After 1000 km 600 mi of operation the engine oil must be changed the oil filter cartridge or element replaced and the oil strain er cleaned If any engine trouble should occur during the engine break in period immediately have a Yamaha dealer check the vehicle ECA10362 E_4C9E1...

Page 35: ... exhaust system can become very hot park in a place where pedestri ans or children are not likely to touch them and be burned Do not park on a slope or on soft ground otherwise the ve hicle may overturn increasing the risk of a fuel leak and fire Do not park near grass or other flammable materials which might catch fire _ E_4C9E1 book Page 6 Thursday January 15 2009 3 03 PM ...

Page 36: ...LLEST POTENTIAL OF YAMAHA MOTORCYCLES 2 A MOTORCYCLE CAN KEEP ITS PERFORMANCE CAPABILITY FOR A LONGER TIME Comparison of wear on engine parts piston piston ring cylinder etc 100 Perfect operative condition Without maintenance Distance covered km Engine overhaul cylinder boring piston ring change etc With maintenance E_4C9E1 book Page 7 Thursday January 15 2009 3 03 PM ...

Page 37: ...PRICE WHEN IT IS TRADED IN AS A USED PRODUCT Fuel consumption 100 Without maintenance Distance covered km With maintenance Customer s running cost fuel cost plus maintenance and repair expenses Without maintenance With maintenance Big repairs at higher expenses Distance covered km S E_4C9E1 book Page 8 Thursday January 15 2009 3 03 PM ...

Page 38: ...amaha dealer per form service _ EWA15121 WARNING _ Turn off the engine when perform ing maintenance unless otherwise specified A running engine has moving parts that can catch on body parts or clothing and electrical parts that can cause shocks or fires Running the engine while ser vicing can lead to eye injury burns fire or carbon monox ide poisoning possibly lead ing to death See page 2 2 for mo...

Page 39: ...ech nical skills _ EAU46930 Periodic maintenance chart for the emission control system NO ITEM CHECK OR MAINTENANCE JOB ODOMETER READING km ANNUAL CHECK 1000 4000 7000 10000 13000 1 Fuel line Check fuel and vacuum hoses for cracks or damage 2 Spark plug Check condition Clean and regap Replace 3 Valves Check valve clearance Adjust 4 Carburetor Adjust engine idling speed 5 Air induction system Check...

Page 40: ...worn to the limit 5 Rear brake Check operation and adjust brake lever free play Replace brake shoes Whenever worn to the limit 6 Brake hose Check for cracks or damage Replace Every 4 years 7 Wheels Check runout and for damage 8 Wheels Check runout spoke tightness and for damage Tighten spokes if necessary 9 Tires Check tread depth and for damage Replace if necessary Check air pressure Correct if n...

Page 41: ... for oil leakage Every 3000 km 1800 mi 18 Engine oil filter element Clean 19 Final transmission oil Check vehicle for oil leakage Change Every 10000 km 6000 mi 20 V belt Check for damage and wear Replace Every 25000 km 16000 mi 21 Front and rear brake switches Check operation 22 Moving parts and cables Lubricate 23 Throttle grip housing and cable Check operation and free play Adjust the throttle c...

Page 42: ...r dusty areas Hydraulic brake service Regularly check and if necessary correct the brake fluid level Every two years replace the internal components of the brake master cylinder and caliper and change the brake fluid Replace the brake hoses every four years and if cracked or damaged _ E_4C9E1 book Page 5 Thursday January 15 2009 3 03 PM ...

Page 43: ...eds to be re moved and installed EAUU0270 Cowlings A To remove the cowling 1 Remove the screws on cowling A and B 2 Pull cowling A off as show TIP _When removing cowling pull out on the areas shown form top to bottom When removing cowling A pull out on the areas shown from top to bottom 1 Panel A 2 Cowling A 3 Cowling B ZAUU0127 1 Screws x 4 2 Cowling A 2 1 ZAUU0262 1 Screws x 8 2 Cowling B ZAUU01...

Page 44: ...l off as shown To install the panel Place the panel in the original position and then install the screws EAUT1835 Checking the spark plug The spark plug is an important engine component which is easy to check Since heat and deposits will cause any spark plug to slowly erode the spark plug should be removed and checked in accordance with the peri odic maintenance and lubrication chart In addition t...

Page 45: ...ead have a Yamaha dealer check the vehicle _ 2 Check the spark plug for elec trode erosion and excessive car bon or other deposits and replace it if necessary To install the spark plug 1 Measure the spark plug gap with a wire thickness gauge and if necessary adjust the gap to specification 2 Clean the surface of the spark plug gasket and its mating sur face and then wipe off any grime from the spa...

Page 46: ...art To check the engine oil level 1 Place the vehicle on the center stand A slight tilt to the side can result in a false reading 2 Start the engine warm it up for several minutes and then turn it off 3 Wait a few minutes until the oil settles remove the oil filler cap wipe the dipstick clean insert it back into the oil filler hole without screwing it in and then remove it again to check the oil l...

Page 47: ...trainer remove drain bolt B also _ 4 Clean the engine oil strainer with solvent and then check it for damage and replace it if neces sary 5 Check the O ring for damage and replace it if necessary 6 Install the engine oil strainer compression spring O ring and engine oil drain bolt and then tighten the drain bolt to the speci fied torque TIP _ Make sure that the O ring is properly seated _ 7 Refill...

Page 48: ... oil The final transmission case must be checked for oil leakage before each ride If any leakage is found have a Yamaha dealer check and repair the scooter In addition the final transmis sion oil must be changed as follows at the intervals specified in the periodic maintenance and lubrication chart 1 Start the engine warm up the fi nal transmission oil by riding the scooter for several minutes and...

Page 49: ...d lubrica tion chart Service the air filter elements more frequently if you are riding in un usually wet or dusty areas Checking and replacing the air filter element 1 Place the vehicle on the center stand 2 Remove the air filter case cover by removing the screws 3 Remove the air filter element by pulling it out 4 Check the air filter element for ex cessive dirt or damage and re place it if necess...

Page 50: ...il of the recommended type to the entire surface of the el ement and then squeeze the ex cess oil out WARNING Use only a dedicated parts cleaning solvent To avoid the risk of fire or explosion do not use gaso line or solvents with a low flash point EWA10431 NOTICE To avoid damaging the air filter element handle it gently and carefully and do not twist it ECA10521 1 V belt case air filter case cove...

Page 51: ...out the filter elements installed otherwise the piston s and or cylinder s may become exces sively worn ECA10531 Cleaning the air filter check hose and caps 1 Check each cap at the bottom left side of the air filter case and the hose at the bottom of the V belt case for accumulated dirt or water 2 If dirt or water is visible remove the cap or hose clean it and then install it Recommended oil Yamah...

Page 52: ...peed must be checked and if necessary adjusted as follows at the intervals specified in the periodic maintenance and lubrica tion chart The engine should be warm before making this adjustment TIP _ The engine is warm when it quick ly responds to the throttle A diagnostic tachometer is need ed to make this adjustment _ 1 Open the seat See page 4 8 for seat opening and closing proce dures 2 Remove p...

Page 53: ... and if neces sary adjust it as follows TIP _ The engine idling speed must be cor rectly adjusted before checking and adjusting the throttle cable free play _ 1 Loosen the locknut 2 To increase the throttle cable free play turn the adjusting nut in di rection a To decrease the throt tle cable free play turn the adjusting nut in direction b 3 Tighten the locknut 1 Throttle stop screw Engine idling ...

Page 54: ...tire pressure may cause se vere injury or death from loss of control The tire air pressure must be checked and adjusted on cold tires i e when the tempera ture of the tires equals the am bient temperature The tire air pressure must be adjusted in accordance with the riding speed and with the total weight of rider passen ger cargo and accessories ap proved for this model _ EWA10511 WARNING _ Never ...

Page 55: ... to an accident _ After extensive tests only the tires list ed below have been approved for this model by Yamaha Motor Co Ltd EWA10560 WARNING _ It is dangerous to ride with a worn out tire When a tire tread begins to show crosswise lines have a Yamaha dealer re place the tire immediately The replacement of all wheel and brake related parts includ ing the tires should be left to a Yamaha dealer wh...

Page 56: ...el or damage before each ride If any damage is found have a Yamaha dealer replace the wheel Do not attempt even the smallest repair to the wheel A de formed or cracked wheel must be replaced The wheel should be balanced whenever either the tire or wheel has been changed or replaced An unbalanced wheel can result in poor performance adverse handling characteristics and a shortened tire life Ride at...

Page 57: ...f there is air in the hydraulic sys tem have a Yamaha dealer bleed the system before operating the ve hicle Air in the hydraulic system will diminish the braking perfor mance which may result in loss of control and an accident _ EAU22170 Adjusting the rear brake lever free play The brake lever free play should mea sure 10 20 mm 0 39 0 47 in as shown Periodically check the brake lever free play and...

Page 58: ... wear with out having to disassemble the brake To check the brake pad wear check the wear indicator grooves If a brake pad has worn to the point that the wear indicator grooves have almost disappeared have a Yamaha dealer replace the brake pads as a set EAU22540 Rear brake shoes The rear brake is provided with a wear indicator which allows you to check the brake shoe wear without having to disasse...

Page 59: ...only the recommended qual ity brake fluid otherwise the rub ber seals may deteriorate causing leakage and poor braking performance Refill with the same type of brake fluid Mixing fluids may result in a harmful chemical reaction and lead to poor braking performance Be careful that water does not en ter the master cylinder when refill ing Water will significantly lower the boiling point of the fluid...

Page 60: ...checked and re placed by a Yamaha dealer at the in tervals specified in the periodic maintenance and lubrication chart EAU23101 Checking and lubricating the cables The operation of all control cables and the condition of the cables should be checked before each ride and the ca bles and cable ends should be lubri cated if necessary If a cable is damaged or does not move smoothly have a Yamaha deale...

Page 61: ...als specified in the periodic maintenance chart EAU43641 Lubricating the front and rear brake levers Front Rear The pivoting points of the front and rear brake levers must be lubricated at the intervals specified in the periodic maintenance and lubrication chart ZAUU0143 ZAUU0144 Recommended lubricants Front brake lever Silicone grease Rear brake lever Lithium soap based grease E_4C9E1 book Page 2...

Page 62: ..._ EAU23272 Checking the front fork The condition and operation of the front fork must be checked as follows at the intervals specified in the period ic maintenance and lubrication chart To check the condition Check the inner tubes for scratches damage and excessive oil leakage To check the operation 1 Place the vehicle on a level sur face and hold it in an upright posi tion WARNING To avoid injury...

Page 63: ...he intervals specified in the periodic maintenance and lubrica tion chart 1 Place a stand under the engine to raise the front wheel off the ground See page 7 25 for more information WARNING To avoid injury securely support the vehicle so there is no dan ger of it falling over EWA10751 2 Hold the lower ends of the front fork legs and try to move them forward and backward If any free play can be fel...

Page 64: ...if necessary tight ened ECA10620 NOTICE _ Never attempt to remove the bat tery cell seals as this would perma nently damage the battery _ EWA10760 WARNING _ Electrolyte is poisonous and dangerous since it contains sulfuric acid which causes se vere burns Avoid any contact with skin eyes or clothing and always shield your eyes when working near batteries In case of contact administer the fol lowing...

Page 65: ...arger will damage the battery If you do not have access to a constant voltage battery charg er have a Yamaha dealer charge your battery _ To store the battery 1 If the vehicle will not be used for more than one month remove the battery fully charge it and then place it in a cool dry place NO TICE When removing the bat tery be sure the key is turned to OFF then disconnect the negative lead before d...

Page 66: ...use of the specified amperage WARNING Do not use a fuse of a higher amper age rating than recommended to avoid causing extensive damage to the electrical sys tem and possibly a fire EWA15131 3 Turn the key to ON and turn on the electrical circuits to check if the devices operate 4 If the fuse immediately blows again have a Yamaha dealer check the electrical system 1 Spare fuse ZAUU0148 1 Fuse Spec...

Page 67: ...rints on the headlight bulb using a cloth moist ened with alcohol or thinner _ 1 Remove cowling A See page 7 6 2 Remove the headlight bulb holder by pushing it inward and turning it counterclockwise and then re move the burnt out bulb 3 Place a new bulb into position and then secure it with the bulb holder 4 Install the cowling 5 Have a Yamaha dealer adjust the headlight beam if necessary 1 Do not...

Page 68: ... Insert a new bulb into the socket by pushing it in until it stops 6 Install the socket together with the bulb by turning it clockwise 7 Install the cowling EAUU0301 Replacing the tail brake light bulb or a rear turn signal light bulb Place the vehicle on the centerstand Tail brake light bulb 1 Open the seat See page 4 8 for seat opening and closing proce dures 2 Remove the tail brake light bulb s...

Page 69: ...gnal light bulb 1 Open the seat See page 4 8 for seat opening and closing proce dures 2 Remove the turn signal light bulb socket by turning it counterclock wise 3 Remove the burnt out bulb from the socket by pulling it out 4 Insert a new bulb into the socket 5 Install the socket into its original position and then securely close the seat 1 Tail brake light bulb ZAUU0155 1 Rear turn signal light bu...

Page 70: ...ire any repair take it to a Yamaha dealer whose skilled techni cians have the necessary tools expe rience and know how to service the motorcycle properly Use only genuine Yamaha replace ment parts Imitation parts may look like Yamaha parts but they are often inferior have a shorter service life and can lead to expensive repair bills EWA15141 WARNING _ When checking the fuel system do not smoke and...

Page 71: ... the spark plug and check the electrodes 3 Ignition Wipe off with a dry cloth and correct the spark plug gap or replace the spark plug Have a Yamaha dealer check the vehicle The engine does not start Have a Yamaha dealer check the vehicle The engine does not start Check the battery Operate the electric starter 4 Battery The engine turns over quickly The engine turns over slowly The battery is good...

Page 72: ... especially on spoked wheels If such prod ucts are used on hard to re move dirt do not leave the cleaner on the affected area any longer than instructed Al so thoroughly rinse the area off with water immediately dry it and then apply a corrosion protection spray Improper cleaning can damage plastic parts such as cowl ings panels windshields headlight lenses meter lenses etc and the mufflers Use on...

Page 73: ...er and a mild detergent after the engine has cooled down NO TICE Do not use warm water since it increases the corrosive action of the salt ECA10791 2 Apply a corrosion protection spray on all metal including chrome and nickel plated sur faces to prevent corrosion After cleaning 1 Dry the motorcycle with a cham ois or an absorbing cloth 2 Use a chrome polish to shine chrome aluminum and stainless s...

Page 74: ...weather or humid climates can cause the headlight lens to fog Turning the headlight on for a short period of time will help remove the moisture from the lens _ EAU26301 Storage Short term Always store your scooter in a cool dry place and if necessary protect it against dust with a porous cover ECA10820 NOTICE _ Storing the scooter in a poorly ventilated room or covering it with a tarp while it is ...

Page 75: ... from sparking make sure to ground the spark plug electrodes while turning the engine over EWA10951 e Remove the spark plug cap from the spark plug and then install the spark plug and the spark plug cap 5 Lubricate all control cables and the pivoting points of all levers and pedals as well as of the side stand centerstand 6 Check and if necessary correct the tire air pressure and then lift the sco...

Page 76: ...y Periodic oil change 0 80 L Final gear oil Type YAMALUBE 4 or SAE 10W 40 type SE motor oil Quantity 0 12 L Air filter Air filter element Wet element Fuel Recommended fuel Regular gasoline Fuel tank capacity 4 1 L Carburetor Manufacturer KEIHIN Type quantity NCV24 1 Spark plug s Manufacturer model NGK C7HSA Spark plug gap 0 6 0 7 mm Clutch Clutch type Dry centrifugal automatic Transmission Primary...

Page 77: ...t suspension Type Telescopic fork Spring shock absorber type Coil spring oil damper Wheel travel 90 0 mm Rear suspension Type Unit swing Spring shock absorber type Coil spring oil damper Wheel travel 80 0 mm Electrical system Ignition system DC CDI Charging system AC magneto Battery Model GTZ5S Voltage capacity 12 V 3 5 Ah Headlight Bulb type Krypton bulb Bulb voltage wattage quantity Headlight 12...

Page 78: ...y identification number The key identification number is stamped into the key Record this number in the space provided and use it for reference when ordering a new key EAU26410 Vehicle identification number The vehicle identification number is stamped into the frame TIP _ The vehicle identification number is used to identify your motorcycle and may be used to register your motorcy cle with the lic...

Page 79: ...ONSUMER INFORMATION 10 2 10 EAU26450 Engine serial number The engine serial number is stamped into the final gear case 1 Engine serial number ZAUU0105 E_4C9E1 book Page 2 Thursday January 15 2009 3 03 PM ...

Page 80: ...1 CONSUMER INFORMATION E_4C9E1 book Page 1 Thursday January 15 2009 3 03 PM ...

Page 81: ...E_4C9E1 book Page 2 Thursday January 15 2009 3 03 PM ...

Page 82: ...PRINTED IN THAILAND E_4C9E1 book Page 1 Thursday January 15 2009 3 03 PM ...

Reviews: