background image

6

MMP1 Getting Started

 CAUTION

Always follow the basic precautions listed below to 
avoid the possibility of physical injury to you or others, 
or damage to the device or other property. These 
precautions include, but are not limited to, the 
following:

Power supply/power cord 

• When removing the electric plug from the device or an 

outlet, always hold the plug itself and not the cord. Pulling 
by the cord can damage it.

• To disconnect the device from the mains, unplug both 

power cords.

Location

• Do not place the device in an unstable position where it 

might accidentally fall over and cause injuries.

• Do not block the vents. This device has ventilation holes at 

the sides to prevent the internal temperature from becoming 
too high. In particular, do not place the device on its side or 
upside down. Inadequate ventilation can result in 
overheating, possibly causing damage to the device(s), or 
even fire.

• Do not place the device in a location where it may come into 

contact with corrosive gases or salt air. Doing so may result 
in malfunction.

• Before moving the device, remove all connected cables.

• If the device is mounted in an EIA standard rack, carefully 

read the section “Precautions for rack mounting” on 
page 13. Inadequate ventilation can result in overheating, 
possibly causing damage to the device(s), malfunction, or 
even fire.

Maintenance

• Remove the power plug from the AC outlet and also 

disconnect the connected power supply from the [BACKUP 
DC INPUT] connector when cleaning the device.

Handling caution

• Avoid inserting or dropping foreign objects (paper, plastic, 

metal, etc.) into any gaps or openings on the device (vents). 
If this happens, immediately turn off the power and then 
unplug the power cord from the AC outlet, and have the 
device inspected by qualified Yamaha service personnel.

• Do not rest your weight on the device or place heavy 

objects on it. Avoid applying excessive force to the buttons, 
switches or connectors to prevent injuries.

• Avoid pulling the connected cables to prevent injuries or 

damage to the device.

Backup battery

• Do not replace the backup battery by yourself. Doing so 

may cause an explosion and/or damage to the device(s).
When the backup battery needs to be replaced, the error 
icon will appear on the menu bar of the MMP1 Editor while 
the MMP1 is connected to the MMP1 Editor. In this case, 
contact your Yamaha dealer and have qualified Yamaha 
service personnel replace the backup battery.

NOTICE

To avoid the possibility of malfunction/ damage to the product, 
damage to data, or damage to other property, follow the 
notices below.

Handling and maintenance

• Do not use the device in the vicinity of a TV, radio, AV 

equipment, mobile phone, or other electric devices. 
Otherwise, the device, TV, or radio may generate noise.

• Do not expose the device to excessive dust or vibration, or 

extreme cold or heat (such as in direct sunlight, near a 
heater, or in a car during the day), in order to prevent the 
possibility of panel disfiguration, unstable operation, or 
damage to the internal components.

• Do not place vinyl, plastic or rubber objects on the device, 

since this might discolor the panel.

• When cleaning the device, use a dry and soft cloth. Do not 

use paint thinners, solvents, cleaning fluids, or chemical-
impregnated wiping cloths.

• Condensation can occur in the device due to rapid, drastic 

changes in ambient temperature—when the device is 
moved from one location to another, or air conditioning is 
turned on or off, for example. Using the device while 
condensation is present can cause damage. If there is 
reason to believe that condensation might have occurred, 
leave the device for several hours without turning on the 
power until the condensation has completely dried out.

• The rubber feet included in this package can be attached to 

the device to prevent slippage when it is to be used on a 
slippery surface.

• Always turn the power off when the device is not in use.

• Even when the both (

P

) [MAIN] switch and (

P

) [BACKUP] 

switch are in standby status (power indicators are off), 
electricity is still flowing to the instrument at the minimum 
level. When you are not using the instrument for a long time, 
make sure you unplug the power cord from the wall AC 
outlet, and also disconnect the connected power supply 
from the [BACKUP DC INPUT] jack.

Yamaha cannot be held responsible for damage caused 
by improper use or modifications to the device, or data 
that is lost or destroyed.

PA_en_8  2/2

Summary of Contents for MMP1

Page 1: ...JA RU IT PT ES FR DE EN English Deutsch Fran ais Espa ol Portugu s Italiano SIGNAL PROCESSOR Getting Started Einf hrung Prise en Main C mo Empezar Introdu o Guida Introduttiva...

Page 2: ...CEDURE Responsible Party Yamaha Corporation of America Address 6600 Orangethorpe Ave Buena Park Calif 90620 Telephone 714 522 9011 Type of Equipment Signal processor Model Name MMP1 This device compli...

Page 3: ...nused for long periods of time 14 Refer all servicing to qualified service personnel Servicing is required when the apparatus has been damaged in any way such as power supply cord or plug is damaged l...

Page 4: ...12 3 2 Before connecting 12 3 3 Precautions for rack mounting 13 3 4 Power supply 13 3 5 About Dante 13 3 6 Notes regarding the use of network switches 13 3 7 Dante network settings and audio routing...

Page 5: ...or modify them in any way If it should appear to be malfunctioning discontinue use immediately and have it inspected by qualified Yamaha service personnel Water warning Do not expose the device to ra...

Page 6: ...may cause an explosion and or damage to the device s When the backup battery needs to be replaced the error icon will appear on the menu bar of the MMP1 Editor while the MMP1 is connected to the MMP1...

Page 7: ...eir respective companies Software may be revised and updated without prior notice European models Purchaser User Information specified in EN55103 2 2009 Conforms to Environments E1 E2 E3 and E4 weee_e...

Page 8: ...ok In order to distinguish between the controls on the MMP1 unit and the controls on the screen control names are written in the following manner Actual buttons on the unit are called keys and virtual...

Page 9: ...turned on the indicator lights up NOTICE Even when the power switch is in the standby position N a small amount of current is flowing through the unit When you are not using the unit for a long time...

Page 10: ...C power supply The connector type is XLR 4 32 Refer to Specifications for pin assignments CAUTION Before connecting or disconnecting the external power supply you must set to standby the power of this...

Page 11: ...ed to the STP cable shield by conductive tape or comparable means For connecting only Dante compatible devices or GbE compatible devices including a computer WORD CLOCK IN OUT connectors For connectin...

Page 12: ...panel of the unit 3 2 3 IP address Determines the IP address for identifying this unit from a computer For this setting use the DIP switch 7 and 8 on the rear panel of the unit Any settings you chang...

Page 13: ...ure to remove the power cord from the AC outlet 3 4 2 Turning the power on and set to standby When you turn on the power to the unit be sure to turn on the power to the power amplifiers and or powered...

Page 14: ...x indicate the version of the MMP1 5 Follow the onscreen instructions NOTE In Windows when the User Account Control dialog box appears click Continue or Yes To uninstall the MMP1 Editor Windows In Co...

Page 15: ...tly with the Dante Controller For details refer to the Dante Controller User Guide available on the website https www audinate com products software dante controller lang en 5 3 How to update the firm...

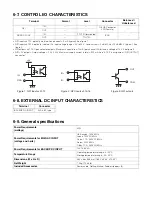
Page 16: ...balanced Nominal Max before clip ANALOG INPUT 1 8 20k 150 Lines 4dB 1 23 V 24dBu 12 28V D SUB Connector 25P Female Balanced 10k 600 Lines 10dBV 0 32 V 10dBV 3 16V Unbalanced Output Terminals Actual So...

Page 17: ...l Format Level Connector Balanced Unbalanced GPI IN D SUB Connector 25P Female OUT WORD CLOCK IN TTL 75 terminated BNC OUT TTL 75 Terminal Connector BACKUP DC INPUT XLR 4 32 type Power Requirements wa...

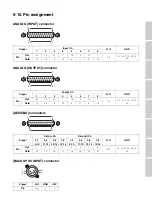
Page 18: ...12 23 9 20 6 17 3 14 Signal Output Ch N O GND 1 2 3 4 5 6 7 8 Pin Hot 24 10 21 7 18 4 15 1 13 2 5 8 11 16 19 22 25 Cold 12 23 9 20 6 17 3 14 Signal Data In Ch Data Out Ch N O GND 1 2 3 4 5 6 7 8 1 2...

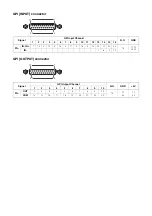
Page 19: ...2 3 4 5 6 7 8 9 10 11 12 13 14 15 16 Pin IN IN 1 14 2 15 3 16 4 17 5 18 6 19 20 21 22 23 13 11 12 24 25 IN 7 8 9 10 Signal GPI Output Channel N O GND 5V 1 2 3 4 5 6 7 8 9 10 Pin OUT 1 2 3 4 5 6 7 8 9...

Page 20: ...obtenir la version la plus r cente du manuel acc dez au site Web de Yamaha puis t l chargez le fichier du manuel concern El contenido de este manual se aplica a las ltimas especificaciones seg n la f...

Page 21: ...t from the Program is covered only if its contents constitute a work based on the Program independent of having been made by running the Program Whether that is true depends on what the Program does 1...

Page 22: ...tions to the wide range of software distributed through that system in reliance on consistent application of that system it is up to the author donor to decide if he or she is willing to distribute so...

Page 23: ...is license or the ordinary General Public License is the better strategy to use in any particular case based on the explanations below When we speak of free software we are referring to freedom of use...

Page 24: ...n of it thus forming a work based on the Library and copy and distribute such modifications or work under the terms of Section 1 above provided that you also meet all of these conditions a The modifie...

Page 25: ...rary side by side in a single library together with other library facilities not covered by this License and distribute such a combined library provided that the separate distribution of the work base...

Page 26: ...ftware Foundation either version 2 1 of the License or at your option any later version This library is distributed in the hope that it will be useful but WITHOUT ANY WARRANTY without even the implied...

Page 27: ...sobre a distribui o do c digo fonte Por tr s anos ap s a expedi o final da f brica voc pode solicitar Yamaha o c digo fonte de quaisquer partes do produto que estejam licenciadas sob a Licen a P blic...

Page 28: ......

Page 29: ...Yamaha Pro Audio global website http www yamahaproaudio com Yamaha Downloads http download yamaha com ZV90460 Manual Development Group 2017 Yamaha Corporation Published 09 2017 MWES A0...

Reviews: