Creating a Voice/Performance by Using the Sampling Function
MOTIF XF Reference Manual
127
V
oice mode
Song mode
P
a
tt
er
n mode
Mixing mode
Mast
er mode
Utility mode
F
ile mode
P
erf
or
mance
mode
Sampling
mode 1
Sampling
mode 2
R
e
fe
rence
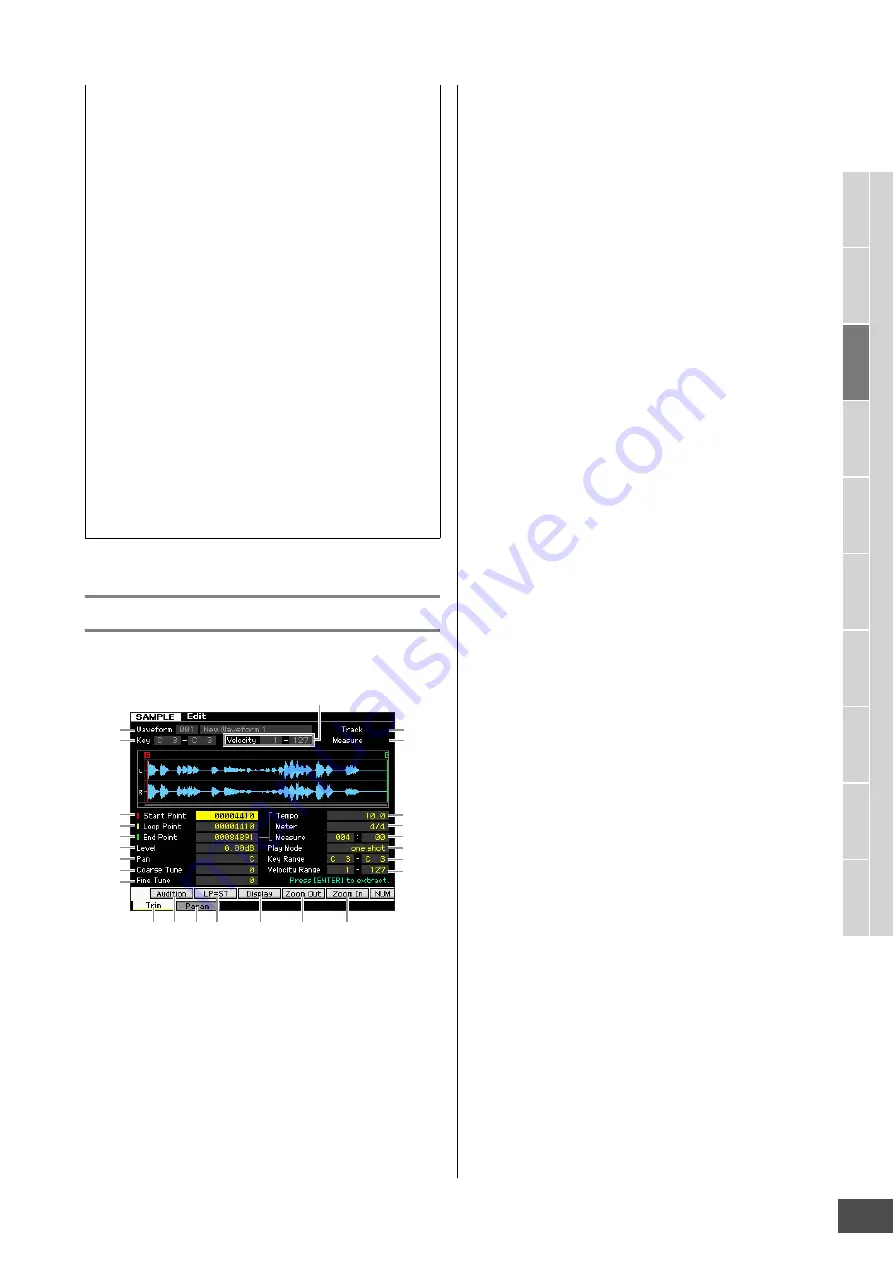
Sample Playback settings—[F1] Trim
This display lets you set the playback range and loop
range of the Sample.
n
The NUM icon is shown on the tab corresponding to the [SF6]
button depending on the selected parameter. In this condition,
you can use the [F1] – [F6] buttons and the [SF1] – [SF5]
buttons as numeric key pads by pressing the [SF6] button. For
details, see page 36.
1
Waveform
(Indication only)
Indicates the number and name of the selected Waveform.
2
Key (Key Range)
(Indication only)
Indicates the key range of the currently selected Key Bank.
3
Velocity (Velocity Range)
(Indication only)
Indicates the velocity range of the currently selected Key
Bank.
4
Track
(Indication only)
Indicates the track of the current Song/Pattern. This is
available only when entering the Sampling mode from the
Song/Pattern mode.
5
Measure
(Indication only)
Indicates the measure number of the selected Song/
Pattern. This is available only when entering the Sampling
mode from the Song/Pattern mode.
6
Start Point
Determines the Start point for Sample playback. The part at
the left side of this point will not be played back. When
pressing the [SF2] button, the value of the Loop Point (
7
)
is copied to the Start Point.
Settings:
0000000 – End point
7
Loop Point
Determines the Loop point at which the loop playback starts.
When the Play mode is set to “loop,” the Sample is played
back between this Loop point and the End point (
8
).
Settings:
0000000 – End point
8
End Point
Determines the End point for Sample playback. The part at
the right side of this point will not be played back. The End
Point will be automatically determined so that the length
between the Start Point and the End Point matches the
settings of the Tempo (
#
), Meter (
$
), and Measure (
%
).
Settings:
0000000 – (depending on the Sample’s length)
9
Level
Determines the output level of the selected Sample.
Settings:
-95.25 dB – +0.00 dB
)
Pan
Determines the stereo pan position of the sound.
Settings:
L64 (far left) – C (center) – R63 (far right)
!
Coarse Tune
Determines the coarse tuning for the pitch of the Sample in
semitones.
Settings:
-64 – +0 – +63
@
Fine Tune
Determines the fine tuning for the pitch of the Sample in
cents.
Settings:
-64 – +0 – +63
How to set the tempo of the Sample
If you do not know the tempo of the Sample containing
the rhythm pattern, follow the instructions below.
1
While holding the [SF1] Audition button, adjust
the Start Point and End Point so that looped
playback of the Sample is smooth and matches
the beat timing.
Make sure to also use the Extract operation to delete
unnecessary parts from the Sample.
2
Set the time signature and measure.
Press the [F1] Trim button to call up the Trim display
(below) then set the time signature (
$
) and measure
(
%
).
3
Increase or decrease the Tempo (
#
) as
necessary so that the End Point (
8
) becomes
equivalent to the end point applied to the
original Sample.
Set the Tempo (
#
) to a large value then decrease it
gradually so that the End Point (
8
) increases
gradually. Once you reach a certain value, the End
Point no longer increases, even when you decrease
the Tempo. The resulting value is the End Point
applied to the original Sample. The final Tempo value
is the most appropriate tempo for Sample playback.
1
2
4
5
6
7
9
)
!
@
8
#
$
%
^
&
*
E (
A
B
C
D
F
3


