background image

95

MO

TIF XS6/MO

TIF XS7/MO

TIF XS8

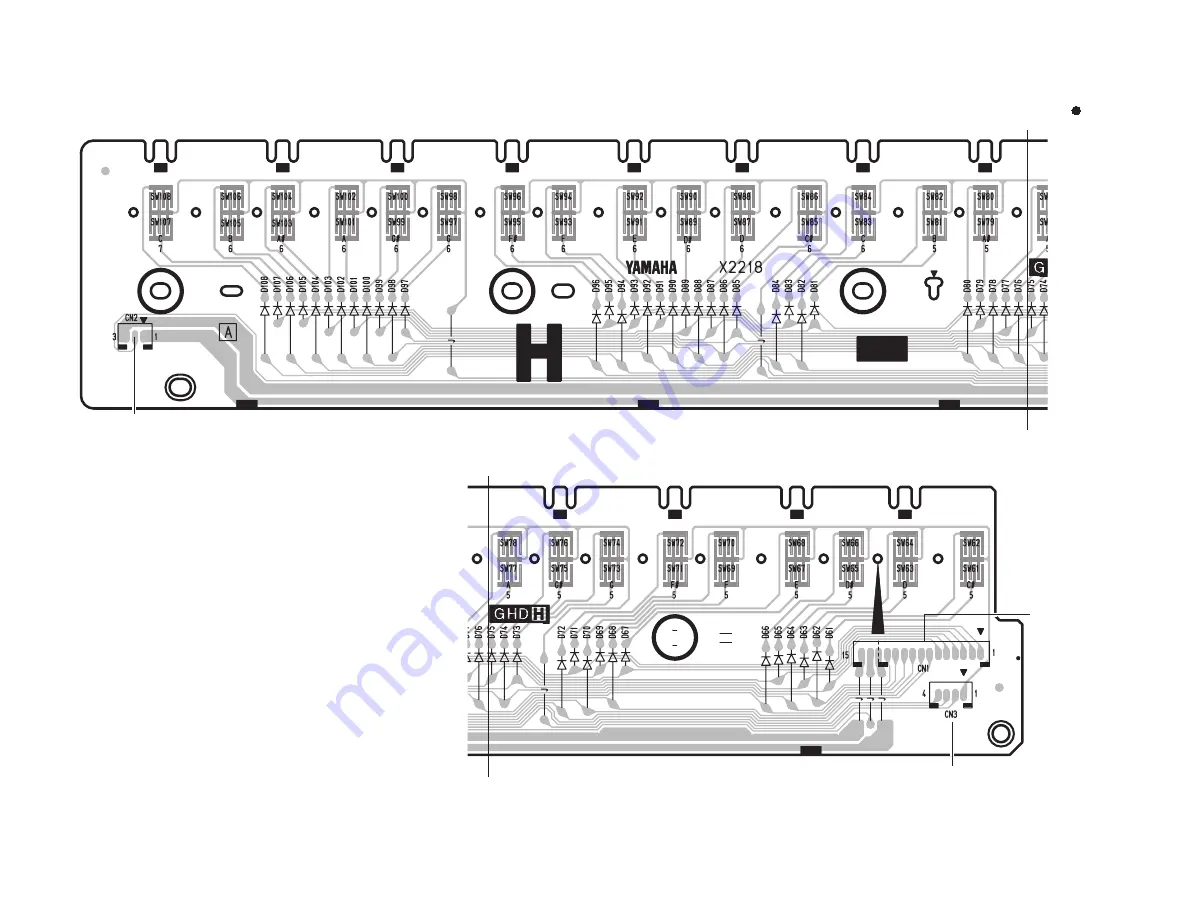
to GHDPC-CN1

H

H'

to HEDaf M-CN4

H

H'

to HEDaf_M-CN2

 HEDaf H Cir

cuit Boar

(MOTIF XS8)

Component side

(部品側)

2NAK8-V852150

Summary of Contents for Motif XS Series

Page 1: ...手順 32 INSTALLING OPTIONAL HARDWARE 拡張部品 別売 の取り付け 55 59 LSI PIN DESCRIPTION LSI 端子機能表 63 IC BLOCK DIAGRAM IC ブロック図 74 CIRCUIT BOARDS シート基板図 77 TEST PROGRAM テストプログラム 111 138 SAVING and LOADING A FILE ファイルのセーブ ロード 165 167 CONTENTS 目次 FACTORY SET ファクトリーセット 169 170 FIRMWARE UPDATING PROCEDURES ファームウェアバージョンアップ手順 171 173 MOTIF XS BOOT SEQUENCE MOTIF XS ブートシーケンス 175 176 DISPLAY MESSAGES メッセージリスト 177 179 M...

Page 2: ...ship of any form The data provided is belived to be accurate and applicable to the unit s indicated on the cover The research engineering and service departments of Yamaha are continually striving to improve Yamaha products Modifications are therefore inevitable and changes in specification are subject to change without notice or obligation to retrofit Should any discrepancy appear to exist please...

Page 3: ...m to freeze due to corruption of data in the Flash ROM This means that this synthesizer may not be able to start up prop erly even when turning the power on next time Backing up the USB storage device external media To protect against data loss through media damage we recommend that you save your important data onto two USB stor age devices external media Be sure to perform it 作成したデータの保存とバックアップ DR...

Page 4: ...o 1 GB 512 MB DIMM x 2 slots DIMMs are not installed to the instrument when shipped from the factory Sample Length Mono 32 MB Stereo 64 MB Sampling Time 44 1 kHz 6 min 20 sec 22 05 kHz 12 min 40 sec 11 025 kHz 25 min 20 sec 5 0125 kHz 55 min 40 sec Mono Stereo Sample Format Original format WAV AIFF Sequencer block Note Capacity Approx 130 000 notes Note Resolution 480 ppq parts per quarter note Ma...

Page 5: ...ble Knobs x 8 Assignable Function buttons x 2 Data dial Display 320 x 240 dot 5 7 inch graphic color backlit LCD Connectors OUTPUT L MONO R standard phone jack ASSIGNABLE OUTPUT L R standard phone jack A D INPUT L R standard phone jack DIGITAL OUT PHONES standard stereo phone jack FOOT CONTROLLER 1 2 FOOT SWITCH x 2 SUSTAIN ASSIGNABLE MIDI IN OUT THRU USB TO HOST TO DEVICE AC IN ETHERNET mLAN MOTI...

Page 6: ...ング mLAN MOTIF XS6 7は mLANボードmLAN16E2装着時 A D変換 D A変換 A D変換 24ビット 64倍オーバーサンプリング D A変換 24ビット128倍オーバーサンプリング サンプルデータビット 16 bit サンプリング周波数 44 1 kHz 22 05 kHz 11 025 kHz 5 5125 kHz ステレオ モノ mLAN入力時 MOTIF XS6 7は mLANボードmLAN16E2装着時 44 1 kHz固定 波形メモリー 最大拡張時1 GB 512MB DIMM 2 工場出荷時にはDIMMは装着されていません 最大サンプルサイズ 1モノサンプル 32 MB 1ステレオサンプル 64 MB 1回あたりのサンプリング 時間 44 1 kHz 約6分20秒 22 05 kHz 約12分40秒 11 025 kHz 約25分20秒 5 0125 ...

Page 7: ...ます 主な操作子 ピッチベンドホイール 1 モジュレーションホイール 1 リボンコントローラー 1 アサイナブルコントロールスライダー 8 アサイナブルノブ 8 アサイナブルファンクションボタン 2 データダイアル 1 ディスプレイ 320 240ドット 5 7インチ グラフィックカラー LCD バックライト付 接続端子 OUTPUT L MONO R 標準フォーンジャック ASSIGNABLE OUTPUT L R 標準フォーンジャック A D INPUT L R 標準フォーンジャック DIGITAL OUT PHONES ステレオ標準フォーンジャック FOOT CONTROLLER 1 2 FOOT SWITCH 2 SUSTAIN ASSIGNABLE MIDI IN OUT THRU USB TO HOST TO DEVICE AC IN ETHERNET mLAN MOTIF X...

Page 8: ... FX REVERB CHORUS PAN TONE 1 MASTER VOLUME LOCATE 1 2 ASSIGNABLE FUNCTION CONTROL 1 2 3 4 5 6 7 8 9 0 SELECTED PART CONTROL MULTI PART ON OFF ON OFF EQ LOW EQ MID F CUTOFF RESONANCE SWING QUANTIZE VALUE EQ MID EQ MID Q ATTACK DECAY QUANTIZE STRENGTH GATE TIME REMOTE ARPEGGIO EFFECT BYPASS SEQ TRANSPORT VOLUME 1 VOLUME 2 VOLUME 3 VOLUME 4 VOLUME 5 VOLUME 6 VOLUME 7 VOLUME 8 EQ HIGH PAN SUSTAIN RELE...

Page 9: ... 9 10 11 12 13 14 15 16 COMMON EDIT TRACK MUTE SOLO EXIT ENTER F1 SF2 SF3 SF4 SF5 SF6 MULTI PART VOICE PERFORM MASTER INTEGRATED SAMPLING MIXING F F O N O P R A T C E L E S T R A P D L O H P R A E T U M T R A P FILE UTILITY SEQUENCER COMPARE SEQ SETUP SCENE STORE SECTION I P SECTION A H PERFORMANCE CONTROL SUB CATEGORY MODE PRE 1 PRE 2 PRE 3 PRE 4 PRE 5 PRE 6 PRE 7 PRE 8 PROGRAM A B C D E F G H DE...

Page 10: ...lation wheel r Ribbon Controller t ASSIGNABLE FUNCTION 1 2 buttons y MASTER VOLUME u Control rotary knobs i SELECTED PART CONTROL button o MULTI PART CONTROL button 0 Control Sliders VOLUME 1 8 1 REMOTE ON OFF button 2 ARPEGGIO ON OFF button 3 EFFECT BYPASS buttons 4 MASTER EFFECT button 5 OCTAVE DOWN UP buttons 6 SEQ TRANSPORT buttons Top button Reverse button Forward button Record button Stop bu...

Page 11: ...AD PADS CHOIRS SYN COMP CHROMATIC PERCUSSION DRUM PERCUSSION SOUND EFX MUSICAL EFX ETHNIC 7 C 6 C 5 C 4 C 3 C B B 7 LCD Display 8 F1 F6 Function buttons 9 SF1 SF5 Sub Function buttons 0 Data dial 1 INC YES button 2 DEC NO button 3 Cursor buttons 4 EXIT button 5 ENTER button 6 MODE buttons 7 Bank buttons 8 Group A H buttons 9 Number 1 16 buttons 0 COMMON EDIT button 1 PROGRAM button 2 CATEGORY SEAR...

Page 12: ...6 4 C C Rear Panel リアパネル q POWER ON OFF switch w AC IN AC Power Cord Socket e ETHERNET connector r USB connectors t LCD CONTRAST Control y mLAN 1 2 IEEE 1394 connectors only MOTIF XS8 u mLAN expansion board mLAN16E2 cover MOTIF XS6 MOTIF XS7 i DIGITAL OUT connector q POWER ON OFF パワーオン オフ スイッチ w AC IN ACイン 端子 e ETHERNET イーサーネット 端子 r USB 端子 t LCD CONTRAST LCDコントラスト ノブ y mLAN 1 2 IEEE1394 端子 MOTIF X...

Page 13: ...ES PH ONES ASSIGNABLE SUSTAIN FOOT SWITCH FOOT CONTROLLER 2 1 ASSIGNABLE OUTPUT OUTPUT R R L L MONO DIGITAL OUT A D INPUT R L GAIN C C o MIDI IN OUT THRU connectors 0 FOOT SWITCH jacks 1 FOOT CONTROLLER 1 2 jacks 2 ASSIGNABLE OUTPUT L R jacks 3 OUTPUT L MONO R jacks 4 PHONES Headphone jack 5 A D INPUT L R jacks 6 GAIN knob o MIDI IN OUT THRU 端子 0 FOOT SWITCH フットスイッチ 端子 1 FOOT CONTROLLER 1 2 フットコント...

Page 14: ...M PNB PN PNB BLG LCD 液晶ディスプレイ JKAN LC MK61L MKH D JKAN JA MOTIF XS6 XS7 XS7 Keyboard assembly FSX鍵盤 This figure shows the MOTIF XS6 このイラストはMOTIF XS6を表しています PNB RB Powewr supply unit 電源ユニット Wheel assembly ホイールAss y Touch volume タッチボリューム MKC MKH D MK76L EMKS FD EMKS FD JKAN ML ...

Page 15: ...OTIF XS7 MOTIF XS8 PNA PNC DM PNB PN PNB BLG MLAN LCD 液晶ディスプレイ JKAN LC GHD EBUS L HEDaf H JKAN JA MOTIF XS8 HEDaf M MK SUB GHDPC PNB RB Powewr supply unit 電源ユニット Wheel assembly ホイールAss y Touch volume タッチボリューム JKAN ML ...

Page 16: ...rcuit Board MKH D シート EMKS FD シート 31 DISASSEMBLY PROCEDURE MOTIF XS6 MOTIF XS7 分解手順 The unit is heavy Treat the unit with enough care when lifting it up If you want to turn the unit or control panel assembly upside down prepare supporting materials and put the unit or control panel on them with the end portions of the unit or control panel placed on the supporting materials Fig A Attach the filame...

Page 17: ...anner 2 Control Panel Assembly Time required About 4 minutes 2 1 Turn the unit upside down and remove the three 3 screws marked 40B Fig 1 2 2 Remove the side panel R and side panel L See procedure 1 2 3 Remove the seven 7 screws marked 30A and six 6 screws marked 40C Fig 1 1 サイドパネル R サイドパネル L 所要時間 各約 1 分 1 1 40A のネジ 5 本を外して サイドパネル R を外 します 図 1 サイドパネル L も同様にして外すことができます 2 コンパネ Ass y 所要時間 約 4 分 2 1 本...

Page 18: ...JA Circuit Board Time required About 4 minutes 3 1 Remove the side panel R and side panel L See procedure 1 3 2 Open the control panel assembly see procedure 2 and use the service stay V6295700 to make the panel secured Photo 1 3 3 Remove the nine 9 screws marked 370 the screw marked 385 and two 2 screws marked 390 The JKAN JA circuit board can then be removed Fig 4 4 DM Circuit Board Time require...

Page 19: ...190 Bind Head Screw 小ネジ BIND 3 0X6 MFZN2B3 WE878300 200 Bind Head Tapping Screw B B タイト BIND 3 0X10 MFZN2B3 WE972200 210 Bind Head Tapping Screw S S タイト BIND 4 0X8 MFZN2W3 WE941800 230 Bind Head Tapping Screw B B タイト BIND 3 0X6 MFZN2W3 WE936300 310 Bind Head Screw 小ネジ BIND 3 0X6 MFZN2B3 WE878300 320 Bind Head Tapping Screw B B タイト BIND 3 0X6 MFZN2W3 WE936300 4 4 350 のネジ 11 本を外して カバー DM とアース プレートB ...

Page 20: ...ive 5 screws marked 230 The power supply unit can then be removed Fig 5 6 5 AC IN Connector Power Switch Time required About 5 minutes 6 5 1 Remove the four 4 screws marked 200 and the screw marked 210 The AC IN connector assembly can then be removed Fig 5 6 5 2 Remove the AC IN connector from the AC IN connector assembly Fig 5 6 5 3 Remove the two 2 screws marked 190 and remove the power switch h...

Page 21: ...oved Fig 8 8 4 LCD Time required About 5 minutes 8 4 1 Remove the EMC cover See procedure 7 3 8 4 2 Remove the four 4 screws marked D60 and the screw marked 130B The LCD can then be removed together with the display angle Fig 7 8 8 4 3 Remove the screw marked D50 The LCD can then be removed from the display angle Fig 8 7 ディスプレイ Ass y 所要時間 約 5 分 7 1 サイドパネル R とサイドパネル L を外します 1 項参照 7 2 コンパネ Ass y を外し...

Page 22: ... angle 1 A can then be removed Fig 7 9 5 Remove the three 3 screws marked 410 The shield plate JA can then be removed Fig 7 9 6 Remove the three 3 screws marked 40E The PNA circuit board can then be removed Fig 9 When installing the PNA circuit board fit the holes to the positioning pins A first and then tighten the screws Fig 9 The PNA circuit board contains the following buttons Photo 3 20 Push ...

Page 23: ... can then be removed Fig 9 When installing the PNB PN circuit board fit the holes to the positioning pins B first and then tighten the screws Also install with the claw marked C in Fig 9 positioned above the circuit board Fig 9 The PNB PN circuit board contains the following buttons Photo 4 Push button MR Gray 3 pcs Push button MR Gray 1 pc Push button M Gray 2 pcs Push button M Black 2 pcs Button...

Page 24: ...es 1 B can then be removed Fig 7 11 6 Remove the five 5 screws marked 90B The PNC circuit board can then be removed Fig 9 When installing the PNC circuit board fit the holes to the positioning pins C first and then tighten the screws Fig 9 The PNC circuit board contains the following buttons Photo 5 20 Push button M Gray 4 pcs 30 Push button M Black 4 pcs 40 Push button MR Gray 2 pcs 50 Push butto...

Page 25: ... removed Fig 13 14 End Block L Touch Volume Time required About 6 minutes each 14 1 Remove the end block L assembly See procedure 13 4 14 2 Remove the wheel assembly See procedure 13 6 14 3 Remove the six 6 screws marked E80C The end block L shield plate can then be removed Fig 13 14 4 Remove the PNB RB circuit board See procedure 13 5 12 拍子木 R 所要時間 約 1 分 12 1 サイドパネル R を外します 1 項参照 12 2 140 のネジ 2 本...

Page 26: ...e removed with the touch volume attached from the end block L Fig 13 14 6 Separate the touch volume angle from the touch volume Photo 6 When installing touch volume fit the pin holes of the touch volume and the pin holes of the touch volume angle to the positioning pins D first and then tighten the screws Photo 6 14 5 E80D のネジ 2 本を外して 拍子木 L からリボ ンアングルをタッチボリュームがついた状態で外 します 図 13 14 6 タッチボリュームとリボンアング...

Page 27: ...ile sliding to the right Fig 14 16 Keys White and Black Keys 16 1 Remove the keyboard assembly See procedure 15 16 2 Remove the key stoppers corresponding to the keys to be replaced Table 1 Fig 15 16 3 White key 16 3 1 Place the white key in the horizontal position and remove it lifting while pushing rearward Photo 7 At this time a key guide cap may come off together Photo 9 16 4 Black key 16 4 1 ...

Page 28: ...点ゴム 12Key C C4 C5 C1 C2 C3 C4 C5 C6 E0 C1 C2 C3 C4 C5 C6 G6 Rubber contact 76L 接点ゴム 76L E0 C1 Rubber contact 12 Key E 接点ゴム 12Key E C1 C2 Rubber contact 12 Key F 接点ゴム 12Key F C2 C3 Rubber contact 12 Key G 接点ゴム 12Key G C3 C4 Rubber contact 12 Key H 接点ゴム 12Key H C4 C5 Rubber contact 12 Key I 接点ゴム 12Key I C5 C6 Rubber contact 76H 接点ゴム 76H C6 G6 MK61L MK76L MKH D MKC MKH D 240E EMKS FD C 2 C 3 C 4 C 5 ...

Page 29: ...le pushing it rearward At this time pay attention not to bend the key guide cap by lowering the front portion of the key too much Photo 9 17 2 White key 17 2 1 After installing the black keys install the white keys in the same way as the black keys See procedure 17 1 17 3 Install the removed key stoppers Table 1 Fig 15 18 Disassembling Keyboard Assembly 18 1 Rubber Contact 18 1 1 Remove the keyboa...

Page 30: ...pper 76 B Table 1 Fig 15 18 3 3 Remove the keys and key springs from E0 to C3 See procedure 16 18 3 4 Remove the eleven 11 screws marked 250B and disconnect the connector from the underside of the keyboard unit The MK76L circuit board can then be removed Fig 17 Photo 12 The rubber contacts are not parts of the MK76L circuit board When replacing the MK76L circuit board remove the rubber contacts fr...

Page 31: ...to G6 in case of MOTIF XS7 See procedure 16 18 5 4 Remove the nine 9 screws marked 250D eleven 11 screws marked 250E in case of MOTIF XS7 and disconnect the connectors from the underside of the keyboard The MKH D circuit board can then be removed Fig 17 Photo 11 12 The EMKS FD circuit board is a part of the MKH D circuit board and is soldered to the MKH D circuit board at connectors The rubber con...

Page 32: ...ing the Strings Set ストリングセットの取り付け 50 23 Disassembling the HEDaf EBUS Keyboard HEDaf EBUS 鍵盤の分解 52 24 Assembling the HEDaf EBUS Keyboard HEDaf EBUS 鍵盤の組立 53 DISASSEMBLY PROCEDURE MOTIF XS8 分解手順 The unit is heavy Treat the unit with enough care when lifting it up If you want to turn the unit or control panel assem bly upside down prepare supporting materials and put the unit or control panel on them...

Page 33: ...ssembly 0 5mm 0 5mm see Fig 2 A B Clearance between the side cover R side cover L and front rail assembly 1 5mm 1mm see Fig 2 C D Clearance between the side cover R side cover L and rear panel assembly 1 5mm 1mm see Fig 2 E F 1 腕木 R 腕木 L 所要時間 約 1 分 1 1 70A のネジ 6 本を外して 腕木 R を外します 図 1 腕木 L も同様にして外すことができます 腕木を取り付けるときは 下記に記載した数値の 隙間をつくるように取り付けてください 腕木 R 腕木 L とコンパネ Ass y の隙間 0 5mm 0 5mm 図 2 A B 参照 腕木 R...

Page 34: ...2 3 Insert your fingers under the middle portion of the control panel assembly and open to the position shown in Fig 4 and then pull off the control panel assembly upward Fig 3 4 When installing the control panel assembly tilt the control panel assembly as shown in Fig 4 and insert the protrusions from the bottom unit into the three holes Fig 4 When closing the control panel assembly take care not...

Page 35: ... Time required About 4 minutes 4 1 Remove the side cover R and side cover L See procedure 1 4 2 Open the control panel assembly See procedure 3 2 4 3 Remove the connector assembly from the cable clamp on the DM cover 4 4 Remove the eight 8 screws marked 260A The DM cover and earth plate B can then be removed Fig 5 4 5 Remove the five 5 screws marked 253A and the screw marked 260B The DM circuit bo...

Page 36: ... Bind Head Tapping Screw B B タイト BIND 3 0X6 MFZN2W3 WE936300 280 Bind Head Tapping Screw B B タイト BIND 3 0X6 MFZN2W3 WE936300 290A Bind Head Tapping Screw B B タイト BIND 3 0X10 MFZN2B3 WE972200 485 Cup Screw B B タイト CUP 3 0X8 MFZN2W3 WK386600 Fig 6 図 6 125 Bind Head Tapping Screw B B タイト BIND 3 0X6 MFZN2W3 WE936300 170 Bind Head Screw 小ネジ BIND 3 0X6 MFZN2B3 WE878300 180A Bind Head Tapping Screw B B タ...

Page 37: ...screw marked 198 The PS guard can then be removed Fig 5 6 4 Power Supply Unit Time required About 6 minutes 6 4 1 Remove the five 5 screws marked 125 The power supply unit can then be removed Fig 6 6 5 AC IN Connector Power Switch Time required About 5 minutes 6 5 1 Remove the two 2 screws marked 180A two 2 screws marked 185A and the screw marked 191 The AC IN connector assembly can then be remove...

Page 38: ...5 minutes 8 4 1 Remove the EMC cover See procedure 7 3 8 4 2 Remove the four 4 screws marked D60 and the screw marked 130B The LCD can then be re moved together with the display angle Fig 9 8 4 3 Remove the screw marked D50 The LCD can then be removed from the display angle Fig 9 7 ディスプレイ Ass y 所要時間 約 5 分 7 1 腕木 R と腕木 L を外します 1 項参照 7 2 コンパネ Ass y を外します 2 項参照 7 3 40B のネジ 1 本と 52A のネジ 1 本 90A のネ ジ 1...

Page 39: ...ved Fig 8 9 5 Remove the two 2 each screws marked 70B The two 2 PCB angles 1 A can then be removed Fig 8 9 6 Remove the three 3 screws marked 40C The PNA circuit board can then be removed Fig 10 When installing the PNA circuit board fit the holes to the positioning pins A first and then tighten the screws Fig 10 The PNA circuit board contains the following buttons Photo 3 20 Push button MR Gray 2 ...

Page 40: ...ig 10 When installing the PNB PN circuit board fit the holes to the positioning pins B first and then tighten the screws Also install with the claw marked I in Fig 10 positioned above the circuit board Fig 10 The PNB PN circuit board contains the follow ing buttons Photo 4 10b Push button MR Gray 3 pcs 10c Push button MR Gray 1 pc 10d Push button M Gray 2 pcs 10e Push button M Black 2 pcs 10f Butt...

Page 41: ...gles 1 B can then be re moved Fig 8 11 6 Remove the five 5 screws marked 90B The PNC circuit board can then be removed Fig 10 When installing the PNC circuit board fit the holes to the positioning pins C first and then tighten the screws Fig 10 The PNC circuit board contains the following buttons Photo 5 20 Push button M Gray 4 pcs 30 Push button M Black 4 pcs 40 Push button MR Gray 2 pcs 50 Push ...

Page 42: ...move the control panel assembly See procedure 2 14 4 Remove the four 4 screws marked 52B and the screw marked 59A The arm assembly L can then be removed Fig 13 12 腕木 R Ass y 所要時間 約 4 分 12 1 本体を裏向きにして 45A のネジ 2 本と 45B のネジ 1 本 47 のネジ 1 本を外します 図 12 12 2 腕木 R を外します 1 項参照 12 3 コンパネ Ass y を外します 2 項参照 12 4 42 のネジ 2 本と 49A のネジ 1 本を外して 腕 木 R Ass y を外します 図 13 13 拍子木 R サイドアングル R 所要時間 約 4 分 13 1 腕木 R Ass y を外...

Page 43: ...apping Screw 1 TP 1 BIND 3 5X12 MFZN2W3 WE970900 49A Bind Head Tapping Screw B B タイト BIND 3 0X8 MFZN2B3 WE774400 52B Bind Head Tapping Screw 1 TP 1 BIND 3 5X12 MFZN2W3 WE970900 59A Bind Head Tapping Screw B B タイト BIND 3 0X8 MFZN2B3 WE774400 72 Bind Head Tapping Screw 1 TP 1 BIND 4 0X14 MFZN2W3 WE971900 75 Pan Head Screw 小ネジ PAN 5 0X25 MFZN2W3 SW WF001500 570 Bind Head Tapping Screw 1 TP 1 BIND 3 5...

Page 44: ... assembly can then be removed Fig 15 16 End Block L Touch Volume Time required About 6 minutes each 16 1 Remove the arm assembly L See procedure 14 16 2 Remove the side angle L and wheel assembly from the arm assembly L See procedure 15 2 15 4 15 サイドアングル L PNB RB シート ホイー ル Ass y 所要時間 各約 5 分 15 1 腕木 L Ass y を外します 14 項参照 15 2 サイドアングル L 15 2 1 L75 のネジ 2 本を外して サイドアングル L を 外します 図 15 15 3 PNB RB シート 15 ...

Page 45: ...ed 45A the screw marked 45B the screw marked 47 two 2 screws marked 55A the screw marked 55B the screw marked 57 and the screw marked 58 Fig 12 17 2 Remove the side covers L and R See procedure 1 17 3 Remove the control panel assembly See procedure 2 17 4 Remove the arm assembly R See procedure 12 17 5 Remove the arm assembly L See procedure 14 17 6 Remove the two 2 screws marked 22B The front rai...

Page 46: ...を外します 2 項参照 18 4 32B のネジ 2 本 49B のネジ 1 本 59B のネ ジ1本 115 のネジ3本 180B のネジ2本 185B のネジ 2 本 220B のネジ 2 本 253B のネジ 5 本 290B のネジ 9 本 540 のネジ 2 本を外して 左右の腕木 Ass y を外側に広げながらリアパネル を外します 図 18 図 19 220A のネジのネジ穴 2 箇所には それぞれ 1 個 ずつブッシュが差し込まれています 外れやすい ので 無くさないように気を付けてください 32B 32B Rear panel リアパネル Fig 17 図 17 Fig 19 図 19 49B Bind Head Tapping Screw B B タイト BIND 3 0X8 MFZN2B3 WE774400 59B Bind Head Tapping Screw B ...

Page 47: ...1 Exchanging the PC Sensor 21a Prepare a PC Sensor for Replacement The sensor sheet holder for the PC sensor assem bly is fixed to the keyboard assembly with adhesive bond and cannot be removed When replacing the PC sensor remove the PC sensor with a spring from the servicing part PC sensor assembly V678290 and use it as a replacement part 21a 1 Remove the three 3 screws marked P60 of the servicin...

Page 48: ...s from the V spring as sembly Photo 8 Photo 9 21b 4 Remove the slave strings from the PC sensor spring Photo 10 Photo 11 21b 5 Remove the 3PIN connector assembly from the GHDPC circuit board Fig 22 21b 6 Remove the GHDPC circuit board See procedure 20 21b 7 Remove the PC sensor spring from the sensor sheet holder Fig 22 When removing the PC sensor spring and GH DPC circuit board hold the notch por...

Page 49: ...to the slit of the PC sen sor spring Photo 10 Photo 11 Fig 23 Check that the slave strings can be moved smoothly by moving the PC sensor spring with your fingers lightly then 21c 5 Insert the slave strings into the slit of the V spring assembly Photo 8 Photo 9 Check that the V spring assembly can be moved smoothly in the direction of the strings then 21c 6 Remove the jig screw VB299400 Fig 22 図 22...

Page 50: ...keyboard frame slowly Photo 12 22a 3 Remove the master strings and slave strings from the V spring assembly Photo 8 Photo 9 22a 4 Remove the master strings from the sensor sheet holder Photo 10 22a 5 Remove the slave strings from the PC sensor spring Photo 10 Photo 11 22b Installing the String Set 22b 1 Insert the master string one by one securely into the slit of the sensor sheet holder Photo 13 ...

Page 51: ...r and that they are positioned at the center of the stopper 22b 5 Attach the two sided tape that comes with the string set to the frame side and attach the cloth cover Photo 16 22b 6 Check that the position of the PC sensor spring is at the marking portion of the sensor sheet holder Photo 17 The position of the sensor is detected automati cally Maximum tolerance is 0 5 mm forward or backward After...

Page 52: ...then be re moved Fig 26 23 3 HEDaf H Circuit Board 23 3 1 Remove the four 4 screws marked 260E and the screw marked 262 The HEDaf H circuit board can then be removed Fig 26 White keys and black keys can be replaced with out removing each circuit board After removing the GHD EBUS L HEDaf M or HEDaf H circuit board the rubber contacts can be removed 23 HEDaf EBUS 鍵盤の分解 シートを外す前に 接点ゴムを歪ませないよう に フレームとハ...

Page 53: ... the keyboard assembly upside down and peel the stopper L88_W away The white key hammer can then be removed Fig 30 The black key hammer can be removed in the same manner 24 Disassembling the Keyboard Assembly 24 1 White Key Hammer Black Key Hammer 24 1 1 From the rear side of the keyboard assembly insert a white key black key hammer into the frame and put the stopper L88_W on Fig 31 There are four...

Page 54: ...it Board Install the seven 7 screws marked 260C and install the GHD EBUS L circuit board Fig 26 24 6 HEDaf M Circuit Board Tighten the five 5 screws marked 260D and the screw marked 262 to fix the HEDaf M circuit board Fig 26 24 7 HEDaf H Circuit Board Tighten the four 4 screws marked 260E and the screw marked 262 to fix the HEDaf H circuit board Fig 26 When installing the GHD EBUS L and HEDaf M c...

Page 55: ...the screw s from inside the unit before turning the power on Loose screws inside the instrument can cause improper operation or serious damage Install the optional units carefully as described in the procedure below Improper installation can cause shorts which may result in irreparable damage and pose a fire hazard Do not disassemble modify or apply excessive force to board areas and connectors on...

Page 56: ...t to misplace them Keep the cover and fixing screws in a safe place for future use 1 2 Insert the mLAN16E2 along the guide rails Push the mLAN16E2 all the way into the slot so that the connector at the end of the mLAN16E2 is correctly inserted into the connector inside the slot 3 Replace the cover with the two screws you removed in step 2 above 4 mLAN16E2 The optionally available mLAN expansion bo...

Page 57: ...all commercially available DIMMs Before purchasing DIMMs see the following website http www yamahasynth com DIMM Type and DIMM Configuration Yamaha recommends that you purchase DIMMs that conform to the JEDEC standard Please be aware however that conformance to this standard does not constitute a guarantee that the DIMMs will operate correctly on the MOTIF XS JEDEC Joint Electron Device Engineerin...

Page 58: ...mory size is indicated in the display NOTE If the DIMMs have not been installed properly the MOTIF XS may freeze when you press the INTEGRATED SAMPLING button If this occurs turn the power off perform the instructions above again and make sure to install the DIMMs firmly in step 4 5 6 Rear side Bottom Location for DIMM installation DIMM sockets Installing the DIMM modules to the sockets Make sure ...

Page 59: ...コードのプラグをコンセントから抜き取り さら に 本体と周辺機器を接続しているケーブルを抜き取っ てから行なってください ネジ類を本体内部に落とさないように注意してくださ い これを防ぐため 拡張部品を取り付けている間 外したネジやカバーを本体から離れた場所に置いてお くことを おすすめします 落としたネジを内部に放 置したまま電源を入れると 正常に動作しなくなった り 故障したりする場合があります 取り付けは 手順に従って注意深く作業してください 手順に従わなかった場合 製品の破損や故障の原因に なることがあります 拡張部品のボード部分やコネクターを分解 改造した り 過度な力を加えたりしないでください ボード部 分やコネクター部を曲げたり変形させたりすると 感 電や火災 または故障などの原因になります 注意 本体や拡張部品の金具で手を切らないように 厚手の 手袋を着用して作業することを...

Page 60: ...す なくさないようにご注意ください また 外したふ たは 本体の中に残さないように取り出して保管してくだ さい 1 2 取 り 付 け ス ロ ッ ト 内 の ガ イ ド レ ー ル に mLAN16E2 の両端を合わせ ガイドレールに 沿って mLAN16E2 を差し込みます このとき mLAN16E2 の端子がスロット内部の端子 に正しく差し込まれるように mLAN16E2 を奥まで 確実に差し込みます 3 手順 2 で外したネジ 2 本で mLAN16E2 と本 体を固定します 4 mLAN16E2 の取り付け 別売の mLAN16E2 を MOTIF XS6 7 に装着できます MOTIF XS8 には mLAN16E2 が標準搭載されています ガイドレール mLAN16E2 が固定されていないと 故障や誤動作 の原因となることがありますのでご注意ください ...

Page 61: ...で確認してください http www yamaha co jp product syndtm DIMM の種類 内部構成に関する注意 DIMM は JEDEC 仕様準拠のものを推奨しますが JEDEC 仕様でも内部回路構成上 コンピューターでは 動作しても 本機では動作しない場合があります JEDEC Joint Electron Device Engineering Council とは 電 子デバイス技術協議会のことです 電子デバイスの標準的な 端子配列などを規定しています DIMM は 64MB 128MB 256MB 512MB の 168 ピ ンタイプ シンクロナス DRAM 搭載 100MHz 133MHz のものを使ってください DIMM は 必ず同じ容量の DIMM を 2 枚 1 組で取り 付けます 1 枚だけの増設はできません メモリー DIMM スロットは 2 つあり...

Page 62: ...から F6 INFO ボタンを押し サンプル用のメモリー サイズが正しい値になっているか 確認してください DIMM が適切に取り付けられていない場合 IN TEGRATED SAMPLING ボタンを押すとシステ ムが停止 フリーズ し MOTIF XS が操作不 能になる可能性があります このような場合は 電源を切り もう一度上記手順の操作を実行し 手順 4 で DIMM を確実に差し込んでください 5 6 DIMM の取り付け位置 DIMM スロット 2 DIMM スロットへの取り付け DIMM の向きを確かめて取り付けてください 切り欠き 取り外し ボタン 4 2 DIMM を垂直に 奥まで差し込みます 同時にレバーが立ち上げられ DIMM を 固定した状態でロックされます ここで 左右のレバーがしっかりロック されているか確認してください DIMMs の取り外し方 左右のレバーを...

Page 63: ...23 P24 P25 I O I O I O I O I O I O I I I O I O I O I O I O O I O I O I O I O I O I O I O I O Port P1 In output Ground System reset input Analog power supply 3 3 V Reference voltage input Ground Clock input Clock output Power supply 3 3 V Ground Port P6 In output Analog power supply 3 3 V USB reference power supply USB reference volyage output USB upstream in output Port P2 In output 33 34 35 36 37...

Page 64: ...for B block input data Shiftup for B block input data Bypass for B block input output Damp output data for B block Ground 51 52 53 54 55 56 57 58 59 60 61 62 63 64 65 66 67 68 69 70 71 72 73 74 75 76 77 78 79 80 81 82 83 84 85 86 87 88 89 90 91 92 93 94 95 96 97 98 99 100 VDD BOSD3 BOSD2 BOSD1 BOSD0 VSS BISD3 BISD2 BISD1 BISD0 VDD DIVSEL1 DIVSEL0 DIVCLK0 VSS AOSD3 AOSD2 AOSD1 AOSD0 VDD AISD3 AISD2...

Page 65: ... VSS MIRQ MCS MWR MRD MA VDD MD0 MD1 MD2 MD3 MD4 MD5 MD6 MD7 VSS MD8 VDD MD9 MD10 MD11 MD12 MD13 MD14 MD15 VSS I O I O I O I I I O I I I I O I O I O I O I O I O I O I O I O I O I O I O I O I O I O I O Clock Power supply Scan enable Ground Test Reset Ground Power supply Ground Analog power supply Ground Interrupt request Control port Write Read Power supply DRAM data bus Ground DRAM data bus Power ...

Page 66: ...und Chip select Rotary encoder input General purpose I O I O 3 3V Serial intput I O ground 69 70 71 72 73 74 75 76 77 78 79 80 81 82 83 84 85 86 87 88 89 90 91 92 93 94 95 96 97 98 99 100 101 102 103 104 105 106 107 108 109 110 111 112 113 114 115 116 117 118 119 120 121 122 123 124 125 126 127 128 129 130 131 132 133 134 135 136 OUTER NO D9 D10 D11 D12 D13 D14 D15 D16 D17 D18 D19 D20 E1 E2 E3 E4 ...

Page 67: ...U0_DCD VD6 TDF_IFS1 U1_DCD HFS2 VCLK TDF_O2 U1_OUT1 GPIO14 WCKI TDF_OFS1 U0_OUT1 PLL_1V8 AES ADAT TDIF PLL_GND AES ADAT TDIF EXT_512BR AES_RX3 AES_TX2 DSAI_RX2 DSAI_SYNCA DSAI_SYNCC DSAI_TX1 EN3_A GPIO2 SDRAM_BNK2 SCLK PHD1 PHD3 PHCT1 PHLO VD0 TDF_I0 U0_CTS VD3 TDF_I3 U0_RI VD7 TDF_IEM U1_RI VRDY TDF_O1 U1_RTS GPIO13 BLKS TDF_OFS0 U0_RTS VSS3I FILTER_AES OPTI AES_RX0 AES_TX0 AES_TX3 DSAI_RX3 DSAI_...

Page 68: ... 108 109 110 111 112 113 114 115 116 117 118 119 120 121 122 123 124 125 126 127 128 129 130 131 132 133 134 135 136 137 138 139 140 141 142 143 144 145 146 147 148 149 150 151 152 153 154 155 156 157 158 159 160 161 162 163 164 165 166 167 168 169 170 171 172 173 174 175 176 177 178 179 180 181 182 183 184 185 186 187 188 189 190 191 192 193 194 195 196 197 198 199 200 201 202 203 204 205 206 207...

Page 69: ...4 335 336 337 338 339 340 341 342 343 344 345 346 347 348 349 350 351 352 353 354 355 356 357 358 359 360 361 362 363 364 365 366 367 368 369 370 371 372 373 374 375 376 377 378 379 380 381 382 383 384 385 386 387 388 389 390 391 392 393 394 395 396 397 398 399 400 401 402 403 404 405 406 407 408 409 410 411 412 413 414 415 416 417 418 419 420 OUTER NO OUTER NO AB22 AC23 AD24 AE25 AF26 AC22 AB21 A...

Page 70: ...ort s power supply control output USB root hub port s overcurrent status input USB root hub port s power supply control output USB root hub port s overcurrent status input USB root hub port s power supply control output USB root hub port s overcurrent status input USB root hub port s power supply control output Reset for power management PCI PME signal PCI CLK signal Hardware reset for chip Power ...

Page 71: ...2 P55 A13 P56 A14 P57 A15 Vss0 VDD0 P30 P31 P32 SDA0 P33 SCL0 P34 P35 P36 P20 SI30 P21 SO30 P22 SCK30 P23RxD0 P24 TxD0 P25 ASCK0 VDD1 AVss P17 ANI7 P16 ANI6 P15 ANI5 P14 ANI4 P13 ANI3 P12 ANI2 P11 ANI1 I O I O I O I O I O I O I O I O I O I O I O I O I O I O I O I O I O I O I O I O I O I I I I I I I Port 5 Higher address bus Ground Power supply Port 3 Port 3 Serial data input output Port 3 Serial c...

Page 72: ... WKP3 P54 WKP4 P55 WKP5 ADTRG P10 TMOW P11 P12 SDA SCL P74 TMRIV P75 TMCIV P76 TMOV NC NC O I I I O I I O I O I O I O I O I O I O I O I O I O I O I O I O I O Not used Power supply Crystal resonator Power supply Reset pin Test pin Ground Crystal or ceramic resonator Power supply 8 bit I O port Interrupt request Not used 8 bit I O port Interrupt request 8 bit I O port Interrupt request A D converter...

Page 73: ...s GPIO1 DISPON Memory address bus 65 66 67 68 69 70 71 72 73 74 75 76 77 78 79 80 81 82 83 84 85 86 87 88 89 90 91 92 93 94 95 96 97 98 99 100 101 102 103 104 105 106 107 108 109 110 111 112 113 114 115 116 117 118 119 120 121 122 123 124 125 126 127 128 MA2 MA4 MA3 Vss CLKI TESTEN CLKI2 VDD FPFRAME FPLINE NC DRDY FPSHIFT Vss FPDAT0 FPDAT1 FPDAT2 FPDAT3 FPDAT4 FPDAT5 FPDAT6 FPDAT7 Vss FPDAT8 FPDAT...

Page 74: ...r HD74LVC244ATELL X2308A00 MLAN XS 8 only IC121 Octal 3 State Bus Buffer 1 2 3 4 5 6 7 1A 1Y 2A 2Y 3A 3Y Vss 14 13 12 11 10 9 8 VDD 6A 6Y 5A 5Y 4A 4Y 1 2 3 4 5 6 7 1A 1Y 2A 2Y 3A 3Y GND 14 13 12 11 10 9 8 VDD 6A 6Y 5A 5Y 4A 4Y 1 2 3 1A 1Y 4 2A 5 2B 6 2Y 7 VSS 1B 14 13 12 VDD 4A 11 4Y 10 3B 9 3A 8 3Y 4B 1 2 3 1A NC 4 1C 5 1D 6 1Y 7 GND 1B 14 13 12 Vcc 2C 11 NC 10 2B 9 2A 8 2Y 2D INPUTS OUTPUTS PR C...

Page 75: ...08DCKR X3833A00 DM IC519 620 Single 2 Input Positive AND Gate 1 D1R 2 3 4 5 6 7 8 9 10 A1 A2 A3 A4 A5 A6 A7 A8 GND 11 12 13 14 15 16 17 18 19 20 VCC G B1 B2 B3 B4 B5 B6 B7 B8 10 9 8 7 6 5 4 3 2 1 D5 D CK Q OE D CK Q OE D CK Q OE D CK Q OE D CK Q OE D CK Q OE D CK Q OE D CK Q OE D6 D7 GND D4 D3 D2 D1 D0 Output Control Q5 Q6 Q7 Clock Q4 Q3 Q2 Q1 Q0 Vcc 11 12 13 14 15 16 17 18 19 20 1 5 2 3 4 IN B GN...

Page 76: ...FEAT 0 22V 50mV EN SLEEP 0 4V BURST COMP 0 86V OVDET 0 8V EA IRCMP ICOMP UVLO TRIP 2 5V SHUTDOWN S Q R Q SWITCHING LOGIC AND BLANKING CIRCUIT ANTI SHOOT THRU 9 SENSE 7 TG 6 BG 10 SW 5 GND 1 5 2 3 4 Vcc NC SMBus 1 SMBus 2 GND 2 GND 4 SMBus2 5 SMBus1 1 Vcc 100uA 175uA 1 925mA STANDBY SLEW RATE DETECTOR CONTROL LOGIC CHANNEL TWO DUPLICATE OF CHANNEL ONE 0 65V VREF VOLTAGE COMP GATE CONTROL 5 OUT 3 FL...

Page 77: ...ircuit Board X6578C0 MOTIF XS6 98 99 MK76L Circuit Board X5655D0 MOTIF XS7 100 101 MKC Circuit Board X5656D0 MOTIF XS7 107 MKH D Circuit Board X6579B0 MOTIF XS6 102 MKH D Circuit Board X5657C0 MOTIF XS7 104 105 MLAN Circuit Board X7749D0 MOTIF XS8 J U O models 90 91 MLAN Circuit Board X9109A0 MOTIF XS8 E B models 92 93 PNA Circuit Board X7365C0 110 PNB BLG Circuit Board X7366C0 109 PNB PN Circuit ...

Page 78: ...78 MOTIF XS6 MOTIF XS7 MOTIF XS8 DM Circuit Board 2NA WG14150 1 3 A A not installed N C N C to JKAN ML CN301 to EMKS FD CN4 MOTIF XS6 MOTIF XS7 GHD EBUS L CN1 MOTIF XS8 ...

Page 79: ...er NetのMACアドレスです DMシートを交換するとMACアドレスが変わります Ether Net経由でテストプログラムを実行する時にこのMACアドレスが必要です 点線内に貼付されています This number is the Ethernet MAC Address written on the DM circuit board If the DM circuit board is replaced the MAC address will be changed The MAC address is required to execute the test program through Ethernet Attached in the dotted frame 2NA WG14150 1 3 Scale 90 100 ...

Page 80: ...80 MOTIF XS6 MOTIF XS7 MOTIF XS8 DM Circuit Board B B 2NA WG14150 1 3 ...

Page 81: ...81 MOTIF XS6 MOTIF XS7 MOTIF XS8 Component side 部品側 3 layer 3 層 B B 2NA WG14150 1 3 Scale 90 100 ...

Page 82: ...82 MOTIF XS6 MOTIF XS7 MOTIF XS8 C C DM Circuit Board 2NA WG14150 1 3 ...

Page 83: ...83 MOTIF XS6 MOTIF XS7 MOTIF XS8 C C Component side 部品側 6 layer 6 層 2NA WG14150 1 3 Scale 90 100 ...

Page 84: ...84 MOTIF XS6 MOTIF XS7 MOTIF XS8 D D to JKAN ML CN303 to JKAN LC CN202 not installed not installed DM Circuit Board 2NA WG14150 2 1 ...

Page 85: ...85 MOTIF XS6 MOTIF XS7 MOTIF XS8 D D not installed to JKAN JA CN5 Pattern side パターン側 2NA WG14150 2 1 Scale 90 100 ...

Page 86: ...N101 WHEEL Assembly to PNA CN2 R PHONES L A D INPUT R L MONO OUTPUT R L ASSIGNABLE OUTPUT GAIN to JKAN ML CN300 to DM CN824 to LCD Assembly to LCD Assembly JKAN JA Circuit Board JKAN LC Circuit Board Component side 部品側 JKAN JA JKAN LC 2NA WG45460 1 1 ...

Page 87: ...o JKAN ML CN301 to DM CN615 to PNA CN1 2 1 FOOT CONTROLLER ASSIGNABLE SUSTAIN FOOT SWITCH IN OUT THRU DIGITAL OUT MIDI JKAN LC Circuit Board Pattern side パターン側 Component side 部品側 JKAN JA 2NA WG45460 1 1 JKAN LC 2NA WG45460 2 1 Scale 90 100 ...

Page 88: ...N C to DM CN901 JKAN JA CN4 to MLAN CN104 to DM CN304 to JKAN LC CN201 to DM CN613 to DM CN614 to Power supply unit CN2 JKAN JA Circuit Board JKAN ML Circuit Board Component side 部品側 JKAN JA 2NA WG45460 2 1 JKAN ML 2NA WG45460 1 1 Scale 90 100 ...

Page 89: ...89 MOTIF XS6 MOTIF XS7 MOTIF XS8 F F JKAN ML Circuit Board Pattern side パターン側 Pattern side パターン側 JKAN JA JKAN ML 2NA WG45460 2 1 Scale 90 100 Scale 90 100 ...

Page 90: ...led to JKAN ML CN402 2 1 m LAN DIP switch SW103 SW102 N O N O MLAN Circuit Board MOTIF XS8 J U O models Component side 部品側 Component side 部品側 3 layer 3 層 2NA WH16080 1 Make sure that the SW102 and 103 are set to ON SW102 103 は 必 ず ON に 設 定してください ...

Page 91: ...91 MOTIF XS6 MOTIF XS7 MOTIF XS8 MLAN Circuit Board MOTIF XS8 J U O models Component side 部品側 6 layer 6 層 Pattern side パターン側 2NA WH16080 2 2NA WH16080 1 ...

Page 92: ...lled to JKAN ML CN402 2 1 m LAN DIP switch SW103 SW102 N O N O MLAN Circuit Board MOTIF XS8 E B models Component side 部品側 Component side 部品側 3 layer 3 層 2NA WK93970 1 Make sure that the SW102 and 103 are set to ON SW102 103 は 必 ず ON に 設 定してください ...

Page 93: ...93 MOTIF XS6 MOTIF XS7 MOTIF XS8 MLAN Circuit Board MOTIF XS8 E B models Component side 部品側 6 layer 6 層 Pattern side パターン側 2NA WK93970 2 2NA WK93970 1 ...

Page 94: ...94 MOTIF XS6 MOTIF XS7 MOTIF XS8 to DM CN603 G G to HEDaf M CN3 to HEDaf M CN1 to MK SUB CN1 to MK SUB CN3 G G not installed GHD EBUS L Circuit Board MOTIF XS8 Component side 部品側 2NAK8 V646930 ...

Page 95: ...95 MOTIF XS6 MOTIF XS7 MOTIF XS8 to GHDPC CN1 H H to HEDaf M CN4 H H to HEDaf_M CN2 HEDaf H Circuit Board MOTIF XS8 Component side 部品側 2NAK8 V852150 ...

Page 96: ...96 MOTIF XS6 MOTIF XS7 MOTIF XS8 to HEDaf H CN1 I I to HEDaf H CN3 to GHD EBUS L CN2 to GHD EBUS L CN3 I I HEDaf M Circuit Board MOTIF XS8 Component side 部品側 2NAK8 V852150 ...

Page 97: ...XS6 MKH D CN7 MOTIF XS7 to DM CN603 not installed not installed to GHD EBUS L CN4 to GHD EBUS L CN5 not installed EMKS FD Circuit Board MOTIF XS6 MOTIF XS7 MK SUB Circuit Board MOTIF XS8 Pattern side パターン側 Component side 部品側 Component side 部品側 Pattern side パターン側 EMKS FD WE62240 MK SUB 2NA V658820 ...

Page 98: ...98 MOTIF XS6 MOTIF XS7 MOTIF XS8 J J N C J J K K K K to MKH D CN4 MK61L Circuit Board MOTIF XS6 Component side 部品側 2NAKZ WD80020 3 ...

Page 99: ...99 MOTIF XS6 MOTIF XS7 MOTIF XS8 L L L L M M M M MK61L Circuit Board MOTIF XS6 Pattern side パターン側 2NAKZ WD80020 3 ...

Page 100: ...100 MOTIF XS6 MOTIF XS7 MOTIF XS8 N N N C N N O O O O to MKC CN3 MK76L Circuit Board MOTIF XS7 Component side 部品側 ...

Page 101: ...101 MOTIF XS6 MOTIF XS7 MOTIF XS8 P P P P Q Q Q Q MK76L Circuit Board MOTIF XS7 Pattern side パターン側 ...

Page 102: ...S6 MOTIF XS7 MOTIF XS8 R R to EMKS FD CN5 to MK61L CN1 to EMKS FD CN6 S S MKH D Circuit Board MOTIF XS6 GHDPC Circuit Board MOTIF XS8 GHDPC to HEDaf H CN2 Component side 部品側 GHDPC 2NA V677460 MKH D 2NAKZ WD78540 2 ...

Page 103: ...103 MOTIF XS6 MOTIF XS7 MOTIF XS8 R R to After touch sensor N C S S Pattern side パターン側 Component side 部品側 2NAKZ WD78540 2 ...

Page 104: ...104 MOTIF XS6 MOTIF XS7 MOTIF XS8 T T to EMKS FD CN5 to MKC CN4 to EMKS FD CN6 T T U U U U to After touch sensor N C MKH D Circuit Board MOTIF XS7 Component side 部品側 ...

Page 105: ...105 MOTIF XS6 MOTIF XS7 MOTIF XS8 V V V V W W W W MKH D Circuit Board MOTIF XS7 Pattern side パターン側 ...

Page 106: ...NSERTION OCTAVE DOWN EFFECT BYPASS SYSTEM OCTAVE UP MASTER EFFECT TOP TOP REC REC REW REW STOP STOP FF FF PLAY PLAY SELECTED MULTI PART CTRL5 SELECTED MULTI PART CTRL6 SELECTED MULTI PART CTRL7 SELECTED MULTI PART CTRL8 VOLUME 5 VOLUME 6 VOLUME 7 VOLUME 8 PNB PN Circuit Board 2NA WG45440 1 Scale 90 100 ...

Page 107: ...OTIF XS6 MOTIF XS7 MOTIF XS8 X X F1 SF1 F2 SF2 F3 SF3 F4 SF4 F5 SF5 F6 SF6 to MK76L CN1 to MKH D CN5 MKC Circuit Board MOTIF XS7 Component side 部品側 Component side 部品側 Pattern side パターン側 PNB PN 2NA WG45440 1 ...

Page 108: ...OICE SEQUENCER SONG INTEGRATED SAMPLING FILE EDIT COMPARE UTILITY JOB SEQUENCER MIXING PERFORM SEQUENCER PATTERN MASTER SEQ SETUP STORE SET LOCATE COMMON EDIT PR USE A 1 9 to Touch volume to JKAN JA CN1 PNC Circuit Board PNB RB Circuit Board Component side 部品側 PNB RB 2NA WG45440 1 PNC 2NA WG45450 1 ...

Page 109: ...TEGORY SEARCH PROGRAM ETHNIC PRE8 SAX WOODWIND PRE2 KEYBOARD USER2 PADS CHOIRS PRE3 ORGAN USER3 SYN COMP PRE4 GUITAR GM CHROMATIC PERCUSSION PRE5 BASS GM DR DRUM PERCUSSION PRE6 STRINGS PRE DR SOUND EFX PRE7 BRASS USE DR MUSICAL EFX PNB BLG Circuit Board Component side 部品側 Component side 部品側 PNB BLG 2NA WG45440 1 PNC 2NA WG45450 1 Scale 85 100 Scale 90 100 ...

Page 110: ...TION 1 ASSIGNABLE FUNCTION 2 MULTI PART CONTROL SELECTED PART CONTROL MASTER VOLUME VOLUME 1 VOLUME 2 VOLUME 3 VOLUME 4 SELECTED MULTI PART CTRL2 SELECTED MULTI PART CTRL3 SELECTED MULTI PART CTRL4 SELECTED MULTI PART CTRL1 PNA Circuit Board Component side 部品側 PNA 2NA WG44410 1 Scale 90 100 ...

Page 111: ...dBu or less 33 Ω T16 AD g DA MIC Measurement OUTPUT L 4 0 2 dBu R 60 0 dBu or less 10 KΩ A01000 Lch INPUT SW T17 AD g DA LINE Measurement OUTPUT R 4 0 2 dBu R 70 0 dBu or less 10 KΩ A01100 Rch INPUT SW T18 DIMM OK NG Capacity R W A01900 T19 DIMM OK NG Full Test A01A00 T20 ROM OK NG SYSTEM ROM ID Read A01B00 OK NG WAVE ROM Data Read T21 SYSTEM RAM OK NG R W A01C00 EFFECT RAM T22 mLAN OK NG In addit...

Page 112: ...he buttons The following screen will appear and test mode will be selected MOTIF XS Firmware Version a aa a a aa a Firmware Version b b bb Kernel Version c cc c Contents Version MOTIF XS Kernel Version b b bb MOTIF XS Contents Version c cc c ENTER Test Start Store Factory Set PLAY Start Sending USB Test Packet EXIT Exit TEST MOTIF XS Test Program If you press the EXIT button when the screen is sho...

Page 113: ...ode Updater How to enter Turn on the power while simultaneously pressing the B UTILITY buttons until the MOTIF XS is displayed on the screen and release the buttons Press ENTER 01 EBUS ID Check TEST MOTIF XS Test Program Press ENTER MAC Address TEST MOTIF XS Test Program T00 1 MAC Address Read Write Test Code A02200 This operation is not necessary in usual cases However if you replaced the Flash R...

Page 114: ... same screen as the First indication will appear indicating that a condition waiting for test number is selected T01 EBUS ID Check Test Code A02100 First indication Test contents Check the ID numbers for each EBUS IC automatically obtained when starting the test program MAC Address Read Write xx Writing data yy Loading data Read yy yy yy yy yy yy Write xx xx xx xx xx xx MAC Address TEST MOTIF XS T...

Page 115: ...OK the test will be completed and item selection condition will be selected If the judgment is NG on the way refer to D How to carry out tests when judged as NG page 113 to proceed the test program Others None T02 LCD LED Blink Test Code A00200 First indication Test contents After entering the test LCD switches between RGB color bar and B W inversion as you press the ENTER button All the LEDs will...

Page 116: ... button will be selected If an unexpected code is sent wrong switch is pressed NG will be shown and no sound will be played Then if a correct code is received the test for the next button will be selected OK will be shown if all the buttons are normal The following is an order for checking the buttons The color of the LED that lights when the button is pressed is shown after G Green O Orange R Red...

Page 117: ...rks normally Compare the Encoder data from the EBUS controller with the target value on the LCD Test method Turn the encoder clockwise according to indications on the LCD and then turn the encoder counterclockwise 0 8 0 8 Press ENTER 04 Encoder TEST MOTIF XS Test Program MIDI code output for judgment result OK A0 04 02 If all the panel buttons are normal NG No output How to quit test When all the ...

Page 118: ...dition will be selected If the judgment is NG on the way refer to D How to carry out tests when judged as NG page 113 to proceed the test program Others None First indication Press ENTER 05 Knob TEST MOTIF XS Test Program Knob1 Knob3 Knob5 Knob7 Knob2 Knob4 Knob6 Knob8 05 Knob TEST MOTIF XS Test Program yyy Target value xxx Current value Knob 1 yyy xxx Knob 2 yyy xxx Knob 3 yyy xxx Knob 4 yyy xxx ...

Page 119: ...LUME1 VOLUME3 VOLUME5 VOLUME7 VOLUME2 VOLUME4 MASTER VOLUME VOLUME6 VOLUME8 MASTER VOLUME is checked at T14 and T15 First indication Test contents Check that sliders 1 to 8 VOLUME 1 to 8 work normally Compare the AD data slider from the EBUS controller with the target value on the LCD Test method Move each slider according to an LCD indication as follows smoothly from bottom to top Slider 1 to 8 V...

Page 120: ...nt is NG on the way refer to D How to carry out tests when judged as NG page 113 to proceed the test program Others None T07 1KeyOn Test Code A00800 XS6 XS7 XS8 C1 C2 C3 C4 C5 C6 C1 E0 C2 C3 C4 C5 C6 G6 C1 C0 A 1 C2 C3 C4 C5 C6 C7 First indication Press ENTER 07 1KeyOn TEST MOTIF XS Test Program Test contents Check that the keyboard works normally Compare the Key ON data from the EBUS controller w...

Page 121: ...xxx Velocity of the pressed key yyy Target value zzz Current value Scaling Press C 1 After Touch yyy zzz AT Offset 1 556 v Velocity xxx OK Displayed for XS8 only After Touch test Note AT Offset test is displayed on MOTIF XS8 only Displayed for XS8 only OK 08 Keyboard AT TEST MOTIF XS Test Program yyy Target value zzz Current value Scaling After Touch yyy zzz AT Offset 1 556 v OK Press the key that...

Page 122: ...t contents Check that Pitch Bend PB Modulation Wheel MW and Ribbon RB controller Touch Volume work normally Compare the PB MW RB value input from the EBUS A D input with the target values on the LCD Test method According to an LCD indication as follows operate controllers In case of PB 64 62 to 66 127 126 to 127 0 0 to 1 Middle Up Down Move smoothly in the order mentioned above In case of MW 0 0 t...

Page 123: ...value xxx Current value 1 When the jack is not connected Input FC3 will be displayed No indication will be shown during AD Test After the AD Test is completed Extract Plug will be displayed Foot Controller 1 Foot Controller 2 yyy xxx Foot Switch yyy xxx Sustain Switch yyy xxx OK 1 10 FC1 2 Sus FS TEST MOTIF XS Test Program Foot Controller 1 Foot Controller 2 Foot Switch Sustain Switch OK OK OK OK ...

Page 124: ...the same data group are received within specified period This test can be executed in MIDI MODE only See Others for checking in MIDI MODE Test method Connect the MIDI IN connector and MIDI OUT connector with a MIDI cable and then execute the test In case of OK check with a MIDI monitor if a test pattern AA EF 00 55 is sent via MIDI THRU connector Check item Check that result of MIDI IN OUT connect...

Page 125: ...Check that the USB TO DEVICE connector works normally Checks if the connected device is recognized Checks via USB Host Controller if USB Memory USB 2 0 compatible is connected Test method Press the ENTER when the first indication is shown and the following indication will be shown Then insert a USB memory into the USB TO DEVICE connector Press the ENTER button again to execute the test 12 USB to D...

Page 126: ... the ENTER button Check that Connect USB is displayed and then connect the USB TO DEVICE connector and the USB TO HOST with a USB cable A B Type Then press the ENTER button to execute the test 13 USB to HOST TEST MOTIF XS Test Program Connect USB Check item Check that the MOTIF XS is recognized Judgment indication OK OK 13 USB to HOST TEST MOTIF XS Test Program Example of an NG NG 13 USB to HOST T...

Page 127: ...R VOLUME knob to check that volume from the OUTPUT L MONO is changed smoothly OUTPUT R 85 0 dBu or less 10 kohm load ASSIGNABLE OUTPUT L 1 KHz 1 5 Hz Sine wave 4 0 2 dBu 10 kohm load Distortion factor of 0 1 or less ASSIGNABLE OUTPUT R 85 0 dBu or less 10 kohm load PHONES L 1 KHz 1 5 Hz Sine wave 2 0 2 dBu 33 ohm load Distortion factor of 0 1 or less PHONES R 70 0 dBu or less 33 ohm load DIGITAL O...

Page 128: ...0 1 or less PHONES L 70 0 dBu or less 33 ohm load PHONES R 1 KHz 1 5 Hz Sine wave 2 0 2 dBu 33 ohm load Distortion factor of 0 1 or less DIGITAL OUT R Output sound from a powered monitor speaker with digital input and check that sine wave without distortion is output The checking is not necessary if the result of DIGITALOUT L jack test is normal Judgment indication OK No indication NG No indicatio...

Page 129: ...e executed Others None T17 A D D A LINE Test Code A01100 First indication Press ENTER 17 AD DA LINE TEST MOTIF XS Test Program Test contents Check the signal path from A D input to D A output Default Gain setting is LINE The input from the ADC is routed through the SWP51 Master side DM IC010 to be output from the DAC AD Gain is set to LINE via CPU Test method Input sine waves into the A D INPUT R ...

Page 130: ...aster side DM IC010 specific data are written to the specified address group of the DIMM and the data are loaded and compared with the written data Test method Executes the test Check item Check the test result on the LCD Press ENTER 18 DIMM TEST MOTIF XS Test Program Judgment indication OK xxxxxxxx Capacity 18 DIMM TEST MOTIF XS Test Program OK Memory Size xxxxxxxx Byte Example of an NG xxxxxxxx ...

Page 131: ...F XS Test Program Example of an NG NG 19 DIMM Full TEST MOTIF XS Test Program If any IC is NG the result will be NG MIDI code output for judgment result OK A0 1A 02 NG A0 1A 03 How to quit test When the judgment is shown and output the test will be completed and item selection condition will be selected Others None T20 ROM Test Code A01B00 First indication Test contents Executes ID Read test of th...

Page 132: ...w to quit test When the judgment is shown and output the test will be completed and item selection condition will be selected Others None T21 RAM R W Test Code A01C00 First indication Test contents Executes Write Read Verify test of the MAIN CPU and SDRAM for Effect DM IC201 DDR RAM high 16 Bit side IC202 DDR RAM low 16 Bit side DM IC602 SWP51 Master Effect IC601 SWP51 Slave Effect Specific data a...

Page 133: ... to ANALOG OUT Data is output from the DIGITAL OUT as well qMLAN circuit board or mLAN16E2 connection test Detects if the MLAN circuit board or mLAN16E2 is connected or not wMIDI test The test pattern 90 40 7F is transferred from the unit and it is checked if the Echo Back data is normal eAudio test Tests 3 systems of audio inputs 6ch and 8 systems of outputs 16ch In particular fullscale 1 KHz sin...

Page 134: ...Send a test code for another test to complete the current test and the test for the newly sent test code will be executed Press the EXIT button to quit the test and the same screen as the First indication will appear indicating that a condition waiting for test number is selected Others The following shows relationship between sounding channel at the Audio test and Loop back destination A Test e S...

Page 135: ...IF XS Test Program MIDI code output for judgment result OK A0 20 02 NG A0 20 03 How to quit test When the judgment is shown and output the test will be completed and item selection condition will be selected Others None T24 Factory Set Test Code A01E00 First indication Press ENTER 24 FactorySet TEST MOTIF XS Test Program Test contents Reset to the factory default settings Write initial values for ...

Page 136: ...t the ON OFF click noise of the unit power switch is OUTPUT L MONO R 500 mv pp or less ASSIGNABLE OUTPUT L R 500 mv pp or less PHONES L R 500 mv pp or less Check that the noise level when no key is pressed on meets the following requirements from above conditions A D INPUT L R jack should not be plugged Judgment indication OK 24 FactorySet TEST MOTIF XS Test Program MIDI code output for judgment r...

Page 137: ...following table MOTIF XS6 XS7 Power unit connector pin Voltage Current CN2 1 2 PinGND 3 4 Pin 5 V 0 3 V 2000 50 mA CN2 5 Pin GND 6 7 Pin 12 V 0 6 V 190 10 mA CN2 8 Pin GND 8 Pin 12 V 0 6 V 40 10 mA MOTIF XS8 Power unit connector pin Voltage Current CN2 1 2 Pin GND 3 4 Pin 5 V 0 3 V 2400 50 mA CN2 5 Pin GND 6 7 Pin 12 V 0 6 V 190 10 mA CN2 8 Pin GND 8 Pin 12 V 0 6 V 40 10 mA H Default setting Defau...

Page 138: ... 0 dBu 以下 10 KΩ A00F00 AS OUT R 4 0 2 dBu L 85 0 dBu 以下 10 KΩ DIGITAL OUT R PHONES R 2 0 2 dBu L 70 0 dBu 以下 33 Ω T16 AD g DA MIC 測定 OUTPUT L 4 0 2 dBu R 60 0 dBu 以下 10 KΩ A01000 Lch INPUT SW T17 AD g DA LINE 測定 OUTPUT R 4 0 2 dBu R 70 0 dBu 以下 10 KΩ A01100 Rch INPUT SW T18 DIMM OK NG 容量 R W A01900 T19 DIMM OK NG Full Test A01A00 T20 ROM OK NG SYSTEM ROM ID Read A01B00 OK NG WAVE ROM Data Read T21...

Page 139: ...on b b bb Kernel Version c cc c Contents Version MOTIF XS Kernel Version b b bb MOTIF XS Contents Version c cc c ENTER Test Start Store Factory Set PLAY Start Sending USB Test Packet EXIT Exit TEST MOTIF XS Test Program こ の 画 面 の 状 態 で EXIT ボ タ ン を 押 す と T25 EXIT 画面が表示されます MIDI MODE 本体の電源を MANUAL MODE で立ち上げ後 数秒待 ち テスト画面の表示になったことを確かめた後 MIDI コード F0 43 10 18 5A 00 F7 を送ると 次の画面 が表示されます REMOTE INC YES ...

Page 140: ...です F 隠しモード アップデータ エントリー方法 B UTILITY ボタンを押しながら電源 ON し 画面 に MOTIF XS の文字が表示されれば離します Press ENTER 01 EBUS ID Check TEST MOTIF XS Test Program Press ENTER MAC Address TEST MOTIF XS Test Program T00 1 MAC Address Read Write テストコード A02200 通常 この検査は必要ありません ただし DM シー ト内の FLASH ROM IC515 を交換した場合は必ず この検査を実施して MAC Address の書込みを行って ください DM シート交換を行った場合 この検査は 必要ありません 準備 MOTIF XS の USB TO HOST 端子と PC を USB ケーブ ル A...

Page 141: ...ードを送ると終了し 新たに 送られてきたテストコードのテストが実行されます EXIT ボタンを押すと テストは終了し 最初の表示 と同じ画面を表示して テストナンバー待ち状態にな ります T01 EBUS ID Check テストコード A02100 最初の表示 テスト内容 テストプログラム立ち上がり時に各 EBUS IC の ID 番号 を自動的に取得した内容を確認します MAC Address Read Write xx 書込みデータ yy 読出しデータ Read yy yy yy yy yy yy Write xx xx xx xx xx xx MAC Address TEST MOTIF XS Test Program パソコンでの操作 この状態で MACBAR macbar exe を起動します 1 出力ポート 入力ポートを設定 選択 します 2 バーコード入力の所に PC のキ...

Page 142: ...確認します 判定結果の MIDI コード出力 OK A0 21 02 全ての EBUS ID 番号が OK の時 NG A0 21 03 EBUS ID 番号が一項目でもNGの時 テストの終了方法 すべての EBUS ID 番号が正常にチェックされれば OK と表示されてテストは終了し 項目選択状態となります テストの途中で NG と判断した場合の処理方法は D NG と判断した時のテストの進め方 P 140 を参照し てください その他 なし T02 LCD LED Blink テストコード A00200 最初の表示 テスト内容 テストに入ると ENTER ボタンを押す毎に LCD が RGB カラーバー 黒白反転に切り替わります その間 LED は全点灯します LCD LCDC DM IC824 経由で RGB カラーバー 黒 白反転の全ドット表示を繰り返します LED EBUS コ ...

Page 143: ...Orange 橙 R Red 赤 SELECTED PART CONTROL G G G と MULTI PART CONTROL G G G は 3 回ずつスイッチを押します SELECTED PART CONTROL G G G MULTI PART CONTROL G G G ASSIGNABLE FUNCTION1 G ASSIGNABLE FUNCTION2 G REMOTE ON OFF O ARPEGGIO ON OFF G EFFECT INSERTION G BYPASS SYSTEM G MASTER EFFECT G OCTAVE DOWN G OCTAVE UP G SEQ TRANSPORT U SEQ TRANSPORT E SEQ TRANSPORT R SEQ TRANSPORT S R SEQ TRANSPORT A SEQ TRANSPORT W G S...

Page 144: ...r Green Orange Red 03 Panel SW TEST MOTIF XS Test Program Press xxxxxxx LED yyyyyyy NG テスト内容 Encoder が正常に動作することを確認します EBUS コントローラからの Encoder 情報を LCD 表示 の目標値と比較します テスト方法 エンコーダーツマミを以下の LCD の表示に従って時計回 りに回し 次に 反時計回りに回します 0 8 0 8 Press ENTER 04 Encoder TEST MOTIF XS Test Program 判定結果の MIDI コード出力 OK A0 04 02 総てのパネルスイッチが正常の時 NG 出力なし テストの終了方法 すべてのスイッチが正常にチェックされれば OK が表 示されてテストを終了し 項目選択状態となります テストの途中で NG と...

Page 145: ... NG と判断した場合の処理方法は D NG と判断した時のテストの進め方 P 140 を参照し てください その他 なし 最初の表示 Press ENTER 05 Knob TEST MOTIF XS Test Program Knob1 Knob3 Knob5 Knob7 Knob2 Knob4 Knob6 Knob8 05 Knob TEST MOTIF XS Test Program yyy 目標値 xxx 現在値 Knob 1 yyy xxx Knob 2 yyy xxx Knob 3 yyy xxx Knob 4 yyy xxx Knob 5 yyy xxx Knob 6 yyy xxx Knob 7 yyy xxx Knob 8 yyy xxx T05 Knob テストコード A00600 テスト内容 Knob1 8 が正常に動作することを確認します EBUS コントローラか...

Page 146: ...E3 VOLUME5 VOLUME7 VOLUME2 VOLUME4 MASTER VOLUME VOLUME6 VOLUME8 MASTER VOLUME は T14 T15 で検査を行います 最初の表示 テスト内容 Slider1 8 VOLUME1 8 が正常に動作することを確 認します EBUS コントローラからの AD 情報 Slider を LCD に 表示の目標値と比較します テスト方法 各 Slider を 以下の様な LCD の表示に従って Slider1 8 VOLUME1 8 0 min 0 1 127 max 126 127 となるように 下 上と滑らかに動かします チェックする Slider の順番は特に指定しません Press ENTER 06 Slider TEST MOTIF XS Test Program チェック項目 引っ掛りがなく 数字が滑らかに変化し...

Page 147: ...ります テストの途中で NG と判断した場合の処理方法は D NG と判断した時のテストの進め方 P 140 を参照し てください その他 なし T07 1KeyOn テストコード A00800 XS6 XS7 XS8 C1 C2 C3 C4 C5 C6 C1 E0 C2 C3 C4 C5 C6 G6 C1 C0 A 1 C2 C3 C4 C5 C6 C7 最初の表示 Press ENTER 07 1KeyOn TEST MOTIF XS Test Program テスト内容 キーボードが正常に動作することを確認します EBUS コントローラから鍵盤 ON 情報を C3 KeyON と比較します テスト方法 KeyCode C3 を入力します C3 鍵を押します チェック項目 LCD のテスト結果を確認します 判定結果の表示 OK Press C3 Key 07 1KeyOn TEST M...

Page 148: ... C1 を押鍵した場合 08 Keyboard AT TEST MOTIF XS Test Program xxx 押鍵された velocity yyy 目標値 zzz 現在値 Scaling Press C 1 After Touch yyy zzz AT Offset 1 556 v Velocity xxx OK XS8 のみ表示されます After Touch 検査 注 AT Offset 検査の表示は MOTIF XS8 のみです XS8 のみ表示されます OK 08 Keyboard AT TEST MOTIF XS Test Program yyy 目標値 zzz 現在値 Scaling After Touch yyy zzz AT Offset 1 556 v OK LCD に表示されている鍵盤を KeyOn します KeyOn 時には その際の Velocity を表示し...

Page 149: ...ibbon Controller RB タッチボリューム 最初の表示 Press ENTER 09 PB MW RB TEST MOTIF XS Test Program テスト内容 Pitch Bend Modulation Wheel Ribbon controller タッチ ボリューム が正常に動作することを確認します EBUS A D 入力から入力される PB MW RB の値を LCD 表示の目標値と比較します テスト方法 以下の様な LCD 表示に従って PB の場合 64 62 66 127 126 127 0 0 1 中央 上 下 と滑らかに動かします MW の場合 0 0 1 127 126 127 下 上 と滑らかに動かします RB の場合 0 15 90 112 off 113 127 左端 右端 離す 指でリボンをゆっくりスライドさせてから 離します チェックする...

Page 150: ... 2 Sus FS TEST MOTIF XS Test Program yyy 目標値 xxx 現在値 1 未挿入時には Input FC3 と表示されます AD Test 中は表示はありません AD Test 終了後は Extract Plug と表示されます Foot Controller 1 Foot Controller 2 yyy xxx Foot Switch yyy xxx Sustain Switch yyy xxx OK 1 10 FC1 2 Sus FS TEST MOTIF XS Test Program Foot Controller 1 Foot Controller 2 Foot Switch Sustain Switch OK OK OK OK NG 表示なし EBUS A D 入力から入力される FOOT CONTROLLER 1 2 の値を LCD 表示...

Page 151: ... CPU のシリアル送信より特定のデータ群を送信し 一 定時間内に同一のデータ群が受信されることを確認し ます なおこのテストは MANUAL MODE でのみ実行できます MIDI MODE については その他 を参照 テスト方法 MIDI IN OUT 端子を MIDI ケーブルで接続した後 テ ストを実行します OK であれば MIDI モニターで MIDI THRU 端子か らテストパターン AA EF 00 55 が出力されていること を確認します チェック項目 MIDI IN OUT 端 子 チ ェ ッ ク で OK と な り MIDI THRU 端子からテストパターンが出力されることを確認 します 判定結果の表示 OK 11 MIDI TEST MOTIF XS Test Program OK NG の例 期待されないデータが受信された場合 11 MIDI TEST MOT...

Page 152: ... XS Test Program テスト内容 USB TO DEVICE 端子が正常に動作することを確認し ます 接続された機器の認識テストを行います USB Host Controller 経由で USB Memory USB2 0 対 応品 の有無を確認します テスト方法 最初の表示で ENTER ボタンを押すと以下の表示とな るので USB TO DEVICE 端子に USB Memory を接続 します 再び ENTER ボタンを押して テストを実行します 12 USB to DEVICE TEST MOTIF XS Test Program Insert USB Memory and Press ENTER チェック項目 USB Memory を認識することを確認します 判定結果の表示 OK OK 12 USB to DEVICE TEST MOTIF XS Test Progr...

Page 153: ... XS の接続の有無を 確認します テスト方法 最初の画面が表示されれば ENTER ボタンを押しま す Connect USB 表 示 が 確 認 さ れ れ ば USB TO DEVICE 端子と USB TO HOST 端子を USB ケーブル A B Type で接続した後 ENTER ボタンを押し テス トを実行します 13 USB to HOST TEST MOTIF XS Test Program Connect USB チェック項目 MOTIF XS を認識することを確認します 判定結果の表示 OK OK 13 USB to HOST TEST MOTIF XS Test Program NG の例 NG 13 USB to HOST TEST MOTIF XS Test Program 判定結果の MIDI コード出力 OK A0 0D 02 NG A0 0D 03 テス...

Page 154: ...UTPUT L MONO 1 KHz 1 5 Hz 正弦波 5 0 2 dBu 負荷 10kohm 歪率 0 1 以下 MASTERVOLUME ノブを操作し OUTPUT L MONO の音量が滑ら かに変化することを確認します OUTPUT R 85 0 dBu 以下 負荷 10 kohm ASSIGNABLE OUTPUT L 1 KHz 1 5 Hz 正弦波 4 0 2 dBu 負荷 10 kohm 歪率 0 1 以下 ASSIGNABLE OUTPUT R 85 0 dBu 以下 負荷 10 kohm PHONES L 1 KHz 1 5 Hz 正弦波 2 0 2 dBu 負荷 33 ohm 歪率 0 1 以下 PHONES R 70 0 dBu 以下 負荷 33 ohm DIGITAL OUT L Digital 入力付きのパワードモニ ター SP で音出しをし 歪みの無 い正...

Page 155: ...SIGNABLE OUTPUT L 85 0 dBu 以下 負荷 10 kohm ASSIGNABLE OUTPUT R 1 KHz 1 5 Hz 正弦波 4 0 2 dBu 負荷 10 kohm 歪率 0 1 以下 PHONES L 70 0 dBu 以下 負荷 33 ohm PHONES R 1 KHz 1 5 Hz 正弦波 2 0 2 dBu 負荷 33 ohm 歪率 0 1 以下 DIGITAL OUT R Digital 入力付きのパワードモニ ター SP で音出しをし 歪みの無 い正弦波を確認します DIGITAL OUT L 端子で確認されていれば 特に確認する必要はありません 判定結果の表示 OK 表示なし NG 表示なし 判定結果の MIDI コード出力 なし テストの終了方法 MANUAL MODE EXIT ボタンを押すと テストは終了し 最初の表示 と同じ画面表示を...

Page 156: ...のテストが実行され ます その他 なし T17 A D D A LINE テストコード A01100 最初の表示 Press ENTER 17 AD DA LINE TEST MOTIF XS Test Program テスト内容 A D 入力から D A 出力までの信号経路をテストします Default で Gain は LINE になっています ADC からの入力を SWP51 Master 側 DM IC010 を 経由し DAC に出力させます AD Gain は CPU 経由で LINE に設定します テスト方法 A D INPUT R 端子に 以下の順序で 1 kHz 5 Hz 17 0 dBu 0 dBu 歪率 0 1 以下 の正弦波を入力し OUTPUT L MONO R 端子から以下のレベルの出力が得 られることを確認します 17 AD DA LINE TEST MOTI...

Page 157: ...テストを行います SWP51 Master 側 DM IC010 経由で DIMM の特定 のアドレス群に特定のデータを書込んだ後に読出し 書込んだ値と比較します テスト方法 テストを実行させます チェック項目 LCD のテスト結果を確認します Press ENTER 18 DIMM TEST MOTIF XS Test Program 判定結果の表示 OK xxxxxxxx 容量 18 DIMM TEST MOTIF XS Test Program OK Memory Size xxxxxxxx Byte NG の例 xxxxxxxx 容量 18 DIMM TEST MOTIF XS Test Program NG Memory Size xxxxxxxx Byte どれかの IC が NG になれば NG となります 判定結果の MIDI コード出力 OK A0 19 02 NG A0...

Page 158: ...Program OK 19 DIMM Full TEST MOTIF XS Test Program NG の例 NG 19 DIMM Full TEST MOTIF XS Test Program どれかの IC が NG になれば NG となります 判定結果の MIDI コード出力 OK A0 1A 02 NG A0 1A 03 テストの終了方法 判定を表示 出力してテストを終了し 項目選択状態と なります その他 なし T20 ROM テストコード A01B00 最初の表示 テスト内容 MAIN CPU FLASH ROM の ID Read テストを行います DM IC515 ROM から DeviceID を取得し 規定の ID と比較します 各 WAVE ROM DM IC715 716 の DATA をアドレスポ イントに対して 8 ビット単位で読込み チェックサム比較 をし...

Page 159: ...IC716 H1 H2 OK OK 判定結果の MIDI コード出力 OK A0 1B 02 NG A0 1B 03 テストの終了方法 判定を表示 出力してテストを終了し 項目選択状態と なります その他 なし T21 RAM R W テストコード A01C00 最初の表示 テスト内容 MAIN CPU 及び Effect 用 SDRAM のライト リード ベ リファイテストを行います DM IC201 DDR RAM 上位 16Bit 側 IC202 DDR RAM 下位 16Bit 側 DM IC602 SWP51 Master Effect IC601 SWP51 Slave Effect 特定のアドレス群に特定のデータを書込んだ後に読出 し 書込んだ値と比較します テスト方法 テストを実行させます チェック項目 LCD に表示されたテスト結果を確認します 判定結果の表示 OK Pr...

Page 160: ...を経由して DAC からアナ ログ OUT に出力します 同時に DIGITAL OUT 端子からも出力されます qMLAN シート または mLAN16E2 接続テスト MLAN シ ー ト ま た は mLAN16E2 の有無を検出します wMIDI テスト 本体よりテストパターン 90 40 7F を転送し Echo Back されたデー タが正しいかどうかを確認します eAudio テスト Audio 入 力 3 系 統 6ch 出 力 8 系 統 16ch のテストをします 具体的には 本体より Audio 出力 8 系統に対してフルスケールの 1 KHz 正弦波を全 ch 出力し MLAN シー ト の DICEII チ ッ プ IC106 で 6ch 毎順次切替えて戻された Audio 信 号が本体側へ正常に Echo Back さ れ DA 変換して STEREO OUT ...

Page 161: ...L MODE EXIT ボタンを押すとテストを終了し テストナンバー 待ち状態になります MIDI MODE 他のテストのテストコードを送ると テストは終了し 新たに送られてきたテストコードのテストが実行され ます EXIT ボタンを押すと テストは終了し 最 初の表示 と同じ画面を表示して テストナンバー待ち 状態になります その他 Audio テストでの発音チャンネルと Loopback 先の対応は 次の通りです ア テスト e SWP51 ch1 2 OUT MLAN ch1 2 IN SWP51 ch3 4 OUT MLAN ch3 4 IN SWP51 ch5 6 OUT MLAN ch5 6 IN SWP51 ch7 8 OUT MLAN ch1 2 IN SWP51 ch9 10 OUT MLAN ch3 4 IN SWP51 ch11 12 OUT MLAN ch5 6 I...

Page 162: ...確認します 判定結果の表示 OK OK 23 Ethernet TEST MOTIF XS Test Program NG の例 NG 23 Ethernet TEST MOTIF XS Test Program 判定結果の MIDI コード出力 OK A0 20 02 NG A0 20 03 テストの終了方法 判定を表示 出力してテストを終了し 項目選択状態と なります その他 なし T24 Factory Set テストコード A01E00 最初の表示 Press ENTER 24 FactorySet TEST MOTIF XS Test Program テスト内容 工場出荷データにセットします SDRAM に各パラメータの初期値を書込んだ上でそれ らのデータを Flash ROM に書込みます テスト方法 テストを実行させます 約 10 秒かかります 正常に終了すると 正弦波が一瞬...

Page 163: ...スを行います 本体パワースイッチの ON OFF クリックノイズが OUTPUT L MONO R 500 mv pp 以下 ASSIGNABLE OUTPUT L R 500 mv pp 以下 PHONES L R 500 mv pp 以下 であることを確認します また 上記条件から 一度もノートオンしていない時の ノイズレベルが次の条件を満たすことを確認します A D INPUT L R 端子にプラグが挿入されてないこと 判定結果の表示 OK 24 FactorySet TEST MOTIF XS Test Program 判定結果の MIDI コード出力 OK A0 1E 02 NG なし テストの終了方法 判定を表示 出力してテストを終了します その他 Factory Set 終了後 次に示すデータがセットされます System Setup データ初期値がセットされます Inter...

Page 164: ...表のようになります MOTIF XS6 XS7 電源ユニットコネクタ Pin 電圧 電流 CN2 1 2 PinGND 3 4 Pin 5 V 0 3 V 2000 50 mA CN2 5 Pin GND 6 7 Pin 12 V 0 6 V 190 10 mA CN2 8 Pin GND 8 Pin 12 V 0 6 V 40 10 mA MOTIF XS8 電源ユニットコネクタ Pin 電圧 電流 CN2 1 2 Pin GND 3 4 Pin 5 V 0 3 V 2400 50 mA CN2 5 Pin GND 6 7 Pin 12 V 0 6 V 190 10 mA CN2 8 Pin GND 8 Pin 12 V 0 6 V 40 10 mA H 出荷設定 出荷時には 本体の各コントローラーは 次の状態に設 定されています VOLUME 1 8 最小 Knob 1 8 中央 MA...

Page 165: ...sts the directories and files belonging to the current directory If you wish to create a new directory and save the file there see the left column for detailed instruc tions on creating a new directory Basic Procedure in the File mode To upper level File 4 The amount of used memory total memory Fig 1 Procedure to create a new directory 1 Press the SF5 button to call up the Input Character window 2...

Page 166: ...r is located on such a naming parameter the CHAR icon appears at the lower right corner of the display When pressing the SF6 button in this status the Input Character window appears as shown below In the Edit area you can move the cursor to determine the loca tion at which the character is to be input by using the F1 and F2 buttons In the Character List you can move the cursor to determine the cha...

Page 167: ...レクトリー 図 1 w には 現在作業中のディ レクトリー カレントディレクトリー がパス付き で表示され ディレクトリー ファイルリスト 図 1 e にはカレントディレクトリー内のディレク トリーやファイルが表示されます 新しいディレクトリーを作成してファイルを保存 する場合 ディレクトリーを作成する手順につい ては右記をご覧ください ファイルの操作手順 上の階層 ディレクトリー ファイル 4 デバイスの容量 図 1 ディレクトリーの作成手順 1 SF5 ボタンを押してニューディレクトリー画面 を表示します 2 ディレクトリーネームを入力します ディレクトリーネームは 英数字を使って最大 20 文字で設定できます 名前の入力方法については 文字入力 168 ページ の項を参照してください 3 ENTER ボタンを押すと 新しいディレクトリー が作成されます ファイルのセーブ データをまと...

Page 168: ...かじめ USB 記憶装置に保存 セーブ し ておくこと 167 ページ参照 文字入力 ボイスネームやパフォーマンスネームなど 文字を入力 するパラメーターにカーソルを移動すると 画面右下に CHAR が表示されます このとき SF6 ボタンを押すと 下図のような画面が表示され 文字を入力する状態にな ります 編集エリアでは F1 F2 ボタンを押して左右にカーソ ルを移動し 文字を入力する位置を選びます 文字入力一覧では カーソルボタン INC YES DEC NO ボタン データダイアルを操作して 入力する文字 を選びます F4 ボタンを押すと 文字入力一覧で選ばれている文字 が 編集エリアに挿入されます 編集エリアで カーソルのある文字を消す場合は F5 ボ タン すべての文字を消すときには F6 ボタンを押しま す 入力が終わったら ENTER ボタンを押して入力した文 字を確定させ...

Page 169: ...iginal display For Factory Set operations that take longer to process you will see the message Now executing Factory Set during processing While such a message is shown on the display never attempt to turn off the power while data is being written to Flash ROM Turning the power off in this state results in loss of all user data and may cause the system to freeze due to corruption of data in the Fl...

Page 170: ...憶装置に 保存してください 167 ページ ファクトリーセット ユーザーメモリー上のデータを初期化して工場出荷時の状態に戻す機能 ファクトリーセットを実行します 1 UTILITY ボタンを押したあと JOB ボタンを押してユーティリティージョブモードに入ると ファクト リーセット画面が表示されます 図 1 ユーティリティージョブモードでは 本体内蔵のユーザーメモリーを工場出荷時の状態に戻すファクトリーセットの ジョブを実行します 2 そのまま ENTER ボタンを押します 実行を確認するダイアログ画面が表示されます 実行を中止する場合は DEC NO ボタンを押します 3 INC YES ボタンを押して ファクトリーセットを実行します 画面に Completed が表示されるとファクトリーセットが終了し 実行前の表示に戻ります ファクトリーセットの実行に時間がかかる場合は 画面に Now...

Page 171: ...conds of the appearance of Fig 1 screen 3 A screen as in Fig 3 is shown on the LCD to indicate that firmware update mode is se lected If the Fig 4 screen appears the unit is in normal start up mode Turn off the power and repeat from the procedure 2 FIRMWARE UPDATING PROCEDURES Fig 1 Fig 2 4 The following message will be displayed to indicate that the firmware updater file is be ing searched Search...

Page 172: ...enter the test program is the same as the entry method for the firmware updating except that the panel switches to be pressed simultaneously are different 2 The version will be shown in the entry screen for the test program Check the version MOTIF XS Firmware Versioin Fig 5 Fig 6 9 When the verifying check is completed the result will be shown as OK or NG If OK ap pears as follows the writing proc...

Page 173: ... 通常モードで起動してしまいます そ の場合は図 4 の画面が表示されることになります 図 1 の画面がでてから 3 秒以内に押すようにしてく ださい 3 図 3 の画面が LCD に表示され ファームウェ アアップデートモードにエントリしたことが 分かります もし図 4 の画面が表示された場合は 通常モードで 起動していますので POWER OFF して 2 の作業 からやり直します ファームウェアバージョンアップ手順 図 1 図 2 4 以下のようにファームウェアアップデータ ファイルを探しているメッセージが表示され ます Searching for the firmware updater 5 ファームウェアアップデータファイルが見つ かると以下のように表示されます MOTIF XS Updater ver 6 フラッシュロムの消去の実行状況を以下のよ うに表示します Erase 7 ...

Page 174: ... REMOTE ボタンを図 6 の画面 テストモー ド起動画面 がでるまで同時押しし続けます 尚 同時押しのパネルスイッチが異なるだけでエン トリー方法はファームウェアアップデートの場合と 同様です 2 テストモードのエントリ画面で以下のように バージョン表示するので そこでバージョンを 確認します MOTIF XS Firmware Versioin 図 5 図 6 9 ベリファイチェックが完了すると結果を OK NG 表示いたします 以下のように OK が表示 されれば問題なしです これで書き込み作業は 完了になります Verify OK Finish Please turn off 一連のバージョンアップにかかる時間はおよそ 15 分です ...

Page 175: ...IO driver Activate mLAN driver Start miscellaneous services UI Start test program Power On Factory Set Autoload Power On Mode Activate network background 1 The result of minimum DDR SDRAM read write check is passed to Linux by using SRAM It will be shown in the normal test mode 4 There are three test modes REMOTE REC Normal test mode Tests for LCD controllers MIDI USB mLAN ethernet audio ROM RAM a...

Page 176: ... USB hotplug detection Automount background Start firmware update program on USB storage Activate I2C driver Activate SWP51 TG driver Activate GPIO driver Activate mLAN driver Start miscellaneous services UI Start test program Power On Factory Set Autoload Power On Mode Activate network background 1 DDR SDRAMの必要最低限のread write checkを行います その結果はCPU内蔵のSRAM経由でLinuxに情報を伝えます 伝えられた情報はnormal test modeで見る事が...

Page 177: ...e r o t g n i y r t n e h w s r a e p p a e g a s s e m s i h T a t a d k l u b l a g e l l I bulk data was transmitted For example trying to receive bulk data of Voice Edit data in the Mixing mode calls up this message When receiving bulk data make sure to set the instrument to the same mode as the one in which the bulk data was transmitted e m a n t n e r e f f i d a g n i r e t n e y r T d i l ...

Page 178: ... Convert Job cannot be executed d e t u c e x e e b t o n n a c b o J h c t e r t S e m i T e h t d n a e g r a l o o t s i e z i s e l p m a S e h T g n o l o o t s i e l p m a S d e t u c e x e e b t o n n a c b o J t r e v n o C y c n e u q e r F e h t d n a t r o h s o o t s i h t g n e l e l p m a S e h T t r o h s o o t s i e l p m a S Sample memory full The Sample memory is full and further...

Page 179: ...isk or memory read write error 外部記憶装置へのリード ライト中にエラーが発生しました Favorites limit exceeded フェーバリットカテゴリーに上限 256 を超えるボイスを登録しようとした場合に表示されます File is not found 選択したタイプのファイルがありません Illegal bulk data 送信したときと違うモードでバルクデータを受信しようとした場合に表示されます 送信時のモードと同じモードでバルクデータを受信してください Illegal file name ファイル名が無効の場合表示されます Illegal file ロードのとき 目的のファイルがMOTIF XSでは扱えない または現在のモードではロードできない場 合に表示されます Illegal parameters ソング パターンモードでのジョブ実行時に 不...

Page 180: ...ンバートジョブを実行することができない場合に表示さ れます Sample is too long サンプルのサイズが大きすぎてタイムストレッチジョブが実行できない場合に表示されます Sample is too short サンプルのサイズが小さすぎ フリケンシーコンバートジョブなどを実行することができない場合に表 示されます Sample memory full サンプル用のメモリーが一杯で サンプリングやジョブ ロードなどが実行できない場合に表示されま す Sample voice full サンプリングやジョブ ロードの実行時に サンプルボイス数の合計が最大数を超える場合に表示され ます Scene stored SF1 SF5 ボタンにソングシーンがストア 保存 されました Sequence memory full シーケンサー用の内部メモリーが一杯で レコーディングやエディット ジ...

Page 181: ...181 MOTIF XS6 MOTIF XS7 MOTIF XS8 MIDI IMPLEMENTATION CHART ...

Page 182: ...182 MOTIF XS6 MOTIF XS7 MOTIF XS8 ...

Page 183: ...3 F T C E L E S G N O S SW3 SYSTEM REALTIME MESSAGE H 8 F K C O L C G N I M I T H A F T R A T S H B F E U N I T N O C H C F P O T S ACTIVE SENSING FEH SW4 SYSTEM EXCLUSIVE MESSAGE All in Seq SW5 BULK DUMP F0H 43H 0nH 7FH 03H bhH blH ahH amH alH ddH ddH ccH F7H SW5 PARAMETER CHANGE H 7 F H d d H d d H l a H m a H h a H 3 0 H F 7 H n 1 H 3 4 H 0 F SYSTEM EXCLUSIVE MESSAGE IDENTITY REPLY H 0 0 H 6 0 ...

Page 184: ...EL VOICE MESSAGES 3 1 1 NOTE OFF STATUS 1000nnnn 8nH n 0 15 CHANNEL NUMBER NOTE No 0kkkkkkk k 0 C 2 127 G8 VELOCITY 0vvvvvvv v ignored Receive only 3 1 2 NOTE ON OFF STATUS 1001nnnn 9nH n 0 15 CHANNEL NUMBER 8 G 7 2 1 2 C 0 k k k k k k k k 0 R E B M U N E T O N VELOCITY NOTE ON 0vvvvvvv v 0 NOTE OFF 0vvvvvvv v 0 3 1 3 CONTROL CHANGE STATUS 1011nnnn BnH n 0 15 CHANNEL NUMBER CONTROL NUMBER 0ccccccc...

Page 185: ...VE CHANNEL 3 2 7 POLY CONTROL NUMBER 7FH DATA VALUE 0 Performs the same function as when receiving ALL SOUNDS OFF The channel will be Mode 3 In the Voice mode the mode can be Mode 1 according to VOICE RECEIVE CHANNEL 3 3 REGISTERED PARAMETER NUMBER STATUS 1011nnnn BnH n 0 15 CHANNEL NUMBER H 4 6 0 0 1 0 0 1 1 0 B S L RPN LSB 0ppppppp p RPN LSB Refer to the table as shown below H 5 6 1 0 1 0 0 1 1 ...

Page 186: ...tinguished the other controllers channel messages equally affect the entire notes ALL SOUND OFF clears all the sounds in the specific channel s played by both the keyboard and the data via MIDI ALL NOTES OFF received via MIDI clears the sounds in the specific channel s played via MIDI SEQ KBD TG MIDI In MIDI Out From USB To USB USB MIDI MIDI Local Sw SEQ KBD TG Local Sw Thru Port USB MIDI USB MIDI I...

Page 187: ...ERALL ASSEMBLY MOTIF XS6 XS7 総組立 2 MOTIF XS8 OVERALL ASSEMBLY MOTIF XS8 総組立 4 MOTIF XS6 XS7 BOTTOM ASSEMBLY MOTIF XS6 XS7 ボトム Ass y 6 MOTIF XS8 BOTTOM UNIT MOTIF XS8 ボトムユニット 10 CONTROL PANEL ASSEMBLY コンパネ Ass y 14 MOTIF XS6 FSX KEYBOARD ASSEMBLY D MOTIF XS6 FSX 鍵盤 D 16 MOTIF XS7 FSX KEYBOARD ASSEMBLY D MOTIF XS7 FSX 鍵盤 D 18 MOTIF XS8 HEDaf EBUS KEYBOARD ASSEMBLY MOTIF XS8 HEDaf EBUS 鍵盤 20 WHEEL AS...

Page 188: ...8 MOTIF XS6 XS7 OVERALL ASSEMBLY MOTIF XS6 XS7 総組立 50 40 40 10 80 70 40 60 40 30 190 45 20 45 170 180 160 A view A 矢視図 O model only U model only 150 Control panel assembly See page 14 コンパネAss y Bottom assembly See page 6 ボトムAss y A ...

Page 189: ... MFZN2W3 S タ イ ト B I N D 6 01 50 WJ426900 Side Panel R RIGHT サ イ ド パ ネ ル R 塗 装 品 60 WJ427000 Side Panel L LEFT サ イ ド パ ネ ル L 塗 装 品 70 Label ラ ベ ル U V229410 80 Label CCC AV ラ ベ ル O WA65000 150 WA458900 Slider Knob Black White VOLUME ス ラ イ ダ ー ノ ブ VOLUME 1 8 8 02 160 WA459000 Slider Knob Black Red VOLUME ス ラ イ ダ ー ノ ブ MASTER VOLUME 02 170 VT651700 Encoder Knob Black エ ン コ ー ダ ー ツ マ ミ Data dial 02 18...

Page 190: ...MOTIF XS8 MOTIF XS8 OVERALL ASSEMBLY MOTIF XS8 総組立 O model only U model only 170 190 310 300 30 30 10 20 60 50 70 70 40 B 180 160 150 Control panel assembly See page 14 コンパネAss y Bottom unit See page 10 ボトムユニット B view B 矢視図 ...

Page 191: ... ス ラ イ ダ ー ノ ブ VOLUME 1 8 8 02 160 WA459000 Slider Knob Black Red VOLUME ス ラ イ ダ ー ノ ブ MASTER VOLUME 02 170 VT651700 Encoder Knob Black エ ン コ ー ダ ー ツ マ ミ Data dial 02 180 WJ414900 Knob VR ノ ブ プ ラ 軸 用 SELECTED PART MULTI PART 8 CONTROL 1 8 190 CB825380 Push Button Black プ ッ シ ュ ボ タ ン POWER ON OFF 03 300 Label ラ ベ ル U V229410 310 Label CCC AV ラ ベ ル O WA65000 ACCESSORIES 付 属 品 VT119800 AC Cord J 7A 1...

Page 192: ... E30 E40 E80 E80 E80 E80 160 B30 B50 B10 B50 B20 B40 B40 130 140 120 430 200 200 180 500 190 410 400 410 400 270 290 230 260 270 350 450 340 340 110 110 330 220 210 420 550 460 310 350 440 420 370 430 B50 B50 100 B50 120 390 380 360 385 510 530 320 300 540 290 380 E70 E10 E50 150 170 B40 B40 430 510 570 560 280 530 E60 90 80 70 60 500b 500a XS7 only XS6 only 60 40 50 10 20 30 E80 E80 E90 E90 165 3...

Page 193: ...00 410 310 B40 30 A A B40 310 370 370 370 410 430 420 420 545 285 700 710 700 660 670 680 690 690 640 630 460 250 430 210 40mm C view C 矢視図 C Top view 上から見た図 430 383 385 460 340 265 93 97 610 600 470 470 255 267 450 340 357 353 165 40mm 40mm Top view 上から見た図 ...

Page 194: ...65 Connector Assembly KB GND 4P 3P GND K B G N D 束 線 WK23110 170 WE936300 Bind Head Tapping Screw B 3 0X6 MFZN2W3 B タ イ ト B I N D 01 180 Holder Power Switch P S W ア ン グ ル WE13590 190 WE878300 Bind Head Screw 3 0X6 MFZN2B3 小 ネ ジ B I N D 2 01 200 WE972200 Bind Head Tapping Screw B 3 0X10 MFZN2B3 B タ イ ト B I N D 4 01 210 WE941800 Bind Head Tapping Screw S 4 0X8 MFZN2W3 S タ イ ト B I N D 01 220 WG978900...

Page 195: ... Tapping Screw B 4 0X8 MFZN2B3 B タ イ ト B I N D 01 630 Earth Plate ア ー ス プ レ ー ト WJ81500 640 WE936300 Bind Head Tapping Screw B 3 0X6 MFZN2W3 B タ イ ト B I N D 3 01 660 WK802400 Bushing D6580 3515 POM 段 付 き ブ ッ シ ュ 670 WK813200 Ferrite Core ESD R 14C フ ェ ラ イ ト コ ア 680 Sponge C 4266 ス ポ ン ジ WK80220 690 WK834300 Ferrite Core E04FG460808 フ ェ ラ イ ト コ ア 2 700 Sponge C 4266 ス ポ ン ジ WK84160 2 710 Filament T...

Page 196: ...40 415 191 110 315 320 330 320 240 260 260 290 115 220 253 253 185 180 170 160 150 195 192 125 120 420 245 350 257 370 255 276 273 280 450 270 410 250 200 205 340 300 100 B20 B20 B50 20b 20a L75 L90 L80 L70 L70 L30 L20 L10 L60 L40 L50 B40 B20 25 22 22 10 57 20 55 52 52 70 90 72 35 35 35 32 32 49 45 32 30 32 59 75 58 47 45 45 42 40 50 B10b B10a 150a 150b L100 420 410 240 370 440 430 210 257 490 L13...

Page 197: ... 180 185 253 220 225 49 B B 115 253 290 290 290 59 450 417 415 500 470 510 150 485 480 40mm 520 530 E view E 矢視図 700 700 690 690 F view F 矢視図 710 E F 590 660 600 670 610 680 Top view 上から見た図 570 560 560 580 257 267 350 490 198 197 257 570 263 40mm 40mm 40mm Top view 上から見た図 ...

Page 198: ...ACIN VH 5P A C I N 束 線 WG98270 150a WA782600 AC IN Connector R 301 B18 A C イ ン レ ッ ト AC IN 02 150b VP184000 Push Switch SDDLB13600 プ ッ シ ュ S W POWER ON OFF 03 160 Holder Power Switch P S W ア ン グ ル WE13590 170 WE878300 Bind Head Screw 3 0X6 MFZN2B3 小 ネ ジ B I N D 2 01 180 WE972200 Bind Head Tapping Screw B 3 0X10 MFZN2B3 B タ イ ト B I N D 2 01 185 WE972200 Bind Head Tapping Screw B 3 0X10 MFZN2B3 B タ ...

Page 199: ...70 WK813200 Ferrite Core ESD R 14C フ ェ ラ イ ト コ ア 680 Sponge C 4266 ス ポ ン ジ WK80220 690 WK834300 Ferrite Core E04FG460808 フ ェ ラ イ ト コ ア 2 700 Sponge C 4266 ス ポ ン ジ WK84160 2 710 Filament Tape 12X50m フ ィ ラ メ ン ト テ ー プ 2154500 WG435700 Bottom Board Assembly 底 板 A s s y B10 Bottom Board 底 板 WG43550 B10a Nut B 4 0X9 5 MFZN2W3 鬼 目 ナ ッ ト WF69470 17 B10b Nut B 5 0X12 MFZN2W3 ナ ッ ト オ ニ メ WF73830 9 B20 WH81...

Page 200: ...ート See page 23 PNC circuit board PNCシート See page 25 PNB PN circuit board See page 24 PNB PNシート XS8 only XS8 only XS8 only XS8 only 110 100 100 130 120 110 160 150 190 170 305 D70 D35 D60 D50 D10 D20 D80 D90 D40 D30 410 400 180 140 52 55 40 40 40 90 80 30 20 50 10 70 70 60 60 D100 D130 D120 305 440 D45 D45 D100 D140 D140 D140 D140 D60 D60 D60 D160 D160 Bottom view 下から見た図 ...

Page 201: ...ord Holder BK 1 イ ン シ ュ ロ ッ ク タ イ CB06925 180 Band RSG 100 リ ユ ー ス バ ン ド V474980 190 Filament Tape 12X50m フ ィ ラ メ ン ト テ ー プ 2154500 305 Filament Tape 12X50m フ ィ ラ メ ン ト テ ー プ MOTIF XS8 2154500 400 Shield Plate JA シ ー ル ド 板 J A MOTIF XS6 XS7 WE13790 410 WE936300 Bind Head Tapping Screw B 3 0X6 MFZN2W3 B タ イ ト B I N D MOTIF XS6 XS7 3 01 410 WE936300 Bind Head Tapping Screw B 3 0X6 MFZN2W3 B タ イ ト B ...

Page 202: ...XS6 FSX KEYBOARD ASSEMBLY D MOTIF XS6 FSX 鍵盤 D 240 240 240 250 110 230 155 10b 260 205 210 220 250 105 100 106 20 60 30 30 20 50 40 80 90 70 210a 220a 220b 220b 220c 210b 210b 320 330 10a MK61L assembly MK61L Ass y MKH D assembly MKH D Ass y ...

Page 203: ...per 61 FSX C61 キ ー ス ト ッ パ ー 6 1 02 110 WB171100 Key Guide Cap キ ー ガ イ ド キ ャ ッ プ 61 01 155 Frame Holder フ レ ー ム 固 定 金 具 WB18860 205 V3438000 PC Sensor YMHM 016 P C セ ン サ ー 10 210 MKH D Assembly M K H D A s s y WD80060 210a WD801000 Circuit Board MKH D M K H D シ ー ト 15 210b WB168800 Rubber Contact 12KEY 2M 接 点 ゴ ム 1 2 K e y C 4 C5 C 5 C6 2 04 220 MK61L Assembly FSV X M K 6 1 L A s s y WD53540 220a ...

Page 204: ... D MKC assembly MKC Ass y MKH D assembly MKH D Ass y 240 240 250 110 230 155 10b 260 205 210 220 250 100 80 90 210a 220a 220b 220b 210b 210b 320 240 100 230 330 215b 250 215a 215 10a 30 60 20 30 40 75 50 20 72 74 210c 220c MK76L assembly MK76L Ass y 10 FSX frame assembly FSXフレーム Ass y ...

Page 205: ...lder フ レ ー ム 固 定 金 具 WB18860 205 VK735000 PC Sensor YMHM 013 P C セ ン サ ー 11 210 MKH D Assembly FSX M K H D A s s y WD80690 210a WD806100 Circuit Board MKH D M K H D シ ー ト 210b WB168800 Rubber Contact 12KEY 2M 接 点 ゴ ム 1 2 K e y C 4 C5 C 5 C6 2 04 210c WD811600 Rubber Contact 76H C G 2M 7KEY 接 点 ゴ ム 7 6 H C 6 G6 215 MKC Assembly FSX M K C A s s y WD80720 215a WD807100 Circuit Board MKC M K C シ ー ト 2...

Page 206: ... 60 80 100 270 390 200 110 70 30 40 50 String Set V7843000 Master String X1 Slave String X1 Adhesive Tape X1 390 Service Tool VB299400 370 Service Parts V6782900 P60 P10 P20 P30 280 210 224 400 220 222 ストリングセット マスターストリング 両面テープ スレーブストリング サービス用ツール サービスパーツ 150 190 260 230 260 235b 235a 260 235 235c 235a 262 240 260 ...

Page 207: ... 08 230 V6469310 Circuit Board GHD EBUS L GHD EBUSシートL 235 V8612200 Circuit Board HEDaf M H E D a f M シ ー ト 235a V7766700 Cable 15P L 106 P 2 ケ ー ブ ル 2 235b V7766800 Cable 9P L 106 P 2 ケ ー ブ ル 235c V8521000 Cable 4P L 106 P 2 ケ ー ブ ル 240 V8612300 Circuit Board HEDaf H H E D a f H シ ー ト 260 WF001000 Bind Head Tapping Screw P 3 0X10 MFZN2W3 P タ イ ト B I N D 16 01 262 WF765500 PW Head Tapping Screw P ...

Page 208: ...01 40 CB819020 Wheel Tube ホ イ ー ル チ ュ ー ブ 2 04 50 EW600110 Stop Ring 12 0 C S 形 止 め 輪 01 60 VQ764300 Rotary Variable Resistor 10 0K RK16311 ロ ー タ リ ー V R PITCH 03 70 VN245400 Rotary Variable Resistor 10 0K RK16311 ロ ー タ リ ー V R MODULATION 03 80 Connector Assembly WHRB67 PHR 8P 3P W H R B 6 7 束 線 MOTIF XS6 XS7 WG98380 80 Connector Assembly WHRB67 PHR 8P 3P W H R B 6 7 束 線 MOTIF XS6 XS7 WG98381 80 C...

Page 209: ...P N A シ ー ト with buttons 20 WA262700 Push Button Gray x1 MR プ ッ シ ュ ボ タ ン M R ASSIGNABLE FUNCTION 1 2 2 01 30 WB213500 Push Button Gray x1 M プ ッ シ ュ ボ タ ン M SELESTED PART CONTROL 2 01 MULTI PART CONTROL PNA CIRCUIT BOARD PNA シート 20 30 REF NO PART NO DESCRIPTION 部 品 名 REMARKS QTY RANK New Parts RANK Japan only ...

Page 210: ...EFFECT 01 10c WB213500 Push Button Gray x3 M プ ッ シ ュ ボ タ ン M SF1 SF6 2 10d V4162600 Push Button Black x3 M プ ッ シ ュ ボ タ ン M F1 F6 2 02 10e WA656000 Button White x1 LL W_PLAY ボ タ ン L L 印 刷 品 W PLAY 02 10f WA656100 Button White x1 LL W_REC ボ タ ン L L 印 刷 品 S REC 01 10g WA656200 Button White x1 LL W_STOP ボ タ ン L L 印 刷 品 A STOP 01 10h WA656300 Button White x1 LL W_FF ボ タ ン L L 印 刷 品 R FF 01 10i WA656400...

Page 211: ...47600 Push Button Gray x2 MR プ ッ シ ュ ボ タ ン M R SEQ INTEGRATED SAMPLING 2 MIXING 60 WA262700 Push Button Gray x1 MR プ ッ シ ュ ボ タ ン M R EDIT COMMON EDIT PROGRAM 8 01 CATEGORY SEARCH PERFORMA NCE CTR TRACK MUTE SOLO 70 WB213300 Push Button Gray x2 M プ ッ シ ュ ボ タ ン M JOB STORE 01 80 WA262900 Push Button Gray x4 MR プ ッ シ ュ ボ タ ン M R PRE1 8 USER1 3 GM GM DR 6 04 PRE DR USE DR ETHNIC A H 90 V6553900 Push B...

Page 212: ... チ ッ プ セ ラ B J C169 WG969400 Monolithic Ceramic Cap 10 000 6 3V K チ ッ プ 積 層 セ ラ コ ン C170 WG969400 Monolithic Ceramic Cap 10 000 6 3V K チ ッ プ 積 層 セ ラ コ ン C171 WD758100 Ceramic Capacitorc 22 000 6 3V K RECT チ ッ プ セ ラ 01 C201 US634100 Ceramic Capacitor B chip 0 010 16V K RECT チ ッ プ セ ラ B 01 C202 US625100 Ceramic Capacitor BJ chip 0 100 10V K RECT チ ッ プ セ ラ B J 212 US625100 Ceramic Capacitor BJ chip 0...

Page 213: ...6V K RECT チ ッ プ セ ラ B 01 C608 US662470 Ceramic Capacitor B chip 470P 50V K RECT チ ッ プ セ ラ B C609 US634100 Ceramic Capacitor B chip 0 010 16V K RECT チ ッ プ セ ラ B 01 C610 US662470 Ceramic Capacitor B chip 470P 50V K RECT チ ッ プ セ ラ B C611 US634100 Ceramic Capacitor B chip 0 010 16V K RECT チ ッ プ セ ラ B 01 C612 US662470 Ceramic Capacitor B chip 470P 50V K RECT チ ッ プ セ ラ B C613 US634100 Ceramic Capacitor ...

Page 214: ... RECT チ ッ プ セ ラ B 01 C774 US662470 Ceramic Capacitor B chip 470P 50V K RECT チ ッ プ セ ラ B C775 US634100 Ceramic Capacitor B chip 0 010 16V K RECT チ ッ プ セ ラ B 01 C776 US662470 Ceramic Capacitor B chip 470P 50V K RECT チ ッ プ セ ラ B C777 US634100 Ceramic Capacitor B chip 0 010 16V K RECT チ ッ プ セ ラ B 01 C778 US662470 Ceramic Capacitor B chip 470P 50V K RECT チ ッ プ セ ラ B C779 US634100 Ceramic Capacitor B ch...

Page 215: ...00 Electrolytic Cap chip 330U 35V チ ッ プ ケ ミ コ ン U D 01 C1617 US634100 Ceramic Capacitor B chip 0 010 16V K RECT チ ッ プ セ ラ B 01 C1618 US634100 Ceramic Capacitor B chip 0 010 16V K RECT チ ッ プ セ ラ B 01 C1619 US126100 Ceramic Capacitor F chip 1 0000 10V Z RECT チ ッ プ セ ラ F 01 C1620 US625100 Ceramic Capacitor BJ chip 0 100 10V K RECT チ ッ プ セ ラ B J C1621 US634100 Ceramic Capacitor B chip 0 010 16V K RECT...

Page 216: ...ector FFC FPC 6244 30P TE FFC FPCコネクタ CN901 LB932040 Base Post Connector VH 4P TE ベ ー ス ポ ス ト 01 D901 V9805600 Diode MBRM120LT1G TP ダ イ オ ー ド 01 D902 WA296300 Diode MMSD914T1G TP ダ イ オ ー ド 01 EM901 VZ581100 EMI Filter chip 31PT222Z1E9L TP チ ッ プ エ ミ フ ィ ル 01 EM902 VZ581100 EMI Filter chip 31PT222Z1E9L TP チ ッ プ エ ミ フ ィ ル 01 FT901 WA296100 FET SI4562DY T1 E3 TP F E T 05 IC001 IC TX4939C I C CPU RISC ...

Page 217: ... 63M J RECT チ ッ プ 抵 抗 01 832 RD350000 Carbon Resistor chip 0 63M J RECT チ ッ プ 抵 抗 01 L901 WF706200 Chip Inductance 10μH CDRH5D28NP100 チ ッ プ イ ン ダ ク タ L902 WB365300 Chip Inductance 2 1μH CDRH125 2R1NC チ ッ プ イ ン ダ ク タ 03 LD406 VN925500 LED chip Red CL 170SD CD T チ ッ プ L E D 01 R101 RD253560 Carbon Resistor chip 5 6 0 1 J RECT チ ッ プ 抵 抗 R102 RD250000 Carbon Resistor chip 0 0 0 0 J RECT チ ッ プ 抵 抗 01 R...

Page 218: ...63 RD450000 Carbon Resistor chip 0 00 63M J RECT チ ッ プ 抵 抗 01 466 RD450000 Carbon Resistor chip 0 00 63M J RECT チ ッ プ 抵 抗 01 R468 RF455100 Carbon Resistor chip 100 0 D RECT チ ッ プ 抵 抗 471 RF455100 Carbon Resistor chip 100 0 D RECT チ ッ プ 抵 抗 R472 RD450000 Carbon Resistor chip 0 00 63M J RECT チ ッ プ 抵 抗 01 R473 RD450000 Carbon Resistor chip 0 00 63M J RECT チ ッ プ 抵 抗 01 R474 RD454470 Carbon Resistor ch...

Page 219: ...hip 68 0 63M J RECT チ ッ プ 抵 抗 620 RD454680 Carbon Resistor chip 68 0 63M J RECT チ ッ プ 抵 抗 R621 RD456150 Carbon Resistor chip 1 5K 63M J RECT チ ッ プ 抵 抗 01 R622 RD456150 Carbon Resistor chip 1 5K 63M J RECT チ ッ プ 抵 抗 01 R623 RD457100 Carbon Resistor chip 10 0K 63M J RECT チ ッ プ 抵 抗 01 R624 RD454470 Carbon Resistor chip 47 0 63M J RECT チ ッ プ 抵 抗 626 RD454470 Carbon Resistor chip 47 0 63M J RECT チ ッ プ ...

Page 220: ...r chip 0 00 63M J RECT チ ッ プ 抵 抗 01 R770 RD457100 Carbon Resistor chip 10 0K 63M J RECT チ ッ プ 抵 抗 01 780 RD457100 Carbon Resistor chip 10 0K 63M J RECT チ ッ プ 抵 抗 01 R782 RD457100 Carbon Resistor chip 10 0K 63M J RECT チ ッ プ 抵 抗 01 R784 RD457100 Carbon Resistor chip 10 0K 63M J RECT チ ッ プ 抵 抗 01 786 RD457100 Carbon Resistor chip 10 0K 63M J RECT チ ッ プ 抵 抗 01 R787 RD454680 Carbon Resistor chip 68 0 6...

Page 221: ...Resistor chip 1 2K D 1608 チ ッ プ 抵 抗 01 R917 RF356620 Carbon Resistor chip 6 2K D 1608 チ ッ プ 抵 抗 R918 RF356620 Carbon Resistor chip 6 2K D 1608 チ ッ プ 抵 抗 R919 RF356120 Carbon Resistor chip 1 2K D 1608 チ ッ プ 抵 抗 01 R920 RD455330 Carbon Resistor chip 330 0 63M J RECT チ ッ プ 抵 抗 01 R923 RD456100 Carbon Resistor chip 1 0K 63M J RECT チ ッ プ 抵 抗 01 R1501 RD455220 Carbon Resistor chip 220 0 63M J RECT チ ッ プ...

Page 222: ...晶 発 振 器 04 X501 WG164400 Quartz Crystal Unit 20 000MHz DSO321SV 水 晶 発 振 器 X601 WG162000 Quartz Crystal Unit 11 2896MHz DSX321G 水 晶 振 動 子 X823 WJ495200 Ceramic Resonator 6 000MHz セ ラ ミ ッ ク 振 動 子 X824 WG979800 Quartz Crystal Unit 40 000MHzDSO321SR4 水 晶 発 振 器 V6469310 Circuit Board GHD EBUS L GHD EBUSシートL XS8 XZ138D0 V6588200 Circuit Board MK SUB M K サ ブ シ ー ト V658810 XZ142B0 10 Nonwoven Fabric Cloth...

Page 223: ... L 106 P 2 ケ ー ブ ル 01 D1 VB941200 Diode 1SS133 1SS176 TE ダ イ オ ー ド 01 60 VB941200 Diode 1SS133 1SS176 TE ダ イ オ ー ド 01 J Jumper Wire 0 55 ジ ャ ン パ ー 線 VA07890 WG978700 Circuit Board JKAN JA J K A N J A シ ー ト XS6 XS7 WG45460 X7368C0 WG978700 Circuit Board JKAN JA J K A N J A シ ー ト XS8 WG97830 X7368C0 WG978100 Circuit Board JKAN LC J K A N L C シ ー ト XS6 XS7 WG45460 X7368C0 WG978100 Circuit Board JKAN ...

Page 224: ...V5621200 Electrolytic Cap 47 00 50 0V RX TP ケ ミ コ ン T O N E R 01 C69 V5621200 Electrolytic Cap 47 00 50 0V RX TP ケ ミ コ ン T O N E R 01 C70 VR329300 Mylar Capacitor chip 0 0015 50V J RECT チ ッ プ マ イ ラ ー 01 C71 VR328300 Mylar Capacitor chip 00033 50V J RECT チ ッ プ マ イ ラ ー 01 C72 VR327500 Mylar Capacitor chip 0 0001 50V J RECT チ ッ プ マ イ ラ ー 01 C73 VR328300 Mylar Capacitor chip 00033 50V J RECT チ ッ プ マ イ...

Page 225: ...US145100 Ceramic Capacitor F chip 0 1000 25V Z RECT チ ッ プ セ ラ F 01 C205 US145100 Ceramic Capacitor F chip 0 1000 25V Z RECT チ ッ プ セ ラ F 01 C206 US062220 Ceramic Capacitor SL chip 220P 50V J RECT チ ッ プ セ ラ S L 01 C209 WC404500 Electrolytic Cap chip 150 00 10 0V チ ッ プ ケ ミ コ ン U D 01 C301 V9451800 Electrolytic Cap chip 47 00 10 0V REFLOW チ ッ プ O S ケ ミ コ ン C302 UF038100 Electrolytic Cap chip 100 16V チ...

Page 226: ... 04 JK13 V7705200 PIN Connector Black 1P YKC21 3894N ピ ン コ ネ ク タ 1 P DIGITAL OUT 01 K1 V2192700 Shield VR V R シ ー ル ド 04 K3 V3885100 Holder JKAD J K A D ア ン グ ル 02 K5 V6508200 Holder JKBC B J K B C ア ン グ ル B 01 K7 VU931500 Holder Jack J K ア ン グ ル 03 K9 VU931500 Holder Jack J K ア ン グ ル 03 L1 VR579900 Chip Inductance BK2125 HS601 T チ ッ プ イ ン ダ ク タ 01 17 VR579900 Chip Inductance BK2125 HS601 T チ ッ プ ...

Page 227: ...220 Carbon Resistor chip 220 0 63M J RECT チ ッ プ 抵 抗 01 R52 RD356120 Carbon Resistor chip 1 2K 63M J RECT チ ッ プ 抵 抗 01 R53 RD356470 Carbon Resistor chip 4 7K 63M J RECT チ ッ プ 抵 抗 01 R54 RD358100 Carbon Resistor chip 100 0K 63M J RECT チ ッ プ 抵 抗 01 R55 RD357100 Carbon Resistor chip 10 0K 63M J RECT チ ッ プ 抵 抗 01 R56 RD357100 Carbon Resistor chip 10 0K 63M J RECT チ ッ プ 抵 抗 01 R57 RD357110 Carbon Resist...

Page 228: ...3 VI194900 Metal Film Resistor chip 1 0K 1 10 D RECT チ ッ プ 金 被 抵 抗 01 R124 VI195100 Metal Film Resistor chip 1 2K 1 10 D RECT チ ッ プ 金 被 抵 抗 01 R125 RD256120 Carbon Resistor chip 1 2K 1 0 J RECT チ ッ プ 抵 抗 01 R126 RD256120 Carbon Resistor chip 1 2K 1 0 J RECT チ ッ プ 抵 抗 01 R127 VI194900 Metal Film Resistor chip 1 0K 1 10 D RECT チ ッ プ 金 被 抵 抗 01 R128 VI196400 Metal Film Resistor chip 3 9K 1 10 D RECT ...

Page 229: ...R F ト ラ ン ジ ス タ 01 TR3 VD303700 Transistor 2SC3326 A B TE85R ト ラ ン ジ ス タ 01 TR4 VD303700 Transistor 2SC3326 A B TE85R ト ラ ン ジ ス タ 01 TR5 VJ927100 Transistor 2SC2712 Y TE85R F ト ラ ン ジ ス タ 01 TR6 IC287820 Transistor 2SC2878 A B TP ト ラ ン ジ ス タ 01 TR7 VJ927100 Transistor 2SC2712 Y TE85R F ト ラ ン ジ ス タ 01 TR8 VQ395600 Transistor 2SA1052MCTL E C TE ト ラ ン ジ ス タ 01 TR9 VG013300 Transistor 2SB1132 82 390 TP...

Page 230: ... SL chip 100P 50V J RECT チ ッ プ セ ラ S L 01 0045 US062100 Ceramic Capacitor SL chip 100P 50V J RECT チ ッ プ セ ラ S L 01 C0046 US061330 Ceramic Capacitor CH chip 33P 50V J RECT チ ッ プ セ ラ C H 01 C0047 US061330 Ceramic Capacitor CH chip 33P 50V J RECT チ ッ プ セ ラ C H 01 CN004 VT388800 Base Post Connector PH 7P TE ベ ー ス 付 ポ ス ト CN005 WB249800 Connector 20P GPFA105 2002A0 中 継 タ ー ミ ナ ル 04 CN006 WE621400 Conne...

Page 231: ...プ セ ラ B 01 C139 WF474600 Ceramic Capacitor chip 10 0000 16V M RECT チ ッ プ セ ラ C140 US064100 Ceramic Capacitor B chip 0 0100 50V K RECT チ ッ プ セ ラ B 01 143 US064100 Ceramic Capacitor B chip 0 0100 50V K RECT チ ッ プ セ ラ B 01 C144 UF037100 Electrolytic Cap chip 10 16V チ ッ プ ケ ミ コ ン 01 C145 US064100 Ceramic Capacitor B chip 0 0100 50V K RECT チ ッ プ セ ラ B 01 148 US064100 Ceramic Capacitor B chip 0 0100 50V...

Page 232: ... ネ ジ 端 子 M 3 BB07136 K101 Screw Terminal 8 3X13 M1698 ネ ジ 端 子 M 3 BB07136 L100 WF706200 Chip Inductance 10μH CDRH5D28NP100 チ ッ プ イ ン ダ ク タ L101 WA626200 Chip Choke Coil DLW31SN161SQ2L チ ッ プ チ ョ ー ク コ イ ル 03 104 WA626200 Chip Choke Coil DLW31SN161SQ2L チ ッ プ チ ョ ー ク コ イ ル 03 R100 RD357100 Carbon Resistor chip 10 0K 63M J RECT チ ッ プ 抵 抗 01 R101 RD357100 Carbon Resistor chip 10 0K 63M J RECT チ ッ プ 抵 抗...

Page 233: ...05 RD357100 Carbon Resistor chip 10 0K 63M J RECT チ ッ プ 抵 抗 01 R206 RD357100 Carbon Resistor chip 10 0K 63M J RECT チ ッ プ 抵 抗 01 R207 RF356100 Carbon Resistor chip 1 0K D 1608 チ ッ プ 抵 抗 01 R208 RF356100 Carbon Resistor chip 1 0K D 1608 チ ッ プ 抵 抗 01 R209 RD354220 Carbon Resistor chip 22 0 63M J RECT チ ッ プ 抵 抗 01 R210 RD354220 Carbon Resistor chip 22 0 63M J RECT チ ッ プ 抵 抗 01 R211 RD354100 Carbon Res...

Page 234: ... C140 US064100 Ceramic Capacitor B chip 0 0100 50V K RECT チ ッ プ セ ラ B 01 1 143 US064100 Ceramic Capacitor B chip 0 0100 50V K RECT チ ッ プ セ ラ B 01 1 C144 UF037100 Electrolytic Cap chip 10 16V チ ッ プ ケ ミ コ ン 01 1 C145 US064100 Ceramic Capacitor B chip 0 0100 50V K RECT チ ッ プ セ ラ B 01 1 148 US064100 Ceramic Capacitor B chip 0 0100 50V K RECT チ ッ プ セ ラ B 01 1 C149 US061220 Ceramic Capacitor CH chip 22P...

Page 235: ...4LVC1G08DCKR I C AND 01 1 IC121 X2308A00 IC HD74LVC244ATELL I C BUFFER 03 1 IC122 XZ287A00 IC SN74LVC245APWR I C TRANSCEIVER 02 1 124 XZ287A00 IC SN74LVC245APWR I C TRANSCEIVER 02 1 IC125 X4961A00 IC HD74LVC08TELL I C AND 01 1 IC126 X4961A00 IC HD74LVC08TELL I C AND 01 1 IC127 X7764A00 IC R1114N181A TR F I C REGULATOR 1 8V 1 K100 Screw Terminal 8 3X13 M1698 ネ ジ 端 子 M 3 BB07136 1 K101 Screw Termina...

Page 236: ...r chip 22 0 63M J RECT チ ッ プ 抵 抗 01 1 R197 RD354220 Carbon Resistor chip 22 0 63M J RECT チ ッ プ 抵 抗 01 1 200 RD354220 Carbon Resistor chip 22 0 63M J RECT チ ッ プ 抵 抗 01 1 R201 RD350000 Carbon Resistor chip 0 63M J RECT チ ッ プ 抵 抗 01 1 R202 RD354220 Carbon Resistor chip 22 0 63M J RECT チ ッ プ 抵 抗 01 1 204 RD354220 Carbon Resistor chip 22 0 63M J RECT チ ッ プ 抵 抗 01 1 R205 RD357100 Carbon Resistor chip 10...

Page 237: ... J1 Jumper Wire 0 55 ジ ャ ン パ ー 線 VA07890 J2 Jumper Wire 0 55 ジ ャ ン パ ー 線 VA07890 J3 Jumper Wire 0 55 ジ ャ ン パ ー 線 VA07890 LD1 V6309000 LED Green SEL6710K TP5 L E D ASSIGNABLE FUNCTION 1 01 LD2 V6309000 LED Green SEL6710K TP5 L E D ASSIGNABLE FUNCTION 2 01 LD3 V6308700 LED Green SEL2710Y TP8 L E D TONE 1 01 LD4 V6308700 LED Green SEL2710Y TP8 L E D TONE 2 01 LD5 V6308700 LED Green SEL2710Y TP8 L E D...

Page 238: ...フ ィ ル タ ー E M I 01 IC1 XZ916200 IC UPD780031AYGK N05 I C E PNS2a LED SWITCH DRIVER 05 IC2 XR363A00 IC NJM3414AD I C OP AMP 02 J1 Jumper Wire 0 55 ジ ャ ン パ ー 線 VA07890 J2 Jumper Wire 0 55 ジ ャ ン パ ー 線 VA07890 LD1 V6309100 LED Orange SEL6910A TP5 L E D REMOTE ON OFF 01 LD2 V6309000 LED Green SEL6710K TP5 L E D EFFECT BYPASS INSERTION 01 LD3 V6309000 LED Green SEL6710K TP5 L E D OCTAVE DOWN 01 LD4 VT02...

Page 239: ...02 8 VF611200 Monolithic Ceramic Cap 0 100 50V Z RX TP 積 層 セ ラ コ ン 02 C9 FG644100 Ceramic Capacitor F 0 0100 50V Z RX TP セ ラ コ ン F 01 C10 VF611200 Monolithic Ceramic Cap 0 100 50V Z RX TP 積 層 セ ラ コ ン 02 C11 UI528220 Electrolytic Cap 220 00 10 0V ケ ミ コ ン C12 UI528220 Electrolytic Cap 220 00 10 0V ケ ミ コ ン C13 VF611200 Monolithic Ceramic Cap 0 100 50V Z RX TP 積 層 セ ラ コ ン 02 CN1 VB390700 Base Post Con...

Page 240: ...or 10 0 1 4 J AX TP カ ー ボ ン 抵 抗 01 3 HF454100 Carbon Resistor 10 0 1 4 J AX TP カ ー ボ ン 抵 抗 01 R4 HF456100 Carbon Resistor 1 0K 1 4 J AX TP カ ー ボ ン 抵 抗 01 R5 HF454560 Carbon Resistor 56 0 1 4 J AX TP カ ー ボ ン 抵 抗 01 12 HF454560 Carbon Resistor 56 0 1 4 J AX TP カ ー ボ ン 抵 抗 01 RA1 VF771900 Resistor Array RGLE8X103J 抵 抗 ア レ イ 01 3 VF771900 Resistor Array RGLE8X103J 抵 抗 ア レ イ 01 SW1 VZ085500 Tact Switch...

Page 241: ...W 7 01 SW57 VV439800 Tact Switch SKQNAJ タ ク ト S W 15 01 SW58 VV439800 Tact Switch SKQNAJ タ ク ト S W PRE8 SAX WOODWIND 01 SW59 VV439800 Tact Switch SKQNAJ タ ク ト S W ETHNIC 01 SW60 VV439800 Tact Switch SKQNAJ タ ク ト S W H 01 SW61 VV439800 Tact Switch SKQNAJ タ ク ト S W 8 01 SW62 VV439800 Tact Switch SKQNAJ タ ク ト S W 16 01 SW63 VV439800 Tact Switch SKQNAJ タ ク ト S W PROGRAM 01 SW64 VV439800 Tact Switch SK...

Page 242: ...SW1 4 LD1 8 VOLUME Slider 1 4 AB4 B14 GAIN VR1 E18 B15 A11 C12 C17 B13 IC602 86P x32 IC601 86P IRQ Wait IC8 28P IC6 8P IC7 8P IC6 8P IC7 8P IC5 8P IC9 8P IC1 8P IC3 8P IC1 8P IC3 8P IC11 3P IC21 3P DAC IC10 28P Max 512MB x2 option CN303 4P CN300 2P to JKAN LC CN201 Switch LED SW1 25 LD1 9 Switch LED SW1 68 LD1 58 EC1 Sound Control Knob Assignable Slider Master volume Audio2ch Audio2ch IC4 16P Audi...

Page 243: ... 4 P 3 DM2 4 L 3 P 3 DM2 4 D 5 P 3 DM2 4 K 6 P 3 DM2 4 K 6 P 3 DM2 4 K 5 P 4 DM3 4 G 3 P 3 DM2 4 J 6 P 3 DM2 4 J 7 P 3 DM2 4 F 7 P 3 DM2 4 G 5 P 3 DM2 4 G 5 P 3 DM2 4 F 1 P 3 DM2 4 M 2 P 3 DM2 4 F 2 P 3 DM2 4 J 7 P 3 DM2 4 J 7 P 3 DM2 4 C 3 P 3 DM2 4 C 3 P 3 DM2 4 C 3 P 3 DM2 4 C 3 P 3 DM2 4 C 3 P 3 DM2 4 C 3 P 3 DM2 4 C 3 P 3 DM2 4 C 2 P 3 DM2 4 L 2 P 3 DM2 4 L 2 P 3 DM2 4 L 2 P 3 DM2 4 L 2 P 3 D...

Page 244: ...M1 4 M 9 P 2 DM1 4 F 2 P 5 DM4 4 I 4 P 5 DM4 4 M 5 P 2 DM1 4 M 6 P 2 DM1 4 L 9 P 2 DM1 4 D 5 P 2 DM1 4 M 9 P 2 DM1 4 M 9 P 2 DM1 4 M 5 P 2 DM1 4 C 5 P 2 DM1 4 D 5 P 2 DM1 4 D 5 P 2 DM1 4 D 5 P 2 DM1 4 D 5 P 5 DM4 4 I 4 P 2 DM1 4 D 3 P 2 DM1 4 D 3 P 5 DM4 4 I 2 P 5 DM4 4 I 2 P 5 DM4 4 I 4 P 2 DM1 4 K 10 P 2 DM1 4 F 2 P 5 DM4 4 I 4 P 5 DM4 4 I 4 P 5 DM4 4 I 4 P 5 DM4 4 I 4 P 5 DM4 4 I 4 P 2 DM1 4 C ...

Page 245: ...Note See parts list for details of circuit board component parts 注 シートの部品詳細はパーツリストをご参照ください 28CC1 2001003867 0070 1 CPU RISC PROCES X6669A0 REGULATOR 1 5V REGULATOR 1 5V SWP51 MASTER SWP51 MASTER SWP51 SLAVE SWP51 SLAVE FLASH ROM 512M WAVE L FLASH ROM 512M WAVE H P 2 DM1 4 D 3 P 3 DM2 4 D 3 P 3 DM2 4 D 3 Ceramic Capacitor chip チップセラミックコンデンサー 1 2 3 6 5 4 R1172S151D X7565A00 REGULATOR 1 5V DM IC713 7...

Page 246: ... INVERTER INVERTER INVERTER INVERTER CPU USB to JKAN ML CN300 Page 11 P 2 2SC4672 V9065800 TRANSISTOR JKAN LC TR200 201 1 BASE 2 COLLECTOR 3 EMITTER 1 3 2 1 2 3 P 3 DM2 4 K 7 P 3 DM2 4 K 7 P 3 DM2 4 J 7 P 3 DM2 4 J 7 P 3 DM2 4 F 2 P 3 DM2 4 J 7 P 3 DM2 4 L 3 P 3 DM2 4 J 7 P 3 DM2 4 J 7 P 3 DM2 4 J 7 P 3 DM2 4 J 7 P 3 DM2 4 J 7 P 3 DM2 4 D 2 Quartz crystal P 3 DM2 4 D 2 P 3 DM2 4 D 4 P 3 DM2 4 L 3 ...

Page 247: ...te See parts list for details of circuit board component parts 注 シートの部品詳細はパーツリストをご参照ください EMKS FD 28CC1 2000001485 Not installed Not installed Not installed Not installed Not installed MK61L 28CC1 2000001484 1 28CC1 2000001483 1 After touch sensor to DM CN603 Page 2 DM1 4 L 4 CPU OP AMP C1 C4 C 4 C6 MKH D RLS 73 TE 11 VV925900 DIODE EMKS FD D0001 0006 0008 1 ANODE 2 CATHODE 1 2 Not connected Not co...

Page 248: ...KS FD 28CC1 2000001485 Not installed Not installed Not installed Not installed Not installed to DM CN603 Page 2 DM1 4 L 4 CPU OP AMP 28CC1 2001002090 28CC1 2001002088 28CC1 2001002091 MKH D MKC MK76L Note See parts list for details of circuit board component parts 注 シートの部品詳細はパーツリストをご参照ください After touch sensor RLS 73 TE 11 VV925900 DIODE EMKS FD D0001 0006 0008 1 ANODE 2 CATHODE 1 2 Not connected No...

Page 249: ...DPC The part which isn t mounted is as mentioned in the following table Ref No C2 C8 C9 C10 R5 R6 R7 R11 R12 R13 D2 SW1 28CC1 8818010 3 28CC1 8822378 28CC1 8822377 HEDaf M HEDaf H G2 C5 A 1 F 2 C 5 C7 OP AMP OP AMP CPU LKS Not installed Note See parts list for details of circuit board component parts 注 シートの部品詳細はパーツリストをご参照ください to DM CN603 Page 2 DM1 4 L 4 Not installed Monolithic Ceramic Capacitor ...

Page 250: ...MLAN2 2 N 10 P 10 MLAN2 2 N 10 P 10 MLAN2 2 N 10 P 10 MLAN2 2 N 10 P 10 MLAN2 2 N 10 P 10 MLAN2 2 N 11 P 10 MLAN2 2 N 10 P 10 MLAN2 2 N 10 P 10 MLAN2 2 N 10 P 10 MLAN2 2 N 10 P 10 MLAN2 2 N 10 P 10 MLAN2 2 N 11 P 10 MLAN2 2 N 11 P 10 MLAN2 2 N 11 P 10 MLAN2 2 N 11 TPS62040DGQR X7250A00 DC DC CONVERTER MLAN IC104 1 EN 2 VIN 3 VIN 4 GND 5 FB 6 MODE 7 SW 8 SW 9 PGND 10 PGND 1 2 3 4 5 8 9 10 7 6 Not i...

Page 251: ...GULATOR 1 8V P 9 MLAN1 2 D 2 P 9 MLAN1 2 C 2 P 9 MLAN1 2 C 3 P 9 MLAN1 2 C 3 P 9 MLAN1 2 C 2 P 9 MLAN1 2 C 2 P 9 MLAN1 2 C 2 P 9 MLAN1 2 D 2 P 9 MLAN1 2 D 5 P 9 MLAN1 2 D 5 P 9 MLAN1 2 D 5 P 9 MLAN1 2 D 5 P 9 MLAN1 2 O 10 P 9 MLAN1 2 O 10 P 9 MLAN1 2 O 10 P 9 MLAN1 2 O 10 RB160M 30 WC549600 DIODE MLAN D100 1 ANODE 2 CATHODE 1 2 R1114N181A TR X7764A00 REGULATOR 1 8V MLAN IC127 1 VDD 2 GND 3 CE or C...

Page 252: ...ANODE 2 CATHODE 1 2 NJM78M05DL1A XS534A00 REGULATOR 5V JKAN JA IC11 21 1 INPUT 2 GND 3 OUTPUT 1 2 3 2SC3326 VD303700 TRANSISTOR JKAN JA TR3 4 11 14 1 3 2 1 BASE 2 EMITTER 3 COLLECTOR 1 2 3 2SB1132 VG013300 TRANSISTOR JKAN JA TR9 1 BASE 2 COLLECTOR 3 EMITTER 1 3 2 1 2 3 2SC2712 VJ927100 2SA1162 VJ927200 TRANSISTOR JKAN JA TR1 5 7 JKAN JA TR2 1 3 2 1 BASE 2 EMITTER 3 COLLECTOR 1 2 3 2SA1052 VQ395600...

Page 253: ... GR GR GR GR GR GR GR GR GR GR GR GR GR GR GR GR GR GR GR GR GR GR GR GR GR GR GR GR GR GR GR GR GR GR GR GR GR GR GR GR GR GR OR OR OR OR OR OR OR GR GR GR GR GR GR GR GR GR GR GR GR GR GR GR GR GR S3 D2 S0 S2 S1 L6 L3 L5 L4 D1 D0 D5 D3 D4 D6 SW7 REMOTE ON OFF SW14 SYSTEM SW21 MASTER EFFECT SW19 R 2 SW16 ARPEGGIO ON OFF SW12 E 1 SW4 SF2 SW3 F2 LD6 ARPEGGIO ON OFF SW1 F1 SW2 SF1 LD1 REMOTE ON OFF ...

Reviews: