MSP7 STUDIO
7
■
DISASSEMBLY PROCEDURE
(分解手順)
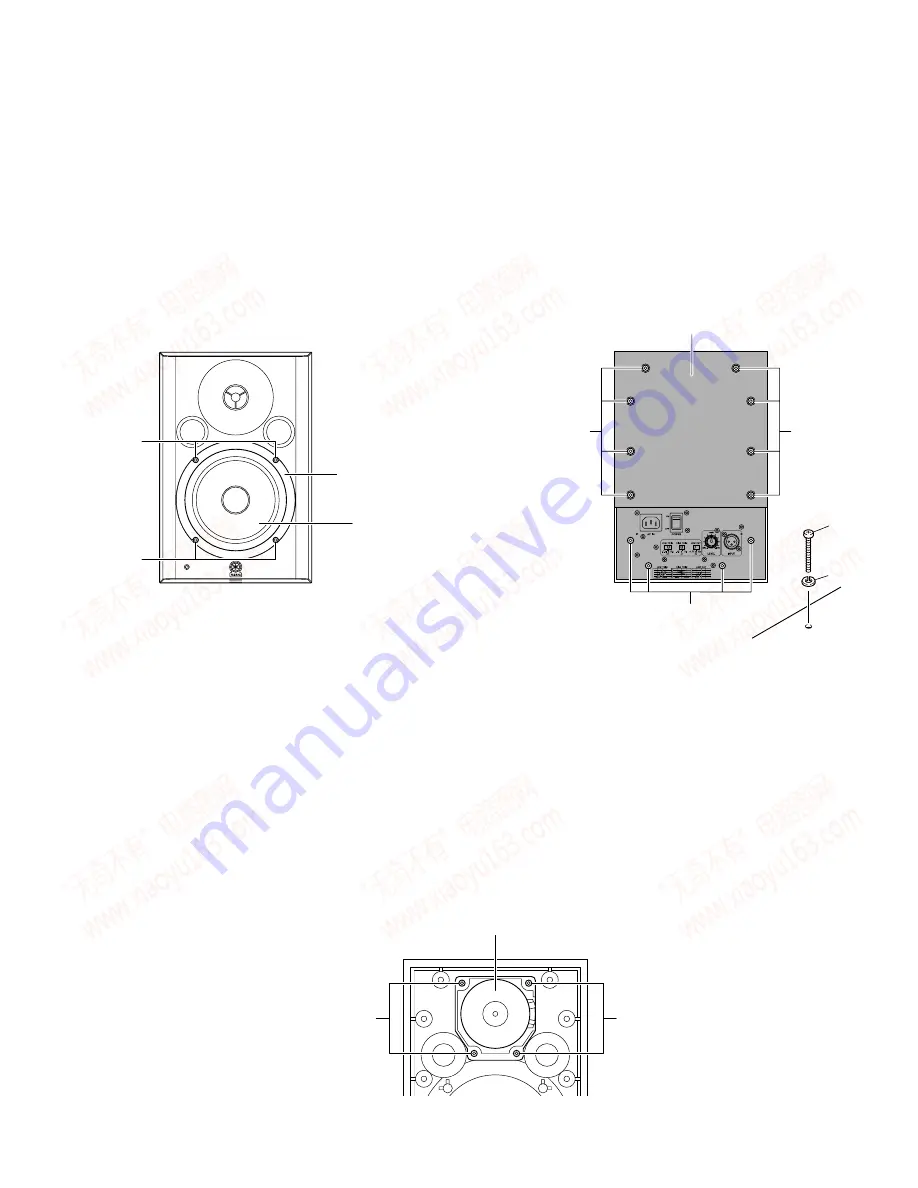
Fig. 1
(図 1)
Fig. 2
(図 2)
Tweeter (Time required: About 3 minutes)
Remove the rear panel assembly. (See procedure 2)
Remove the four (4) screws marked [A].
The tweeter can then be removed. (Fig. 3)
1.
ウーファー
(所要時間:約1分)
1-1
[2 2 0 ]の6 角穴付ネジ4 本を外し、ウーファーとウー
ファーリングを外します。
(図 1)
2.
リアパネルAss y
(所要時間:約2分)
2-1
[230]
のネジ12本と
[260]
のスプリングワッシャー12個
を外し、リアパネルAss yを外します。
(図 2)
[230]: Bind Head Tapping Screw-P 5x25 (WJ286300)
+バインドP
タイト
[260]: Spring Washer M5xM8.9xt1.0 (WJ478800)
スプリングワッ
シャー
[220]
Woofer
(ウーファー)
Woofer Ring
(ウーファーリング)
[220]
Rear Panel Assembly
(リアパネルAss'y)
[230], [260]
[230], [260]
[230], [260]
[260]
[230]
1.
Woofer (Time required: About 1 minute)
1-1
Remove the four (4) hexagonal socket screws marked
[220]. The woofer and woofer ring can then be removed.
(Fig. 1)
2.
Rear panel Assembly
(Time required: About 2 minutes)
2-1
Remove the twelve (12) screws marked [230] and twelve
(12) spring washers marked [260].
The rear panel assembly can then be removed. (Fig. 2)
3.
ツィータ
(所要時間:約3分)
3-1
リアパネルAss yを外します。
(2項参照)
3-2
[A]
のネジ4本を外し、ツィータを外します。
(図 3)
[220]: Hexagonal Socket Tapping Screw-P 4x20 (WG341100)
6角
穴付Pタイト
Fig. 3
(図 3)
[ A ]
[ A ]
Tweeter
(ツイータ)
Rear view
www. xiaoyu163. com
QQ 376315150
9
9
2
8
9
4
2
9
8
TEL 13942296513
9
9
2
8
9
4
2
9
8
0
5
1
5
1
3
6
7
3
Q
Q
TEL 13942296513 QQ 376315150 892498299
TEL 13942296513 QQ 376315150 892498299


