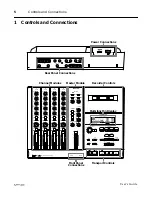
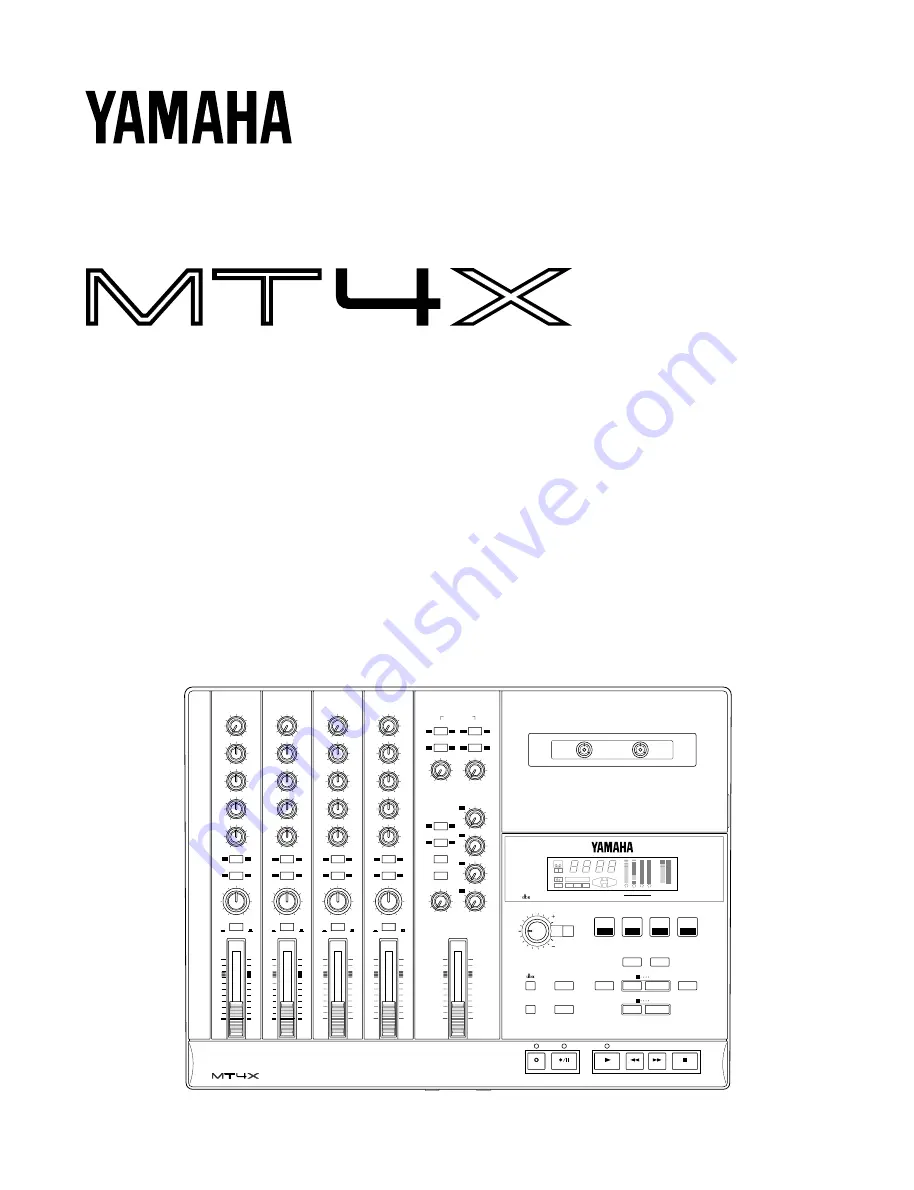
Multitrack Cassette Recorder
User’s Guide
Manuel de l’utilisateur
Bedienungsanleitung
Guía del Usuario
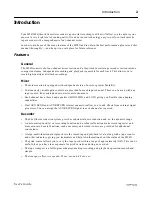
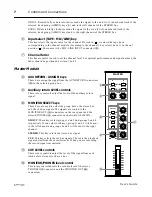
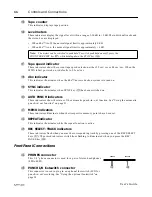
NOISE REDUCTION SYSTEM
1
2
3
4
TRACK
STEREO
STOP
FF
REW
PLAY
REC/PAUSE
REHE
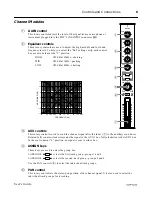
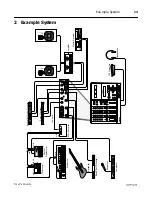
MIC/LINE
1
HIGH
GAIN
MID
LOW
AUX
PAN
1
3
2
4
LINE
MIC
-12
+12
-12
+12
-12
+12
AUX 1
AUX 2
R
EVEN
L
ODD
MIC/
LINE
TAPE
ASSIGN
C
10
9
8
7
6
5
4
3
2
1
0
MIC/LINE
2
HIGH
GAIN
MID
LOW
AUX
PAN
1
3
2
4
LINE
MIC
-12
+12
-12
+12
-12
+12
AUX 1
AUX 2
R
EVEN
L
ODD
MIC/
LINE
TAPE
ASSIGN
C
10
9
8
7
6
5
4
3
2
1
0
MIC/LINE
3
HIGH
GAIN
MID
LOW
AUX
PAN
1
3
2
4
LINE
MIC
-12
+12
-12
+12
-12
+12
AUX 1
AUX 2
R
EVEN
L
ODD
MIC/
LINE
TAPE
ASSIGN
C
10
9
8
7
6
5
4
3
2
1
0
MIC/LINE
4
HIGH
GAIN
MID
LOW
AUX
PAN
1
3
2
4
LINE
MIC
-12
+12
-12
+12
-12
+12
AUX 1
AUX 2
R
EVEN
L
ODD
MIC/
LINE
TAPE
ASSIGN
C
10
9
8
7
6
5
4
3
2
1
0
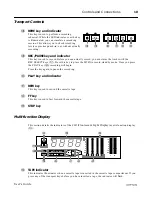
MASTER
1
2
3
4
GROUP
1
3
2
4
ASSIGN
1
3
2
4
ASSIGN
1
2
AUX RETURN
LEVEL
10
9
8
7
6
5
4
3
2
1
0
10
9
8
7
6
5
4
3
2
1
0
1
3
2
4
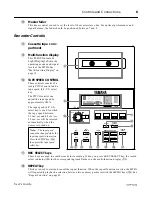
MULTITRACK CASSETTE RECORDER
0
10
0
10
0
10
0
10
0
10
0
10
MIN
MAX
CUE LEVEL
MONITOR
SELECT
STEREO
CUE
MONITOR/PHONES
TAPE
9.5 4.8
SYNC
START
IN
OUT
AUTO PUNCH
MEMO
REPEAT
1
2
+9
6
3
0
3
6
10
-20
+9
6
3
0
3
6
10
-20
REC
1
2
3
4
L
R
REC SELECT
1
2
3
4
PHONES
PUNCH I/O
TAPE SPEED CONTROL
4.8 / 9.5
PITCH
O
AUTO
PUNCH I/O
CLEAR
SYNC
CHECK
MEMO
LOCATE
1
MEMO
LOCATE
2
COUNTER
RESET
RETURN
TO ZERO
REPEAT


