background image

6

En

PREPARATION 

Part names and functions

Part names and functions

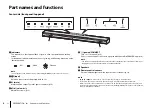
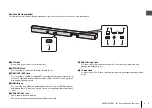
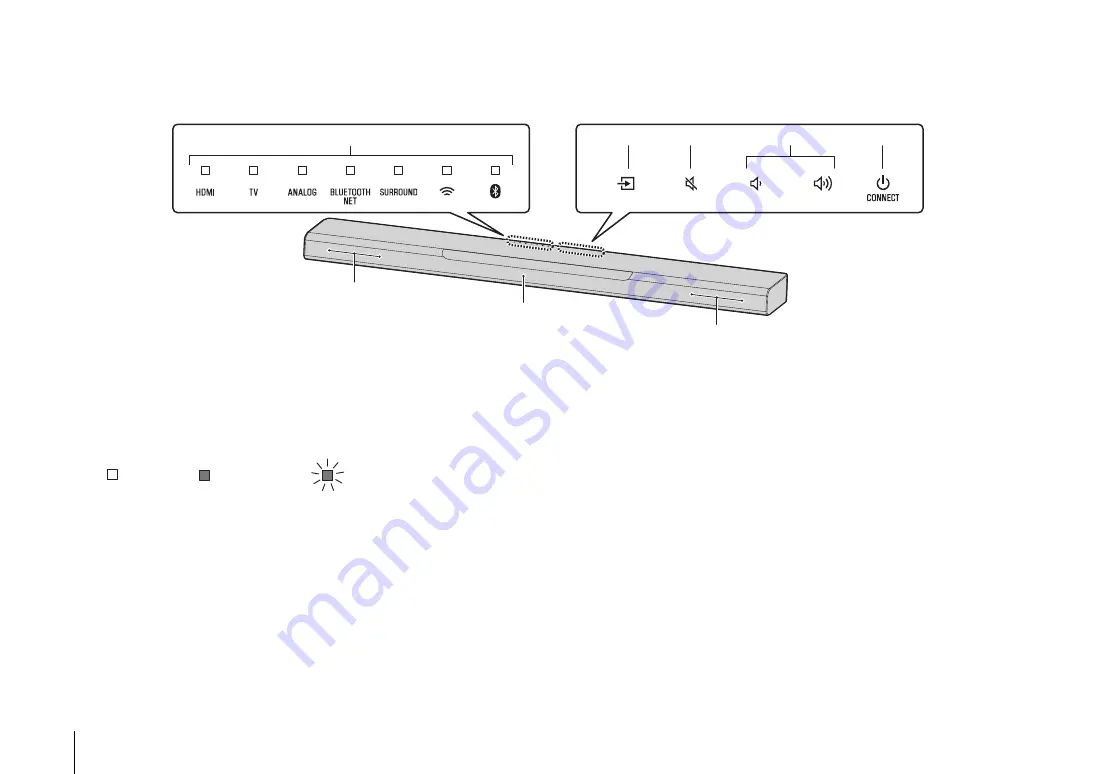
Center unit (front panel/top panel)

a

Indicators

The indicators on the top panel flash or glow, to show the operation and setting 
status.
In this manual, indicators status, such as off, glowing, and flashing, are shown as the 
illustrations below.

NOTE

• The brightness of the indicators can be changed using DIMMER on the remote control (p. 17).

b

y

 (input)

Select an input source to be played back (p. 14).

c

|

 (mute)

Mute the audio output. Touch 

|

 again to unmute (p. 15).

d

}

/

{

 (/-)

Adjust the volume (p. 15).

e

z

 (power)/CONNECT

Turn on or off the unit (p. 13).
Use to connect the unit to a network using the MusicCast CONTROLLER app (p. 19).

NOTE

• The unit may automatically turn off when the auto power standby function is enabled. For details, see 

“Setting the auto power standby function” in the Owner’s Manual.

f

Speakers

g

Remote control sensors

Receive infrared signals from the remote control of the unit (p. 13).

NOTE

b

c

d

 and 

e

 are touch sensors. Touch icons with your finger to control functions.

• Do not place any objects on the touch panel as doing so may result in unintended operations.
• When touch panel control is disabled, no operations can be performed using the unit’s touch panel. This 

prevents accidental operation of the unit. For details, see “Enabling/disabling touch panel control (child lock 
function)” in the Owner’s Manual.

g

b

c

d

e

a

f

f

: Off

: Glows

: Flashes

Summary of Contents for MusicCast BAR 400

Page 1: ...UAB Front Surround System YAS 408 Quick Start Guide EN English...

Page 2: ...ing website https download yamaha com For U S customers only Visit the following website for additional information FAQ s downloads such as Owner s Manual and product updates http usa yamaha com suppo...

Page 3: ...ideo played on a TV Features TV Playback device BD DVD player The unit Play audio from a TV or BD DVD player in surround sound Play audio from a Bluetooth device with excellent quality Play audio over...

Page 4: ...has already been inserted into the remote control Optical digital audio cable Power cord 2 DRILL HERE PERCER CIC MOUNTING TEMPLATE GABARIT DE FIXATION DRILL HERE PERCER CIC Mounting template Use when...

Page 5: ...emote control Operate the remote control within the range as shown below Battery s insulating strip Remote control sensor Within 6 m 20 ft Replacing the battery in the remote control Press and hold th...

Page 6: ...o connect the unit to a network using the MusicCast CONTROLLER app p 19 NOTE The unit may automatically turn off when the auto power standby function is enabled For details see Setting the auto power...

Page 7: ...Audio Return Channel ARC is used TV audio signal can also be input through this jack d HDMI IN jack For connecting to an HDMI compatible playback device such as a BD DVD player a satellite and cable T...

Page 8: ...AC IN jack Connect the power cord of the subwoofer p 11 c PAIRING button Use to pair the center unit with the subwoofer manually d STANDBY indicator Shows subwoofer s status p 13 e indicator Glows wh...

Page 9: ...center unit and a BD player or other device directly on each other Doing so may cause a malfunction due to vibrations Avoid touching and never place any weight or pressure on the subwoofer s speaker p...

Page 10: ...ideo connect the unit to the HDMI input jack one compatible with HDCP 2 2 on an HDCP 2 2 compliant TV and to the HDMI output jack on a HDCP 2 2 compliant BD DVD player Use a premium high speed HDMI ca...

Page 11: ...the supplied power cords to the AC IN jacks on the center unit and subwoofer respectively and plug the power cords into AC wall outlets CAUTION If volume can be adjusted on the device connected to the...

Page 12: ...nit and subwoofer are automatically connected via wireless connection Once the connection has been successfully established the indicator on the subwoofer s rear panel glows and the unit is ready for...

Page 13: ...r is flashing network settings from your iOS device an iPhone etc can be applied to the unit to connect the unit to a wireless network For details on settings see Connecting to a network using the WAC...

Page 14: ...ying content via a network see the following in the Owner s Manual Play music with AirPlay Play music stored on a media server computer or NAS Listening to Internet radio Listening to streaming servic...

Page 15: ...R VOICE button Enable disable the clear voice function When this function is enabled human voices such as lines in movies and TV shows or news and sport commentary are played clearly BASS EXTENSION bu...

Page 16: ...MI glows red DTS TV glows white AAC HDMI and TV off PCM analog input no input b Show whether Dolby Pro Logic II is enabled or disabled Dolby Pro Logic II is enabled automatically when 2 channel stereo...

Page 17: ...source has been assigned NOTE Favorites assigned to FAVORITE 1 2 or 3 using the remote control will also be assigned to MusicCast CONTROLLER app Favorites 1 2 and 3 If favorite 1 2 or 3 is changed wit...

Page 18: ...ons Should this occur change security software and or network device settings A network connection cannot be established if the MAC address filter on your router is enabled Check your router s setting...

Page 19: ...a MusicCast enabled device Install the MusicCast CONTROLLER app on your mobile device to connect the unit to a network and register it as a MusicCast enabled device NOTE Confirm that your mobile devi...

Page 20: ...the unit will be connected and enter the router s password encryption key The router s password encryption key is often noted on the router itself Refer to documentation supplied with the router for d...

Page 21: ...name and the name and photo of the room where the unit is installed can be changed later Network connection with the MusicCast CONTROLLER app is now complete and the unit has been registered as a Musi...

Page 22: ...rted content protection method SCMS T sink Radio frequency U K and Europe models 2402 MHz to 2480 MHz Maximum output power EIRP U K and Europe models 6 5 dBm 4 5 mW Network Ethernet standard 100BASE T...

Page 23: ...4 W HDMI control off network standby on Wired Wi Fi Bluetooth 1 6 1 8 1 7 W HDMI control on network standby off 0 7 W HDMI control on network standby on 2 2 W Dimensions W x H x D 980 60 110 5 mm 38 5...

Page 24: ...03 2020 KSOD B0 Manual Development Group 2018 Yamaha Corporation AV17 0268 Yamaha Global Site https www yamaha com Yamaha Downloads https download yamaha com 10 1 Nakazawa cho Naka ku Hamamatsu 430 8...

Reviews: