background image

MV800 — Owner’s Manual

Front & Rear Panels

3

q

u i

y

t

r

e

w

Channels 1-8
(Monaural)

Response [dB]

+5

+10

+15

–15

–10

–5

0

Frequency [Hz]

10k

1k

100

20k

20

+20

–20

Front & Rear Panels

Front Panel Section

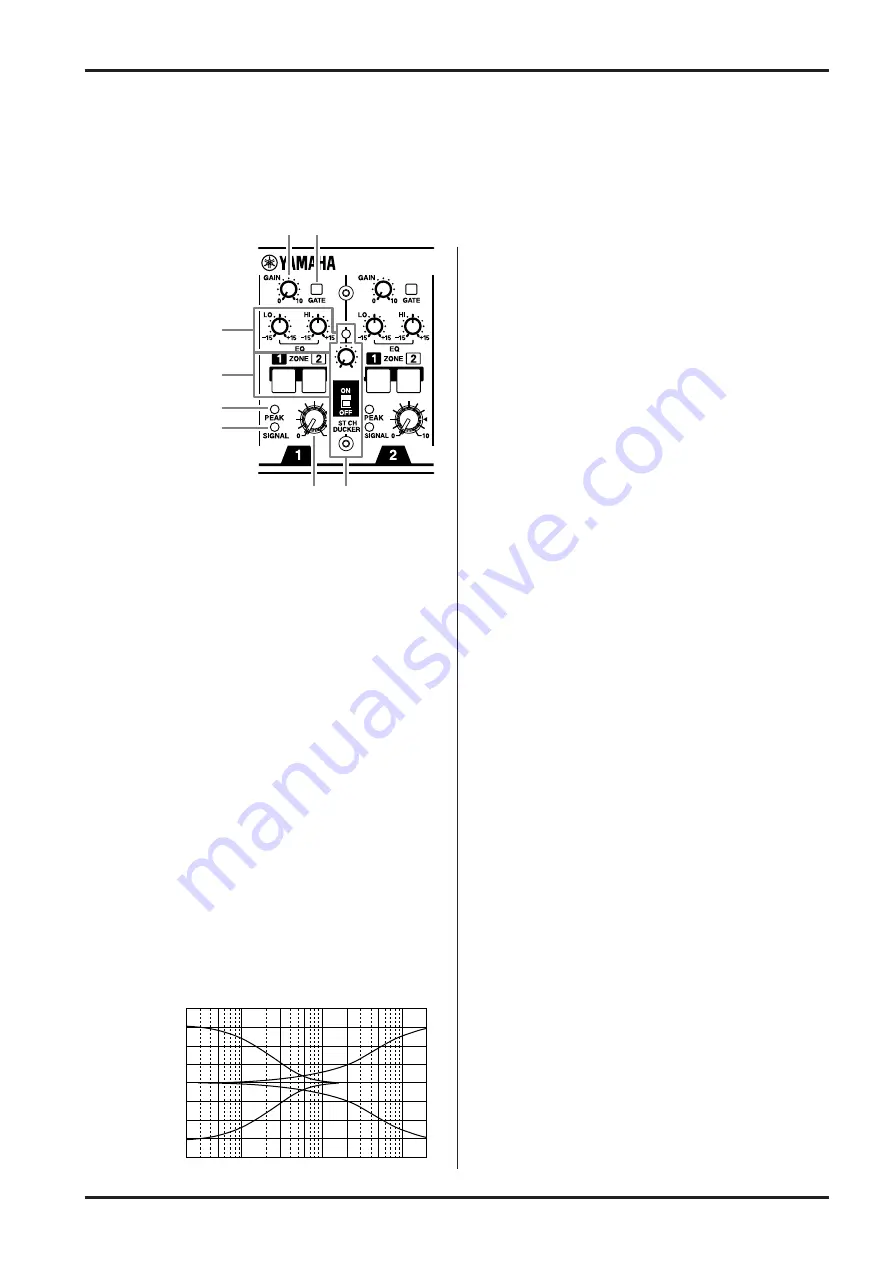
q

GAIN Control

Adjusts the input level of the signal entering the mixer to
an optimum level.
To obtain an optimum balance between the S/N ratio
and dynamic range, adjust the level so that the PEAK
Indicator 

t

 occasionally lights.

w

GATE Switch

Turns the Noise Gate ON/OFF.
When the switch is ON (

>

), the signal entering the

channel’s INPUT jack will only be allowed to pass
through the circuit when the designated level is ex-
ceeded. This function can be used to effectively eliminate
unwanted background noise (sounds that are lower than
the designated level). (Refer to page 9 for more informa-
tion.)

* To turn the switch ON/OFF, use an insulator that is smaller

than the size of the switch.

e

Equalizer

Pr/-15dB of control over high and low frequency
ranges at the center frequencies listed below.

HIGH :

10kHz (shelving)

LOW

:

100Hz (shelving)

Frequency response is flat when the knob is at its center
position.

r

ZONE Select Switch

Sends each channel’s signal to the ZONE 1 bus and/or
ZONE 2 bus.
When the switch is ON (

>

), the signal is sent to the

relative bus.

t

PEAK Indicator

The indicator detects peaks in the signal after it has
passed the EQ.
The indicator will light red when the level r17dB
to warn that clipping is imminent.

y

SIGNAL Indicator

The indicator lights when the signal’s level exceeds that
of the Noise Gate’s threshold level post EQ.
The light will go off shortly after the signal is cut.

u

Channel Volume

Controls the output level of the channel’s signal and
adjusts the volume balance between channels.

* The volume on channels not being used should be

lowered.

i

ST CH DUCKER
(Stereo Channel Ducker)

Input channels 1 and 2 are equipped with a “DUCKER
Function”.
This function automatically decreases the ST Input
signal’s volume when the signal from channel 1 or 2
exceeds the designated level. (Refer to page 9 for more
information.)

• DUCKER ON/OFF Switch

Switches the DUCKER Function ON/OFF.

• DUCKER Indicator

Lights when the DUCKER function is activated.

• DUCKER Attenuator

Sets the volume level to which the signal from the ST
input jacks will be lowered when the DUCKER
Function is operating.
Rotating the knob to the right decreases the volume.

Summary of Contents for MV800

Page 1: ...s the MV800 also offers individual control of those two zones directly from the front panel without the need to change the wiring making it an excellent mixer for banquet rooms etc In order to get the most out of your MV800 and its excellent functions and to enjoy years of trouble free use please read this Owner s Manual thor oughly before using And please keep it in a safe place for future refere...

Page 2: ...minals in your plug proceed as follows The wire which is coloured GREEN and YELLOW must be connected to the terminal in the plug which is marked by the letter E or by the safety earth symbol or coloured GREEN and YELLOW The wire which is coloured BLUE must be connected to the terminal which is marked with the letter N or coloured BLACK The wire which is coloured BROWN must be connected to the term...

Page 3: ...ssary contact your dealer Do not modify the unit Doing so is a fire and electrical shock hazard If lightning begins to occur turn off the power switch of the unit as soon as possible and unplug the power cable plug from the electrical outlet If there is a possibility of lightning do not touch the power cable plug if it is still connected Doing so may be an electrical shock hazard Cautions When rac...

Page 4: ...ctors to be connected to individual channels Equipped with two ZONE buses that include not only monaural and stereo channels but also REC OUT and OUTPUT jacks a single MV800 easily provides sound control for two rooms Separate REC OUT jacks are supplied for both ZONES 1 and 2 allowing easy recording to a tape deck Along with XLR and phone jacks Euro block connectors are also supplied for the main ...

Page 5: ... center position r ZONE Select Switch Sends each channel s signal to the ZONE 1 bus and or ZONE 2 bus When the switch is ON the signal is sent to the relative bus t PEAK Indicator The indicator detects peaks in the signal after it has passed the EQ The indicator will light red when the level reaches 17dB to warn that clipping is imminent y SIGNAL Indicator The indicator lights when the signal s le...

Page 6: ...input level Threshold level at which the compressor will function Rotating the control to the right allows the compressor to function at lower volume levels RATIO Control Sets the ratio of compression that is applied to the signal when it exceeds the threshold level Rotating the knob to the right increases the amount of compres sion When the knob is turned fully to the left the signal will not be ...

Page 7: ... L and R channels are to be mixed as a monaural signal 2 ZONE 1 TO 2 Switches Set the switch to its ON position to send the signal from ZONE 1 pre volume to ZONE 2 pre volume In this case the ZONE 1 pre volume signal will be sent to the ZONE 2 output jacks and that signal s volume can be adjusted with the ZONE 2 Volume control 3 POWER Indicator The indicator will light when the unit s power is ON ...

Page 8: ...e transformer is ungrounded MIC Compatible with 50 600Ω microphones LINE Compatible with 600Ω line level devices INSERT IN Jack INSERT OUT Jack These are input output jacks that are positioned between the noise gate and channel volume of the input channel The INSERT IN jack is a balanced phone type jack with a nominal input impedance of 0dB 600Ω The INSERT OUT jack is balanced phone type jack with...

Page 9: ...d the same signal that is sent from the ZONE OUT jacks The signal from ZONE 1 is sent to the 1L and 1R jacks while the ZONE 2 signal is sent to the 2L and 2R jacks The signal sent from these jacks is not affected by the ZONE volume controls Make recording level adjustments on the recording device Also the ZONE 1 TO 2 switch is ineffective with these jacks y ZONE OUTPUT Jacks ZONE 1 L R ZONE 2 L R ...

Page 10: ...t the wires according to the jack s pole display and turn the upper screw to the right to secure the wire 3 Connect the Euro block connector to the mixer s jack r Replace the cover and re attach it in its original location Caution Electric shock may occur if the Euro block connectors are used without the cover attached Feet Four rubber feet are supplied with the mixer According to the orientation ...

Page 11: ...en difficult to hear the speaker over the music In this case it is necessary to reduce the BGM volume raise the microphone s volume or both If so it is impossible to safely leave the mixer for any length of time In such cases the Stereo Channel Ducker Function is very useful This function automatically reduces the volume of the BGM source that is connected to the ST Input jacks A B when a signal e...

Page 12: ...araoke songs sung by the party guests A pair of headphones connected to the PHONES jack can be used to monitor the overall volume balance etc Connections ZONE 2 Assign the Karaoke room to ZONE 2 q Connect microphones to the INPUT jacks of channels 5 and 6 If a condenser microphone is used set the Input Select Switch to its MIC 48V position if a microphone other than a condenser microphone is used ...

Page 13: ...araoke Power Amp Speakers DVD Player for Karaoke Set the ZONE 1 switch to ON on CH 1 4 only ST CH DUCKER Switch ON Reverb Unit Reverb Unit Set the ZONE 2 switch to ON on CH 5 8 only Set the ZONE 1 switch to ON on ST CH only ZONE AFL Select Switch Select the zone you want to monitor Set the 1 TO 2 Switch OFF Cassette Deck for recording ZONE 1 Cassette Deck for recording ZONE 2 If necessary setup th...

Page 14: ...amp lights when a large signal is present Use the volume control on the power amp to adjust the volume delivered by the speakers If necessary setup the PAGING system Connect a pair of headphones to the PHONES jack and set the ZONE AFL Select Switch to ZONE 1 AFL to monitor the final output Setting ZONE 2 Channel 5 and 6 Settings 1 Make the following settings Channel Volume Gate Switch ON ZONE Sele...

Page 15: ...t EQ signal level exceeds that of the noise gate s threshold level Stereo input indicator PEAK red The indicator will light when the post buffer amp signal level exceeds 17dB SIGNAL green The indicator will light when the post buffer amp signal level exceeds 10dB Compressor indicator Orange When the compressor is activated the indicator will light Stereo channel ducker indicator Orange When the St...

Page 16: ...nsitivity the lowest level that will produce the nominal output level when the unit is set to maximum gain 2 XLR type connector Euro block connector phone jack TRS T Hot R Cold S Gnd balanced type 3 RCA phono jack phone jack TRS T ZONE 1 R ZONE 2 S Gnd unbalanced type 0dB 0 775Vrms 0dBV 1Vrms Output Specifications Output connectors Output Nominal Output level Connector type impedance impedance Nom...

Page 17: ...MV800 Owner s Manual Supplement 15 429 87 5 479 88 301 337 325 Units mm Dimensions ...

Page 18: ...dBV L R ST MONO ST ST M M SUM SUM INV INV REC1 OUT 10dBV L R LEVEL 6dB 0dB BA G PEAK SIGNAL CONTROL IN PAGING ON TH OFF OFF OFF OFF ON ON ON ON PAGING ON ZONE1 DUCKER ZONE2 DUCKER 0dB PAD HA PAGING MIC 60 16dB LINE 34 10dB G MIC 48V MIC LINE GAIN 60 16dB 34 10dB 48V STACK OUT 0dB SUM SUM COMP CHANNEL COMP OFF COMP BA BA OFF OFF ON ON ON RATIO TH STACK IN 0dB ZONE1 ZONE2 CV GEN ATT OFF ON OFF ON ST...

Page 19: ...MV800 Owner s Manual ...

Page 20: ...YAMAHA CORPORATION Pro Audio Digital Musical Instrument Division P O Box 3 Hamamatsu 430 8651 Japan V627640 R1 1 CP 20 NP Printed in Taiwan ...

Reviews: