Reference
Front & Rear Panels
MW8CX/MW10C Owner’s Manual
21
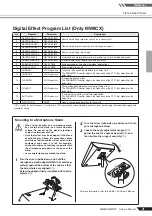
Digital Effect Program List (Only MW8CX)
* “LFO” stands for Low Frequency Oscillator. An LFO is normally used to modulate another signal, determining the modulation speed and
waveform shape.
No
Program
Parameter
Description
1
REVERB HALL 1
REVERB TIME
Reverb simulating a large space such as a concert hall.
2
REVERB HALL 2
REVERB TIME
3
REVERB ROOM 1
REVERB TIME
Reverb simulating the acoustics of a small space (room).
4
REVERB ROOM 2
REVERB TIME
5
REVERB STAGE 1
REVERB TIME
Reverb simulating a large stage.
6
REVERB STAGE 2
REVERB TIME
7
REVERB PLATE
REVERB TIME
Simulation of a metal-plate reverb unit, producing a more hard-edged sound.
8
DRUM AMBIENCE
REVERB TIME
A short reverb that is ideal for use with kick drum.
9
KARAOKE ECHO
DELAY TIME
Echo designed for karaoke (sing-along) applications.
10
VOCAL ECHO
DELAY TIME
Echo suitable for vocals.
11
CHORUS 1
LFO Frequency
Creates a thick sound by modulating the delay time.
The PARAMETER control adjusts the frequency of the LFO* that modulates the
delay time.
12
CHORUS 2
LFO Frequency
13
FLANGER
LFO Frequency
A sweeping pitched effect.
The PARAMETER control adjusts the frequency of the LFO* that modulates the
delay time.
14
PHASER
LFO Frequency
Phase modulation produces a cyclical phasing effect.
The PARAMETER control adjusts the frequency of the LFO* that modulates the
delay time.
15
AUTO WAH
LFO Frequency
A wah-wah effect with cyclical filter modulation.
The PARAMETER control adjusts the frequency of the LFO* that modulates the
delay time.
16
DISTORTION
DRIVE
Adds a sharp-edged distortion to the sound.
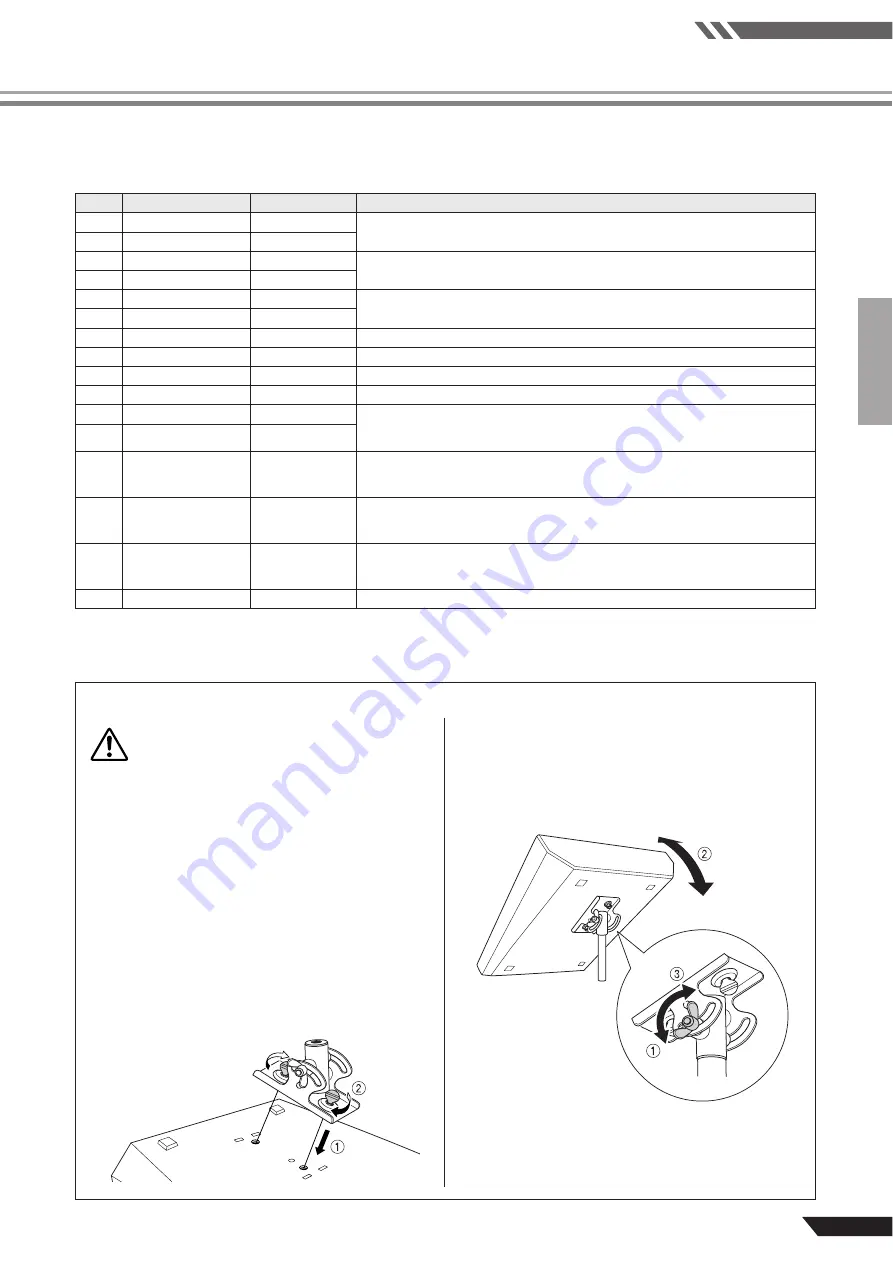
Mounting to a Microphone Stand
• When using the mixer on a microphone stand,
be sure to set the stand on a level and stable
surface. Do not set up the stand in locations
subject to vibrations or wind.
• Note that mixer may be damaged if the stand
should fall over. Attach the connection cables
carefully so that the cables will not catch on the
equipment and cause it to fall. For example:
arrange the cables so that they run parallel with
the microphone pole down to the base of the
stand.
• Leave ample free space around the stand.
1
Turn the mixer upside-down, and hold the
microphone-stand adaptor (BMS-10A; sold sep-
arately) against the bottom of the mixer so that
the screw holes are aligned (
q
).
Screw the adaptor firmly into place with the two
screws (
w
).
2
Turn the mixer right-side up, and mount it onto
your microphone stand.
3
Loosen the angle adjustment wingnut (
q
),
adjust the mixer’s angle as desired (
w
), and
then tighten the wingnut securely (
e
).
For more information, refer to the BMS-10A Owner’s Manual.
CAUTION

