8
Placing the Speakers
1
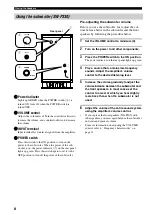
Power indicator
Lights up GREEN when the POWER
switch (
4
) is
turned ON; turns off when the POWER
switch is
turned OFF.
2
VOLUME control
Adjusts the volume level. Turn the control clockwise to
increase the volume, and counterclockwise to decrease
the volume.
3
INPUT terminal
Input terminal for line level signals from the amplifier.
4
POWER switch
Press this switch to the ON position to turn on the
power to the subwoofer. When the power of the sub-
woofer is on, the power indicator (
1
) on the rear panel
lights up green. Press this switch again to set it to the
OFF position to turn off the power of the subwoofer.
Pre-adjusting the subwoofer volume
Before you use the subwoofer, first adjust the vol-
ume balance between the subwoofer and the front
speakers by following the procedure below.
1
Set the VOLUME control to minimum (0).
2
Turn on the power to all other components.
3
Press the POWER switch to the ON position.
The power indicator on the rear panel lights up green.
4
Play a source that contains low-frequency
sounds. Adjust the amplifier’s volume
control to the desired listening level.
5
Increase the volume gradually to adjust the
volume balance between the subwoofer and
the front speakers. In most cases, set the
control to a level at which you hear slightly
more bass than when the subwoofer is not
used.
6
Adjust the volume of the entire sound system
using the amplifier’s volume control.
•
If you replace the front speakers (NX-P200) with
other speakers, you must again balance the subwoofer
and surround speaker volume.
•
For more information on adjusting the VOLUME
control, refer to “Frequency characteristics” on
page 11.
Using the subwoofer (SW-P330)
OFF
POWER
ON
VOLUME
INPUT
OFF
POWER
ON
VOLUME
INPUT
Rear panel
Summary of Contents for NS-P336
Page 1: ......


