9
N3, N2, N1, NU1
Defi nition of term
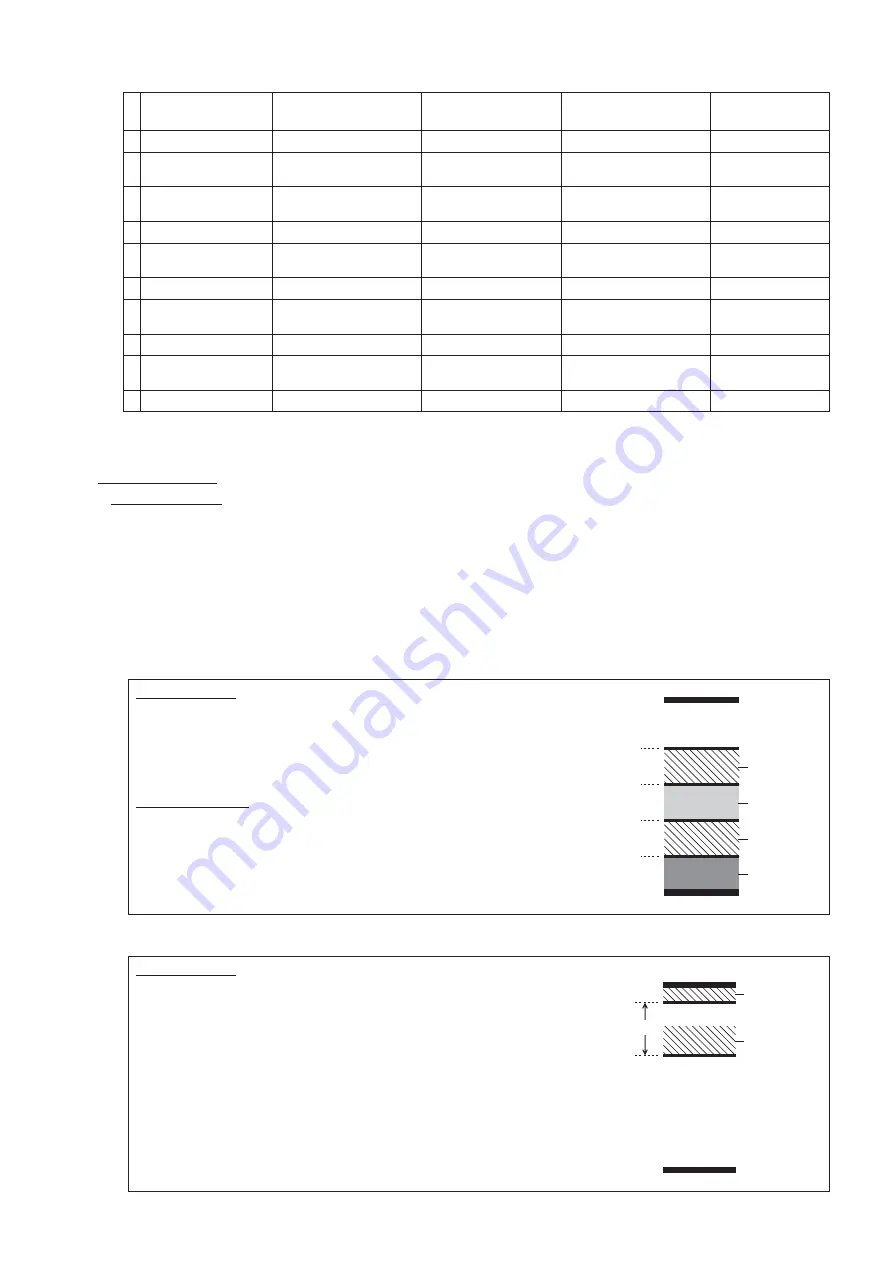
· REST
: Position when the keyboard is not pressed.
· END
: Position when the keyboard is lightly pressed to the bottom of the key.
· K1/K2/K3/K4 : Four threshold values between the REST position and END position when a key is pressed. While the value
of the END is 10 mm, the threshold values are K1 = 2.7 mm, K2 = 4.5 mm, K3 = 6.3 mm and K4 = 8.1 mm.
· M1/M2
: Two threshold values between the REST position and END position when a hammer is in motion. The
distance between the M1 and M2 is 10 mm while that between the M2 and END is 1 mm.
Startup method
N3, N2, N1: [A-1]+[B-1]+[C0]+Power ON
J
release keys after 7 seconds
NU1: [MET[[PLAY/STOP]+Power
ON
Select Test mode No. 27 with [+]/[-] and execute [PLAY/STOP]
Checking method
Check that the K1 through K4 key positions detected by the key sensor are
heard as a sine wave (A5) tone on the headphones.
Startup method
N3, N2, N1: [A-1] + [B-1] +Power ON
J
release keys after 7 seconds
Check that the M1 ON and M2 ON positions detected by the hammer sensor
are heard as a sine wave (A5) tone on the headphones.
* The NU1 has no hammer sensor unit.
10 mm
Continuous
sound
Continuous
sound
M2
END
REST
M1
Continuous
sound
Discontinuous
sound
Short-cycle
discontinuous
sound
K1 (2.7 mm)
K2 (4.5 mm)
K3 (6.3 mm)
K4 (8.1 mm)
END
(10 mm)
REST
Continuous
sound
[1 key measurement mode]
* The operating guide tones in the NU1 are generated electronically, and an operating guide appears on the panel LED screen.
* If measurement fails, then the 78[D4] and 76[C4] keys are trilled and the tone for the applicable error key is generated (*NU1: key
no. displayed).
[Key sensor test mode (N3, N2, N1, NU1)]
[Hammer sensor test mode (N3, N2, N1)]
Sensor test mode
Content
Task Description
(N3,N2,N1)
Operating guide tones
(N3,N2,N1)
Task Description
(NU1)
Screen display
(NU1)
1
Refer to start-up methods Start measurement mode
Chord; 2 taps
Start measurement mode
Displays "1Ky"
2
Do not touch anything
(sensor aging)
Let stand 30 seconds to
1 minute
Let stand 1 minute to
2 minutes
Displays "1Ky"
3
Make measurement key
setting and start measurement
Play only keys measured
Change measurement key
tone to 2 taps
Play only keys measured
Displays key no.
Set measurement key
Not necessary (Auto)
Push the [PLAY/STOP] button Change to display "rSt"
4
Measure the “rest value”
Set in state where all keys
are not up and are depressed
2 tap measurement key
tone
Set in state where all keys
are not up and are depressed
Displays "rSt"
5
Load data into RAM
Depress damper pedal 1 time Change to 3 taps
Push the [PLAY/STOP] button Change to display "En"
6
Measure the “end value”
Play measurement key to the
end value
3 taps
Play measurement key to the
end value
Displays "En"
7
Load data into RAM
Depress damper pedal 1 time Change to 1 time/2 second tone Push the [PLAY/STOP] button Change to display "n_y"
8
Save data and write into
Flash memory
Depress soft pedal 1 time
76[C] tone, sounds at
consecutive taps
Push the [PLAY/STOP] button Displays "PAS"
9
End measurement
Power OFF
Power OFF


