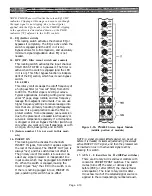
input is available at odd-numbered busses, and
the right input at even numbered busses (and, of
course, L&R in are available to the L&R stereo
bus). In L position, the right input is deactivated,
and the left input connector is available to all
group busses and the L&R sides of the stereo bus.
Similarly, in R position, the right input is avail-
able to the various busses. In L+R position, the
left and right inputs are combined to mono, and
this mono mix is then available to the various bus
outputs. (Actually, this switch also affects the
signal available to the cue and aux busses, too.)
The LED in the BAL/PAN switch is engaged
when the balance or pan function is active. When
the switch is up, the rotary control has no effect,
and a 3 dB pad is placed in line to all bus out-
puts. For a stereo pair, 3 dB of padding is the
equivalent to placing a pan control at mid posi-
tion, and thus assures that the total power
available from a pair of outputs is equal to the
power that would be available if all the signal
were panned to one output were. It means there
will be no sudden change in level if, with the pan
pot centered, you engage or disengage the BAL/
PAN switch.
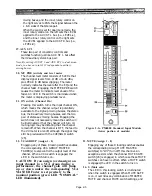
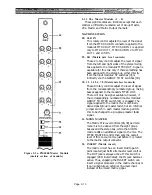
3. ST (Stereo)
This locking switch assigns the channel output
directly to the stereo bus. An LED in the switch
turns on when the signal is assigned to the stereo
bus. The left and right inputs will be routed to
the corresponding left and right sides of the
stereo bus only if the adjacent, rotary signal
selector switch [2S] is set to the ST position.
4. +48V
This switch turns phantom power on and off at
the channel’s XLR input connectors. Power can be
turned on, however, only if the MASTER PHAN-
TOM POWER switch is on. An LED in the switch
turns on when phantom power is being applied to
the channel input connector.
When both the Master and this switch are on,
+48 volts is applied to both pins 2 & 3 of the
channel input XLR connectors for remote power-
ing of condenser microphones. Although phantom
power will not harm most dynamic and other
non-phantom powered microphones or line-level
devices, connection of an unbalanced source to
the channel input could partially short the
console’s phantom supply, cause undue loading,
and induce hum. Therefore, it is a good practice
to turn off the channel’s phantom power unless it
is actually in use.
NOTE: The console’s microphone power supply is not
intended for A-B powered microphones. External sup-
plies may be used with these devices, in which case the
console’s phantom power should be turned OFF on the
appropriate channels. The optional input transformers,
if installed, do not affect phantom power operation.
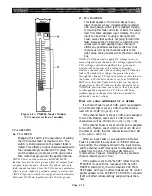
5S. GAIN
This pair of concentric rotary knobs provides
50 dB of continuously variable adjustment for the
left and right input preamplifier gain. A setting
of -70 (full clockwise rotation) provides maximum
gain for low-level mic inputs, whereas a setting of
-20 provides minimum gain for low-level line
inputs or “hot” mics. These settings provide 30 dB
less overall gain when
30
dB pad is engaged [6].
The two controls are clutched so that you can
adjust gain simultaneously for both inputs, but
you can also reduce the gain of the left input
relative to the right if you need to compensate for
inputs which vary in level. In an “emergency”
where you run short of conventional single-
channel inputs, you can use this split gain control
to accommodate two different sources, one mic-
level (right side) and one line-level (left side). Use
care, however, to avoid crosstalk if you split an
input module in this manner.
6. 30 dB (pad switch)
Engaging this pushbutton switch attenuates the
left and right input signals 30 dB and turns on an
LED in the switch. The PAD should be used in
conjunction with the GAIN controls to obtain the
precise channel sensitivity necessary for a given
source. If you’re not sure whether an input is
high line level or mic level, begin with the pad
engaged, and the GAIN controls at -20 (+10)
position. Then rotate the GAIN controls clock-
wise. If you still don’t get enough level, or if the
signal is noisy with a lot of gain, then turn down
the GAIN, disengage the pad and reset the GAIN
controls as necessary.
NOTE: By adjusting the GAIN controls, you may be able
to get the same overall level with or without the pad
engaged. Listen for noise and distortion, though; if the
signal is noisy, don’t use the pad. If there is a lot of
distortion, use the pad.
7S. L-PEAK-R
Page 2-8
This pair red LED turn on to indicate when the
signal present after the corresponding left and
right preamps is too high in level. The LEDs
trigger 3 dB below clipping, and should therefore
flash on only occasionally.
Summary of Contents for PM4000
Page 1: ...PROFESSIONAL AUDIO MIXING CONSOLE PM4000 OPERATING MANUAL YAMAHA ...
Page 2: ...PM4000 OPERATING MANUAL ...
Page 7: ...Section 1 Introduction ...
Page 11: ...Section 2 Brief Operating Instruction ...
Page 47: ...Section 3 Specifications ...
Page 51: ...Dimensional Drawings PM4000 Console all versions Page 3 4 ...
Page 52: ...Page 3 5 ...
Page 53: ...Page 3 6 PM4000 Console Rear Profiles ...
Page 54: ...Module Block Diagrams See back of the manual for overall system block diagram Page 3 7 ...
Page 55: ...Page 3 8 ...
Page 56: ...Page 3 9 ...
Page 57: ...Page 3 10 ...
Page 58: ...Page 3 11 ...
Page 59: ...Page 3 12 ...
Page 60: ...Section 4 Installation Notes ...
Page 72: ...Figure 4 13 Cables For Use With Balanced Sources Page 4 12 ...
Page 79: ...SECTION 5 Gain Structure and Levels ...
Page 82: ...Figure 5 1 Dynamic Range and Headroom in Sound Systems Page 5 3 ...
Page 86: ...Section 6 Optional Functions ...
Page 106: ...Section 7 Operating Notes and Hints ...
Page 119: ...Section 8 Applications ...
Page 127: ...Section 9 Maintenance ...
Page 131: ......
Page 132: ...YAMAHA VN02300 ...


