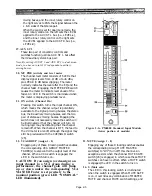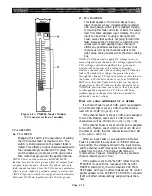
This indicators measure signal from the XLRs or
from the INSERT IN jacks, whichever are active,
as well as after the equalizer. If necessary, use
the PAD or decrease the GAIN setting to prevent
the LEDs from remaining on any longer than
momentarily; otherwise excessive distortion and
insufficient fader travel will result.
With stereo input sources, listen to ensure the
stereo balance is correct. Then adjust both GAIN
controls together; if you adjust only one of the
concentric GAIN controls to eliminate PEAK
indications, you may eliminate clipping, but you
will also disrupt the stereo program balance.
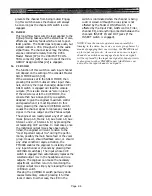
8S. Ø (Phase)
This switch reverses the polarity of pins 2 and 3
of the channel’s two XLR input connectors. In
normal position (switch button up), pin 2 is the
signal high conductor, and in reverse position
(switch engaged), pin 3 is high. An LED in the
switch is illuminated when polarity is reversed.
This function, as supplied from the factory, may
help reduce feedback. However, if the two sources
feeding a single input channel are reversed in
polarity from one another, this function will not
help you. Therefore, each PM4000 stereo input
module has an optional function that causes the
Ø switch to instead reverse the polarity of only
the left input. The switch is available on the
channel’s circuit board (see the OPTIONAL
FUNCTIONS section of this manual for details).
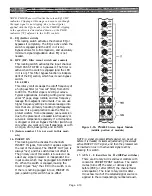
EQUALIZER
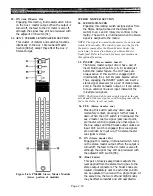
The input channel equalizer is divided into four
bands, each with sweepable filter frequencies.
The high and low bands may be switched for a
peaking or shelving type curve, whereas the high-
mid and low-mid bands are of the peaking type.
All four bands have adjustable Q, providing fully
parametric type EQ. The level (gain) is adjustable
over a range of 15 dB boost and 15 dB cut in each
band. There are actually two equalizers in the
channel, and when you adjust any of these EQ
controls, you are simultaneously affecting the left
and right sides of the channel.
9. HIGH (Peak/Shelf)
This locking switch selects peaking type EQ
(switch out) or shelving type EQ (switch en-
gaged). When the switch is engaged (shelving
mode), the adjacent Q control is not operational.
Q
This rotary control adjusts the Q (the bandwidth)
of this section of the equalizer from a very narrow
band to a very broad band, with a center detent
at a Q of 1.2.
1 ~ 20 kHz
The outer concentric knob sweeps the EQ Fre-
quency between 1,000 and 20,000 Hz.
-15 ~ +15 dB
The inner concentric knob adjusts the gain of the
set frequency band by plus or minus 15 dB. A
center detent is provided for unity gain.
10. HIGH-MID
Q
This rotary control adjusts the Q (the bandwidth)
of this section of the equalizer from a very narrow
band to a very broad band, with a center detent
at a Q of 1.2.
0.4 ~ 8 kHz
The outer concentric knob sweeps the EQ Fre-
quency between 400 Hz and 8,000 Hz.
-15 ~ +15 dB
The inner concentric knob adjusts the gain of the
set frequency band by plus or minus 15 dB. A
center detent is provided for unity gain.
11. LO-MID
Q
This rotary control adjusts the Q (the bandwidth)
of this section of the equalizer from a very narrow
band to a very broad band, with a center detent
at a Q of 1.2.
80Hz ~ 1.6 kHz
The outer concentric knob sweeps the EQ Fre-
quency between 80 Hz and 1,600 Hz.
-15 ~ +15 dB
The inner concentric knob adjusts the gain of the
set frequency band by plus or minus 15 dB. A
center detent is provided for unity gain.
12. LO (Peak/Shelf)
This locking switch selects peaking type EQ
(switch out) or shelving type EQ (switch en-
gaged). When the switch is engaged (shelving
mode), the adjacent Q control is not operational.
Q
This rotary control adjusts the Q (the bandwidth)
of this section of the equalizer from a very narrow
band to a very broad band, with a center detent
at a Q of 1.2.
30 Hz ~ 600 Hz
The outer concentric knob sweeps the EQ Fre-
quency between 30 and 600 Hz.
-15 ~ +15 dB
The inner concentric knob adjusts the gain of
the set frequency band by plus or minus 15 dB.
A center detent is provided for unity gain.
Page 2-9
Summary of Contents for PM4000
Page 1: ...PROFESSIONAL AUDIO MIXING CONSOLE PM4000 OPERATING MANUAL YAMAHA ...
Page 2: ...PM4000 OPERATING MANUAL ...
Page 7: ...Section 1 Introduction ...
Page 11: ...Section 2 Brief Operating Instruction ...
Page 47: ...Section 3 Specifications ...
Page 51: ...Dimensional Drawings PM4000 Console all versions Page 3 4 ...
Page 52: ...Page 3 5 ...
Page 53: ...Page 3 6 PM4000 Console Rear Profiles ...
Page 54: ...Module Block Diagrams See back of the manual for overall system block diagram Page 3 7 ...
Page 55: ...Page 3 8 ...
Page 56: ...Page 3 9 ...
Page 57: ...Page 3 10 ...
Page 58: ...Page 3 11 ...
Page 59: ...Page 3 12 ...
Page 60: ...Section 4 Installation Notes ...
Page 72: ...Figure 4 13 Cables For Use With Balanced Sources Page 4 12 ...
Page 79: ...SECTION 5 Gain Structure and Levels ...
Page 82: ...Figure 5 1 Dynamic Range and Headroom in Sound Systems Page 5 3 ...
Page 86: ...Section 6 Optional Functions ...
Page 106: ...Section 7 Operating Notes and Hints ...
Page 119: ...Section 8 Applications ...
Page 127: ...Section 9 Maintenance ...
Page 131: ......
Page 132: ...YAMAHA VN02300 ...

