gether, or they can be operated completely
independently if, for example, the stereo bus is
used for two discrete mono mixes.
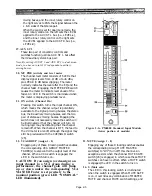
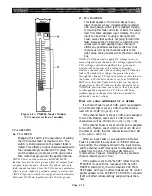
2.1.5 The TB (Talkback) Module
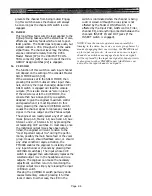
60. TB-TO-MON. B
Engaging this switch assigns the Talkback signal
to the Monitor B mix. An LED in the switch turns
on when it is assigned.
NOTE: Normally, you do not want talkback signal
assigned to monitors because if the monitoring is via
loudspeakers, this can cause feedback. Where the Moni-
tor B circuit is used for remote monitoring, you may
want to assign talkback to it. This switch provides the
flexibility to handle talkback either way.
61. ST (Stereo)
This locking switch assigns the TB/OSC output
directly to stereo mixing buss. An LED in the
switch turns on when the signal is assigned.
62. AUX 1 2 3 4 5 6 7 8
These locking switches assign the Talkback or
Oscillator signal to aux mixing busses 1 through
8. An LED in each switch turns on when the
signal is assigned to the bus.
63. AUX ST 1 & ST 2
These two locking switches assign the Talkback
or Oscillator signal to aux stereo mixing bus 1
(L&R) and bus 2 (L&R). An LED in each switch
turns on when the signal is assigned to the bus.
The TB or OSC signal is mono, and is assigned
equally to the left and right sides of the stereo
bus.
64. TB OUT
This locking switch turns the TB OUT connector
on and off. It affects only the feed to the VU
meter and the output of the talkback system
which appears at the TB OUT connector (the
output being derived from the TB input when the
TALKBACK ON switch is pressed, or otherwise
from the oscillator). This switch does not affect
any TB/OSC signal which may be switch-as-
signed to group mixing busses 1-8, the stereo bus,
the eight aux mixing busses, or the two stereo
aux mixing busses.
Figure 2-5a. PM4000 TB Module
(upper portion of module)
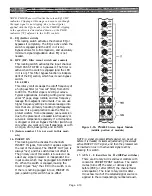
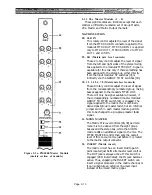
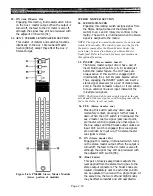
59. 1 2 3 4 5 6 7 8 (TB/OSC To Group Bus Assign)
These locking switches assign the Talkback or
Oscillator signal to group mixing busses 1
through 8. An LED in each switch turns on when
the signal is assigned to the bus.
This locking switch turns the OSC OUT connec-
tor on and off. It affects only the feed to the VU
meter and the output of the oscillator that
appears at the connector. It does not affect any
oscillator signal which may be switch-assigned to
group mixing busses 1-8, the stereo bus, the eight
aux mixing busses, or the two stereo aux mixing
busses.
66. OSC ON
Page 2-19
This red LED turns on when the oscillator is
switched on. It is a reminder to turn off the
65. OSC OUT
Summary of Contents for PM4000
Page 1: ...PROFESSIONAL AUDIO MIXING CONSOLE PM4000 OPERATING MANUAL YAMAHA ...
Page 2: ...PM4000 OPERATING MANUAL ...
Page 7: ...Section 1 Introduction ...
Page 11: ...Section 2 Brief Operating Instruction ...
Page 47: ...Section 3 Specifications ...
Page 51: ...Dimensional Drawings PM4000 Console all versions Page 3 4 ...
Page 52: ...Page 3 5 ...
Page 53: ...Page 3 6 PM4000 Console Rear Profiles ...
Page 54: ...Module Block Diagrams See back of the manual for overall system block diagram Page 3 7 ...
Page 55: ...Page 3 8 ...
Page 56: ...Page 3 9 ...
Page 57: ...Page 3 10 ...
Page 58: ...Page 3 11 ...
Page 59: ...Page 3 12 ...
Page 60: ...Section 4 Installation Notes ...
Page 72: ...Figure 4 13 Cables For Use With Balanced Sources Page 4 12 ...
Page 79: ...SECTION 5 Gain Structure and Levels ...
Page 82: ...Figure 5 1 Dynamic Range and Headroom in Sound Systems Page 5 3 ...
Page 86: ...Section 6 Optional Functions ...
Page 106: ...Section 7 Operating Notes and Hints ...
Page 119: ...Section 8 Applications ...
Page 127: ...Section 9 Maintenance ...
Page 131: ......
Page 132: ...YAMAHA VN02300 ...

