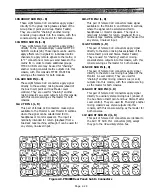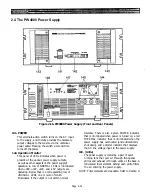
144. DC OUTPUT (Umbilical Connector)
This locking, multi-pin connector provides the
necessary DC voltages from the PW4000 power
supply to the PM4000 console. The cable must be
connected correctly before attempting to operate
the console. See Figure 2-17 for the pin
assignments.
CAUTION: Always make certain that the
PW4000 power is turned OFF prior to
connecting or disconnecting the umbili-
cal cable at the console or at the power
supply.
145. FUSES
Three main fuses and one sub fuse protect the
primary and secondary portions of the PW4000
power supply. They should be replaced only with
fuses of the same current rating and type (250 V
Slo-Blow): 3 Main Fuses @ 6 A; Sub Fuse @ 3A.
NOTE: Internal fuses in the PW4000 are also present,
but should not normally blow. These are for service by
qualified service personnel only.
2 -19V
3 FRAME GND
4 -19V
5 -19V
6 FRAME GND
7 FRAME GND
8 +19V
9 +19V
10 ±19V GND
11 ±19V GND
12 +12V GND
13 +19V
14
+19V
16 ±19V GND
17 +12V GND
18 +12V GND
1 9 PM CAUTION (+)
20 +48V
21 +48V GND
22 +12V
23 +12V
24 PW CAUTION (-)
25 NC
26 N C
27 +12V
146. (Power Cord)
This power cable connects the PW4000 to the AC
power mains. A grounded (3-wire) outlet of at least
15 amperes capacity should be used.
147. LINE VOLTAGE INDICATOR (Switch)
When this slide switch is in the ON position, the
front-panel digital indicator (142) will display
the line voltage regardless of the position of the
POWER switch (141).
CABLE END (MALE)
PIN Nº FUNCTION PIN Nº FUNCTION
1 -19V 15
±19V GND
Figure 2-17. PW4000 Umbilical Connector
Pin Assignments
Page 2-35
Summary of Contents for PM4000
Page 1: ...PROFESSIONAL AUDIO MIXING CONSOLE PM4000 OPERATING MANUAL YAMAHA ...
Page 2: ...PM4000 OPERATING MANUAL ...
Page 7: ...Section 1 Introduction ...
Page 11: ...Section 2 Brief Operating Instruction ...
Page 47: ...Section 3 Specifications ...
Page 51: ...Dimensional Drawings PM4000 Console all versions Page 3 4 ...
Page 52: ...Page 3 5 ...
Page 53: ...Page 3 6 PM4000 Console Rear Profiles ...
Page 54: ...Module Block Diagrams See back of the manual for overall system block diagram Page 3 7 ...
Page 55: ...Page 3 8 ...
Page 56: ...Page 3 9 ...
Page 57: ...Page 3 10 ...
Page 58: ...Page 3 11 ...
Page 59: ...Page 3 12 ...
Page 60: ...Section 4 Installation Notes ...
Page 72: ...Figure 4 13 Cables For Use With Balanced Sources Page 4 12 ...
Page 79: ...SECTION 5 Gain Structure and Levels ...
Page 82: ...Figure 5 1 Dynamic Range and Headroom in Sound Systems Page 5 3 ...
Page 86: ...Section 6 Optional Functions ...
Page 106: ...Section 7 Operating Notes and Hints ...
Page 119: ...Section 8 Applications ...
Page 127: ...Section 9 Maintenance ...
Page 131: ......
Page 132: ...YAMAHA VN02300 ...


