background image

37

Grade

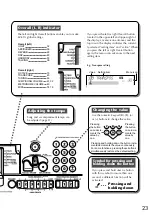
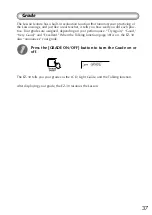
The Lesson feature has a built-in evaluation function that monitors your practicing of 
the Lesson songs, and just like a real teacher, it tells you how well you did each prac-
tice. Four grades are assigned, depending on your performance: “Try Again,” “Good,” 
“Very Good,” and “Excellent.” When the Talking function (page 38) is on, the EZ-30 
also “announces” your grade.

Press the [GRADE ON/OFF] button to turn the Grade on or 
off.

The EZ-30 tells you your grade via the LCD, Light Guide, and the Talking function.

After displaying your grade, the EZ-30 resumes the Lesson.

Summary of Contents for PortaTone EZ-30

Page 1: ...Owner s Manual ...

Page 2: ...disposal of products that contain lead batteries plastics etc If your dealer is unable to assist you please contact Yamaha directly NAME PLATE LOCATION The name plate is located on the bottom of the product The model number serial number power requirements etc are located on this plate You should record the model number serial number and the date of purchase in the spaces provided below and retain...

Page 3: ...attery fluid Keep batteries away from children If the batteries do leak avoid contact with the leaked fluid If the battery fluid should come in contact with your eyes mouth or skin wash immediately with water and consult a doctor Battery fluid is corrosive and may possibly cause loss of sight or chemi cal burns Before connecting the instrument to other electronic compo nents turn off the power for...

Page 4: ...cher Select from any one of 100 songs on the EZ 30 and learn the left and right hand parts independently at first then together Lesson features three easy steps that help you master each song Timing Waiting and Minus One Grade Talking pages 37 and 38 The EZ 30 also has the Grade and Talking features Grade is a virtual teacher evaluating your practice sessions and rating your performance The conven...

Page 5: ...various high quality voices including 480 Expanded voices with a maximum polyphony of 32 voices High quality Reverb DSP and Harmony effects for enhancing the sound of the voices and your performance 106 auto accompaniment styles each with Intro Main A and B and Ending sec tions An Auto Fill function adds dynamic fills when switching sections Powerful easy to use song recording operations for recor...

Page 6: ...g 28 Listening to a Flash Song 29 Switching the Tracks On and Off 29 Melody Voice Change 30 Adjusting the Tempo 31 Tap Function 31 Song Volume Level 32 Switching the Light Guide On and Off 32 Song Lesson 34 Using the Lesson Feature 34 ABC DoReMi Guide 36 Grade 37 Talking 38 Portable Grand 39 Using the Metronome 39 Setting a Tempo 39 Setting the Time Signature of the Metronome 40 Adjusting the Metr...

Page 7: ... Loading a Song into Flash Memory 71 Installing Song Filer 71 Song Filer s Functions 72 Octave 73 Available Flash Memory Amount74 Flash Clear 74 MIDI Functions 75 What is MIDI 75 Available MIDI Funcitons 77 Connecting to a Personal Com puter 78 Local Control 79 Using Bulk Dump Send to Save Data 80 Transmitting the EZ 30 Panel Settings Initial Send 81 Transmitting SMF Format Data 82 Troubleshooting...

Page 8: ...alent batteries as shown in the illustration making sure that the positive and negative termi nals are properly aligned 3 Replace the lid Replace the batteries before they completely discharge If the battery voltage gets low the volume level may be reduced sound integrity may deteriorate the display indicators may disappear or the stored data may be deleted If any of these events occur replace the...

Page 9: ...ontrols while playing the instrument to set the desired listening level This feature lets you use an optional foot switch Yamaha FC4 or FC5 to sustain the sound of the voices The footswitch func tions the same way as a damper pedal on an acoustic piano press and hold down the footswitch as you play the keyboard to sus tain the sound Make sure that the footswitch plug is properly connected to the S...

Page 10: ...E button 39 A ABC DoReMi button 43 B Numeric keypad YES and NO buttons 25 C ACMP ON OFF GRADE ON OFF button 52 37 D REW button 29 E SYNC STOP FF button 52 29 F SYNC START LESSON 1 button52 35 G INTRO ENDING LESSON 2 button 62 35 H MAIN AUTO FILL LESSON 3 button 62 35 I STYLE button 51 J SONG button 28 K START STOP button 29 L VOICE button 42 M RECORD button 67 N SONG MEMORY buttons 67 O REGISTRATI...

Page 11: ...11 P Q R S 7 8 9 0 A B M N O J K L ...

Page 12: ...s complete the subsequent songs 002 003 start playing sequentially If you have loaded songs into flash memory they are the first to play 2 Stop the Demo song Want to find out more See page 28 If you do not wish to play the Demo songs when you press the DEMO button turn on the power to the EZ 30 while pressing and holding down the DEMO button To activate the Demo playback function turn on the power...

Page 13: ...ng 38 Symphonie Nr 9 39 Song Of The Pearl Fisher 40 Gavotte 41 String Quartet No 17 2nd Mov Serenade 42 Menuett 43 Canon 44 The Danube Waves 45 From The Magic Flute 46 Piano Sonate Op 27 2 Mondschein 47 The Surprise Symphony 48 To A Wild Rose 49 Air de Toréador Carmen 50 O Mio Babbino Caro From Gianni Schicchi 51 Im Mai DUET No Song Name 52 O Christmas Tree DUET 53 Mary Had A Little Lamb DUET 54 T...

Page 14: ...t 1 Select Timing Waiting or Minus One and start the lesson When the power of the EZ 30 is turned on the song of 003 Linus And Lucy and the right hand part are selected Lesson 1 Timing This step lets you work on the timing of the notes In Lesson 1 the particular note you play on the keyboard is unimportant The EZ 30 checks your timing and how rhythmically tight your playing is 2 1 ...

Page 15: ...s playing in tempo 2 When you re finished stop the Lesson Want to find out more See page 34 The EZ 30 has a built in evaluation function that monitors your practicing and like a real teacher tells you how well you did each practice Four grades are assigned depending on your performance Try Again Good Very Good and Excellent Want to find out more See page 37 This feature talks to you through the sp...

Page 16: ... automati cally reset the entire EZ 30 for piano play 1 Press the PORTABLE GRAND button The song and style are also set for piano performance 2 Play the keyboard Want to find out more See page 39 Playing along with the Metronome 1 Press the METRONOME button Want to find out more See page 39 2 1 1 1 1 ...

Page 17: ...he ABC DoReMi again 2 Play the keyboard Want to find out more See page 43 Selecting and Playing Other Voices The EZ 30 has a huge total of 610 dynamic and realistic instrument voices Let s try a few of them out now 1 Press the VOICE button 2 Select a voice 3 Play the keyboard Want to find out more See page 42 ABC DoReMi Off ...

Page 18: ... melodies and you ll sound like an entire band For more information on playing proper chords for the auto accompaniment see Using Auto Accompaniment Multi Finger ing on page 55 and Looking up Chords in the dictionary on page 58 1 Press the STYLE button 2 Select a style Refer to the Style List on page 90 7 1 3 4 2 6 Left hand Right hand Auto accompaniment for example bass guitar drums Melody Accomp...

Page 19: ...ay a chord with your left hand The auto accompaniment starts as soon as you play the keyboard Want to find out more See page 55 6 Select a section The auto accompaniment has four sections Intro Main A B and Ending 7 Stop the auto accompaniment Want to find out more See page 51 ...

Page 20: ...ionary function teaches you how to play chords by showing you the individual notes In the example below we ll learn how to play a GM7 chord 1 Press the Dict button 15 Keys for entering the chord type C3 B4 Keys for entering the chord root C5 B5 Chord detection key range C1 B2 G M7 Root note Chord type Example ...

Page 21: ... type of the chord in this case M7 4 Play the chord by pressing the keys lighted up The chord name flashes and a congratulations melody is played when the chord is played properly 5 To leave the Dictionary function press the Dict button again Want to find out more See page 58 ...

Page 22: ...clock wise lowers the volume level Rotating the dial clockwise raises the volume level Even when the STANDBY ON switch is in the STANDBY position electricity still flows through the instrument at the minimum level When you plan not to use the EZ 30 for a long period of time make sure you unplug the AC power adaptor from the wall AC outlet and or remove the batteries from the instrument Panel Displ...

Page 23: ... holding down the button incre ments decrements the value continuously For some functions pressing these buttons simultaneously restores the default setting Overall L R indicator The left and right Overall buttons enable you to make EZ 30 s global settings If you press the left or right Overall button located in the upper left and upper right of the display a menu icon advances and the top row in ...

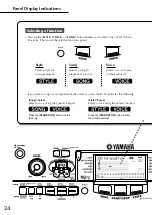
Page 24: ...f the selected function appears Song Selects a song for playback or practice Style Select a style for accompaniment Voice Selects a voice to play on the keyboard If you select a song or accompaniment then select a voice the EZ 30 indicates the following Press the START STOP button to start the song Press the START STOP button to start the accompaniment Style Voice Select a voice using the numeric ...

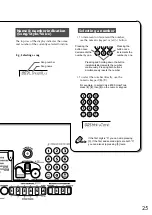
Page 25: ...e number directly use the numeric keypad 0 9 For example to select Voice 005 HnkyTonk press 0 0 then 5 on the numeric keypad If the first digit is 0 you can skip pressing 0 If the first and second digits are both 0 you can also skip pressing 0 twice Pressing the button once increments the number by one Pressing the button once decrements the number by one Pressing and holding down the button incre...

Page 26: ...setting ABC or DoReMi for the Lesson function Accompaniment On indicator This appears when the auto accompaniment has been turned on Low battery indicator This appears when the battery voltage is getting low Song track ON OFF indicators Song track DATA indicators Song track GUIDE indicators A frame appears around the number of a track that uses the right hand left hand guide function They indicate...

Page 27: ...may not be displayed Measure indicator Beat indicators The measure numbers of a song or accompaniment are displayed If you select a free tempo song F t appears Four arrows flash to indicate the beat of a song or accompaniment Octave indicator Chord indicator Fingering guide During the Lesson this guide suggests a fingering for playing the song This indicator indicates the name of the currently pla...

Page 28: ...nd holding down the DEMO button will disable the Demo song playback function To enable the Demo song playback turn the power on in the normal manner If a song or songs has been loaded into flash memory the Flash song s starts playing first Press the START STOP button or the DEMO button to stop Demo playback Selecting and Playing a Song Press the SONG button Select the desired song number Use the n...

Page 29: ...tively and switch tracks 6 16 on and off altogether using the A button This is useful when you practice playing a certain track by switching that track off the track sound will be muted A song contains the following tracks Tracks 1 5 Each track can be switched on and off individually Tracks 6 16 Tracks 6 16 can be switched on and off altogether Other controls FF button Pressing this button during ...

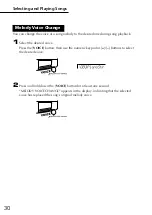
Page 30: ...lect the desired voice Press the VOICE button then use the numeric keypad or buttons to select the desired voice 2 Press and hold down the VOICE button for at least one second MELODY VOICE CHANGE appears in the display indicating that the selected voice has replaced the song s original melody voice Melody Voice Change ...

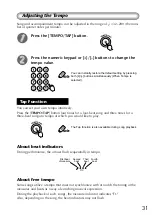
Page 31: ...imes for a four beat song and three times for a three beat song at a tempo at which you would like to play The Tap function is also available during song playback About beat indicators During performance the arrows flash sequentially in tempo About free tempo Some songs utilize a tempo that does not synchronize with or match the timing of the measures and beats as a way of enriching musical expres...

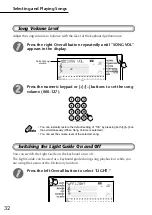
Page 32: ...0 127 You can instantly restore the default setting of 100 by pressing both but tons simultaneously When Song Volume is selected You can set the volume level of the selected song Switching the Light Guide On and Off You can switch the Light Guide on the keyboard on or off The Light Guide can be used as a keyboard guide during song playback or while you are using the Lesson or the Dictionary functi...

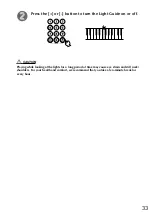
Page 33: ... the Light Guide on or off CAUTION Playing while looking at the lights for a long period of time may cause eye strain and stiff neck shoulders For your health and comfort we recommend that you take a ten minute break for every hour ...

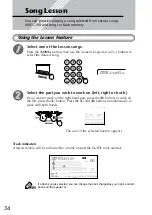
Page 34: ...ect the part you wish to work on left right or both If you want to work on the right hand part press the R button to work on the left press the L button Press the L and R buttons simultaneously to work with both hands The icon of the selected hand s appears Track indicators A lesson track s will be indicated by a frame around the GUIDE track number If a flash song is selected you can change the tr...

Page 35: ...Lesson Press one of the following buttons to select and start a type of Lesson Lesson 1 Timing This lesson step lets you practice just the timing of the notes any note can be used The mel ody does not sound unless you play in rhythm Lesson 2 Waiting In this lesson step the EZ 30 waits for you to play the correct notes before continuing play back of the song When you play the correct note the next ...

Page 36: ...ted the EZ 30 sings the next note to play using A B C or Do Re Mi in Lesson 2 For instruction on changing the guide voice ABC or DoReMi see page 43 Press the left Overall button repeatedly to select ABC DoReMi Press the or button to turn the ABC DoReMi Guide on or off ...

Page 37: ...h prac tice Four grades are assigned depending on your performance Try Again Good Very Good and Excellent When the Talking function page 38 is on the EZ 30 also announces your grade Press the GRADE ON OFF button to turn the Grade on or off The EZ 30 tells you your grade via the LCD Light Guide and the Talking function After displaying your grade the EZ 30 resumes the Lesson ...

Page 38: ...s the titles of the Lesson steps and the names of certain functions Press the left Overall button repeatedly to select TALKING Press the buttons to set Talking to on or off The Talking function includes the following announcements Dictionary LESSON 1 3 Try Again Good Very Good Excellent Talking off Talking on ...

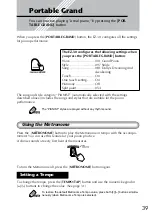
Page 39: ... the Metronome in tempo with the accompa niment You can use this feature for your piano practice A chime sounds at every first beat of the measures To turn the Metronome off press the METRONOME button again To change the tempo press the TEMPO TAP button and use the numeric keypad or buttons to change the value See page 31 To restore the default Metronome Tempo value press both buttons simulta neou...

Page 40: ...f the Metronome also changes to that of the selected style or song You can adjust the volume of the Metronome sound independently of the other EZ 30 sounds The volume range is 000 127 1 Press the right Overall button repeatedly to select METRONOME VOLUME Setting the Time Signature of the Metronome Numeric keypad Time signature 0 A chime does not sound 1 1 4 A chime sounds on every beat 2 2 4 3 3 4...

Page 41: ...s the numeric keypad or buttons to set the desired Metronome Volume value To restore the default Metronome Volume value 100 press both buttons simultaneously when Metronome Volume is selected in the Overall menu ...

Page 42: ...he keyboard and another voice is assigned to the left side Drum kit 117 128 Playing different keys on the keyboard produces different drum sounds ABC Oboe voice 609 DoReMi Oboe voice 610 When you play the keyboard the EZ 30 sings the corresponding notes using ABC or DoReMi If the Transpose value is adjusted other than 00 they sound using Oboe voice Playing a Voice Press the VOICE button Select the...

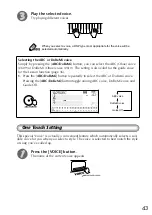
Page 43: ...cted to best match the style or song you ve called up Press the VOICE button The name of the current voice appears Selecting the ABC or DoReMi voice Simply by pressing the ABC DoReMi button you can select the ABC Oboe voice 609 or DoReMi Oboe voice 610 The setting is also valid for the guide voice for the Lesson function page 36 1 Press the ABC DoReMi button repeatedly to select the ABC or DoRemi ...

Page 44: ...fferent voice on the right and left sides of the split point on the keyboard To restore the default setting of 54F 2 press both buttons simultaneously Press the numeric keypad or buttons to change the split point 54F 2 means that the left side of the keyboard ranges up to F 2 Split point for auto accompaniment The split point for the auto accompaniment the border between the melody key range and t...

Page 45: ...r buttons to set the desired Transpose value 12 12 To transpose the pitch down simultaneously press and hold the button and use the numeric keypad to type in the negative value You can instantly restore the default setting of 00 by pressing both but tons simultaneously when Transpose is selected The Transpose function has no effect on the Drum Kits voices 117 128 If the Transpose value is adjusted...

Page 46: ...all button repeatedly to select TUNING Press the numeric keypad or buttons to set the desired Tuning value 100 100 To tune the pitch down simultaneously press and hold the button and use the numeric keypad to type in the negative value You can instantly restore the default setting of 000 by pressing both but tons simultaneously when Tuning is selected The Tuning settings have no effect on the Drum...

Page 47: ... how strongly you play the keys Select the Touch Sensitivity control Press and hold the TOUCH button for more than one second to display the Touch Sensitivity setting Change the value Use the numeric keypad or buttons to set the desired setting 1 2 or 3 Settings The default Touch Sensitivity is 2 1 Soft This results in limited touch response and produces a rel atively narrow dynamic range no matte...

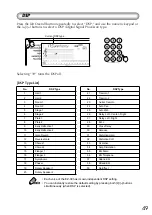
Page 48: ... Selecting 9 turns the Reverb off Reverb Type List No Reverb Type Each style of the EZ 30 has its own indepen dent Reverb setting You can instantly restore the default setting by pressing both buttons simulta neously when Reverb is selected 1 Hall 1 2 Hall 2 3 Room 1 4 Room 2 5 Stage 1 6 Stage 2 7 Plate 1 8 Plate 2 9 Off Current Reverb type ...

Page 49: ... No DSP Type 1 Hall 1 21 Tremolo 1 2 Hall 2 22 Tremolo 2 3 Room 1 23 Guitar Tremolo 4 Room 2 24 Auto Pan 5 Stage 1 25 Auto Wah 6 Stage 2 26 Delay Left Center Right 7 Plate 1 27 Delay Left Right 8 Plate 2 28 Echo 9 Early Reflection 1 29 Cross Delay 10 Early Reflection 2 30 Karaoke 11 Gate Reverb 31 Distortion Hard 12 Reverse Gate 32 Distortion Soft 13 Chorus 1 33 Overdrive 14 Chorus 2 34 Amp Simula...

Page 50: ... Types see page 97 Harmony is added to only one note If you play multiple keys harmony notes are added based on the highest note or the last note you played The Harmony function is disabled when you use the Dictionary function or the Lesson function You can instantly restore the default setting by pressing both buttons simultaneously when Harmony is selected No Harmony Type No Harmony Type 1 Duet ...

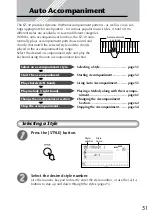
Page 51: ...nd play the keyboard using the auto accompaniment function Selecting a Style page 51 Starting Accompaniment page 52 Using Auto Accompaniment page 55 Playing a Melody along with the Accompa niment page 61 Changing the Accompaniment Section page 62 Stopping the Accompaniment page 54 Selecting a Style Press the STYLE button Select the desired style number Use the numeric keypad to directly enter the ...

Page 52: ...niment key range the accompaniment starts playing To cancel Sync start waiting mode press the SYNC START button again At this time playing a chord in the accompaniment key range will produce bass sounds and chords without a rhythm section Sync start Sync stop When you press the SYNC STOP button the EZ 30 enters Sync start mode When you release keys in the accompaniment key range the accompaniment ...

Page 53: ... TEMPO TAP button four times for a four beat song and three times for a three beat song at a tempo at which you would like to play The rhythm part starts playing Start Tap start Intro Sync start Press the SYNC START button The EZ 30 enters Sync start waiting mode and the beat indicators flash Then press the INTRO ENDING button The EZ 30 waits for the sync start that begins with an Intro section Wh...

Page 54: ... stopped or Voice 000 is selected selecting an accom paniment style automatically sets a tempo suitable for the accompaniment If any voice other than Voice 000 is selected changing the accompaniment during playback will not automatically change the tempo You can instantly restore the default setting by pressing both buttons simultaneously when Tempo is selected Press the START STOP button The acco...

Page 55: ...ndicate and then automatically generates the accompaniment Chords that can be produced in Single Finger operation are major minor seventh and minor seventh The illustration shows how to produce the four chord types The key of C is used here as an example other keys follow the same rules For example Bb7 is played as Bb and A A root key and keys you play Single Finger Chords C To play a major chord ...

Page 56: ...h add sharp eleventh M7 11 1 2 3 4 5 7 or 1 2 3 4 5 7 CM7 11 CM7 11 Flatted fifth b5 1 3 b5 C b5 Cb5 Major seventh flatted fifth M7b5 1 3 b5 7 CM7b5 CM7b5 Suspended fourth sus4 1 4 5 Csus4 Csus4 Augmented aug 1 3 5 Caug Caug Major seventh augmented M7aug 1 3 5 7 CM7aug CM7aug Minor m 1 b3 5 Cm Cm Minor add ninth m 9 1 2 b3 5 Cm 9 Cm 9 Minor sixth m6 1 b3 5 6 Cm6 Cm6 Minor seventh m7 1 b3 5 b7 Cm7 ...

Page 57: ... accompaniment function is the same as that for the split voices See page 44 Minor major seventh mM7 1 b3 5 7 CmM7 CmM7 Minor major seventh ninth mM7 9 1 2 b3 5 7 CmM7 9 CmM7 9 Minor seventh flatted fifth m7b5 1 b3 b5 b7 Cm7b5 Cm7b5 Minor major seventh flatted fifth mM7b5 1 b3 b5 7 CmM7b5 CmM7b5 Diminished dim 1 b3 b5 Cdim Cdim Diminished seventh dim7 1 b3 b5 6 Cdim7 Cdim7 Seventh 7 1 3 5 b7 or 1 ...

Page 58: ...pecify the root of the chord Press the key on the keyboard that corresponds to the desired chord root as printed on the panel Pressing this key selects the root G Specify the type of the chord major minor seventh etc Press the key on the keyboard that corresponds to the desired chord type as printed on the panel In this example play M7 keys Usually a Major chord name is represented by a root note ...

Page 59: ...ecause it anchors the sound harmonically by determining its key and forms the basis for how we hear the other notes of the chord The second note of this chord is four semitones higher than the first and the third is three semitones higher than the second Keeping our root note fixed and changing these notes by a semitone up or down sharp or flat we can create four different chords Keep in mind that...

Page 60: ...on top of each other and the stacked notes are indicated in the chord name of the chord type as a number the number being the distance of the note from the root See the keyboard dia gram below For example the minor 6th chord includes the 6th note of the scale the major 7th chord has the 7th note of the scale etc The Intervals of the Scale To better understand the intervals and the numbers used to ...

Page 61: ...uttons to set the desired Accompaniment Volume value 000 127 You can instantly restore the default setting of 100 by pressing both but tons simultaneously when Accompaniment Volume is selected Accompaniment Volume cannot be changed unless the Style mode is active Adjusting the Accompaniment Volume Accompaniment key range While playing different chords with your left hand Play a melody with your ri...

Page 62: ...fore pressing the START STOP button to spec ify the Main section that follows the Intro section To cancel the Intro section press the INTRO ENDING button again The display indi cates the Main section A or B that will be played when the song starts There are two Main sections A and B When you press the MAIN AUTO FILL but ton the EZ 30 plays the Fill in pattern then changes to another variation You ...

Page 63: ...tton during the Ending section the song gets slower little by little and then stops 1 2 3 4 1 2 3 4 1 2 3 1st measure 2nd measure 3rd measure Beat and the Main A or B section begins here If you press the MAIN AUTO FILL button before beat 4 a fill in pattern plays immediately until the end of the measure and the Main A or B section begins here If you press the MAIN AUTO FILL button here after beat ...

Page 64: ...a total of sixteen Make all desired settings for the EZ 30 Virtually all of the EZ 30 s settings can be saved to a Registration Memory button Select the desired bank Press the BANK button then press the desired bank number 1 8 Each of the sixteen Registration Memory can have different settings for the following parameters Voice number Accompaniment On Off Split Point MAIN A B Split On Off Accompan...

Page 65: ...hich data has already been recorded the existing data will be overwritten and deleted Recalling a Registration Memory Preset Select the appropriate Registration Memory bank If you recall settings from a Registration Memory preset the current panel set tings will be lost Save important panel settings to another Registration Memory preset Press the desired Registration Memory preset button 1 or 2 Ba...

Page 66: ...verb Type DSP Type Sustain Tempo Time Signature if no data is recorded in the accompaniment track Data that can be recorded to the accompaniment track Chord changes and timing Changing sections Intro Main A B etc Style number Accompaniment Volume Reverb Type DSP Type Tempo Time Signature These settings can only be recorded once at the beginning of a song other settings can be changed in the middle...

Page 67: ...ssing and holding down the RECORD button press the desired SONG MEMORY button 1 5 and A button Keep in mind that all recording operations replace the data In other words if you record to a track that already has recorded data all pre vious data in the track will be erased and replaced by the newly recorded data If you select the accompaniment track for recording the auto accompaniment function is ...

Page 68: ...ng track indicator The track indicator is turned off Start recording You can start recording simply by playing the keyboard or by pressing the START STOP button The current measure number is indicated on the display during recording Stop recording After you ve finished playing the part press the START STOP or RECORD button When you press the INTRO ENDING button while recording the accompa niment t...

Page 69: ... a song while leaving the other tracks intact use the Track Clear operation page 70 1 Select the desired song Press the SONG button then use the numeric keypad or buttons to select the desired song 201 205 2 While holding down the A button press SONG MEMORY button 1 All track indications in the display flash indicating that all tracks are to be erased 3 Press the YES button 4 At the Sure prompt pr...

Page 70: ... numeric keypad or buttons to select the desired song 201 205 2 Press and hold down the button corresponding to the track to be erased Press and hold down the appropriate SONG MEMORY button 1 5 A for at least one second 3 Press the YES button 4 At the Sure prompt press the YES button or press the NO button to abort Pressing the YES button executes the Track Clear operation Pressing the NO button a...

Page 71: ...r has an Internet connection Yamaha PK CLUB Portable Keyboard Home Page http www yamahaPKclub com Visit the Yamaha PK CLUB website for more information on the latest version of Song Filer and the installation method Song data that can be saved in flash memory The number of songs max 99 songs Song 101 Available memory 488 KB Data format SMF System requirements for Song Filer Windows OS Windows 95 9...

Page 72: ...a computer You cannot use the Song Filer s Receive Files function with the EZ 30 For more information on using Song Filer refer to the PDF manual included in the Song Filer application Transmit Files You can transmit song files from your computer to your EZ 30 s Flash Memory Manage Files on Flash Memory You can delete and rename files on your EZ 30 s Flash Memory using your computer EZ 30 Computer...

Page 73: ... instantly restore the default setting of 0 by pressing both but tons simultaneously when Octave is selected You can set the Octave function only for the Flash songs Selecting a right left hand guide track You can select a track that guides your right and left hand fingering during the Les son See page 34 This function is available only when you select a flash memory song SMF format 0 1 While the ...

Page 74: ... memory Song 101 can be initialized Press the STANDBY ON switch to turn off the power to the EZ 30 While holding down the highest black key A 5 press the STANDBY ON switch to turn on the power to the EZ 30 The flash memory will be initialized When the initialization is complete the EZ 30 indicates ClrFlash on the display See page 84 for information on initializing the panel settings The amount of ...

Page 75: ...tor section electronic circuit is played based on information received from the keyboard So then what is the information from the keyboard that becomes the basis for note production For example let s say you play a C quarter note using the grand piano sound on the EZ 30 keyboard Unlike an acoustic instrument that puts out a resonated note the elec tronic instrument puts out information from the ke...

Page 76: ...Messages This is data that is used in common by the entire MIDI system System messages include messages like Exclusive Messages that transmit data unique to each instrument manufacturer and Realtime Messages that control the MIDI device The messages transmitted received by the EZ 30 are shown in the MIDI Implementa tion Chart on page 98 Message Name EZ 30 Operation Panel Setting Note ON OFF Messag...

Page 77: ...exchange MIDI data between multiple devices each device must be con nected by a cable The MIDI terminals of the EZ 30 are located on the rear panel MIDI IN Receives MIDI data from another MIDI device MIDI OUT Transmits the EZ 30 s keyboard infor mation as MIDI data to another MIDI device MIDI LSB receive cancel To set the EZ 30 so that it will not receive LSB data for Bank Select press the STANDBY...

Page 78: ...ect the MIDI terminals of the personal computer and the EZ 30 Use only special MIDI cables when connecting MIDI devices Connect the MIDI terminals of the EZ 30 to the MIDI terminals of the personal computer When using a MIDI interface with a Macintosh series computer connect the RS 422 terminal of the computer modem or printer terminal to the MIDI interface as shown in the diagram below You can se...

Page 79: ...l over the EZ 30 s voices This would come in handy for example when recording notes to MIDI sequencer If you are using the sequencer to play back the voices of the EZ 30 you would want to set this to off in order to avoid getting double notes both from the keyboard and from the sequencer Normally when playing the EZ 30 by itself this should be set to on Press the right Overall button repeatedly to...

Page 80: ...ime you need it This allows you to save your data to floppy disk using a computer or a MIDI data filer such as the Yamaha MDF3 and have unlimited storage capacity for your valuable EZ 30 data Saving Bulk Data This function cannot be used in the Song playing recording or when the accompa niment is playing Press the right Overall button repeatedly to select MIDI Press the 2 button to display BULKDUM...

Page 81: ...ayback saving a Registration Memory preset sending Bulk Dump data etc When the EZ 30 is receiving bulk data none of the panel controls can be used If for some reason some problem occurred in the data reception a RcvError message is shown in the display Check all connections and settings and try the operation again Transmitting the EZ 30 Panel Settings Initial Send The EZ 30 s panel settings can be...

Page 82: ...MF format 1 Select a User song to transmit 2 Follow the steps described above in the Transmitting the EZ 30 Panel Settings Ini tial Send section 3 Press the SONG button then the START STOP button to transmit the song data You can store the data received on the computer via MIDI in the SMF format file so that it can be used for another application ...

Page 83: ...8 the keys in the right hand section are used only for entering the chord root and type The effects Reverb DSP Har mony are not applied Each effect Reverb DSP Harmony is turned off Select a type for each effect See page 48 49 50 The auto accompaniment doesn t turn on even when pressing the ACMP ON OFF button When playing back one of the Pianist styles 97 106 the rhythm cannot be heard The Pianist ...

Page 84: ... turning on the power while holding the highest rightmost white key on the keyboard CLr Backup will appear briefly on the display 1 Press the STANDBY ON switch to turn off the power to the EZ 30 2 While holding down the highest white key press the STANDBY ON switch to turn on the power to the EZ 30 to initialize the data When initialization is com plete the display indicates CLr Backup All Registr...

Page 85: ...cordion 026 000 113 023 Bandoneon 027 000 112 022 Harmonica GUITAR 028 000 112 024 Classical Guitar 029 000 112 025 Folk Guitar 030 000 113 025 12Strings Guitar 031 000 112 026 Jazz Guitar 032 000 113 026 Octave Guitar 033 000 112 027 Clean Guitar 034 000 112 028 Muted Guitar 035 000 112 029 Overdriven Guitar 036 000 112 030 Distortion Guitar BASS 037 000 112 032 Acoustic Bass 038 000 112 033 Fing...

Page 86: ...tric Piano 148 000 045 004 Velocity Crossfade Electric Piano 1 149 000 064 004 60 s Electric Piano 1 150 000 000 005 Electric Piano 2 151 000 001 005 Electric Piano 2 KSP 152 000 032 005 Chorus Electric Piano 2 153 000 033 005 DX Electric Piano Hard 154 000 034 005 DX Legend 155 000 040 005 DX Phase Electric Piano 156 000 041 005 DX Analog Electric Piano 157 000 042 005 DX Koto Electric Piano 158 ...

Page 87: ...d Bass 280 000 035 038 Clavi Bass 281 000 040 038 Techno Synth Bass 282 000 064 038 Orbiter Voice Bank Select MIDI Program Change Voice Name MSB LSB 283 000 065 038 Square Bass 284 000 066 038 Rubber Bass 285 000 096 038 Hammer 286 000 000 039 Synth Bass 2 287 000 006 039 Mellow Synth Bass 288 000 012 039 Sequenced Bass 289 000 018 039 Click Synth Bass 290 000 019 039 Synth Bass 2 Dark 291 000 032...

Page 88: ... Lead 420 000 065 084 Wire Lead 421 000 000 085 Voice Lead 422 000 024 085 Synth Aahs Voice Bank Select MIDI Program Change Voice Name MSB LSB 423 000 064 085 Vox Lead 424 000 000 086 Fifths Lead 425 000 035 086 Big Five 426 000 000 087 Bass Lead 427 000 016 087 Big Low 428 000 064 087 Fat Perky 429 000 065 087 Soft Whirl SYNTH PAD 430 000 000 088 New Age Pad 431 000 064 088 Fantasy 432 000 000 08...

Page 89: ...elodic Tom 2 553 000 065 117 Real Tom 554 000 066 117 Rock Tom 555 000 000 118 Synth Drum 556 000 064 118 Analog Tom 557 000 065 118 Electronic Percussion 558 000 000 119 Reverse Cymbal SOUND EFFECT 559 000 000 120 Fret Noise 560 000 000 121 Breath Noise 561 000 000 122 Seashore 562 000 000 123 Bird Tweet 563 000 000 124 Telephone Ring Voice Bank Select MIDI Program Change Voice Name MSB LSB 564 0...

Page 90: ... 47 Disco Latin Swing Jazz 48 Swing 49 Big Band 1 50 Big Band Ballad 51 Jazz Ballad 52 Jazz Trio 53 Boogie 54 Bebop 55 Big Band 2 56 Dixieland Rhythm Blues 57 Gospel Shuffle 58 R B 59 Motown 60 Soul Shuffle 61 6 8 Blues Country 62 Country Rock 63 Country 8 Beat 64 Country Pop 65 Country Swing 66 Bluegrass 67 Country Ballad Latin 68 Samba Rio 69 Bossa Nova 70 Espanole 71 Swing Reggae 72 Salsa 73 Ma...

Page 91: ... Brush Swirl 39 D 1 27 D 0 Brush Slap 40 E1 28 E0 Brush Tap Swirl 41 F1 29 F0 Snare Roll 42 F 1 30 F 0 Castanet 43 G1 31 G0 Snare H Soft Snare H Soft 2 SD Rock H 44 G 1 32 G 0 Sticks 45 A1 33 A0 Bass Drum Soft 46 A 1 34 A 0 Open Rim Shot Open Rim Shot 2 47 B1 35 B0 Bass Drum Hard Bass Drum H 48 C2 36 C1 Bass Drum Bass Drum 2 BD Rock 49 C 2 37 C 1 Side Stick 50 D2 38 D1 Snare M Snare M 2 SD Room L ...

Page 92: ... 91 G5 79 G4 Cuica Open 92 G 5 80 G 4 Triangle Mute 93 A5 81 A4 Triangle Open 94 A 5 82 A 4 Shaker 95 B5 83 B4 Jingle Bell 96 C6 84 C5 Bell Tree Voice No 117 118 119 120 MSB LSB PC 127 000 000 127 000 001 127 000 008 127 000 16 Keyboard MIDI Standard Kit 1 Standard Kit 2 Room Kit Rock Kit Note Note Note Note Voice No 121 122 123 124 MSB LSB PC 127 000 24 127 000 25 127 000 27 127 000 32 Keyboard M...

Page 93: ...3 48 C2 E Tom 5 Analog Tom 5 Analog Tom 5 Jazz Tom 5 61 C 3 49 C 2 Analog Cymbal Analog Cymbal 62 D3 50 D2 E Tom 6 Analog Tom 6 Analog Tom 6 Jazz Tom 6 63 D 3 51 D 2 64 E3 52 E2 65 F3 53 F2 66 F 3 54 F 2 67 G3 55 G2 68 G 3 56 G 2 Analog Cowbell Analog Cowbell 69 A3 57 A2 70 A 3 58 A 2 71 B3 59 B2 72 C4 60 C3 73 C 4 61 C 3 74 D4 62 D3 Analog Conga H Analog Conga H 75 D 4 63 D 3 Analog Conga M Analo...

Page 94: ... D1 Brush Slap Marching Sn M Door Slam 51 D 2 39 D 1 String Slap Scratch Cut 52 E2 40 E1 Brush Tap Marching Sn H Scratch 53 F2 41 F1 Brush Tom 1 Jazz Tom 1 Wind Chime 54 F 2 42 F 1 Telephone Ring 2 55 G2 43 G1 Brush Tom 2 Jazz Tom 2 56 G 2 44 G 1 57 A2 45 A1 Brush Tom 3 Jazz Tom 3 58 A 2 46 A 1 59 B2 47 B1 Brush Tom 4 Jazz Tom 4 60 C3 48 C2 Brush Tom 5 Jazz Tom 5 61 C 3 49 C 2 Hand Cym L 62 D3 50 ...

Page 95: ...4 90 F 5 78 F 4 91 G5 79 G4 92 G 5 80 G 4 93 A5 81 A4 94 A 5 82 A 4 95 B5 83 B4 96 C6 84 C5 Dog Machine Gun 97 C 6 85 C 5 Horse Laser Gun 98 D6 86 D5 Bird Tweet 2 Explosion 99 D 6 87 D 5 Firework 100 E6 88 E5 101 F6 89 F5 102 F 6 90 F 5 Ghost 103 G6 91 G5 Maou Voice No 125 126 127 128 MSB LSB PC 127 000 40 127 000 48 126 000 000 126 000 001 Keyboard MIDI Brush Kit Symphonic Kit SFX Kit 1 SFX Kit 2...

Page 96: ...Symphonic Symphony Exceptionally rich deep chorusing 18 Phaser Phaser Pronounced metallic modulation with periodic phase change 19 Rotary Speaker 1 Rotary1 Rotary speaker simulation 20 Rotary Speaker 2 Rotary2 21 Tremolo 1 Tremolo1 Rich Tremolo effect with both volume and pitch modulation 22 Tremolo 2 Tremolo2 23 Guitar Tremolo Guitar Tremolo Simulated electric guitar tremolo 24 Auto Pan Auto Pan ...

Page 97: ...e types sound whether the auto accompaniment is on or not how ever the actual speed of the effect depends on the Tempo set ting page 54 The individual note values in each type let you synchronize the effect precisely to the rhythm Triplet settings are also available 1 6 quarter note triplets 1 12 eighth note triplets 1 24 six teenth note triplets The Trill effect Types 6 12 create two note trills ...

Page 98: ...9nH v 1 127 o 9nH v 1 127 Note OFF o 9nH v 0 o 9nH v 0 or 8nH After Key s x x Touch Ch s x x Pitch Bend x o 0 32 o o Bank Select 1 x 2 o Modulation wheel 6 38 x 2 o Data Entry 7 o o Part Volume Control 10 x o Pan 11 x 2 o Expression Change 64 o o Sustain 71 x 2 o Harmonic Content 72 x 2 o Release Time 73 x 2 o Attack Time 74 x 2 o Brightness 91 93 94 x o Effect Depth 96 97 x o RPN Inc Dec 100 101 ...

Page 99: ...os x x Common Song Sel x x Tune x x System Clock o o Real Time Commands o 4 o 4 Aux All Sound OFF x o 120 126 127 Reset All Cntrls x o 121 Local ON OFF x o 122 5 All Notes OFF x o 123 125 Mes Active Sense o o sages Reset x x Mode 1 OMNI ON POLY Mode 2 OMNI ON MONO o Yes Mode 3 OMNI OFF POLY Mode 4 OMNI OFF MONO x No ...

Page 100: ...or MIDI Master Tuning Values for ll are ignored MIDI Master Tuning F0H 43H 1nH 27H 30H 00H 00H mm ll cc F7H This message simultaneously changes the tuning value of all channels The values of mm and ll are used for MIDI Master Tuning The default value of mm and ll are 08H and 00H respectively Any values can be used for n and cc Reverb Type F0H 43H 1nH 4CH 02H 01H 00H mmH llH F7H mm Reverb Type MSB ...

Page 101: ...SB TYPE LSB 00 01 02 08 16 17 18 19 20 000 064 No Effect 065 Chorus Chorus2 066 Celeste Chorus1 067 Flanger Flanger1 Flanger2 068 127 No Effect TYPE MSB TYPE LSB 00 01 02 08 16 17 18 19 20 000 No Effect 001 1 Hall1 2 Hall2 002 Room 3 Room1 4 Room2 003 Stage 5 Stage1 6 Stage2 004 Plate 7 Plate1 8 Plate2 005 Delay L C R 26 Delay L C R 006 27 Delay L R 007 28 Echo 008 29 Cross Delay 009 9 Early Refle...

Page 102: ...gs Up to 488 KB Song Clear Track Clear Recording Song User Song 5 Songs Real Time Recording Recording Tracks 1 2 3 4 5 CHORD Flash Memory Flash Song max 99 Songs Memory size 488 KB MIDI Initial Send Local Control Bulk Dump Auxiliary jacks PHONES OUTPUT DC IN 10 12V MIDI IN OUT SUSTAIN Amplifier 6 W 6 W When using PA 5C power adaptor 4 W 4 W When using batteries Speakers 12 cm x 2 3 cm x 2 Power Su...

Page 103: ...etronome 39 MIDI 75 MIDI channels 75 MIDI Implementation Chart 98 MIDI LSB Receive cancel 77 MIDI terminals 77 Multi Fingering 55 Music Stand 9 N numeric keypad 25 O Octave 73 One Touch Setting 43 Overall buttons 23 P PHONES OUTPUT jack 9 Portable Grand 39 Q Quick Guide 12 R RECORD button 66 recording song 66 Registration Memory 64 Reverb 48 Reverb types 96 Root 59 S sections accompaniment 62 Sing...

Page 104: ...e You may also contact Yamaha directly at the address provided below 2 Deliver the unit to be serviced under warranty to the retailer selling the product an authorized service center or to Yamaha with an explanation of the problem Please be prepared to provide proof purchase date sales receipt credit card copy etc when requesting service and or parts under warranty 3 Shipping and or insurance cost...

Page 105: ...Greece Tel 01 364 7111 SWEDEN Yamaha Scandinavia AB J A Wettergrens Gata 1 Box 30053 S 400 43 Göteborg Sweden Tel 031 89 34 00 DENMARK YS Copenhagen Liaison Office Generatorvej 8B DK 2730 Herlev Denmark Tel 44 92 49 00 FINLAND F Musiikki Oy Kluuvikatu 6 P O Box 260 SF 00101 Helsinki Finland Tel 09 618511 NORWAY Norsk filial av Yamaha Scandinavia AB Grini Næringspark 1 N 1345 Østerås Norway Tel 67 ...

Page 106: ...M D G PA DMI Division Yamaha Corporation 2001 Yamaha Corporation V AP 01A0 Printed in China Yamaha Manual Library English versions only http www2 yamaha co jp manual english ...

Reviews: