background image

3

PRECAUTIONS

PLEASE READ CAREFULLY BEFORE PROCEEDING

* Please keep these precautions in a safe place for future reference.

 WARNING

Always follow the basic precautions listed below to avoid the possibility of serious injury or even death from electrical shock,
short-circuiting, damages, fire or other hazards. These precautions include, but are not limited to, the following:

• Do not expose the instrument to excessive dust or vibrations, or extreme cold or

heat (such as in direct sunlight, near a heater, or in a car during the day) to prevent
the possibility of panel disfiguration or damage to the internal components.

• Do not use the instrument near other electrical products such as televisions, radios,

or speakers, since this might cause interference which can affect proper operation
of the other products.

• Do not place the instrument in an unstable position where it might accidentally fall

over.

• Before moving the instrument, remove all connected adaptor and other cables.

• When cleaning the instrument, use a soft, dry cloth. Do not use paint thinners,

solvents, cleaning fluids, or chemical-impregnated wiping cloths. Also, do not
place vinyl, plastic or rubber objects on the instrument, since this might discolor
the panel or keyboard.

• Do not rest your weight on, or place heavy objects on the instrument, and do not

use excessive force on the buttons, switches or connectors.

• Use only the stand/rack specified for the instrument. When attaching the stand or

rack, use the provided screws only. Failure to do so could cause damage to the
internal components or result in the instrument falling over.

• Do not operate the instrument for a long period of time at a high or uncomfortable

volume level, since this can cause permanent hearing loss. If you experience any
hearing loss or ringing in the ears, consult a physician.

Yamaha cannot be held responsible for damage caused by improper use or
modifications to the instrument, or data that is lost or destroyed.

Always turn the power off when the instrument is not in use.

Make sure to discard used batteries according to local regulations.

The illustrations as shown in this owner’s manual are for instructional purposes
only, and may be different from the ones your instrument.

• Do not open the instrument or attempt to disassemble the internal parts or modify

them in any way. The instrument contains no user-serviceable parts. If it should
appear to be malfunctioning, discontinue use immediately and have it inspected by
qualified Yamaha service personnel.

• Do not expose the instrument to rain, use it near water or in damp or wet conditions,

or place containers on it containing liquids which might spill into any openings.

• If the AC adaptor cord or plug becomes frayed or damaged, or if there is a sudden

loss of sound during use of the instrument, or if any unusual smells or smoke
should appear to be caused by it,  immediately turn off the power switch, disconnect
the adaptor plug from the outlet, and have the instrument inspected by qualified
Yamaha service personnel.

• Use the specified adaptor (PA-3B, PA-3C, PA-3 or an equivalent recommended

by Yamaha) only. Using the wrong adaptor can result in damage to the instrument
or overheating.

• Before cleaning the instrument, always remove the electric plug from the outlet.

Never insert or remove an electric plug with wet hands.

• Check the electric plug periodically and remove any dirt or dust which may

have accumulated on it.

• Do not put burning items, such as candles, on the unit. A burning item may fall

over and cause a fire.

 CAUTION

Always follow the basic precautions listed below to avoid the possibility of physical injury to you or others, or damage to the
instrument or other property. These precautions include, but are not limited to, the following:

• Do not place the AC adaptor cord near heat sources such as heaters or radiators,

and do not excessively bend or otherwise damage the cord, place heavy objects on
it, or place it in a position where anyone could walk on, trip over, or roll anything
over it.

• When removing the electric plug from the instrument or an outlet, always hold the

plug itself and not the cord.

• Do not connect the instrument to an electrical outlet using a multiple-connector.

Doing so can result in lower sound quality, or possibly cause overheating in the
outlet.

• Unplug the AC power adaptor when not using the instrument, or during electrical

storms.

• Always make sure all batteries are inserted in conformity with the +/- polarity

markings. Failure to do so might result in overheating, fire, or battery fluid leakage.

• Always replace all batteries at the same time. Do not use new batteries together

with old ones. Also, do not mix battery types, such as alkaline batteries with
manganese batteries, or batteries from different makers, or different types of batteries
from the same maker, since this can cause overheating, fire, or battery fluid leakage.

• Do not dispose of batteries in fire.

• Do not attempt to recharge batteries that are not intended to be charged.

• When the batteries run out, or if the instrument is not to be used for a long time,

remove the batteries from the instrument to prevent possible leakage of the battery
fluid.

• Keep batteries away from children.

• If the batteries do leak, avoid contact with the leaked fluid. If the battery fluid should

come in contact with your eyes, mouth, or skin, wash immediately with water and
consult a doctor. Battery fluid is corrosive and may possibly cause loss of sight or
chemical burns.

• Before connecting the instrument to other electronic components, turn off the power

for all components. Before turning the power on or off for all components, set all
volume levels to minimum. Also, be sure to set the volumes of all components at
their minimum levels and gradually raise the volume controls while playing the
instrument to set the desired listening level.

(4)-7

Summary of Contents for Portatone PSR-125

Page 1: ...tition des œuvres Caractéristiques techniques 5 6 8 9 12 13 13 14 15 16 26 Table des matières Contents Getting Started Playing Your New PortaTone Voice Mode Style Mode Song Mode Troubleshooting Percussion Assign List Voices 40 and 00 Jam Track Chord Progression List One Touch Setting List Song Scores Specifications 5 6 8 9 12 13 13 14 15 16 26 ESPAÑOL Preparativos Tocando con el nuevo PortaTone Mo...

Page 2: ... TV interference relocate reorient the antenna If the antenna lead in is 300 ohm ribbon lead change the lead in to co axial type cable If these corrective measures do not produce satisfactory results please contact the local retailer authorized to distribute this type of product If you can not locate the appropriate retailer please contact Yamaha Corporation of America Electronic Service Division ...

Page 3: ...if any unusual smells or smoke shouldappeartobecausedbyit immediatelyturnoffthepowerswitch disconnect the adaptor plug from the outlet and have the instrument inspected by qualified Yamaha service personnel Usethespecifiedadaptor PA 3B PA 3C PA 3oranequivalentrecommended byYamaha only Usingthewrongadaptorcanresultindamagetotheinstrument or overheating Beforecleaningtheinstrument alwaysremovetheele...

Page 4: ... Track patterns providing specially programmed rhythms and chord progressions for playing along with One Touch Setting for automatically calling up an appropriate Voice for playing with the Style Song or Jam Track you select You now own a portable keyboard that packs advanced functions and great sound in a highly compact size Its outstanding features also make it an exceptionally expressive and ve...

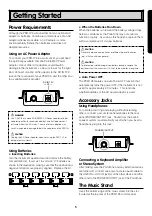
Page 5: ...d Replace the lid Accessory Jacks Using Headphones For private practicing and playing without disturbing others connect a set of stereo headphones to the rear panel PHONES OUTPUT jack Sound from the built in speaker system is automatically cut off when you insert a headphone plug into this jack PHONES OUTPUT Connecting a Keyboard Amplifier or Stereo System After making sure the PortaTone and any e...

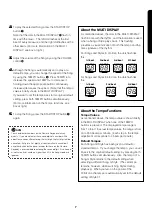
Page 6: ...cks have been recorded to your PortaTone to give you a taste of what you can do with the instrument and to provide music and patterns for you to play along with To select and play one of the Songs 1 With the Song mode selected use the Numeric Keypad 5 to enter the desired Song or Jam Track number Be sure to enter a two digit number as is printed next to each song on the panel For example to select...

Page 7: ...when one of the TEMPO buttons is pressed The displayed tempo range is from 10 to 60 in actual tempo values the range is from 40 to 240 beats per minute Each step in the tempo adjustment corresponds to 4 beats per minute Default Tempos Each Song and Style has been given a default or standard tempo If you change the tempo you can set it back to the original default setting by pressing both TEMPO but...

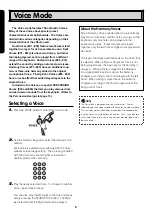
Page 8: ...dle C with one Voice may sound higher or lower than another Voice at the same key 3 Play the newly selected Voice To change to another Voice repeat step 2 above You can also play rhythm Styles in the Voice mode by simply pressing the START STOP button The Style last selected from the Style mode will be played NOTE The PortaTone is polyphonic up to a maximum of 12 notes Depending on the Voice selec...

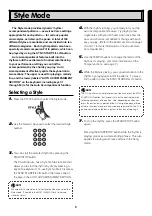
Page 9: ...g mode The Style mode provides dynamic rhythm accompaniment patterns as well as Voice settings appropriate for each pattern for various popular music styles as listed on the panel A total of 100 different Styles are available and are divided into ten different categories Each rhythm pattern also has a specially created companion Fill In pattern which can be played by using the SYNC START FILL IN b...

Page 10: ...methods is automatic you can set Auto Accompaniment to function exclusively in either the Single Finger or Fingered mode To set Auto Accompaniment to Single Finger turn the power off then hold down the button on the Numeric Keypad and simultaneously turn the power on SF Single Finger briefly appears in the MULTI DISPLAY NOTE In Single Finger the AUTO ACCOMPANIMENT SECTION is set between the C1 key...

Page 11: ...pended 4th Augmented 7th and diminished 7th chords are interpreted as simple augmented and diminished The PortaTone also has a Chord Cancel function to stop the chord accompaniment but allow the rhythm pattern to continue playing To use Chord Cancel simultaneously press any three consecutive notes in the AUTO ACCOMPANIMENT SECTION for example C C and D C C7sus4 Cm Caug 7 C7 Cdim 7 Cm7 C7 5 CM7 CmM...

Page 12: ...is selected only the selected pattern repeats indefinitely The Song mode features special Songs and Jam Track patterns that have been created using the rich sounds and sophisticated accompaniment functions of the PortaTone The Songs are generally for your listening enjoyment however you can also play along with them on the keyboard Also by using the Minus One function you can mute the original mel...

Page 13: ...e of the keyboard thus the actual sound of the Voice may be slightly different from note to note Quick successive pressing of the STANDBY ON button may fail to turn the power on When using the STANDBY ON button wait a short time between successive presses Troubleshooting Percussion Assign List Voices 40 and 00 S n a r e D r u m 1 R i m S h o t H i h a t P e d a l H i h a t C l o s e C r a s h C y ...

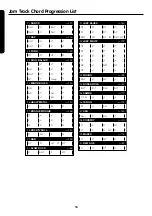
Page 14: ...R B C7 F7 C7 144 136 B E Am 25 MINOR BLUES Am Dm Am 144 G C 27 BOOGIE WOOGIE C F C 136 G F Am7 G7 C F 30 SLOW ROCK 88 G7 32 JAZZ WALTZ C7 C7 G 7 G7 33 FUSION Dm7 G7 34 BOSSA NOVA E 7 Em7 Dm7 D 7 35 SAMBA C F G 36 TANGO E7 Am 38 COUNTRY C C C C 192 128 160 112 124 120 F7 31 JAZZ BLUES C7 F7 C7 Dm7 C7 G7 A7 Dm7 G7 C7 A7 160 F7 C7 C7 37 SKA Am Dm 160 F G7 F C G7 39 MARCH C G7 C 116 40 NEW AGE C C C 8...

Page 15: ...26 FLUTE 19 VIBRAPHONE 05 E ORGAN 50 E PIANO PAD 53 JAZZ GUITAR PAD 55 FANTASY 1 51 E PNO VIBES 52 FOLK GTR PAD 49 PIANO VIBES 24 BRASS ENS 18 ORCHESTRA HIT 04 CLAVI 30 PANFLUTE 50 E PIANO PAD 32 SY BRASS 54 BRASS ENS DUAL 50 E PIANO PAD 82 TRUMPET DUET 09 JAZZ GTR 31 HARMONICA 19 VIBRAPHONE 22 TROMBONE 26 FLUTE 07 ACCORDION 82 TRUMPET DUET 22 TROMBONE 81 MARIMBA TRIO 22 TROMBONE 05 E ORGAN 24 BRA...

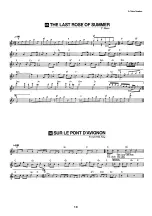
Page 16: ...16 Song Scores Demonstrationsstücke Partition des œuvres Partituras de canciones V Voice Number ...

Page 17: ...17 ...

Page 18: ...18 ...

Page 19: ...19 ...

Page 20: ...20 ...

Page 21: ...21 ...

Page 22: ...22 ...

Page 23: ...23 ...

Page 24: ...24 ...

Page 25: ...25 ...

Page 26: ...ny time without prior notice Since specifications equipment or options may not be the same in every locale please check with your Yamaha dealer Die technischen Daten und Beschreibungen in dieser Bedienungsanleitung dienen nur der Information Yamaha Corp behält sich das Recht vor Produkte oder deren technische Daten jederzeit ohne vorherige Ankündigung zu verändern oder zu modifizieren Da die techn...

Page 27: ......

Page 28: ......

Page 29: ...8650 Tel 053 460 2317 OCEANIA AUSTRALIA Yamaha Music Australia Pty Ltd Level 1 99 Queensbridge Street Southbank Victoria 3006 Australia Tel 3 9693 5111 NEW ZEALAND Music Houses of N Z Ltd 146 148 Captain Springs Road Te Papapa Auckland New Zealand Tel 9 634 0099 COUNTRIES AND TRUST TERRITORIES IN PACIFIC OCEAN Yamaha Corporation Asia Pacific Music Marketing Group Nakazawa cho 10 1 Hamamatsu Japan ...

Page 30: ...M D G PA DMI Division Yamaha Corporation 2002 Yamaha Corporation V882970 MW 01A0 Printed in China ...

Reviews: