background image

28

Specifications

EMX66M—Owner’s Manual

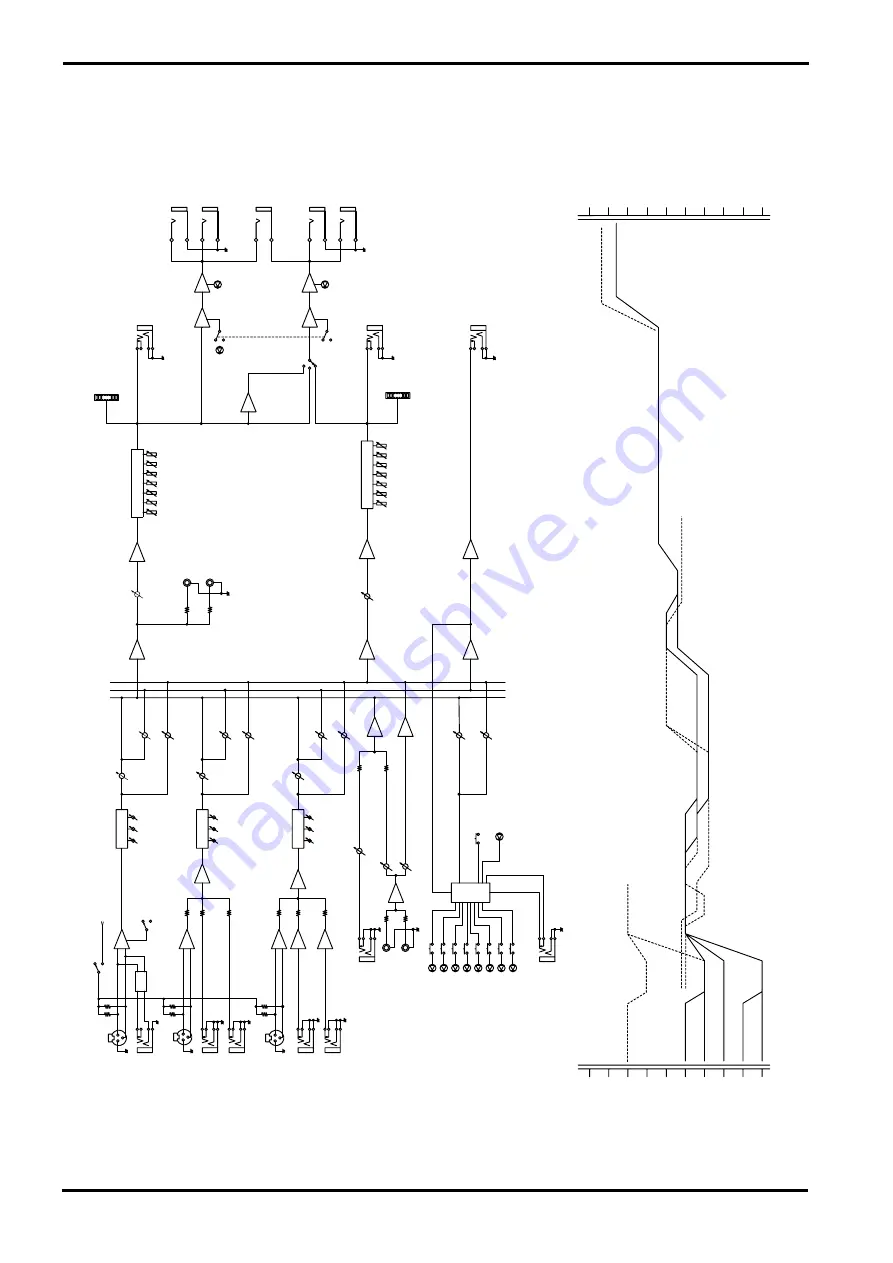
Block and Level diagram

MAIN-BRIDGE

MAIN-MAIN

MAIN-MON

INV

MAIN

EFFECT

MONITO

R

LEVEL

[-16dB]

[-22dB]

MONIT

O

R

EFFECT

[-6dB]

[-6dB]

[0dB]

[0dB]

SUM

[-16dB]

EFFECT RETURN

EFFECT RETURN

3-Stage EQ

HA

[-10dB]

[-10dB]

[-10dB]

[-10dB]

BA

BA

BA

[-22dB]

[-22dB]

[-22dB]

[-16dB]

A

UX IN

BA

[0dB]

A

UX IN

[-10dB]

2TR IN

[-10dB]

[-7.8dB]

V

OCAL ECHO1

V

OCAL ECHO2

V

OCAL REVERB1

V

OCAL REVERB2

HALL1

HALL2

R

OOM

PLA

TE

FOO

T SW

DIGIT

AL EFFECT MITE

1

2

[-16dB]

2TR IN

DIGIT

AL EFFECT ON

ON

DIGIT A

L

EFFECT

+40dB

+30dB

+20dB

+10dB

0dB

-10dB

+20dB

-30dB

-40dB

-50dB

LINE(CH5)[-10dB]

Hi-z P

AD:

 ON[-10dB]

Lo

w-Z P

AD:

 ON[-20dB]

SUPER Hi-Z(CH6)[-30dB]

Hi-Z P

AD:OFF[-40dB]

Lo

w-Z P

AD:OFF[-50dB]

MIC(CH5,6]          [-50dB]  

2TR IN

2TR IN

A

UX IN

[-10dB]

A

UX IN

[-10dBV(-7.8dB)]

Clip Le

v

e

l [+20dB]

CH5,6 [-22dB]

LEVEL

MONT

OR

EFFECT

A

UX,2TR [0dB]

MAIN, MONIT

OR [-16dB]

EFFECT [-22dB]

2

1

2

1

[+4dB]

EFFECT OUT

REC OUT   [-10dBV]   [-7.8dB]

MAIN OUT

MONIT

OR OUT

EFFECT OUT

[+4dB]

[+4dB]

[+4dB]

MAXIMUM OUTPUT PO

WER

[300W/4

]

SPEAKERS OUT [60W/4

]

+40dB

+30dB

+20dB

+10dB

0dB

-10dB

+20dB

-30dB

-40dB

-50dB

[+4dB]

[+4dB]

YSP ON/OFF

LIMITER

B

[300W/4

]

1

2

INV

PO

WER AMP

MONIT

OR OUT

[+4dB]

LED METER(5 point)

7-Stage GEQ

125Hz

250Hz

500Hz

1kHz

2kHz

4kHz

8kHz

MASTER

BA

BA

[-6dB]

[-6dB]

[0dB]

SUM

SUM

LED METER(5 point)

MAIN OUT

[+4dB]

YSP ON/OFF

LIMITER

[300W/4

]

BRIDGE 

[600W/8

]

2

1

2

1

2

1

1

2

MASTER

BA

[+4dB]

[-6dB]

7-Stage GEQ

125Hz

250Hz

500Hz

1kHz

2kHz

4kHz

8kHz

REC OUT

[-10dB]

[-7.8dB]

1

2

LEVEL

LEVEL

[-16dB]

EFFECT

[-22dB]

[-16dB]

[-16dB]

[-16dB]

[-22dB]

MONIT

O

R

MONIT

O

R

EFFECT

MAIN

EFFECT

MONITO

R

[0dB]

SUM

3-Stage EQ

3-Stage EQ

HA

HA

LOW

MID

HIGH

PHANT

OM

OFF

ON

+15V

[-10dB]

PA

D

[30dB]

[10dB]

[-10dB]

[-10dB]

BA

[-22dB]

CH INPUT

     (CH1-4)      

Lo

w-Z

[-50/-20dB]

Hi-Z

[-40/-10dB]

MIC

[-50dB]

CH INPUT

[CH5]

LINE

[-10dB]

MIC

[-50dB]

CH INPUT

[CH6]

SUPER Hi-Z

[-30dB]

1

1

2

2

LOW

MID

HIGH

LOW

MID

HIGH

SPEAKERS OUT

Summary of Contents for powered mixer

Page 1: ... VOCAL ECHO 2 VOCAL REVERB 1 VOCAL REVERB 2 HALL 1 HALL 2 ROOM PLATE ON EFFECT 10 0 10 0 EFFECT RTN 2TR IN GEQ MASTER 12 6 0 6 12 12 6 0 6 12 125 250 500 1k 2k 4k 8k 6 3 0 5 10 10 0 10 0 MAIN AUX IN 10 0 10 0 10 0 EFFECT RTN 2TR IN GEQ MASTER 12 6 0 6 12 12 6 0 6 12 125 250 500 1k 2k 4k 8k 6 3 0 5 10 MONITOR PHANTOM ON OFF POWER AMP LIMITER MON MAIN MAIN MAIN MAIN BRIDGE A B power YAMAHA SPEAKER P...

Page 2: ...e output level is 11dB LIMITER indicator lights the internal amplifier will deliver a maximum of 300W into a 4Ω load If you are using the BRIDGE jack the internal power amplifier will deliver 120W into an 8Ω load with a 4dB signal and a maximum of 600W into an 8Ω load with a 11dB signal E Note The SPEAKERS 1 2 jacks rear panel 1 out put the signals received at the MAIN OUT jack via the internal po...

Page 3: ... 16dB EFFECT 22dB 2 1 2 1 4dB EFFECT OUT REC OUT 10dBV 7 8dB MAIN OUT MONITOR OUT EFFECT OUT 4dB 4dB 4dB SPEAKERS OUT MAXIMUM OUTPUT 300W 4Ω NOMINAL OUTPUT 60W 4Ω 40dB 30dB 20dB 10dB 0dB 10dB 20dB 30dB 40dB 50dB 4dB 4dB YSP ON OFF LIMITER B 300W 4Ω 1 2 INV POWER AMP MONITOR OUT 4dB LED METER 5 point 7 Stage GEQ 125Hz 250Hz 500Hz 1kHz 2kHz 4kHz 8kHz MASTER BA BA 6dB 6dB 0dB SUM SUM LED METER 5 poin...

Page 4: ...orporation of America Electronic Service Division 6600 Orangethorpe Ave Buena Park CA 90620 The above statements apply ONLY to those products distributed by Yamaha Corporation of America or its subsidiaries Explanation of Graphical Symbols The lightning flash with arrowhead symbol within an equilateral triangle is intended to alert the user to the presence of uninsulated dangerous voltage within t...

Page 5: ...ion fire or electrical shock may result If you notice any abnormality such as smoke odor or noise or if a foreign object or liquid gets inside the unit turn it off immediately Remove the power cord from the AC outlet Con sult your dealer for repair Using the unit in this condition is a fire and electrical shock hazard CAUTION Hold the power cord plug when disconnecting it from an AC outlet Never p...

Page 6: ...4 EMX66M Owner s Manual ...

Page 7: ...ent sound distortion and protect the speak ers A digital effect with eight selectable effect types is built in A variety of effects can be applied to add reverberation or ambiance to vocals or instru mental sounds The EMX66M has implemented EEEngine Yamaha s epochal amp drive technology to create an unrivaled high efficiency drive The EEEngine s energy saver low heat genera tion design has reduced...

Page 8: ...plifier mode Set the power amp select switch located on the right corner on the panel to MAIN MAIN This Quick Guide assumes that two main speakers are connected Refer to pages 16 17 for other con nections and power amp select switch settings Connecting a microphone Make sure that the power is turned off to the EMX66M Connect a microphone to the Low Z jack of channel 1 4 Using a condenser microphon...

Page 9: ...rophone has already been connected to the Low Z jack of a channel you cannot connect the effect unit to the Hi Z jack of the channel Connecting an electronic musical instrument To the EMX66M s LINE jacks you can connect an electronic musical instrument such as a syn thesizer drum machine signal processor con nected to an electric guitar etc Refer to the diagram below to make a stereo connection fr...

Page 10: ...a long time the built in amplifier and speakers may be damaged Applying built in effects 1 Turn on the ON switch in the DIGITAL EFFECT section The ON switch indicator lights up 2 Select one of eight effect types then press the switch 3 Adjust the amount of effect applied by using the EFFECT control of the target channel and the EFFECT RTN control in the MAIN section Power off 1 Press the POWER swi...

Page 11: ...ONITOR jacks input output panel 6 3 Effect control EFFECT For each channel this controls the amount of sig nal that is sent to the EFFECT bus The signal of the EFFECT bus is sent to the built in effect and to the EFFECT OUT jacks input output panel 3 4 Level control LEVEL This control adjusts the level of signals routed from each channel to the MAIN bus and to the built in power amplifier The MAIN...

Page 12: ...roviding a maximum of 12 dB of cut boost for each frequency band This graphic equalizer affects both the MAIN bus signal that is output to the speakers and the line level signal which is output from the MAIN jack input output panel 6 9 EFFECT RTN control This adjusts the level of the effect signal which is returned from the built in digital effect to the MAIN bus 0 AUX IN control This adjusts the ...

Page 13: ...WER AMP section This section allows you to select the signals that will be input to the built in two channel power amplifier I LIMITER indicator This indicator lights up when the level of the sig nal output from the power amp section reaches the maximum and the limiter is activated Adjust appropriate control so that the indicator lights up for only a short while when the signal reaches the maximum...

Page 14: ...This switch enables you to compensate the low range of the speakers The low range balance when this switch is on varies depending on the speakers First check the low range balance by auditioning the resultant sound then set this switch to on or off Power switch and indicator M Power ON OFF switch and indicator This switch turns the power of the EMX66M on off When the switch is turned on the indica...

Page 15: ...usly and their high input imped ance makes them ideal for use with instruments such as electric acoustic guitar and electric bass They can also be used with line level sources such as synthesizers and drum machines Nomi nal input level is 30 dB 3 Effect output jack EFFECT OUT The input of an external effect such as a delay or echo can be connected to this jack The signal adjusted by the EFFECT con...

Page 16: ...IN jack and 10 dBV 600Ω for the 2TR IN jacks 6 REC OUT MAIN MONITOR OUTPUT jacks These are output jacks which send line level sig nals from the EMX66M to external devices A stereo recording device such as a cassette deck DAT or MD recorder can be connected to the REC OUT jacks and a playback device such a power amp can be connected to the MONITOR and MAIN jacks The signals sent from each jack are ...

Page 17: ... Two channel parallel connection Bridge connection At this time use the power amp select switch J on the control panel to select a signal sent to the correct jacks Refer to the Speaker connection section on the next page 2 AC IN socket Connect the included power cord to this socket Connect the plug of the power cord to an AC out let that meets the requirements stated in the spec ifications in this...

Page 18: ...nce will not be lower than the specified value When the power amp select switch is set to MAIN MON or MAIN MAIN Two channel connection Two 4 8Ω speakers can be connected to either SPEAKERS jack 1 or jack 2 of channels A and B If you are using speakers rated at 4Ω the maximum output would be 300W 300W Two channel parallel connection Two 8 16Ω speakers can be connected to both SPEAKERS jack 1 and ja...

Page 19: ...ything to the SPEAKERS A and SPEAKERS B jacks Like wise when using the SPEAKERS A and or SPEAKERS B jacks do not connect anything to the BRIDGE jack The BRIDGE jack has a protective cap that prevents a speaker from being accidentally connected to it when you are using two channel or two channel parallel connections Remove this protective cap only when mak ing a bridge connection 8Ω 16Ω SPEAKERS BR...

Page 20: ...off the built in digital effects processor connected to the EMX66M in practice only one effects processor internal or external will be used at a time so the footswitch is not required when using external effects The Low Z and Hi Z input of each channel can not be used simultaneously Electric bass Microphone Effects processor Recorder Cassette DAT MD CD player Synthesizer Drum machine Guitar proces...

Page 21: ...ols are not affected by the LEVEL controls 1 Set the MONI MASTER control to the position 2 While speaking into a connected mic or playing a connected instrument adjust the MONITOR control of the input chan nel that you want to monitor Repeat this procedure for each channel 3 Use the MONI MASTER control to set the overall level of the monitor mix Using the digital effect The EMX66M has a built in d...

Page 22: ...FECT 15 15 15 15 0 15 0 15 0 10 PAD 15 15 1 HIGH MID LOW LEVEL MONITOR EFFECT 15 15 15 15 0 15 0 15 0 10 1 PAD 2 2 PAD 15 15 3 HIGH MID LOW LEVEL MONITOR EFFECT 15 15 15 15 0 15 0 15 0 10 3 PAD 4 4 PAD 5 5 PAD 6 6 1 2 1 1 2 2 1 2 EEEngine SEE REAR PANEL CAUTION Hi Z Hi Z Hi Z Hi Z Low Z Low Z Low Z Low Z LINE MIC MIC Super Hi Z EFFECT OUT FOOT SW AUX IN INPUT TO MAIN OUT PUT 2TR IN REC OUT MAIN MO...

Page 23: ... 15 0 15 0 10 PAD 15 15 1 HIGH MID LOW LEVEL MONITOR EFFECT 15 15 15 15 0 15 0 15 0 10 1 PAD 2 2 PAD 15 15 3 HIGH MID LOW LEVEL MONITOR EFFECT 15 15 15 15 0 15 0 15 0 10 3 PAD 4 4 PAD 5 5 PAD 6 6 1 2 1 1 2 2 1 2 EEEngine SEE REAR PANEL CAUTION Hi Z Hi Z Hi Z Hi Z Low Z Low Z Low Z Low Z LINE MIC MIC Super Hi Z EFFECT OUT FOOT SW AUX IN INPUT TO MAIN OUT PUT 2TR IN REC OUT MAIN MONITOR ON OFF DIGIT...

Page 24: ...o adjust the overall volume and tone Using an external effect 1 Raise the EFFECT controls for the channels to which you want the external effect to be applied 2 Adjust the input level of the external effect so that the sound is not distorted at the input of the external effect 3 Use the MAIN section AUX IN control to adjust the level of the sound processed by the effect Note The MONITOR controls a...

Page 25: ...ultiple devices includ ing the unit in a rack keep a 1U space or more between the devices Use a blank panel with holes for ventilation if you wish to insert a panel between the devices You will need a 7U space to install the rack mount After installation the unit will project 62 mm from the front surface of the rack Installing the rack mount bracket 1 Remove the carrying handle by loosening and re...

Page 26: ...con nections Other The device may have malfunctioned Please con tact your dealer Q The built in effect is not effective A The ON switch in the DIGITAL EFFECT section may not be turned on Or you have adjusted the EFFECT control in the Channel section or the EFFECT RTN control in the MAIN section Q The monitoring sound from the speakers is not power ful enough relative to the level of the input soun...

Page 27: ...CH1 4 72 dB CH IN Low Z to EFFECT OUT CH1 4 48 dB CH IN Low Z to REC OUT CH1 4 56 dB CH IN Hi Z to MAIN OUT MONITOR OUT CH1 4 26 dB AUX IN to MAIN OUT 24 dB 2TR IN to MAIN OUT 66 dB MIC IN to MAIN OUT MONITOR OUT CH5 6 26 dB LINE IN to MAIN OUT MONITOR OUT CH5 46 dB Super Hi Z IN to MAIN OUT MONITOR OUT CH6 Crosstalk at 1 kHz 65 dB adjacent input 65 dB input to output Input channel equalization 15...

Page 28: ...T Hi Z CH1 4 OFF 10 kΩ 50 600Ω Mics 52 dB 1 95 mV 40 dB 7 75 mV 10 dB 245 mV Phone jack TRS 2 ON 600Ω Lines 22 dB 61 6 mV 10 dB 245 mV 20 dB 7 75 V MIC INPUT CH5 6 3 kΩ 50 600Ω Mics 62 dB 0 616 mV 50 dB 2 45 mV 20 dB 77 5 mV XLR 3 31 type2 LINE INPUT CH5 1 2 10 kΩ 600Ω Lines 22 dB 61 6 mV 10 dB 245 mV 20 dB 7 75 V Phone jack3 Super Hi Z CH6 1 2 470 kΩ 1 kΩ 42 dB 6 16 mV 30 dB 24 5 mV 0 dB 0 775 V ...

Page 29: ...Specifications 27 EMX66M Owner s Manual Dimensions 482 305 328 Unit mm ...

Page 30: ...2TR 0dB MAIN MONITOR 16dB EFFECT 22dB 2 1 2 1 4dB EFFECT OUT REC OUT 10dBV 7 8dB MAIN OUT MONITOR OUT EFFECT OUT 4dB 4dB 4dB MAXIMUM OUTPUT POWER 300W 4Ω SPEAKERS OUT 60W 4Ω 40dB 30dB 20dB 10dB 0dB 10dB 20dB 30dB 40dB 50dB 4dB 4dB YSP ON OFF LIMITER B 300W 4Ω 1 2 INV POWER AMP MONITOR OUT 4dB LED METER 5 point 7 Stage GEQ 125Hz 250Hz 500Hz 1kHz 2kHz 4kHz 8kHz MASTER BA BA 6dB 6dB 0dB SUM SUM LED M...

Page 31: ...YAMAHA CORPORATION V832720 R0 1 AP 32 Pwro Audio Digital Musical Instrument Division P O Box 3 Hamamatsu 430 8651 Japan NP Printed in Taiwan ...

Reviews: