background image

94

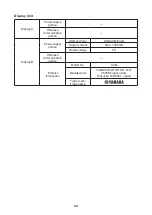
Display Unit 

Display A

Power supply 

portion

Wireless 

communication 

portion

Display B

Power supply 

portion

USB port type

USB2.0 Micro-B

Output current

Max. 1000 mA

Rated voltage

5 V

Wireless 

communication 

portion

Product 

Information

Model No.

X3M

Manufacturer

YAMAHA MOTOR CO., LTD.

2500 Shingai, iwata, 

Shizuoka 438-8501, Japan

Trade mark/

Trade name

Summary of Contents for PW SYSTEM

Page 1: ...FULLY The manual contains important safety information about the product This manual is relevant for the following models CENTURION CHALLENGER E CENTURION IMAGE E CENTURION INVINCIBLE E MBK AIRBORN E MBK OCTANE CROSS E MBK VITESSE E NISHIKI PRO SL B NISHIKI PRO SL E WINTHER SUPERBE 3 WINTHER SUPERBE 3 LTD ...

Page 2: ...The manual describes several different Yamaha E Bike systems It is therefore important that you find out which motor display and battery your particular bike is fitted with You can see this in the chart below View illustrations on page 20 Important information Model Drive Unit Display Unit Battery Pack CENTURION CHALLENGER E PW CE ill no 1 Downtube ill no 17 CENTURION IMAGE E PW ST ill no 3 Downtu...

Page 3: ...ation Battery External Crossover Battery p 78 Charging the Battery Pack removed from the bicycle p 80 Reading the charging status for Battery Pack p 86 Reading the charging status for Display Unit Applies only to models equipped with the Multi Location Battery p 88 Charging time guidelines p 91 I Checking the residual battery capacity p 92 Residual battery capacity indicator display and estimate o...

Page 4: ...f the E Bike Your E Bike is manufactured according to the most advanced production technology Through testing a high quality standard is ensured The E Bike has a strong frame and great performance You will achieve an easier and more enjoyable way of transporting yourself If you have any further questions you are welcome to contact your local dealer Frame number Controlled by Delivery date Manufact...

Page 5: ...hich if not avoided could result in death or serious injury A NOTICE indicates special precautions that must be taken to avoid damage to the vehicle or other property TIP A TIP provides key information to make procedures easier or clearer Indicates forbidden actions which you for safety reasons can not do Product and specifications may change without notice WARNING NOTICE Please make sure you unde...

Page 6: ...on off button You step on the pedals and the drive unit starts to help you depending on which assist level you have chosen See further details under section 4 The bike or its components can be destroyed or damaged if you ride in a way that is more stressful than the way the bike was designed for If the bike is damaged you may lose control and crash Do not exceed the limitations of the bike s desig...

Page 7: ...es It is important that you learn how the brakes work Make sure you can reach the brake lever to the front brake which is activated by the left brake lever Use both brakes moderately for optimum braking effect Gearing The gearing is controlled by using the shifters on the right and left side of the handlebar on some models Remember to stop pedaling when you shift gears NOTICE Change gears as you w...

Page 8: ...nd the bike will last longer We therefore recommend reading the instructions thoroughly Many people can handle most of the maintenance themselves but bicycles are often equipped with complicated fine mechanics which we would advise to have serviced and maintained at the bicycle dealer This manual provides tips and guidance on components and parts that require special attention The chain All chains...

Page 9: ...of Crankshaft pin 35 55 Nm Lock nut on steering bearing 25 35 Nm Front wheel hub nuts 20 30 Nm Rear wheel hub nuts 30 45Nm Expander bolt in stem 15 Nm Seat post 7 Nm Saddle 20 Nm If in doubt you should leave the work to your bicycle dealer as incorrect tightening torque can cause damage to the frame and components and in the worst case lead to accidents Cables All cables should be kept well lubric...

Page 10: ...d accidents On fully hydraulic disc brakes it is important to check the durability of the fluid oil in the brake system Condensation can occur in the system which means reduced braking performance In this case the fluid oil must be changed For safety reasons service is therefore recommended once a year or according to the manufacturer s instructions As it requires great insight and professional ab...

Page 11: ...ear can damage the hub Due to the climatic conditions in Denmark it is important regardless of what the gear manufacturer states that the gear hub is disassembled cleaned and lubricated at least once a year If the hub is exposed to salt water it must be disassembled cleaned and lubricated immediately to prevent corrosion damage that could render the hub unusable Disassembly cleaning and lubricatio...

Page 12: ...g it the de railleur can go into the spokes of the rear wheel with major damage as a result Like the other parts of the gear system the freewheel cassette housing must be lubricated regular ly If the bike is not used for an extended period the freewheel cassette hub must be particularly well lubricated Dismantling the freewheel cassette hub requires special tools and should be car ried out by a sp...

Page 13: ...ire specialist knowledge the maintenance must be carried out by the bicycle dealer Quick release Some bicycle types have quick release hubs This means that the wheels can be removed and in stalled using the eccentric quick release arm on one side It is important that the wheel is clamped correctly and with the right force With correct locking re sistance can only be felt when the arm is half locke...

Page 14: ...kill to carry out the necessary service it is recommended to have the bicycle dealer carry it out Useful links www rockshox com www foxracingshox com www srsuntour cycling com www rst com tw Tires Always keep the tires inflated to the correct tire pressure It makes driving easier and prevents damage to tires tubes and rims The correct tire pressure is indicated on the side of the tyre e g as INFLA...

Page 15: ...turer s instructions for correct maintenance Plastic saddles can be advantageously sprayed with Plastic Finish to freshen up the surface and make it continue to be water resistant If you have had an accident been knocked over hit etc whereby the handlebar frame front fork pedals or crank arms may have been damaged replacement should always take place as the danger of subsequent breakage is present...

Page 16: ...for a long period e g during a severe winter it must be protected from rust Spray chrome plated and galvanized parts and details with an anti rust agent Places on the frame where it is difficult to get to and aluminum parts are protected against rust and oxidation It is a good idea to store the bike hanging This relieves the tires and they are less prone to cracking When the bicycle is put into us...

Page 17: ... information for safe and proper operation Never remove any labels from your Battery Pack and Battery Charger The contents of the label affixed to the product might differ from the contents of the label on this page Be sure to check the label affixed to the product Battery Pack Rear Carrier Battery 400 500 Down Tube Battery 400 500 Multi Location Battery 400 500 ...

Page 18: ...18 Multi Location Battery 600 External Crossover Battery 400 500 ...

Page 19: ...ASP 2 PULL PAC9 Familiarize yourself with the following pictograms and read the explanatory text then make sure to check the pictograms that apply to your model Read the Owner s Manual Do not disassemble Do not dispose of in a fire Do not use with wet hands ...

Page 20: ... 9 Display Unit Display A 10 Display Unit Display B a Display detachable b Display holder c Remote switch 11 Display Unit Display C a Display b Clamp c Remote switch 12 Display Unit Interface X a Communication unit b Mounting spacer c Remote switch 13 Battery Pack Rear Carrier Battery 400 500 14 Battery Pack Down Tube Battery 400 500 15 Battery Pack Multi Location Battery 400 500 16 Battery Pack M...

Page 21: ...lay is removed of display holder Applies to display B Multiple power assist modes are available Choose from Extra Power Mode 1 High Performance Mode Standard Mode Eco Mode Eco Mode and Off Mode to suit your riding conditions See Displaying and switching the assist mode for information on switching between assist modes Assist mode Display 2 Example of recommended driving environment Extra Power Mod...

Page 22: ...head wind Low air temperature Worn out Battery Pack When using the headlight applies only to models equipped with lights powered by the Battery Pack Frequent acceleration Heavier rider and luggage weight Higher assist mode Higher riding speed Range Remaining assist distance will also decrease if the bicycle is not maintained properly Examples of inadequate maintenance that could decrease range rem...

Page 23: ...k fire or damage the Battery Charger Periodically remove dust from the power plug Dampness or other issues could reduce the effectiveness of the insulation resulting in fire Never disassemble or modify the Battery Charger This could result in fire or electric shock Do not use with a power strip or extension cord Using a power strip or similar methods may exceed rated current and can result in fire...

Page 24: ...fire or explosion resulting in serious injury or property damage Do not modify or disassemble the e Bike Systems Do not install anything other than genuine parts and accessories Doing so could result in product damage malfunction or increase your risk of injury When stopped be sure to apply the front and rear brakes and keep both feet on the ground Placing one s foot on the pedal when stopped may ...

Page 25: ...ons near automatic control equip ment such as automatic doors fire alarms etc Otherwise the radio waves could affect the equipment and cause an accident through possible malfunction or un intentional operation Before equipping the bicycle with a Multi Location Battery 400 500 make sure that there is no foreign matter or water in the connector on the bicycle Other wise it could lead to heat generat...

Page 26: ...ator Assist mode switch down USB port Assist mode indicator Speedometer Power switch Battery capacity indicator Function display Walk assist switch Light switch Assist mode switch up TIP The USB port is for connecting the designated YAMAHA diagnostic tool it cannot be used as a power supply ...

Page 27: ...approximately two seconds before starting to ride Displaying and switching the assist mode You can select the assist mode by using the assist mode switches up or down The selected assist mode is displayed by the assist mode indicator When you press the assist mode switch up the mode changes from OFF to ECO or from ECO to ECO or ECO to STD or STD to HIGH or HIGH to EXPW When you press the assist mo...

Page 28: ...ort Mode the assist mode cannot be changed The Automatic Support Mode is saved when the power is turned off When you turn on the power again the e Bike Systems will be activated with the Automatic Support Mode Automatic Support Mode indicator HIGH STD ECO ECO OFF HIGH STD ECO ECO OFF HIGH EXPW STD ECO ECO OFF Assist mode Assist mode Function Function Assist mode indicator Assist mode indicator Ass...

Page 29: ... Push the assist mode switch down for 1 second or long er the display changes as follows Odometer Trip meter Range Odometer You can reset the data for trip meter Odometer This displays the total distance in kilometers or miles rid den while the power was on The odometer cannot be reset Trip meter This displays the total riding distance in kilometers or miles since it was last reset When you turn o...

Page 30: ...be ridden with assist changes The range remaining assist distance estimate cannot be reset TIP Actual range remaining assist distance changes de pending on the riding situation hills headwind etc and as the Battery Pack runs down If in Off Mode is displayed Headlight on off For models equipped with a headlight or taillight powered by the Battery Pack each time you press the light switch the headli...

Page 31: ...press the assist mode switch down for 1 second or longer and release the switch when the display returns to the main riding display WARNING For all setting procedures be sure to stop the bicycle and perform the required settings in a safe location Otherwise lack of attention to surrounding traffic or other hazards could cause an accident TIP The settings cannot be adjusted while riding If you do t...

Page 32: ...ou select Off Mode If the wheels are not turning when braking or coming into contact with an obstacle etc Self diagnosis function The e Bike Systems are equipped with a self diagnosis function If a malfunction or fault occurs in the e Bike Sys tems the main riding display and Er will be shown alter nately while an error code will inform you of the type of error in the function display See Troubles...

Page 33: ...t switch Automatic Support Mode indicator Walk assist switch Assist mode switch up Battery capacity indicator Light indicator Assist mode indicator Function display Speedometer Assist mode switch down Power switch Light switch USB port Clock ...

Page 34: ...ry CR2032 Check if the rated coin battery is installed in the rear of the Display Unit If a coin battery is not installed or if there is not sufficient battery power remaining install a new coin battery In case of setting the language see Language To adjust the time see Settings Cover Coin battery CR2032 O ring ...

Page 35: ... in their abdomen chest or throat be tired or lethargic be quieter or more clingy than usual or otherwise not themselves lose their appetite or have a reduced appetite and not want to eat solid food be unable to eat solid food These sorts of symptoms vary or fluctuate with the pain increasing and then subsiding A specific symptom to coin battery ingestion is vomit ing fresh bright red blood If the...

Page 36: ...secured to prevent easy removal Make sure that the display is properly set in the display holder firmly Then install the display fixing bolt M3 thread 12 mm long from underneath If the display fixing bolt cannot be installed nor removed due to interference of the handle bar loosen the clamp bolts and then remove the display holder from the handlebar WARNING Tighten the clamp bolts to 1 2 N m Other...

Page 37: ...nguage by using the assist mode switches up or down and then press the function select switch This setting will then be kept and the display will return to the main riding display WARNING When setting the language be sure to stop the bicy cle and to set the language in a safe location Other wise lack of attention to surrounding traffic or other hazards could cause an accident TIP The assist system...

Page 38: ...ore starting to ride Displaying and switching the assist mode You can select the assist mode by using the assist mode switches up or down The selected assist mode is displayed by the assist mode indicator When you press the assist mode switch up the mode changes from OFF to ECO or from ECO to ECO or ECO to STD or STD to HIGH or HIGH to EXPW When you press the assist mode switch down the mode chang...

Page 39: ...Mode the assist mode cannot be changed The Automatic Support Mode is saved when the power is turned off When you turn on the power again the e Bike Systems will be activated with the Automatic Support Mode Automatic Support Mode indicator HIGH STD ECO ECO OFF HIGH STD ECO ECO OFF HIGH EXPW STD ECO ECO OFF PWseries TE Drive Unit PWseries CE Drive Unit PWseries ST Drive Unit PWseries S2 Drive Unit P...

Page 40: ...city is left in the Battery Pack Clock Displays the current time in 24 hour format To adjust the time see Settings TIP When the power of the bicycle is turned on if a coin battery CR2032 is not installed or if the remaining battery power is insufficient the clock will flash for 5 seconds and then will remain shown Install the coin battery or replace the coin battery to adjust the clock If the cloc...

Page 41: ...ou can reset the data for trip meter average bicycle speed maximum bicycle speed and trip time For more information see Settings Odometer This displays the total distance in kilometers or miles rid den while the power was on The odometer cannot be reset Trip meter This displays the total riding distance in kilometers or miles since it was last reset When you turn off the power the data up to that ...

Page 42: ...r longer when the maximum bicy cle speed is displayed on the function display Or see Settings Range Remaining assist distance This displays an estimate of the distance in kilometers or miles that can be ridden with assist on the residual bat tery capacity of the Battery Pack installed If you switch the assist mode when the range remaining assist dis tance is displayed the estimate of the distance ...

Page 43: ... h or 1 2 MPH the trip time will not be accumulated Headlight on off For models equipped with a headlight or taillight powered by the Battery Pack each time you press the light switch the headlight and taillight will turn on and off TIP Display backlight operates simultaneously with the light switch As the light switch is turned on or off the display back light will light accordingly For the proce...

Page 44: ...wn When you select an item to set and press the function select switch the setting will be displayed Selecting EXIT returns to the main riding display WARNING For all setting procedures be sure to stop the bicycle and perform the required settings in a safe location Otherwise lack of attention to surrounding traffic or other hazards could cause an accident TIP The settings cannot be adjusted while...

Page 45: ...he assist mode switches up or down 2 Press the function select switch to adjust the minutes 3 Check that the Minute is flashing and adjust the min utes by using the assist mode switches up or down 4 Press the function select switch to return to the main riding display S S S To main riding display Hour adjustment Minute adjustment ...

Page 46: ... the speed in km h When mile is selected the traveled distance will be indi cated in miles and the speed in mph 1 Select km or mile by using the assist mode switches up or down 2 When you press the function select switch the setting will then be kept and the display will return to the main riding display S S To main riding display Selection of km or mile ...

Page 47: ... tery capacity Cadence and TripTime Trip time TIP You cannot hide the odometer indication 1 Select an item by using the assist mode switches up or down 2 Use the function select switch to show or hide the se lected item When an item is shown a check mark will be shown in the check box 3 When you select OK and press the function select switch the setting will be kept and the display will re turn to...

Page 48: ...t an item by using the assist mode switches up or down and use the function select switch to place a check mark in the check box for the item that you want to reset 2 When you select OK and press the function select switch the items with check marks will be reset and the display will return to the main riding display S S S S S S To main riding display Items with check marks will be reset ...

Page 49: ...iding display Setting the display backlight brightness when the head light is off 1 Turn the headlight off by using the light switch 2 Select the display backlight brightness by using the as sist mode switches up or down 3 When you press the function select switch the setting will then be kept and the display will return to the main riding display TIP While adjusting the brightness of the display ...

Page 50: ...eadlight will remain off When Save is selected the on or off status of the head light will be saved when the power of the e Bike Systems is turned off When later turning on the e Bike Systems the headlight will light or not light depending on the on or off status that was last in use 1 Select Discard or Save by the assist mode switches up or down 2 When you press the function select switch the set...

Page 51: ...eeds 6 km h If you select Off Mode If the wheels are not turning when braking or coming into contact with an obstacle etc Self diagnosis function The e Bike Systems are equipped with a self diagnosis function If a malfunction or fault occurs in the e Bike Sys tems the speedometer and Er will be shown alternately and an error message will be shown on the function dis play See Troubleshooting regard...

Page 52: ...ble Check that the USB plug is facing the right way and not totally out of position with the USB port or slanted and make sure it is fully inserted all the way in Do not connect the USB port and the USB plug in a wet state Use a USB 2 0 OTG cable that conforms to the standards Do not insert foreign objects into the USB port unit Otherwise the Display Unit and external device may malfunction TIP Po...

Page 53: ...53 ...

Page 54: ...g instructions for Battery Charger type PASC9 and PASC10 Those types can be found in the labels on the products Before using Battery Charger read all instructions and cautionary markings on Battery Charger Battery Pack and product using Battery Pack Only use the Battery Charger type PASC10 to charge PASB2 PASB4 and PASB5 type Battery Packs for Yamaha e Bike Systems while only using the Battery Cha...

Page 55: ...re while charging You can avoid charging suspension by starting to charge with the Battery Pack cold or at a room temper ature of 15 25 C If charging suspension occurs move the Battery Pack to a cool location to reduce the charging standby time Wintertime charging standby suspension Charging standby will occur if the temperature is less than 0 C If charging is started and the temperature drops bel...

Page 56: ...ack and connect it to the charging plug on the Battery Charger Charging the Battery Pack mounted on the bicycle Multi Location Battery External Crossover Battery 1 Connect the power plug of the Battery Charger to a household power outlet 2 Remove the cap of charging inlet from the charging connector on the bicycle and connect it to the charging plug on the Battery Charger How to open the cap var i...

Page 57: ...irm that charging is complete and then disconnect the charging plug from the Battery Pack How to disconnect the charging plug of Battery Charger type PASC10 see the left figure Grasp the lock release ring Pull it out straight 6 Place the cap of charging inlet on the Battery Pack s charging connector WARNING Never handle the power plug charging plug or touch the Battery Charger contacts with wet ha...

Page 58: ... outlet 5 Remove the cap from the charging connector on the Battery Pack and connect it to the charging plug on the Battery Charger The Multi Location Battery 400 500 and External Crossover Battery 400 500 are not equipped with a cap NOTICE Do not connect the charging plug of the Battery Charger with the charging connector of the Battery Pack in a wet state Otherwise the Battery Charger and Batter...

Page 59: ...59 Cap Charging connector ...

Page 60: ...ctric shock fire or damage the Battery Charger Periodically remove dust from the power plug Dampness or other issues could reduce the effec tiveness of the insulation resulting in fire Never disassemble or modify the Battery Charger This could result in fire or electric shock Do not use with a power strip or extension cord Using a power strip or similar methods may exceed rated current and can res...

Page 61: ...ry bottom is aligned to the top of the case Insert the upper part of the Battery Pack in the direction of the arrow so that the battery handle is aligned to the top of the battery lock Press the upper part of the Battery Pack toward the frame until it clicks into place to secure it TIP Battery Pack mounting method Multi Location Battery How to install Multi Location Batteries varies between bi cyc...

Page 62: ...y Pack in the direction of the arrow so that the battery bottom is aligned to the top of the case Press the upper part of the Battery Pack toward the frame until it clicks into place to secure it Battery bottom Top of the case Battery lock Top of the case Battery bottom Battery lock ...

Page 63: ...se the Battery Pack to become hot or catch fire resulting in serious injury or property damage Do not dispose of the Battery Pack in a fire or ex pose it to a heat source Doing so could cause an explosion resulting in serious injury or property damage Do not drop the Battery Pack or subject it to im pact Doing so could cause the Battery Pack to be come hot or catch fire resulting in serious injury...

Page 64: ...ty indicator lamps indicate the amount of charging completed A flashing battery capacity indicator lamp indicates current progress Charging During charging the battery capacity indicator lamps light up one by one Rear Carrier Battery Down Tube Battery Multi Location Battery External Crossover Battery Example Battery is approximately 50 75 charged ...

Page 65: ... go off Multi Location Battery External Crossover Battery Off Four lamps flash simultaneously Battery Pack is in standby mode The Battery Pack internal temperature is too high or too low Charging will automatically restart when a temperature is reached that allows charging See Appropriate charging environments When possible always perform charging at the optimal temperature of 15 25 C Rear Carrier...

Page 66: ... To check the charge status turn on the power of the Display Unit Battery charger lamp Display Unit Current status Details On Display A 0 1 10 11 99 0 2 second intervals 0 5 second intervals Charging The battery capacity indicator slowly increases Display B 11 99 1 10 0 0 5 second intervals 0 2 second intervals ...

Page 67: ...he battery capacity indicator light up Charging completed When charging is complete all segments of the battery capacity indicator of the Display Unit will go off and the battery charger lamp of the Battery Charger will go out Display B All segments of the battery capacity indicator light up ...

Page 68: ...s in standby mode The Battery Pack internal temperature is too high or too low Charging will automatically restart when a temperature is reached that allows charging See Appropriate charging environments When possible always perform charging at the optimal temperature of 15 25 C Display B All function display items are flashing ...

Page 69: ... equal amount If charging after a long period of disuse the charging time will be lengthened depending on the Battery Pack status However note that if the battery capacity indica tor lamps do not flash in fault pattern See Reading the charging status for Battery Pack there is no malfunc tion Charging start Charging finish Charging standby Charging time Not including standby time TIP For example ev...

Page 70: ...hen you start moving This is not a malfunction Once riding stabilizes and the load is reduced the proper value is displayed Residual battery capacity indicator display and estimate of residual bat tery capacity for Display Unit The residual battery capacity can be displayed as a numerical value on the Display Unit Display of the residual battery capacity for the Display Unit Display of the residua...

Page 71: ...ity for the Display Unit Display of the residual battery capacity Applicable situation Display A 0 5 second intervals 10 1 There is very little residual battery capacity left Please charge the Battery Pack soon Display B 0 5 second intervals ...

Page 72: ...battery capacity Applicable situation Display A 0 2 second intervals 0 There is no more residual battery capacity Turn off the power for the Display Unit and charge the Battery Pack soon Assist is stopped but you can still ride the bicycle as a regular bicycle Display B 0 2 second intervals ...

Page 73: ...tton Display of the battery capacity indicator lamps Estimate of the residual battery capacity Applicable situation Rear Carrier Battery Down Tube Battery 100 76 From full charge 100 the battery capacity indicator lamps turn off one by one Multi Location Battery External Crossover Battery Rear Carrier Battery Down Tube Battery 75 51 Multi Location Battery External Crossover Battery ...

Page 74: ...ty Applicable situation Rear Carrier Battery Down Tube Battery 50 26 From full charge 100 the battery capacity indicator lamps turn off one by one Multi Location Battery External Crossover Battery Rear Carrier Battery Down Tube Battery 25 11 Multi Location Battery External Crossover Battery ...

Page 75: ...Tube Battery 10 1 There is very little battery capacity left Multi Location Battery External Crossover Battery Slow flashing 0 5 second intervals Rear Carrier Battery Down Tube Battery 0 The battery capacity has reached 0 zero Please charge the Battery Pack Multi Location Battery External Crossover Battery Fast flashing 0 2 second intervals ...

Page 76: ...e when you begin moving 4 Display unit Is the display mounted correctly Applies to Display B K Cleaning maintenance and storage WARNING For bicycles equipped with a Multi Location Battery 400 500 do not remove the Battery Pack from the bicycle when cleaning the bicycle Otherwise water could enter the connector and cause heat generation smoke and or a fire NOTICE Do not use high pressure washers or...

Page 77: ...residual battery capacity become too low TIP If you leave the Battery Pack at full charge or empty it will deteriorate quicker Due to self discharge the Battery Pack slowly loses its charge during storage The Battery Pack s capacity decreases over time but proper storage will maximize its service life When using it again after a long storage period be sure to charge the Battery Pack before using i...

Page 78: ... are no longer usable defective or used Battery Packs batteries must be collect ed separately and disposed of in an environmentally correct manner Please return Battery Packs that are no longer usable to a bicycle dealer Cet appareil ses accessoires piles et cordons se recyclent FR À DÉPOSER OU EN MAGASIN À DÉPOSER EN DÉCHÈTERIE Points de collecte sur www quefairedemesdechets fr WARNING Do not dis...

Page 79: ...e This is not a malfunction It is a safeguard engaged when the temperature of the Battery Pack or the Drive Unit is too high Power assist will be restored once the temperature of the Battery Pack or the Drive Unit has decreased Also you can make this less likely to occur by shifting to a lower gear than you would usually use for example by shifting from second to first gear Is the air temperature ...

Page 80: ... locked in place there may be a loose connection with the Battery Pack terminals or wires Have a bicycle dealer inspect your bicycle Strange rumbling or crunching noises come from the Drive Unit There could be a problem inside the Drive Unit Have a bicycle dealer inspect your bicycle Smoke or unusual odor comes from the Drive Unit There could be a problem inside the Drive Unit Have a bicycle deale...

Page 81: ...ay Display B The speedometer and Er will be shown alternately and an error message other than errors relating to the battery pack will be shown on the function display The problem occurs in the e Bike Systems Turn off the power and then turn it on again If the problem cannot be solved have your bicycle inspected by a dealer as soon as possible ...

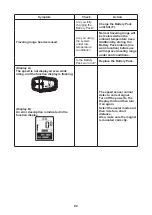
Page 82: ...in a warm location before use will improve traveling range under cold conditions Is the Battery Pack worn out Replace the Battery Pack Display A The speed is not displayed even while riding and the function display is flashing Display B An error description is indicated in the function display The speed sensor cannot detect a correct signal Turn off the power to the Display Unit and then turn it o...

Page 83: ...ed Display B The function display are flashing Power assist is stopped This is not a malfunction It is in a state that the operation of the e Bike Systems is normal This state may occur depending on the pedaling strength and riding speed but it returns to normal condition if it is confirmed that the system is normal ...

Page 84: ...ay Display B The main riding display and Er will be shown alternately and an error message relating to the battery pack error will be shown on the function display The problem occurs in the Battery Pack Turn off the power and then turn it on again If the problem cannot be solved have your Battery Pack inspected by a dealer as soon as possible ...

Page 85: ...s flashing Display B The Automatic Support Mode indicator is flashing There could be a problem inside the Drive Unit Turn off the power to the Display Unit and then turn it on again If the problem cannot be solved have your bicycle inspected by a dealer as soon as possible ...

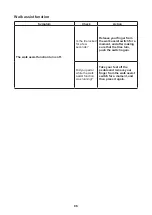
Page 86: ...w seconds Release your finger from the walk assist switch for a moment and after making sure that the tires turn push the switch again Did you pedal while the walk assist function was running Take your feet off the pedals and remove your finger from the walk assist switch for a moment and then press it again ...

Page 87: ...wer on Is the USB version correct Use an external device that complies with USB 2 0 Is the USB cable type correct Use an OTG cable Also connect the host side to the display Is the USB cable firmly connected Reconnect the USB cable Is the USB port or USB plug terminal dirty or wet Disconnect the USB cable from the Display Unit and external device Remove the dirt and water on the USB port and USB pl...

Page 88: ...residual battery capacity indicator lamps lit Review charging method and try charging again If the Battery Pack still does not charge the Battery Charger might be malfunctioning Are the Battery Charger or Battery Pack contact terminals dirty or wet Remove the Battery Pack from the Battery Charger and the charging plug from the socket Use a dry cloth or cotton swab to clean the Battery Charger and ...

Page 89: ...lug into the Battery Pack If battery capacity indicator lamps still flash alternatively there might be a fault in the Battery Pack When the Battery Pack is remounted on the bicycle and the power switch of the Display Unit is pressed if battery capacity indicator lamps still flash alternately there might be a fault in the Drive Unit Multi Location Battery External Crossover Battery ...

Page 90: ...er switch of Display Unit When the charging plug is reconnected into the Battery Pack if battery capacity indicator lamps still flash simultaneously there might be a fault in the Battery Charger Multi Location Battery Is the charging connector on the Battery Pack wet Clean the charging connector and charging plug Then dry them Afterwards connect the charging plug to the charging connector External...

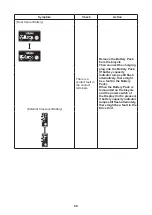
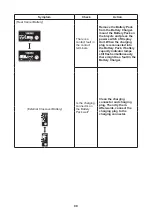
Page 91: ... too hot to be touched by hand unplug the charging plug wait for it to cool and consult a bicycle dealer After charging all of the battery capacity indicator lamps do not light up when the battery capacity indicator button is pressed Has the charging plug been unplugged or the Battery Pack removed during charging Charge the Battery Pack again Did you start charging with the Battery Pack at a high ...

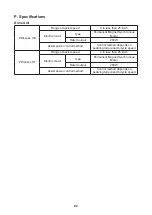
Page 92: ...ous Motor Rated output 250 W Assist power control method Control method depends on pedaling torque and bicycle speed PWseries ST Range of assist speed 0 to less than 25 km h Electric motor Type Permanent Magnet Synchronous Motor Rated output 250 W Assist power control method Control method depends on pedaling torque and bicycle speed ...

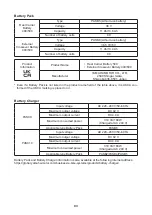
Page 93: ...roduct name field of the table above it is UKCA con formed if the UKCA marking is placed on it Battery Charger PASC9 Input voltage AC 220 240 V 50 60 Hz Maximum output voltage DC 42 V Maximum output current DC 4 0 A Maximum consumed power 310 VA 180 W Charged at AC 240 V Applicable type Battery Pack PASB6 PASC10 Input voltage AC 220 240 V 50 60 Hz Maximum output voltage DC 42 V Maximum output curr...

Page 94: ...ortion Display B Power supply portion USB port type USB2 0 Micro B Output current Max 1000 mA Rated voltage 5 V Wireless communication portion Product Information Model No X3M Manufacturer YAMAHA MOTOR CO LTD 2500 Shingai iwata Shizuoka 438 8501 Japan Trade mark Trade name ...

Page 95: ... of re placing the parts should be detected in time so that repairs are minimized If these guidelines are not followed the risk of damage increases and the warranty on the bike will be lost To maintain and keep the E bike in good condition we recommend an inspection twice a year but at least once a year at an authorized dealer It is important to abide by local traffic laws and ride based on the co...

Page 96: ...has been aware of but that the buyer has not chosen within a reasonable time to have HF Christiansen A S remedied If repairs are carried out within a reasonable time the buyer is not entitled to compensation pro portionate refusal cancellation or redelivery The buyer delivers and collects at his own expense the delivered goods at the repair location specified by HF Christiansen A S within the coun...

Page 97: ...e consequence of errors or negligence committed by HF Christiansen A S HF Christiansen A S is not liable for indirect damages and consequential losses unless the buyer can document that HF Christiansen A S has acted contrary to common decency HF Christiansen A S has given the buyer misleading information that HF Christiansen A S did not have reason to believe to be correct HF Christiansen A S has ...

Page 98: ...yrelsens hjemmeside www forbrug dk Vær opmærksom på at krav om udbedring af mangler ved cyklen indenfor reklamationsfristen efter købelovens regler gælder kun hvis ansvaret for de opståede mangler skyldes forhold som sælger er ansvarlig for Sælger er uden ansvar hvis manglerne f eks skyldes hærværk påkørsel man glende vedligehold unormalt brug eller almindeligt slid Såfremt stel gaffel eller farve...

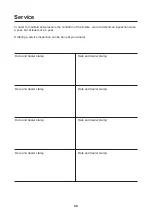
Page 99: ...pection twice a year but at least once a year Ordering a service inspection can be done at your dealer Date and dealer stamp Date and dealer stamp Date and dealer stamp Date and dealer stamp Date and dealer stamp Date and dealer stamp Date and dealer stamp Date and dealer stamp Service ...

Page 100: ...d dealer stamp Date and dealer stamp Date and dealer stamp Date and dealer stamp Date and dealer stamp Date and dealer stamp Date and dealer stamp Date and dealer stamp Date and dealer stamp Date and dealer stamp ...

Page 101: ...EN 15194 2017 Production year 2023 Product Yamaha PW CE PW ST Model MBK Vitesse MBK Airborn MBK Octane Cross Nishiki PRO SLE Nishiki PRO SLB Centurion Invincible Centurion Challenger Centurion Image Winther Superbe 3 Winther Superbe 3 LTD Randers Danmark 5 11 2022 Location Date Michael Hansen Product manager E Bikes CE declaration of conformity 2023 Hvidemøllevej 9 11 DK 8920 Randers NV 45 86 42 3...

Page 102: ...Hvidemøllevej 9 11 DK 8920 Randers NV 45 86 42 33 33 info hfchristiansen com www hfchristiansen com ...

Reviews: