background image

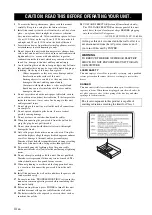
CAUTION: READ THIS BEFORE OPERATING YOUR UNIT.

iii 

En

1

To assure the finest performance, please read this manual 
carefully. Keep it in a safe place for future reference.

2

Install this sound system in a well ventilated, cool, dry, clean 
place – away from direct sunlight, heat sources, vibration, 
dust, moisture, and/or cold. Allow ventilation space of at least 
10 cm (3 15/16 in) on the top, 10 cm (3 15/16 in) on the left 
and right, and 10 cm (3 15/16 in) on the back of this unit. 

3

Locate this unit away from other electrical appliances, motors, 
or transformers to avoid humming sounds.

4

Do not expose this unit to sudden temperature changes from 
cold to hot, and do not locate this unit in an environment with 
high humidity (i.e. a room with a humidifier) to prevent 
condensation inside this unit, which may cause an electrical 
shock, fire, damage to this unit, and/or personal injury.

5

Avoid installing this unit where foreign objects may fall onto 
this unit and/or this unit may be exposed to liquid dripping or 
splashing. On the top of this unit, do not place:

Other components, as they may cause damage and/or 
discoloration on the surface of this unit.

Burning objects (i.e. candles), as they may cause fire, 
damage to this unit, and/or personal injury.

Containers with liquid in them, as they may fall and 
liquid may cause electrical shock to the user and/or 
damage to this unit. 

6

Do not cover this unit with a newspaper, tablecloth, curtain, 
etc. in order not to obstruct heat radiation. If the temperature 
inside this unit rises, it may cause fire, damage to this unit, 
and/or personal injury.

7

Do not plug in this unit to a wall outlet until all connections 
are complete.

8

Do not operate this unit upside-down. It may overheat, 
possibly causing damage.

9

Do not use force on switches, knobs and/or cables.

10

When disconnecting the power cable from the wall outlet, 
grasp the plug; do not pull the cable.

11

Do not clean this unit with chemical solvents; this might 
damage the finish.

12

Only voltage specified on this unit must be used. Using this 
unit with a higher voltage than specified is dangerous and may 
cause fire, damage to this unit, and/or personal injury. 
Yamaha will not be held responsible for any damage resulting 
from use of this unit with a voltage other than specified.

13

To prevent damage by lightning, keep the power cable 
disconnected from a wall outlet or the unit during a lightning 
storm.

14

Do not attempt to modify or fix this unit. Contact qualified 
Yamaha service personnel when any service is needed. The 
cabinet should never be opened for any reasons.

15

When not planning to use this unit for long periods of time 
(i.e. vacation), disconnect the power cable from the wall 
outlet.

16

Install this unit near the wall outlet and where the power cable 
can be reached easily.

17

Be sure to read the “TROUBLESHOOTING” section in this 
manual on common operating errors before concluding that 
this unit is faulty.

18

Before moving this unit, press POWER to turn off this unit 
and then disconnect the power cable from the wall outlet.

19

The batteries shall not be exposed to excessive heat such as 
sunshine, fire or like.

20

VOLTAGE SELECTOR (Asia and General models only)
The VOLTAGE SELECTOR on the rear panel of this unit 
must be set for your local main voltage BEFORE plugging 
into the wall outlet. Voltages are:

................................. AC 110/120/220/230–240 V, 50/60 Hz

LASER SAFETY

This unit employs a laser. Due to possible eye injury, only a qualified 
service person should remove the cover or attempt to service this 
device.

DANGER

This unit emits visible laser radiation when open. Avoid direct eye 
exposure to beam. When this unit is plugged into the wall outlet, do 
not place your eyes close to the opening of the disc tray and other 
openings to look into inside.

CAUTION: READ THIS BEFORE OPERATING YOUR UNIT.

As long as this unit is connected to the wall outlet, it is 
not disconnected from the AC power source even if 
you turn off this unit by POWER.

WARNING

TO REDUCE THE RISK OF FIRE OR ELECTRIC 
SHOCK, DO NOT EXPOSE THIS UNIT TO RAIN 
OR MOISTURE.

The laser component in this product is capable of 
emitting radiation exceeding the limit for Class 1.

Summary of Contents for R CD-S700

Page 1: ...Compact Disc Player Lecteur Compact Disque OWNER S MANUAL MODE D EMPLOI UAB ...

Page 2: ...us the apparatus has been exposed to rain or moisture does not operate normally or has been dropped We Want You Listening For A Lifetime Yamaha and the Electronic Industries Association s Consumer Electronics Group want you to get the most out of your equipment by playing it at a safe level One that lets the sound come through loud and clear without annoying blaring or distortion and most importan...

Page 3: ...ctronic devices Compliance with FCC regulations does not guarantee that interference will not occur in all installations If this product is found to be the source of interference which can be determined by turning the unit OFF and ON please try to eliminate the problem by using one of the following measures Relocate either this product or the device that is being affected by the interference Utili...

Page 4: ...Only voltage specified on this unit must be used Using this unit with a higher voltage than specified is dangerous and may cause fire damage to this unit and or personal injury Yamaha will not be held responsible for any damage resulting from use of this unit with a voltage other than specified 13 To prevent damage by lightning keep the power cable disconnected from a wall outlet or the unit durin...

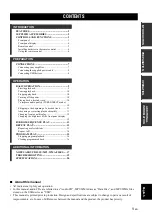
Page 5: ...ersing playback rapidly 11 Changing front panel display 12 Changing the brightness of the front panel display 12 RANDOM SEQUENCE PLAY 13 REPEAT PLAY 13 Repeating a selected item 13 Repeat A B 14 PROGRAM PLAY 15 Stopping program playback 16 Clearing programmed track 16 NOTES ABOUT DISCS MP3 WMA FILES 17 TROUBLESHOOTING 19 SPECIFICATIONS 20 CONTENTS INTRODUCTION PREPARATION OPERATION ADDITIONAL INFO...

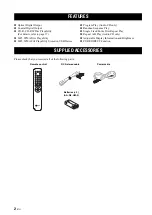
Page 6: ...ability Stored on USB Device Program Play Audio CD only Random Sequence Play Single Track Entire Disc Repeat Play Repeat A B Play Audio CD only Adjustable Display Information and Brightness PURE DIRECT Function Please check that you received all of the following parts FEATURES SUPPLIED ACCESSORIES Remote control RCA stereo cable Batteries 2 AA R6 UM 3 Power cable ...

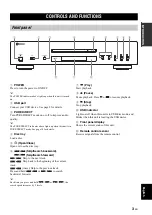
Page 7: ...6 Skip Search backward Skip Search forward Skip to the next track Skip back to the beginning of the current track twice Skip to the previous track Press and hold or to search backward forward y Each time you press and hold or the search speed increases by 2 levels 7 Play Start playback 8 Pause Pause playback Press or to resume playback 9 Stop Stop playback 0 USB indicator Lights on off when this u...

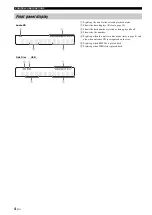
Page 8: ...e 12 3 Shows the track number selected or being played back 4 Shows the file number 5 Lights up when this unit is in disc mode refer to page 9 and also when an Audio CD is recognized on the tray 6 Lights up when MP3 file is played back 7 Lights up when WMA file is played back Front panel display Audio CD Data Disc USB ...

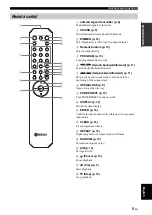
Page 9: ...rd 7 Skip backward forward p 11 Skip to the next previous track or skip back to the beginning of the current track 8 OPEN CLOSE p 9 Open or close the disc tray 9 PURE DIRECT p 10 Turn PURE DIRECT mode on or off 0 DISPLAY p 12 Switch the time display A ENTER p 15 Confirm the track number when this unit is in program input mode B CLEAR p 16 Clear programmed track C REPEAT p 13 Repeat playback of a s...

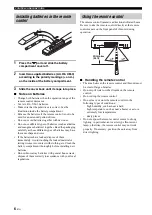
Page 10: ... it come into contact with clothing etc Clean the battery compartment thoroughly before installing new batteries Do not throw away batteries with general house waste dispose of them correctly in accordance with your local regulations The remote control transmits a directional infrared beam Be sure to aim the remote control directly at the remote control sensor on the front panel of this unit durin...

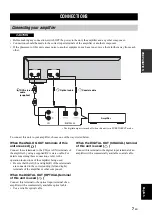
Page 11: ... concerning these connections refer to the operation instructions of the amplifier being used Be sure that the left L and right R of these terminals are connected to the corresponding left and right terminals of the amplifier or other component When the DIGITAL OUT OPTICAL terminal of this unit is used Connect this terminal to the optical input terminal of an amplifier with a commercially availabl...

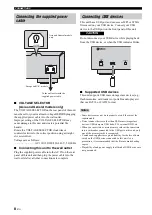
Page 12: ...f this unit Do not disconnect your USB device while playing back from the USB device or when the USB indicator blinks Supported USB devices This unit supports USB mass storage class devices e g flash memories card readers or portable audio players that use FAT16 or FAT32 format Some devices may not work properly even if they meet the requirements Do not connect devices other than USB mass storage ...

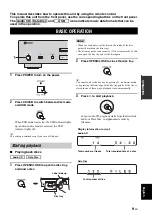
Page 13: ...disc When you load a disc set the disc on the inside of the disc guides 4 marks on the disc tray The disc may not be read correctly if it is set incorrectly In this case open the disc tray and set the disc again 2 Press OPEN CLOSE to close the disc tray y You can also close the disc tray by pressing h a numeric button or by pressing the front edge of the disc tray gently If the tray is closed in o...

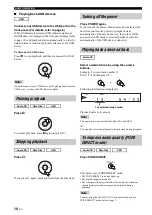
Page 14: ...of the disc on the tray If you turn off the power when USB mode is selected playback will start automatically of the USB device connected Select a desired track by using the numeric buttons Example To select track number 12 Press 1 and then press 2 Following information is displayed Playback starts in 2 seconds This operation is not available for Data Disc and USB y You can also select and playbac...

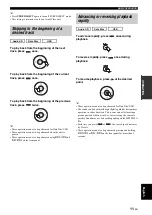
Page 15: ...vance rapidly press once during playback To reverse rapidly press once during playback To resume playback press at the desired point y These operations can also be performed for Data Disc USB The sound can be heard although slightly garbled during these operation in either direction This is convenient for locating a precise position within a track or for reviewing the contents quickly Sound may no...

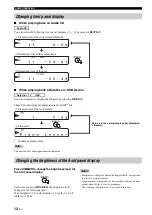
Page 16: ...evel changes in the following order Max brightest J Level1 default J Level2 J Level3 darkest J Max Brightness is slightly decreased during playback except when the level is set to maximum Brightness may temporarily be decreased for some operations except when the level is set to maximum This setting is retained even if you turn off this unit Changing front panel display Note Audio CD 1 Elapsed tim...

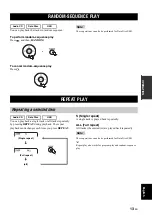
Page 17: ...essing REPEAT during playback The repeat playback mode changes each time you press REPEAT S Single repeat A single track is played back repeatedly ALL Full repeat All tracks the entire disc are played back repeatedly These operations can also be performed for Data Disc USB y Repeat play also works for program play and random sequence play RANDOM SEQUENCE PLAY USB Audio CD Data Disc Note REPEAT PLA...

Page 18: ...epeat play The selected section is played back repeatedly To cancel repeat A B Press A B again to make A B disappear from the front panel display You cannot set repeat A B from one track to another track This operation is not available for Data Disc and USB If you stop playback by pressing repeat A B is canceled You cannot use repeat A B when this unit is in PURE DIRECT mode Repeat A B Audio CD A ...

Page 19: ...ss 6 When you press ENTER Repeat this operation to program more tracks You can select the same track again Pressing PROGRAM in program input mode exits to normal playback mode though programmed tracks are stored 4 Press h to start program play Following information is displayed PROGRAM PLAY Audio CD In this mode the front panel display shows as normally even when this unit is in PURE DIRECT mode N...

Page 20: ...isplayed The last programmed track is cleared Clearing all programmed tracks Press CLEAR after exiting program input mode Following information is displayed All programmed tracks are cleared The display is turned off after 2 seconds Switching to USB mode opening the disc tray or switching off the POWER clears all programmed tracks Stopping program playback Clearing programmed track Note Total numb...

Page 21: ...a Disc starts in alphanumeric order Playback for USB starts in order by date and time of creation Copyright protected WMA DRM files cannot be played back by this unit The disc must be ISO9660 compatible Text data contained in files is not displayed on this unit The maximum file and folder numbers are as follows NOTES ABOUT DISCS MP3 WMA FILES Compact discs digital audio The most popular discs for ...

Page 22: ...e case When removing or storing a disc be careful not to scratch the playing surface Compact discs are not affected by small particles of dust or fingerprints on their playing surface but even so they should be kept clean Wipe by using a clean dry cloth Do not wipe with a circular motion wipe straight outward from the center Do not try to clean the disc s surface by using any type of disc cleaner ...

Page 23: ...a correctly recorded disc playable with this unit 17 The disc is a non standard disc not playable with this unit Replace the disc with a correctly recorded disc playable with this unit 17 This unit is in USB mode Switch to disc mode by pressing CD USB 5 9 USB playback does not start Improper USB device connections Connect the USB device again 8 The format of the MP3 or WMA file is not compatible w...

Page 24: ...s AC 220 240 V 50 Hz Asia and General models AC 110 120 220 240 V 50 60 Hz Korea model AC 220 V 60 Hz China model AC 220 V 50 Hz Power consumption 16 W Dimensions W H D 435 96 300 mm Weight 6 2 kg Please note that all specifications are subject to change without notice The remote control does not work or function properly Wrong distance or angle The remote control functions within a maximum range ...

Page 25: ...ond Yamaha s control 5 Defects of the system into which this product is incorporated and or incompatibility with third party products 6 Use of a product imported into the EEA and or Switzerland not by Yamaha where that product does not conform to the technical or safety standards of the country of use and or to the standard specification of a product sold by Yamaha in the EEA and or Switzerland 7 ...

Page 26: ... 2008 Yamaha Corporation All rights reserved Printed in Malaysia WQ01730 ...

Reviews: