8-17
1
2
3
4
5
6
7
8
9
10
11
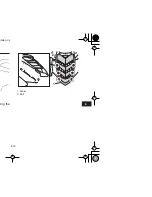
5. Squeeze the excess solvent out of the sponge
material and let it dry.
CAUTION:
ECB00440
Do not twist the sponge material when squeez-
ing it.
6. Check the sponge material and replace it if
damaged.
7. Apply Yamaha foam air filter oil or other qual-
ity foam air filter oil to the sponge material.
NOTE:
The sponge material should be wet but not drip-
ping.
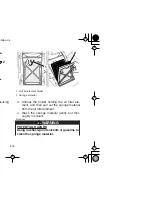
8. Install the sponge material into the air filter el-
ement.
9. Place the air filter element in the original posi-
tion, and then hook the holder.
10. Install the air filter case cover by hooking the
holders onto the air filter case.
11. Install the panel by installing the bolts.
NOTE:
The air filter element should be cleaned every 20–
40 hours. It should be cleaned and lubricated more
often if the ATV is operated in extremely dusty ar-
eas. Each time the air filter element maintenance
is performed, check the air inlet of the air filter case
for obstructions.
CAUTION:
ECB00460
●
Make sure that the air filter element is prop-
erly seated in the air filter case.
●
Never operate the engine with the air filter el-
ement removed. This will allow unfiltered air
to enter the engine, causing rapid engine
wear and possible engine damage. Addition-
ally, operation without the air filter element
will affect carburetor jetting with subsequent
poor performance and possible engine over-
heating.
EBU23891
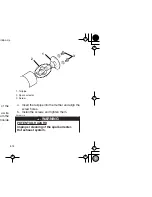
Cleaning the spark arrester
Be sure the exhaust pipe and muffler are cool be-
WHAT CAN HAPPEN
Low-flash-point solvents or gasoline can
catch fire or explode.
HOW TO AVOID THE HAZARD
Use parts cleaning solvent to clean the
sponge material.
Summary of Contents for RAPTOR YFM50RW
Page 2: ......
Page 9: ... 9 2 10 1 11 1 11 1 11 3 11 3 11 5 11 7 ...
Page 17: ...2 1 1 2 3 4 5 6 7 8 9 10 11 RNING AND SPECIFICATION LABELS ...
Page 22: ...3 2 slightly from the figures shown in this manual 4 ...
Page 36: ...4 14 esult in ...
Page 43: ...5 7 1 2 3 4 5 6 7 8 9 10 11 re prop ches are distilled ...
Page 52: ...7 1 DING YOUR ATV ...
Page 93: ...8 15 1 2 3 4 5 6 7 8 9 10 11 ving the 1 Panel 2 Bolt 1 2 2 ...
Page 110: ...8 32 e stand s arrow n of the wheel Front 1 Arrow mark 1 ...
Page 112: ...8 34 ng or ere in l sys mes or s from ...
Page 120: ...10 4 ...
Page 122: ...11 2 o identi n the il abel in e need ha deal 1 Model label 1 ...
Page 124: ...11 4 MILEAGE SERVICING DEALER NAME AND ADDRESS REMARKS ...
Page 129: ...11 9 1 2 3 4 5 6 7 8 9 10 11 ...

