16
RM1x SEQUENCE REMIXER
2. Connections
In order to use the RM1x, the included AC adaptor and an amp system etc. must be connected. If you use external MIDI
devices or controllers, these must also be connected.
This sections explains how to make these connections.
CAUTION!
Be sure to turn off the STANDBY/ON switch before making any connections. If you make connections while the STANDBY/ON
switch is on, you risk damaging external equipment such as the amp or speakers.
❏
Power supply connections
1
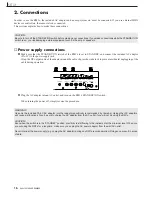
Make sure that the STANDBY/ON switch of the RM1x is set to STANDBY, and connect the included AC adaptor
(PA-5C) to the power supply jack.
Wrap the DC output cable of the adaptor around the cable clip (as shown below) to prevent accidental unplugging of the
cable during operation.
2
Plug the AC adaptor into an AC outlet, and turn on the RM1x STANDBY/ON switch.
When turning the power off, simply reverse the procedure.
WARNING!
Use only the included PA-5C AC adaptor (or other adaptor specifically recommended by Yamaha). Using other AC adaptors
will cause malfunctions. Also, be sure to unplug the AC adaptor from the AC outlet if you will not be using the RM1x.
CAUTION!
Even when the switch is in the “STANDBY” position, electricity is still flowing to the instrument at the minimum level. When you
are not using the RM1x for a long time, make sure you unplug the AC power adaptor from the wall AC outlet.
Never interrupt the power supply (e.g. unplug the AC adaptor) during any RM1x record operation! Doing so can result in a loss
of data.
SETUP


