Basic Operation
RM1x SEQUENCE REMIXER
27
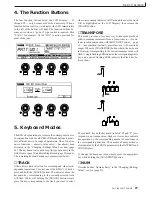
4. The Function Buttons
The four function buttons below the LCD Display — F1
through F4 — only become active when necessary. When a
function button is active, its indicator (the LED immediately
to the left of the button) will light. The function buttons be-
come active when a “go do it” type control is required. Disk
“SAVE,” for example. Or the “DO!” function provided for
most of the jobs.
5. Keyboard Modes
The RM1x keyboard does a lot more than simply enter notes.
In conjunction with the KEYBOARD mode buttons it allows
fast, efficient entry of a range of parameters. One of its alter-
native functions — numeric value entry — has already been
discussed in the “Changing (Editing) Values” section, (page
26). The keyboard is also used for grid-type data entry in the
Grid Groove (page 55) and Grid Step Record (page 54) modes.
The remaining keyboard modes are summarized below:
❏
TRACK
Allows direct track selection for recording and other track-
dependent operations. To select one of the RM1x’s 16 tracks,
press and hold the [TRACK] button. The indicator above the
keyboard key corresponding to the currently selected track
will flash. While still holding the [TRACK] button, simply
press the key corresponding to the track you want to select
(the corresponding indicator will flash and the selected track
will be highlighted on the LCD Display), then release the
[TRACK] button.
❏
TRANSPOSE
This mode provides a fast, easy way to transpose playback
pitch in semitone increments from -12 semitones to +13 semi-
tones (used in conjunction with the OCTAVE buttons — page
13 — transposition is actually possible over a +/- 36 semitone
range). When the [TRANSPOSE] button is held, the keyboard
indicator(s) corresponding to the current transpose value will
flash. A single flashing LED indicates the corresponding white
key, and a pair of flashing LEDs indicates the black key be-
tween them.
The central E key on the keyboard (labeled “H” and “8”) cor-
responds to no transposition. Higher or lower keys indicate
transposition by the corresponding number of semitones in
the corresponding direction. The amount of transposition is
also indicated by the TRANS parameter in the PATTERN and
SONG displays.
To change the transpose value, simply press the appropriate
key while holding the [TRANSPOSE] button.
❏
NUM
Described under “Numeric Entry” in the “Changing (Editing)
Values” section (page 26).


