Pre-Flight Preparation and Inspection
4-15
Installing and Removing Main Rotor Blades
How to Install Main Rotor Blades
1
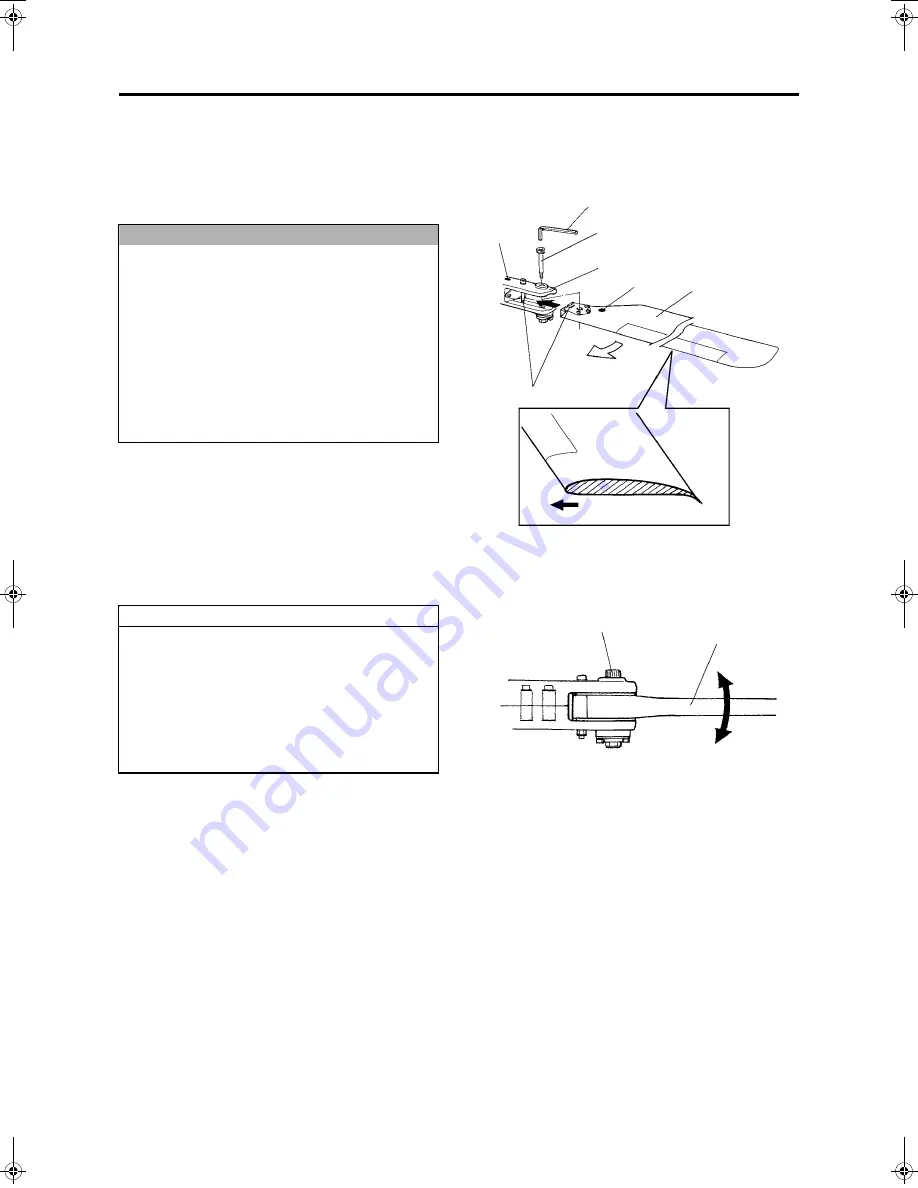
Insert the main rotor blades into the main blade
holder.
2
Use an 8mm hex wrench to tighten the retaining
bolts.
Check the tightening of the retaining bolts as fol-
lows:
●
Tighten each retaining bolt until it comes to a
stop. Then, back it out between 45
°
to 90
°
.
Make sure it is not tightened or loosened
excessively, which could cause vibrations.
●
Check that the main rotor blades move
smoothly by moving them slightly in the direc-
tion of rotation. They are designed to stop by
coming in contact with rubber stops if they are
moved extensively.
How to Remove Main Rotor Blades
Remove the main rotor blades in reverse order of
installation.
●
There are two main rotor blades: right and
left. Install them by matching the color of
the mark of the respective main rotor blade
to the blade holder.
●
Each main rotor blade has a top and bot-
tom. Install it so that its leading edge is
oriented in the direction of rotation as
shown in the cross section diagram.
●
Check that the main rotor blades are free
of debris such as pollen or bugs before
installing them.
NOTICE
Hex Wrench
Retaining Bolt
Main Rotor Blade
Mark
Align groove to bolt
Mark
Cross Section Diagram
Direction of rotation
Blade Holder
Direction of rotation
●
The main rotor blades are properly
installed if their retaining bolts do not
wobble when the blades are moved verti-
cally, and if they move smoothly in the
direction of rotation when a small force is
applied.
●
Tighten both rotor blades to approximately
the same amount of torque.
TIP
Retaining Bolt
Main Rotor Blade
No wobble in this direction
RMAX.book Page 15 Tuesday, January 17, 2012 3:06 PM
Summary of Contents for RMAX Type II G Unit
Page 4: ......
Page 22: ...Part Names 2 5 ...
Page 40: ...Pre Flight Inspection Items 3 17 ...


