background image

15

English

INTR

ODUCTION

PREP

ARA

TION

B

ASIC OPERA-

TION

AD

V

ANCED

OPERA

TION

ADDITIONAL

INFORMA

TION

APPENDIX

CONNECTIONS

L

S

R

V

C

O

DIGITAL OUTPUT

AUDIO

AUDIO

VIDEO

TUNER

DIGITAL INPUT

REMOTE CONTROL

6CH INPUT

MD/
TAPE

CD-R

CD

CD-R

FM

ANT

AM

ANT

GND

GND

RS-

232C

IN

75    UNBAL.

OPTICAL

COAXIAL

COAXIAL:
SELECT BY SETMENU

CD

IN

(PLAY)

DVD

S VIDEO

VIDEO

COMPONENT

DVD

Y

P

B

/

C

B

P

R

/

C

R

S VIDEO

VIDEO

D-TV

/LD

CBL

/SAT

IN

VCR 1

OUT

IN

VCR 2

/DVR

OUT

ZONE 2  OUT

MONITOR

OUT

100 kHz/10 kHz

 50 kHz/  9 kHz

R

MD/TAPE

CBL

/SAT

LD

     RF

(AC-3)

OUT

OUT

(REC)

CD

PHONO

MAIN

CENTER

SUB

WOOFER

FREQUENCY

STEP

FM

AM

SURROUND

IN

(PLAY)

CD-R

OUT

(REC)

L

R

L

D-TV/LD

Y

P

B

/

C

B

P

R

/

C

R

MONITOR

OUT

Y

P

B

/

C

B

P

R

/

C

R

DVD

D-TV

/LD

OPTICAL

L

R

S VIDEO
OUTPUT

S VIDEO
OUTPUT

S VIDEO
OUTPUT

S VIDEO 
INPUT

VIDEO
INPUT

S VIDEO
OUTPUT

AUDIO
OUTPUT

AUDIO
OUTPUT

AUDIO INPUT

AUDIO OUTPUT

COAXIAL
OUTPUT

OPTICAL
OUTPUT

RF
OUTPUT

OPTICAL
OUTPUT

VIDEO
OUTPUT

VIDEO
OUTPUT

AUDIO
OUTPUT

VIDEO
OUTPUT

S VIDEO
INPUT

VIDEO
OUTPUT

VIDEO
INPUT

O

V

S

O

L

R

L

R

L

R

V

S

COMPONENT
INPUT

COMPONENT
OUTPUT

COMPONENT
OUTPUT

V

S

V

V

S

S

L

R

C

C

V

S

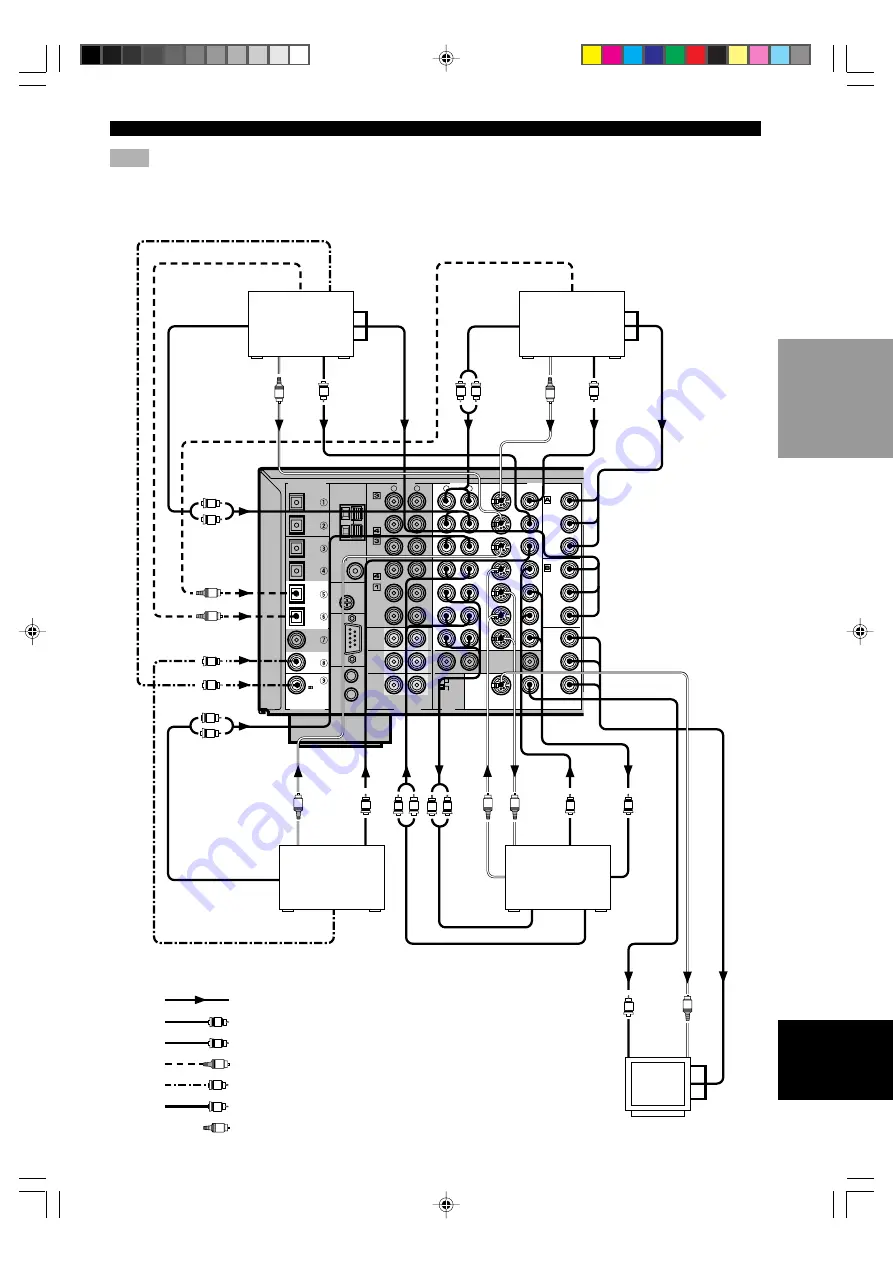
TV/digital TV or

LD player

DVD player

Note

(U.S.A., Canada, Australia and Singapore models only)
• If your LD player has a Dolby Digital RF signal output jack,

connect it to this unit through an RF demodulator (separately
purchased).

Cable TV or

satellite tuner

VCR 1 or

VCR 2/DVR (digital

video recorder)

(General model)

Video monitor

LD player

indicates signal direction

indicates left analog cables

indicates right analog cables

indicates optical cables

indicates coaxial cables

indicates video cables

indicates S-video cables

0103V1000_11-18_EN

8/29/0, 1:33 PM

15

Summary of Contents for RX-V1000

Page 1: ...CROIZAT BP70 CROISSY BEAUBOURG 77312 MARNE LA VALLEE CEDEX02 FRANCE YAMAHA ELECTRONICS UK LTD YAMAHA HOUSE 200 RICKMANSWORTH ROAD WATFORD HERTS WD1 7JS ENGLAND YAMAHA SCANDINAVIA A B J A WETTERGRENS GATA 1 BOX 30053 400 43 VÄSTRA FRÖLUNDA SWEDEN YAMAHA MUSIC AUSTRALIA PTY LTD 17 33 MARKET ST SOUTH MELBOURNE 3205 VIC AUSTRALIA Printed in Malaysia ID V641380 OWNER S MANUAL MODE D EMPLOI RX V1000 Nat...

Page 2: ...ituated on a bed sofa rug or similar surface that may block the ventilation openings or placed in a built in installation such as a bookcase or cabinet that may impede the flow of air through the ventilation openings 9 Heat The unit should be situated away from heat sources such as radiators stoves or other appliances that produce heat 10 Power Sources The unit should be connected to a power suppl...

Page 3: ...tact the local retailer authorized to distribute this type of product If you can not locate the appropriate retailer please contact Yamaha Electronics Corp U S A 6660 OrangethorpeAve Buena Park CA 90620 The above statements apply ONLY to those products distributed by Yamaha Corporation of America or its subsidiaries We Want You Listening For A Lifetime YAMAHAand the Electronic Industries Associati...

Page 4: ...al injury YAMAHA will not be held responsible for any damage resulting from use of this unit with a voltage other than specified 13 To prevent damage by lightning disconnect the power cord from the wall outlet during an electrical storm 14 Take care of this unit so that no foreign objects and or liquid drops inside this unit CAUTION READ THIS BEFORE OPERATING YOUR UNIT 15 Do not attempt to modify ...

Page 5: ...TION SET MENU 36 Adjusting the Items on the SET MENU 36 1 SPEAKER SET speaker mode settings 37 2 LOW FRQ TEST 40 3 L R BALANCE balance of the left and right main speakers 41 4 HP TONE CTRL headphone tone control 41 5 CENTER GEQ center graphic equalizer 41 6 INPUT RENAME 41 7 I O ASSIGNMENT 41 8 INPUT MODE initial input mode 42 9 PARAM INI parameter initialization 42 10 DOLBY D SET Dolby Digital se...

Page 6: ...e Formats BASS EXTENSION Button for Reinforcing Bass Response On Screen Display Function Helpful in Controlling This Unit S Video Signal Input Output Capability Component Video Input Output Capability Optical and Coaxial Digital Audio Signal Jacks Sleep Timer Multi Function Remote Control Custom Installation Facility FEATURES Manufactured under license from Dolby Laboratories Dolby AC 3 Pro Logic ...

Page 7: ...r you have inserted new batteries be sure to push RESET in the battery compartment by using a ballpoint pen or similar object before using the remote control This does not clear the contents of the memory If the remote control is without batteries for more than 3 minutes or if exhausted batteries remain in the remote control the contents of the memory may be cleared When the memory is cleared inse...

Page 8: ...es priority over the source selected with INPUT l h or the input selector buttons 8 SPEAKERS A B Turn on or off the set of main speakers connected to the A and or B terminals on the rear panel 9 BASS EXTENSION ON OFF When pushed in ON this feature boosts the bass frequency of the left and right main channels by 6 dB 60 Hz while maintaining overall tonal balance This boost is useful if you do not u...

Page 9: ... To direct this source to the VCR 1 output jacks select V AUX by using REC OUT ZONE 2 i PRESET TUNING EDIT Switches the function of PRESET TUNING l h the colon turns on or off between selecting a preset station number and tuning This button is also used to exchange the assignment of two preset stations with each other o FM AM Switches the reception band between FM and AM p MEMORY MAN L AUTO FM Sto...

Page 10: ...POWER REC STOP PAUSE PLAY 6 1 ES MONO MOVIE MOVIE THEATER 2 MOVIE THEATER 1 DTS SUR 0 10 100 1 2 3 4 5 6 7 8 9 10 11 12 TV VOL A B C D E PRESET TV INPUT TV MUTE CH DISC MUTE EFFECT VOLUME CHP INDEX e t r y u i o p a s l j k d w q 0 9 8 7 6 4 5 3 2 1 f g h A B C D E A Programming section Provides a selection of programming types you can utilize to conveniently operates your other components B A and...

Page 11: ...s see pages 59 and 60 t LEARN Used for setting up the manufacturer code or for programming the functions of other remote controls see pages 54 to 56 y MACRO Used to program a series of operations for control by a single button see page 58 u MACRO ON OFF Turns the macro function on and off i 6CH INPUT Selects the source connected to the 6CH INPUT jacks o MUTE Mutes the sound Press again to restore ...

Page 12: ... dusty places or in places subject to extremely low temperatures STANDBY ON 30 30 TRANSMIT RE NAME CLEAR MACRO MACRO LEARN OFF ON SYSTEM POWER STANDBY PHONO V AUX TUNER MD TAPE CD R CD D TV LD CBL SAT VCR 1 VCR 2 DVR DVD 6CH INPUT TITLE ENTER MENU SOUND DISPLAY SOURCE SELECT SEARCH CHAPTER 10KEY DSP HALL 1 HALL 2 CHURCH JAZZ CLUB ROCK CONCERT STADIUM TV SPORTS ENTER TAINMENT POWER REC STOP PAUSE P...

Page 13: ...t source with the arrow shaped cursor 0 c indicator Lights up when the built in Dolby Digital Matrix 6 1 or DTS ES decoder is on q v indicator Lights up when this unit is reproducing PCM pulse code modulation digital audio signals w SP A B indicator Lights up according to which set of main speakers is selected Both indicators light up when both sets of speakers are selected e Headphones indicator ...

Page 14: ... impedance Set this unit in the standby mode before you change the setting of this switch see page 19 u AC OUTLET S Use these outlets to supply power to your other A V components see page 19 DIGITAL OUTPUT AUDIO AUDIO VIDEO SPEAKERS PRE OUT MAIN IN MAIN CENTER REAR SURROUND TUNER DIGITAL INPUT REMOTE CONTROL 6CH INPUT MD TAPE CD R CD CD R DVD FM ANT AM ANT GND GND RS 232C IN D TV LD 75 UNBAL OPTIC...

Page 15: ...ion of a subwoofer The use of a subwoofer is effective not only for reinforcing bass frequencies from any or all channels but also for reproducing the LFE low frequency effect channel with high fidelity when the Dolby Digital signal or the DTS signal is played back The YAMAHAActive Servo Processing Subwoofer System is ideal for natural and lively bass reproduction Speaker Placement Refer to the fo...

Page 16: ...re to put the cap back in place This cap protects the jack from dust Note The OPTICAL jacks on this unit conform to the EIA standard If you use a fiber optic cable that does not conform to this standard this unit may not function properly Connecting a turntable PHONO jacks are for connecting a turntable with an MM or high output MC cartridge If you have a turntable with a low output MC cartridge u...

Page 17: ...9 kHz R MD TAPE CBL SAT LD RF AC 3 OUT OUT REC CD PHONO MAIN CENTER SUB WOOFER FREQUENCY STEP FM AM SURROUND IN PLAY CD R OUT REC L R L D TV LD Y PB CB PR CR MONITOR OUT Y PB CB PR CR L R C O L R L R O O O OUTPUT GND L R L R L R INPUT OUTPUT INPUT OUTPUT OUTPUT O C COAXIAL OUTPUT L R L R OPTICAL OUTPUT OPTICAL INPUT OPTICAL INPUT OPTICAL OUTPUT SUBWOOFER OUTPUT CENTER OUTPUT MAIN OUTPUT SURROUND O...

Page 18: ...o jacks may be different depending on the component e g Y CB CR Y PB PR Y B Y R Y etc Component video signals provide the best quality in picture reproduction If your video component has an S video output or component video output you can connect it to this unit Connect the S video signal output jack on your video component to the S VIDEO jack or connect the component signal output jacks on your v...

Page 19: ...TPUT S VIDEO OUTPUT S VIDEO INPUT VIDEO INPUT S VIDEO OUTPUT AUDIO OUTPUT AUDIO OUTPUT AUDIO INPUT AUDIO OUTPUT COAXIAL OUTPUT OPTICAL OUTPUT RF OUTPUT OPTICAL OUTPUT VIDEO OUTPUT VIDEO OUTPUT AUDIO OUTPUT VIDEO OUTPUT S VIDEO INPUT VIDEO OUTPUT VIDEO INPUT O V S O L R L R L R V S COMPONENT INPUT COMPONENT OUTPUT COMPONENT OUTPUT V S V V S S L R C C V S TV digital TV or LD player DVD player Note U...

Page 20: ... by side One of the cables is colored or shaped differently perhaps with a stripe groove or ridge 1 Remove approx 10 mm 3 8 of insulation from each of the speaker cables 2 Twist the exposed wires of the cable together to prevent short circuits Connecting to the SPEAKERS terminals 1 Unscrew the knob 2 Insert one bare wire into the hole in the side of each terminal 3 Tighten the knob to secure the w...

Page 21: ... EX software or DTS ES software by adding the rear center speaker to the 5 speaker configuration Rear center speaker placement Place the rear center speaker in the center between the left and right rear speakers at the same height from the floor as the rear speakers Connecting the rear center speaker 1 Connect the PRE OUT REAR CENTER jack on this unit to the input jack on the separately prepared p...

Page 22: ... main center and or rear channels are directed to this jack The cut off frequency of this jack is 90 Hz The LFE low frequency effect signals generated when Dolby Digital or DTS is decoded are also directed if they are assigned to this jack Notes Adjust the volume level of the subwoofer with the control on the subwoofer The subwoofer volume cannot be adjusted from this unit Depending on the setting...

Page 23: ...IN N IN T MAIN A OR B 4 MIN SPEAKER A B 8 MIN SPEAKER CENTER 6 MIN SPEAKER REAR 6 MIN SPEAKER MAIN A OR B 8 MIN SPEAKER A B 16 MIN SPEAKER CENTER 8 MIN SPEAKER REAR 8 MIN SPEAKER IMPEDANCE SELECTOR SET BEFORE POWER ON SWITCHED 100W MAX TOTAL AC OUTLETS VOLTAGE SELECTOR Left Right Main Connecting the Power Supply Cords After completing all connections connect the AC power cord to an AC power outlet...

Page 24: ...bottom of the screen and then disappears Display off This mode briefly shows the DISPLAY OFF message at the bottom of the screen and then disappears Afterwards no changes to operations appear on the monitor except those of the ON SCREEN button Full display Short display y When you choose the full display mode INPUT l h VOLUME and some other types of operation information are displayed at the botto...

Page 25: ...ccording to the size of the center speaker The possible settings are LRG large SML small and NONE 1B MAIN SP Selects the main channel output mode according to the size of the main speakers The possible settings are LARGE and SMALL LARGE 1C REAR L R SP Selects the rear channel output mode according to the size of the rear speakers The possible settings are LRG large SML small and NONE LRG 1D REAR C...

Page 26: ...e used If you are using two sets of the main speakers press both A and B BASS EXTENSION PROCESSOR DIRECT ON OFF BASS TREBLE Remote control PARAMETER SET MENU VCR2 DVR V AUX VCR 1 CBL SAT D TV LD DVD SOURCE REMOTE REC OUT ZONE 2 A B C D E SPEAKERS A B BASS EXTENSION PROCESSOR DIRECT PRESET TUNING MD TAPE CD R TUNER CD PHONO BASS 6CH INPUT VOLUME INPUT INPUT MODE TREBLE PRESET TUNING EDIT MEMORY MAN...

Page 27: ...CENTER SP on the SET MENU is set to NONE the center channel sound is automatically output from the left and right main speakers Note If the test tone cannot be heard turn down the volume set the unit in the standby mode and check the speaker connections 3 Press k n repeatedly to select the speaker to be adjusted y You can stop the sequence temporarily by holding down k n 4 Press repeatedly to adju...

Page 28: ...AT VCR 1 VCR 2 DVR DVD DIGITAL DTS MOVIE THEATER 1 DTS MOVIE THEATER 1 2 DOLBY DIGITAL DOLBY DIGITAL PRO LOGIC ENTERTAINMENT PRO LOGIC ENTERTAINMENT DSP 6 1 ES PCM PRO LOGIC A SP B D TV LD CBL SAT VCR 1 VCR2 DVR V AUX DVD MD TAPE CD R TUNER CD PHONO VIRTUAL PS PTY RT CT PTY HOLD EON STEREO AUTO NEWSINFOAFFAIRSSPORT NEWSINFOAFFAIRSSPORT MEMORY TUNED ZONE 2 VOLUME dB ms SLEEP VCR2 DVR V AUX VCR 1 CB...

Page 29: ... remote control To restore the audio output to the previous volume level press MUTE again y You can also cancel mute to press any operation buttons such as VOLUME During muting MUTE ON appears on the front panel display and on the video monitor When you have finished using this unit Press STANDBY ON or STANDBY to set this unit in the standby mode Notes on the digital signal The digital input jacks...

Page 30: ... is selected When AUTO is selected this unit automatically determines the type of signal If this unit detects a Dolby Digital or DTS signal the decoder automatically switches to the appropriate setting and reproduces 5 1 channel source The sound output may be interrupted for some LD and DVD players in the following situation The input mode is set to AUTO A search is performed while playing the dis...

Page 31: ...reproduces the noise of an unprocessed DTS signal When you want to play a DTS source be sure to connect the source to a digital input jack and set the input mode to AUTO or DTS If you switch the input mode to ANALOG while playing a source encoded with a DTS signal this unit reproduces no sound If you play a source encoded with a DTS signal and set the input mode to AUTO there will be a moment of n...

Page 32: ...should be used see 12 6 1 ES AUTO on pages 43 and 66 for details 1 Set 10KEY DSP to DSP on the remote control 10KEY DSP HALL 1 HALL 2 CHURCH JAZZ CLUB ROCK CONCERT STADIUM TV SPORTS ENTER TAINMENT MONO MOVIE MOVIE THEATER 2 MOVIE THEATER 1 DTS SUR 0 10 100 1 2 3 4 5 6 7 8 9 10 11 12 DIGITAL DTS MOVIE THEATER 1 2 DSP 6 1 ES PCM PRO LOGIC A SP B D TV LD CBL SAT VCR 1 VCR2 DVR V AUX DVD MD TAPE CD R ...

Page 33: ...effect is turned off when 6CH INPUT is selected as the input source when 96 kHz sampling digital signals are input to this unit when the Dolby Digital KARAOKE source is played when using the test tone or when connecting the headphones EFFECT EFFECT Front panel or Remote control Notes If you turn off the sound effect no sound is output from the center rear and rear center speakers If you turn off t...

Page 34: ...eption is obtained y The AM loop antenna can be removed from the stand and attached to a wall etc Notes The AM loop antenna should be placed away from this unit The AM loop antenna should always be connected even if an outdoor AM antenna is connected to this unit A properly installed outdoor antenna provides clearer reception than an indoor one If you experience poor reception quality an outdoor a...

Page 35: ...EO L AUDIO R OPTICAL SILENT VIDEO AUX EFFECT PROGRAM ON OFF SURROUND D I G I T A L D I G I T A L STANDBY ON 4 2 3 1 1 Press INPUT l h to select TUNER as the input source 2 Press FM AM to select the reception band FM or AM appears on the front panel display Lights up Turn this indicator off TUNING MODE AUTO MAN L MONO AUTO PRESET TUNING EDIT DIGITAL DTS MOVIE THEATER 1 DTS MOVIE THEATER 1 2 DOLBY D...

Page 36: ...g stations on page 33 If the number of the received stations does not reach E8 automatic preset tuning has automatically stopped after searching all stations Only FM stations with sufficient signal strength are stored automatically by automatic preset tuning If the station you want to store is weak in signal strength tune in to it manually in the monaural mode and store it by following the procedu...

Page 37: ...A B C D E DIGITAL DTS MOVIE THEATER 1 DTS MOVIE THEATER 1 2 DOLBY DIGITAL DOLBY DIGITAL PRO LOGIC ENTERTAINM PRO LOGIC ENTERTAINM DSP 6 1 ES PCM PRO LOGIC A SP B VIRTUAL PRESET TUNING Shows the displayed station has been stored as A1 6 Repeat steps 1 to 5 to store other stations Notes Any stored station data existing under a preset number is cleared when you store a new station under that preset n...

Page 38: ... the MEMORY indicator flash on the front panel display 4 Press PRESET TUNING EDIT again The stations stored at the two preset assignments are exchanged VCR2 DVR V AUX VCR 1 CBL SAT D TV LD DVD SOURCE REMOTE REC OUT ZONE 2 A B C D E SPEAKERS A B BASS EXTENSION PROCESSOR DIRECT PRESET TUNING MD TAPE CD R TUNER CD PHONO BASS 6CH INPUT VOLUME INPUT INPUT MODE TREBLE PRESET TUNING EDIT MEMORY MAN L AUT...

Page 39: ...TANDBY ON 2 Notes Do a test recording before you start an actual recording When this unit is set in the standby mode you cannot record between other components connected to this unit The setting of BASS TREBLE BASS EXTENSION VOLUME 3 L R BALANCE on the SET MENU and DSP programs does not affect the recorded material A source connected to the 6CH INPUT jacks of this unit cannot be recorded S video a...

Page 40: ...EVEL 10B D RANGE 11 DTS LFE LEVEL 12 6 1 ES AUTO 13 SP DELAY TIME 14 DISPLAY SET 15 MEMORY GUARD Adjusting the Items on the SET MENU Adjustment should be made with the remote control Note Some items require extra steps to change to the desired setting 1 Set PARAMETER SET MENU to SET MENU 2 Press k n repeatedly to select the item 1 to 15 you want to adjust 3 Press or once to enter the setup mode of...

Page 41: ...o the center speaker SML Select this if you have a small center speaker The low frequency signals 90 Hz and below of the center channel are directed to the speakers selected with 1E LFE BASS OUT Depending on the item press k n to select a sub item 2 LOW FRQ TEST TEST TONE OFF OUTPUT MAIN L R FRQ 88Hz 4 Press repeatedly to change the setting of the item 5 Press k n repeatedly until the current DSP ...

Page 42: ...ker mode 1C REAR L R SP rear speaker mode The OSD shows large small or no rear speakers depending on how you set this item Choices LRG large SML small NONE Initial setting LRG LRG Select this if you have large left and right rear speakers or if a rear subwoofer is connected to the rear speakers The entire range of the rear channel signal is directed to the left and right rear speakers SML Select t...

Page 43: ... to the left and right rear speakers 1E LFE BASS OUT bass out mode LFE signals carry low frequency effects when this unit decodes a Dolby Digital or DTS signal Low frequency signals are defined as 90 Hz and below Choices SWFR subwoofer MAIN BOTH Initial setting BOTH SWFR Select this if you use a subwoofer The LFE signals are directed to the subwoofer MAIN Select this if you do not use a subwoofer ...

Page 44: ...OUTPUT and press to select the speaker you want to compare with the subwoofer If SWFR is selected the test tone above 90 Hz will not be output from the subwoofer The test tone will not necessarily be output from the selected speakers The output mode of the test tone depends on the settings of 1 SPEAKER SET on the SET MENU 3 Press n to go to FRQ and press to select the frequency you want to use 4 A...

Page 45: ...s procedure the test tone remains at the center speaker and you can hear how the sound changes as you adjust the various frequency levels To stop the test tone press TEST see pages 22 and 23 6 INPUT RENAME Use this feature to change the name of the input which appears on the OSD or the front panel display 1 Press an input selector button or use INPUT l h to select the input you want to change the ...

Page 46: ...s do not change if you initialize a program group that does not have the asterisk mark When 15 MEMORY GUARD is set to ON see page 44 you cannot initialize any program groups Once you initialize a DSP program group you cannot automatically revert to the previous parameter settings 10 DOLBY D SET Dolby Digital set This setting is effective only when this unit decodes Dolby Digital signals 10A LFE LE...

Page 47: ...ms 0 to 5 for the center speaker 0 to 30 for the rear center speaker y Increasing the delay by 1 ms simulates moving the speakers about 30 cm one foot farther away from the listening position 11 DTS LFE LEVEL This setting is effective only when this unit decodes DTS signals Use this feature to adjust the output level of the LFE low frequency effect channel when playing back a DTS signal The LFE si...

Page 48: ...ay 15 MEMORY GUARD Use this feature to prevent accidental changes to DSP program parameter values and other settings on this unit Choices ON OFF Initial setting OFF Select ON to protect the following features DSP program parameters All SET MENU items Center rear rear center see page 17 speakers and subwoofer levels The on screen display OSD mode Notes When 15 MEMORY GUARD is set to ON you cannot u...

Page 49: ...ut due to power failure However if the power is cut for more than one week the output level of the effect speakers you adjusted will return to the factory settings If so adjust the output level again ADJUSTING THE LEVEL OF THE EFFECT SPEAKERS PARAMETER SET MENU LEVEL You can adjust the output level of each effect speaker center left and right rear rear center see page 17 and subwoofer while listen...

Page 50: ...By connecting a commercially available timer to this unit you can also set a wake up timer Refer to the operation instructions for the timer Setting the Sleep Timer 1 Select a source and start playback on the source component 2 Press SLEEP repeatedly to set the amount of time before this unit automatically turns off Each time you press SLEEP the front panel display changes as shown below DTS MOVIE...

Page 51: ...rresponding name of the input Input selector buttons 10KEY DSP DSP is selected Input selector buttons and these buttons also switch the control area for each component 10KEY DSP 10KEY is selected Component control area There are 14 component control areas You can set up the manufacturer code and program other remote control functions in each area you cannot set up the manufacturer code in the OPTN...

Page 52: ...mponent control area that can be programmed with other remote control functions Note You cannot set up the manufacturer code in this area See page 53 for the programmable area Zone 2 feature When you make up a second audio video room with this unit s Zone 2 feature you must set Zone2 as the amplifier library in the remote control first Selecting Zone2 by pressing k sets the remote control to the Z...

Page 53: ...K CONCERT STADIUM TV SPORTS ENTER TAINMENT POWER REC STOP PAUSE PLAY 6 1 ES MONO MOVIE MOVIE THEATER 2 MOVIE THEATER 1 DTS SUR 0 10 100 1 2 3 4 5 6 7 8 9 10 11 12 TV VOL A B C D E PRESET TV INPUT TV MUTE CH DISC MUTE EFFECT VOLUME CHP INDEX SYSTEM POWER STANDBY PHONO V AUX TUNER MD TAPE CD R CD D TV LD CBL SAT VCR 1 VCR 2 DVR DVD 6CH INPUT TITLE ENTER MENU SOUND DISPLAY SOURCE SELECT SEARCH CHAPTE...

Page 54: ...EARCH POWER TV VOL TV INPUT and TV MUTE function if you have set up the manufacturer code for your TV in the D TV LD or PHONO area Rec Pause Skip search PLAY PAUSE STOP Numeric buttons 1 to 9 Numeric button 10 Numeric button 0 SYSTEM POWER STANDBY PHONO V AUX TUNER MD TAPE CD R CD D TV LD CBL SAT VCR 1 VCR 2 DVR DVD 6CH INPUT TITLE ENTER MENU SOUND DISPLAY SOURCE SELECT SEARCH CHAPTER 10KEY DSP HA...

Page 55: ...L 2 CHURCH JAZZ CLUB ROCK CONCERT STADIUM TV SPORTS ENTER TAINMENT POWER REC STOP PAUSE PLAY 6 1 ES MONO MOVIE MOVIE THEATER 2 MOVIE THEATER 1 DTS SUR 0 10 100 1 2 3 4 5 6 7 8 9 10 11 12 TV VOL A B C D E PRESET TV INPUT TV MUTE CH DISC MUTE EFFECT VOLUME CHP INDEX SYSTEM POWER STANDBY PHONO V AUX TUNER MD TAPE CD R CD D TV LD CBL SAT VCR 1 VCR 2 DVR DVD 6CH INPUT TITLE ENTER MENU SOUND DISPLAY SOU...

Page 56: ...R 1 VCR 2 DVR DVD 6CH INPUT TITLE ENTER MENU SOUND DISPLAY SOURCE SELECT SEARCH CHAPTER 10KEY DSP HALL 1 HALL 2 CHURCH JAZZ CLUB ROCK CONCERT STADIUM TV SPORTS ENTER TAINMENT POWER REC STOP PAUSE PLAY 6 1 ES MONO MOVIE MOVIE THEATER 2 MOVIE THEATER 1 DTS SUR 0 10 100 1 2 3 4 5 6 7 8 9 10 11 12 TV VOL A B C D E PRESET TV INPUT TV MUTE CH DISC MUTE EFFECT VOLUME CHP INDEX SYSTEM POWER STANDBY PHONO ...

Page 57: ... ROCK CONCERT STADIUM TV SPORTS ENTER TAINMENT POWER REC STOP PAUSE PLAY 6 1 ES MONO MOVIE MOVIE THEATER 2 MOVIE THEATER 1 DTS SUR 0 10 100 1 2 3 4 5 6 7 8 9 10 11 12 TV VOL A B C D E PRESET TV INPUT TV MUTE CH DISC MUTE EFFECT VOLUME CHP INDEX TITLE ENTER MENU SOUND DISPLAY SOURCE SELECT SEARCH CHAPTER 10KEY DSP HALL 1 HALL 2 CHURCH JAZZ CLUB ROCK CONCERT STADIUM TV SPORTS ENTER TAINMENT POWER RE...

Page 58: ...ost worldwide audio video manufacturers in alphabetical order in the display window 4 Press POWER or any other button to check if you have set up the code correctly If the component cannot be controlled with the remote control try setting another code for the same manufacturer y If you continuously want to set up another code for another component press ENTER and repeat steps 1 3 and 4 5 Press LEA...

Page 59: ...IT RE NAME CLEAR MACRO MACRO LEARN OFF ON SYSTEM POWER STANDBY PHONO V AUX TUNER MD TAPE CD R CD D TV LD CBL SAT VCR 1 VCR 2 DVR DVD 6CH INPUT TITLE ENTER SYSTEM POWER STANDBY PHONO V AUX TUNER MD TAPE CD R CD D TV LD CBL SAT VCR 1 VCR 2 DVR DVD 10KEY DSP Programming a New Remote Control Function Learn Feature If you want to program functions not included in the basic operations covered by the man...

Page 60: ...n programming has not been done correctly In this case start over from step 5 When the memory is full FULL appears in the display window and this remote control cannot acquire any more functions Clear unnecessary programmed functions to allow this remote control to acquire new functions 7 Repeat steps 5 and 6 to program additional functions 8 Press LEARN again to exit from the learning mode Notes ...

Page 61: ...n sequentially CD area Macro buttons First Second Third 1 MD TAPE area 3 CD R area 3 CD area 3 VCR 1 area 3 VCR 2 DVR area 3 DVD area 3 D TV LD area 2 1 In order to turn on some components including YAMAHA components connected to this unit connect those components to the AC OUTLET S on the rear panel Power control may not be synchronized with this unit depending on the component For details please...

Page 62: ...s remote control to a macro button If necessary set up the manufacturer code or program a function with the remote control for your component This remote control handles button signals that operate continuously such as volume control as short time interval codes Macro programming that include these types of macro steps are therefore not recommended 1 Press MACRO by using a ballpoint pen or similar...

Page 63: ...acturer code and program any acquired functions that may have been cleared Changing the Source Name in the Display Window 1 Press an input selector button A or B to select the source component you want to rename The selected component name appears in the display window 2 Press RE NAME by using a ballpoint pen or similar object 3 Press k n to select and enter a character Pressing n changes the char...

Page 64: ...ed If this happen start over from step 1 2 Press k n to select the clear mode The mode is shown in the display window in the following order L name of a component Clears all learned functions for the component area Press the input selector button A or B to select the component Clears all learned functions for this unit control area Clears all learned functions Clears all programmed macros Clears a...

Page 65: ...n the second room An infrared emitter in the main room This emitter transmits the infrared signals from the remote control in the second room to the main room for example to a CD player or LD player An amplifier and speakers for the second room A video monitor for the second room y Since there are so many ways to connect and use this unit in a multi room installation we recommend that you consult ...

Page 66: ...LD player s left and right outputs to the analog soundtrack DVDs Use the disc menu to set the DVD player s mixed 2 channel left and right audio outputs to the PCM or Dolby Digital soundtrack For CDs encoded with DTS DO NOT USE the Zone 2 feature for CDs encoded with DTS Remote Control in Zone 2 In the second room Zone 2 the supplied remote control can be used for the Zone 2 remote control You can ...

Page 67: ...is program recreates the acoustic environment of a big church with a high dome and columns along each side The reverberation delay is very long while the early reflections are smaller than with other sound field programs 4 JAZZ CLUB This is the sound field at stage front in The Bottom Line a famous New York jazz club The floor can seat 300 people to the left and right in a sound field offering a r...

Page 68: ...oying the most advanced techniques Program group 10 Sub program Input source Features Spectacle 70 mm Spectacle Dolby Digital DTS Dolby Digital DTS CINEMA DSP Programs For audio video sources Nos 7 to 9 For movie programs Nos 10 to 12 No Program group Sub program Features 7 ENTERTAINMENT Game 9 MONO MOVIE This program is provided for reproducing monaural video sources such as old movies The progra...

Page 69: ...as possible General 70 mm General Analog PCM Dolby Digital in 2 channel DGTL General 1 General 6 1 2 DTS General 1 General ES 2 This program is for reproducing sounds from 70 mm and multichannel soundtrack films and is characterized by a soft and extensive sound field The presence sound field is relatively narrow It spatially spreads all around and toward the screen restraining the echo effect of ...

Page 70: ...tput from the center speaker The effect sound is output from the main speakers when a monaural source is played with CINEMA DSP program groups 7 Game and 8 to 11 Program group 12 PRO LOGIC Normal DOLBY DIGITAL Normal 1 DOLBY DIGITAL Matrix 6 1 2 DTS DIGITAL SUR Normal 1 DTS DIGITAL SUR ES 2 The built in decoder precisely reproduces sounds and sound effects from sources The highly efficient decodin...

Page 71: ...reate a dynamic sound that gives you the feeling of being at a public theater in your listening room by using Dolby Digital or DTS technology Dolby Pro Logic DSP sound field effect These programs express an immense sound field and a large surround effect They also give depth to the sound from the main speakers to recreate the realistic sound of a Dolby Stereo theater Dolby Digital DTS DSP sound fi...

Page 72: ...m at all This ability to create sound fields at will is exactly what YAMAHA has done with the digital sound field processor Sound Field Program Parameters DSP programs consist of some parameters to determine the apparent room size reverberation time distance from you to the performer etc In each program these parameters are set with values precisely calculated by YAMAHA to create a sound field uni...

Page 73: ... If so edit the parameter value again Resetting a Parameter to the Factory set Value To reset some of the parameters to the factory set values Select the parameter you want to reset Then press and hold or until the value temporarily stops at the factory set value The asterisk mark by the parameter name disappears on the video monitor To reset all of the parameters to the factory set values Use 9 P...

Page 74: ...mall value for a large room set it to a large value INT DLY INT DLY INT DLY Level Time Level Sound source First reflection Early reflections Time Level Time Sound source Reflection surface Small value 1 ms Large value 99 ms ROOM SIZE P ROOM SIZE for the presence sound field Function This parameter adjusts the apparent size of the surround sound field The larger the value the larger the surround so...

Page 75: ...ead Level Sound source Time Level Time Live Sound source Small reflected sound Small value 0 Large reflected sound Large value 10 S DELAY surround delay Function This parameter adjusts the delay between the direct sound and the first reflection in the surround sound field Control range 0 49 msec The range depends on the signal format S INIT DLY surround initial delay Function This parameter adjust...

Page 76: ...parameter adjusts the apparent size of the rear center sound field Control range 0 1 2 0 RC LIVENESS rear center liveness Function This parameter adjusts the apparent reflectivity of the virtual wall in the rear center sound field Control range 0 10 REV TIME reverberation time Function This parameter adjusts the amount of time it takes for the dense subsequent reverberation sound to decay by 60 dB...

Page 77: ...e the later the reverberation sound begins A later reverberation sound makes you feel like you are in a larger acoustic environment Sound source Reverberation Time REV LEVEL reverberation level Function This parameter adjusts the volume of the reverberation sound Control range 0 100 Description The larger the value the stronger the reverberation becomes Sound source CT DELAY center delay LS DELAY ...

Page 78: ...t secure Secure the connections The main speakers to be used have not been selected properly Select the main speakers with SPEAKERS A and or B The volume is turned down Turn up the volume The sound is muted Press MUTE or any operation buttons of this unit to cancel a mute and adjust the volume Digital signals other than PCM audio Dolby Digital or DTS signal which this unit cannot reproduce are bei...

Page 79: ...SET MENU is set to MAIN when a Dolby Digital or DTS signal is being played Select SWFR or BOTH 1E LFE BASS OUT on the SET MENU is set to SWFR or MAIN when a 2 channel source is being played Poor bass reproduction 1E LFE BASS OUT on the SET MENU is set to SWFR or BOTH and your system does not include a subwoofer No sound from the rear center speaker 1D REAR CT SP on the SET MENU is set to NONE Sele...

Page 80: ... be changed 15 MEMORY GUARD on the SET MENU is set to ON Select OFF The internal microcomputer has been frozen by an external electric shock such as lightning or excessive static electricity or by a power supply with low voltage Disconnect the AC power cord from the outlet and then plug it in again after about 30 seconds CHECK SPWIRES appears on the front panel display Speaker cables are short cir...

Page 81: ...ation is too weak Use the manual tuning method Use a high quality directional FM antenna Previously preset stations can no longer be tuned in The unit has been disconnected for a long period Re store the stations The desired station cannot be tuned in with the automatic tuning method The signal is weak or the antenna connections are loose Tighten the AM loop antenna connections and orient it for b...

Page 82: ...the two remote controls is too much or too little Place the remote controls at the proper distance The signal coding or modulation of the other remote control is not compatible with this remote control Learning is not possible Memory capacity is full Further learning is not possible without deleting unnecessary functions The internal microcomputer has frozen Press RESET on the remote control Conti...

Page 83: ... 0 V 1 2 kohms VIDEO SECTION Video Signal Type NTSC or PAL Composite Video Signal Level 1 Vp p 75 ohms S Video Signal Level Y 1 Vp p 75 ohms C 0 286 Vp p 75 ohms Component Video Signal Level Y 1 Vp p 75 ohms PB CB PR CR 0 7 Vp p 75 ohms Signal to Noise Ratio 50 dB Frequency Response MONITOR OUT Composite S Video 5 Hz to 10 MHz 3 dB Component DC to 25 MHz 3 dB FM SECTION Tuning Range U S A and Cana...

Page 84: ...CROIZAT BP70 CROISSY BEAUBOURG 77312 MARNE LA VALLEE CEDEX02 FRANCE YAMAHA ELECTRONICS UK LTD YAMAHA HOUSE 200 RICKMANSWORTH ROAD WATFORD HERTS WD1 7JS ENGLAND YAMAHA SCANDINAVIA A B J A WETTERGRENS GATA 1 BOX 30053 400 43 VÄSTRA FRÖLUNDA SWEDEN YAMAHA MUSIC AUSTRALIA PTY LTD 17 33 MARKET ST SOUTH MELBOURNE 3205 VIC AUSTRALIA Printed in Malaysia ID V641380 OWNER S MANUAL MODE D EMPLOI RX V1000 Nat...

Page 85: ...ISPLAY SOURCE SELECT SEARCH CHAPTER 10KEY DSP HALL 1 HALL 2 CHURCH JAZZ CLUB ROCK CONCERT STADIUM TV SPORTS ENTER TAINMENT POWER REC STOP PAUSE PLAY 6 1 ES MONO MOVIE MOVIE THEATER 2 MOVIE THEATER 1 DTS SUR 0 10 100 1 2 3 4 5 6 7 8 9 10 11 12 TV VOL A B C D E PRESET TV INPUT TV MUTE CH DISC MUTE EFFECT VOLUME CHP INDEX SYSTEM POWER STANDBY PHONO V AUX TUNER MD TAPE CD R CD D TV LD CBL SAT VCR 1 VC...

Page 86: ...B C D E PRESET TV INPUT TV MUTE CH DISC MUTE EFFECT VOLUME CHP INDEX Quick Reference Card LD A DISPLAY SEARCH POWER STOP Chapter Time Numeric button 0 1 SOUND CHAPTER chapter search PLAY PAUSE Numeric buttons 1 to 9 Clear Numeric button 10 DVD TITLE MENU DISPLAY SEARCH POWER Return Title Index Numeric button 0 1 Menu cursor ENTER Audio Skip search PLAY PAUSE STOP Numeric buttons 1 to 9 Clear Numer...

Reviews: