ENG
1
2
3
4
5
1
2
EAS00408
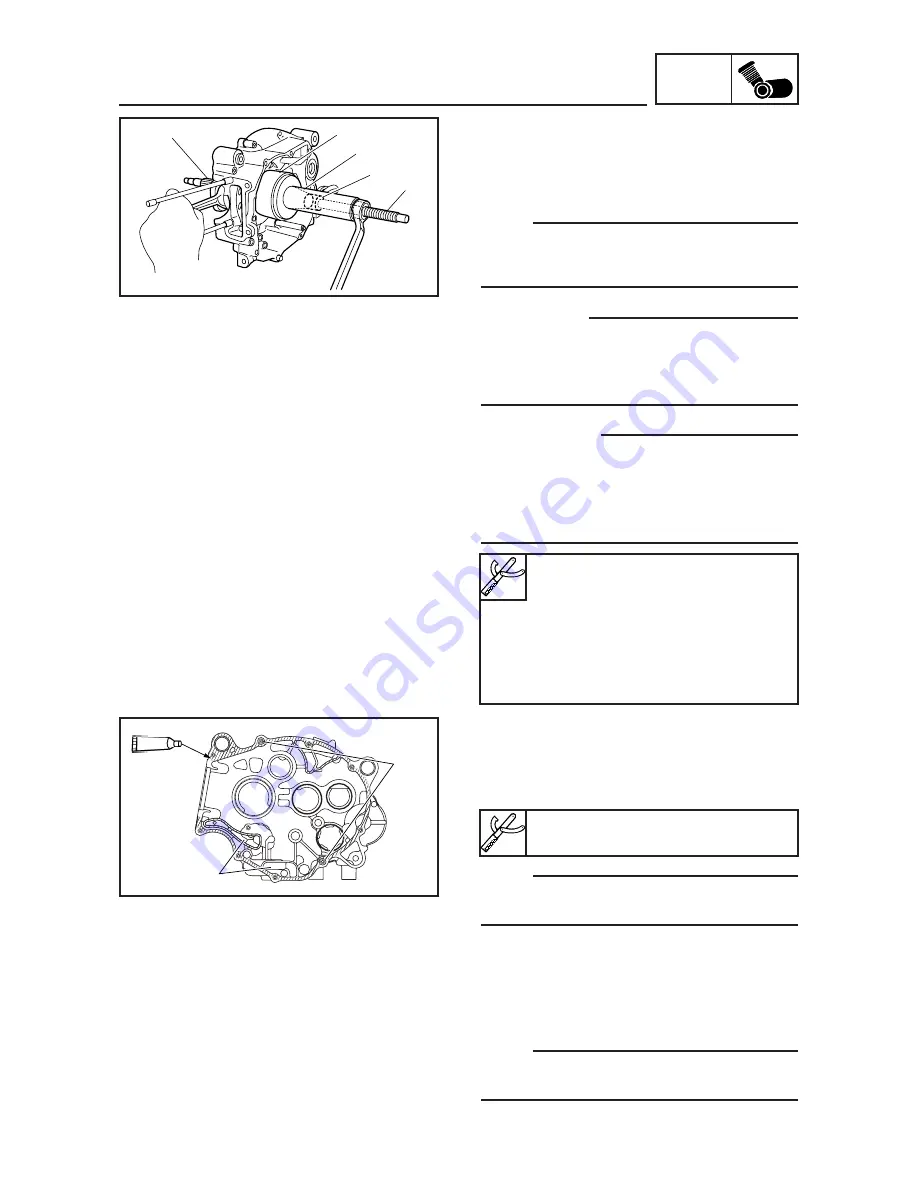
INSTALLING THE CRANKSHAFT
1. Install:
9
crankshaft assembly
1
9
crankshaft spacer
NOTE:
Use the crankshaft installing tool (spacer
2
,
installer pot
3
, installer bolt
4
, adaptor
5
) to
install the crankcase (left).
c
C
To avoid scratching the crankshaft and to
ease the installation procedure, lubricate the
oil seal lips with lithium-soap-based grease
and each bearing with engine oil.
w
9
9
Hold the connecting rod at top dead center
with one hand while turning the nut of the
installing tool with the other.
9
9
Operate the installing tool until the crank-
shaft bottoms against the bearing .
EAS00416
ASSEMBLING THE CRANKCASE
1. Apply:
9
9
sealant
(onto the crankcase mating surfaces)
NOTE:
Do not allow any sealant to come into contact
with the oil gallery
1
.
2. Install:
9
dowel pins
2
3. Install:
9
right crankcase
(onto the left crankcase)
NOTE:
Tap lightly on the right crankcase with a soft
face hammer.
4-72
CRANKCASE AND CRANKSHAFT
Crank pot spacer
2
2
:
90890-04081
Crank shaft installer pot
3
3
:
90890-01274
Crank shaft installer bolt
4
4
:
90890-01275
Adaptor
5
5
:
90890-01278
Yamaha bond No. 1215
90890-85505
3S3-F8197-E0_4_1 05.11.18 13:16 Page 72
Summary of Contents for Sirius T110LSE
Page 1: ...T110LE T110LSE SERVICE MANUAL 3S3 F8197 E0 ...
Page 2: ......
Page 6: ......
Page 8: ......
Page 10: ......
Page 12: ...GEN INFO ...
Page 22: ...SPEC ...
Page 99: ...ENG ...
Page 179: ...ENG 4 80 ...
Page 181: ...CARB ...
Page 261: ...ELEC ...
Page 265: ...ELEC CHECKING SWITCH CONTINUITY 7 4 ...
Page 301: ...TRBL SHTG ...
Page 303: ...TRBL SHTG TROUBLESHOOTING 8 2 COMPRESSION SYSTEM ...
Page 305: ...TRBL SHTG ...
Page 306: ......
Page 307: ...YAMAHA MOTOR CO LTD 2500 SHINGAI IWATA SHIZUOKA JAPAN ...


