background image

Sound Bar

Wall Mounting Installation

Guide

EN

Summary of Contents for SR-B40A

Page 1: ...Sound Bar Wall Mounting Installation Guide EN ...

Page 2: ...CONTENTS About this Wall Mounting Installation Guide 3 Precautions 4 Items to use for wall mounting installation 5 Mounting the sound bar on a wall 6 2 CONTENTS ...

Page 3: ...poses only The company names and product names in this guide are the trademarks or registered trademarks of their respective companies NOTE The Quick Guide and the Safety Guide are included with this product The Quick Guide explains the procedures for this product from opening the box after purchase until enjoying the sound from a TV or Bluetooth device General precautions for handling this produc...

Page 4: ...ls such as drywall or plasterboard Use screws that are of the size specified in this guide and that can support the weight of the installation Do not use nails two sided tape screws other than the size specified or screws that are worn out or damaged Fix the cables in place so nothing will accidentally catch on them When hanging the sound bar on the screws be sure that the connected cables do not ...

Page 5: ...s the following screws commercially available are required Screws 2 Use round head wood screws of the following size 7 to 9 mm in diameter 4 to 5 mm 12 to 14 mm 20 mm or more n Tools Use the following tools for installation Screwdriver Use a screwdriver that matches the screws Pencil Use to mark the positions for the screws on a wall Tape or thumbtacks Use to temporarily attach the mounting templa...

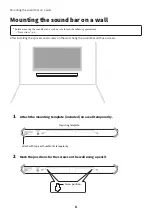
Page 6: ... p 4 After installing the spacers and screws on the wall hang the sound bar on those screws 1 Attach the mounting template included on a wall temporarily Attach with tape or thumbtacks temporarily Mounting template 2 Mark the positions for the screws on the wall using a pencil Screw position 6 Mounting the sound bar on a wall ...

Page 7: ...ng the screw hanging holes of the spacers on those screws Be sure to use screws of the size shown in the illustration below Spacer 12 to 14 mm 4 to 5 mm 20 mm or more 457 mm 7 to 9 mm in diameter Spacer 60 3 mm 8 mm 5 Connect cables to the sound bar For the connection procedure see the Quick Guide or User Guide of your product 7 Mounting the sound bar on a wall ...

Page 8: ...6 Hang the sound bar on the screws Sound bar screw hanging holes Indicators Remote control sensor The installation is completed 8 Mounting the sound bar on a wall ...

Page 9: ...ww yamaha com Yamaha Downloads https download yamaha com 2023 Yamaha Corporation Published 06 2023 NV A0 AV23 0044 Layout Folder YMH_PDF_Manual_A5_AV Stylesheet Name 01_YMH_PDF_Manual_A5_AV_En Multi Stylesheet Version 2022 12 12 ...

Reviews: