background image

Stereo playback

Press STEREO to switch to 2-channel stereo playback.

Flash three times when selected

NOTE

Press INFO to see whether stereo playback is selected.

Related links

(

“Sound functions of this product” (p.33)

(

“Showing the type of audio signal and settings for functions” (p.46)

36

PLAYBACK > Adjusting the sound to your preference

Summary of Contents for SR-B40A

Page 1: ...Sound Bar User Guide EN ...

Page 2: ...2 Part names of the subwoofer 13 Part names of the remote control 14 PREPARATION FOR USE 16 Preparation 16 Precautions for preparation 18 Confirming the included items 20 Installing the product 22 Connecting to a TV and to power 23 Connecting to a TV compatible with ARC 23 Connecting to a TV not compatible with ARC 25 Connecting to an audio device and to power 27 Preparing the remote control 29 Tu...

Page 3: ...G WITH THE APP 45 Controlling the sound bar with the smartphone app Sound Bar Remote 45 CHANGING AND INITIALIZING THE SETTINGS 46 Showing the type of audio signal and settings for functions 46 Changing the brightness of the indicators Dimmer 47 Enabling disabling the HDMI Control function 48 Enabling disabling the Auto Power Standby function 49 Enabling disabling the Child Lock function 50 Enablin...

Page 4: ...ntrol battery 73 What to do if the sound bar and subwoofer are not paired automatically 75 How to reset the sound bar 77 SPECIFICATIONS AND SUPPORT 78 Specifications 78 Supported digital audio signal formats 81 List of indicator displays 82 List of support centers 85 SOFTWARE PROGRAMS AND TRADEMARKS 86 About third party software programs 86 4 CONTENTS ...

Page 5: ...es in this guide are the trademarks or registered trademarks of their respective companies Various smartphones and tablet devices are collectively referred to as smartphones When necessary the type of device is specified in the explanations This guide mainly explains control operations using the remote control If operation using the controls on the sound bar itself is required it will be explained...

Page 6: ...s guide This guide explains all functions and procedures for use including those not covered in the Quick Guide 6 ABOUT THIS PRODUCT AND THE USER GUIDE About the User Guide and other guides included with this product ...

Page 7: ...r system for your TV that allows you to easily enjoy surround sound on the TV with a rich sense of presence n Produce surround sound just by connecting to a TV Related links Surround playback p 35 7 ABOUT THIS PRODUCT AND THE USER GUIDE Features ...

Page 8: ...laying human voices at higher volume CLEAR VOICE p 39 Bass Extension This function focuses on the acoustic image of the bass portion and enhances bass sound It allows you to enjoy rich bass performance with a strong presence by adjusting the overall acoustic image of bass sound to clarify without disturbing the balance of the overall sound Enjoying rich bass sound BASS EXT p 38 Tone control via th...

Page 9: ...TV s remote control In addition the audio signal is transmitted from the TV s HDMI input jack to the sound bar by the ARC Audio Return Channel function Connecting to a TV compatible with ARC p 23 Controlling the sound bar with a TV s remote control HDMI Control function p 44 Dedicated smartphone app Sound Bar Remote The sound bar can also be controlled from your smartphone The app allows you to ch...

Page 10: ...y Input Select an input source p 31 Volume Adjust the volume p 31 c Speakers d Indicators The indicators flash or glow to show the operation and setting status During normal playback the setting status is indicated as follows TV OPTICAL or BLUETOOTH Selected input source glowing CLR VOICE Clear Voice function is enabled glowing disabled off DOLBY ATMOS Dolby Atmos audio signal is input during surr...

Page 11: ...ing NOTE To prevent unintended operation do not place anything on the controls of the sound bar Enabling the Child Lock function prevents accidental operation The brightness of the indicators can be adjusted by pressing DIM Related links Part names of the remote control p 14 Surround playback p 35 Stereo playback p 36 Playing human voices at higher volume CLEAR VOICE p 39 Enabling disabling the Ch...

Page 12: ... eARC ARC jack p 23 b OPTICAL input jack p 27 c UPDATE ONLY jack Use to update the sound bar s firmware Refer to the Update Guide on Yamaha website for details d AC power input jack Related links Part names of the sound bar front top p 10 Part names of the remote control p 14 12 PART NAMES AND FUNCTIONS Part names of the sound bar rear ...

Page 13: ...n Use to pair the sound bar with the subwoofer manually p 75 d STANDBY indicator Indicates the status of the subwoofer p 64 e Indicator Glows when the subwoofer is connected to the sound bar p 30 f AC power input jack Use to connect the power cord of the subwoofer Related links List of indicator displays p 82 13 PART NAMES AND FUNCTIONS Part names of the subwoofer ...

Page 14: ...from a TV OPTICAL button Audio from a device connected to the OPTICAL input jack BLUETOOTH button Audio from a Bluetooth device c INFO button Check information such as the type of audio signal being played and the settings for the sound bar s functions p 46 d CLEAR VOICE button Enable or disable the Clear Voice function p 39 e BASS EXT button Enable or disable the Bass Extension function p 38 14 P...

Page 15: ... VOLUME button Adjust the volume of the sound bar p 31 j SUBWOOFER button Adjust the volume of the subwoofer p 37 k Mute button Mute the audio output p 31 Press this button again or press VOLUME to unmute NOTE Use the remote control within the range shown in the following illustration Within 6 m Remote control sensor Related links Part names of the sound bar front top p 10 15 PART NAMES AND FUNCTI...

Page 16: ...e TV using a method suitable for the type of jacks on the TV and the functions to be used Connecting to a TV compatible with ARC p 23 Connecting to a TV not compatible with ARC p 25 4 Connect an audio device if required Connecting to an audio device and to power p 27 5 Prepare the remote control Preparing the remote control p 29 6 Turn on the sound bar When the sound bar is turned on the subwoofer...

Page 17: ...to the TV s HDMI input jacks HDMI IN This sound bar AV devices When playing audio from a TV or AV device via the sound bar set the input sources as follows Sound bar s input source TV TV s input source AV device playing the content 17 PREPARATION FOR USE Preparation ...

Page 18: ...injury quickly move away from the product and go to a safe place Do not install the product in places where it may come into contact with corrosive gases or salt air or places that have excessive smoke or steam Doing so may result in malfunction NOTICE Do not press hard on the speaker units or fabric covered portion of this product Do not place any objects susceptible to magnetism such as a hard d...

Page 19: ... from the AC outlet Failure to observe this may cause a fire or malfunctions Check the electric plug periodically and remove any dirt or dust which may have accumulated on it Failure to observe this may cause a fire or electric shocks CAUTION Do not use an AC outlet where the power plug fits loosely when inserted Failure to observe this may cause a fire electric shocks or burns When disconnecting ...

Page 20: ...re present n Main devices Sound bar SR CUB40A Subwoofer SR WSWB40A n ACCESSORIES Remote control A Lithium battery CR2025 has already been inserted into the remote control Power cords 2 HDMI cable 1 5 m Mounting template Use when mounting the sound bar on a wall Spacers 2 20 PREPARATION FOR USE Confirming the included items ...

Page 21: ... Use when mounting the sound bar on a wall Quick Guide Safety Guide 21 PREPARATION FOR USE Confirming the included items ...

Page 22: ... prevent sound from reflecting off the wall point the front of the subwoofer slightly inward Controls NOTE For proper installation of the sound bar on a wall make sure to have the work done by the dealer from where you purchased the product or by a contractor with qualified service personnel Refer to the Wall Mounting Installation Guide for more information https manual yamaha com av sb wallmount ...

Page 23: ... transmits the TV s audio signal and the control signal for controlling the sound bar using the TV s remote control 1 Connect the sound bar to a TV Connect the HDMI cable to the HDMI input jack compatible with Audio Return Channel labeled as eARC or ARC on the TV HDMI IN eARC ARC HDMI HDMI HDMI OUT TV eARC ARC jack Sound bar rear TV HDMI input jack compatible with eARC ARC TV s audio signal Contro...

Page 24: ...is an extension of the ARC functionality and is capable of transmitting high definition audio signals such as Dolby Atmos via a TV which ARC cannot transmit The HDMI Control function of the sound bar is enabled by default Disable the HDMI Control function when not using it Connect an AV device such as a set top box to the TV Related links Enabling disabling the HDMI Control function p 48 24 PREPAR...

Page 25: ...lable The digital optical audio cable transmits the TV s audio signal to the sound bar 1 Connect the sound bar to a TV Connect to the digital optical audio output jack of the TV OPTICAL O O Sound bar rear OPTICAL jack Digital optical audio output jack TV TV s audio signal 2 Connect the sound bar to power To an AC wall outlet Power cord included Sound bar rear 25 PREPARATION FOR USE Connecting to a...

Page 26: ... Subwoofer rear NOTE To play audio from a TV via the sound bar set the input source as follows Sound bar s input source OPTICAL Dolby Atmos audio cannot be played when a TV is connected with a digital optical audio cable 26 PREPARATION FOR USE Connecting to a TV and to power ...

Page 27: ...t jack can be connected to the sound bar directly with a digital optical audio cable commercially available 1 Connect an audio device to the sound bar OUTPUT O O Sound bar rear Audio device OPTICAL jack Digital optical audio output jack Audio signal 2 Connect the sound bar to power To an AC wall outlet Power cord included Sound bar rear 27 PREPARATION FOR USE Connecting to an audio device and to p...

Page 28: ...Subwoofer rear NOTE When connecting a device equipped with video output connect the video output jack directly to the video input jack on the TV A device other than a TV cannot be connected with the HDMI cable 28 PREPARATION FOR USE Connecting to an audio device and to power ...

Page 29: ...ing to use the remote control Battery insulating strip NOTE Use the remote control within the range shown in the following illustration Within 6 m Remote control sensor Related links How to replace the remote control battery p 73 29 PREPARATION FOR USE Preparing the remote control ...

Page 30: ...off NOTICE If not using the product for a long period of time be sure to unplug the power plug from the AC outlet Even if the product is turned off standby by the sound bar s power button a small amount of current is still flowing NOTE The same control operation can also be performed from the sound bar s power button When the sound bar is turned on the sound bar and subwoofer are automatically con...

Page 31: ...ected to the OPTICAL input jack BLUETOOTH button Audio from a Bluetooth device The indicator of the selected input source button glows One of the indicators glows n Adjusting volume Press VOLUME to adjust the volume The number of glowing indicators changes to show the volume level Volume is turned up Volume is turned down If audio is being output from both the TV speakers and the sound bar mute th...

Page 32: ...can also be performed from the sound bar s controls y Input For selecting a device to play Volume For adjusting the volume Related links Surround playback p 35 Stereo playback p 36 Playing human voices at higher volume CLEAR VOICE p 39 Enjoying rich bass sound BASS EXT p 38 Listening to audio from a Bluetooth device p 41 32 PLAYBACK Basic control during playback ...

Page 33: ... best suited for movies It creates a sound space that seems to envelop your body GAME This sound mode provides surround playback that is best suited for video games It accurately reproduces and emphasizes the localization of individual sound effects for a highly immersive gaming experience n Sound settings The sound settings allow you to adjust the sound to better suit your preferences Clear Voice...

Page 34: ... to enjoy the sound with your preferred audio balance Related links Surround playback p 35 Stereo playback p 36 Playing human voices at higher volume CLEAR VOICE p 39 Enjoying rich bass sound BASS EXT p 38 Adjusting the volume for frequency ranges separately Tone control p 40 34 PLAYBACK Adjusting the sound to your preference ...

Page 35: ...d that is more faithful to the intentions of content creators by taking advantage of the characteristics of the sound bar Related links Sound functions of this product p 33 Showing the type of audio signal and settings for functions p 46 n Switching the sound characteristics setting of MOVIE The sound characteristics can be partially changed for when the sound mode is set to MOVIE Press and hold M...

Page 36: ...yback Flash three times when selected NOTE Press INFO to see whether stereo playback is selected Related links Sound functions of this product p 33 Showing the type of audio signal and settings for functions p 46 36 PLAYBACK Adjusting the sound to your preference ...

Page 37: ...bwoofer Adjust the volume of the subwoofer only Press SUBWOOFER to adjust the volume The glowing indicator changes to show the volume level Volume is turned down Volume is turned up 37 PLAYBACK Adjusting the sound to your preference ...

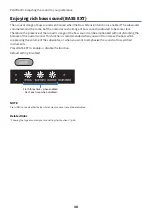
Page 38: ...e of the overall sound This function is recommended when you want to increase the bass while suppressing the volume of the subwoofer or when you want to emphasize the sounds of low pitched instruments Press BASS EXT to enable or disable the function Default setting Disabled Flash three times when enabled Flash one time when disabled NOTE Press INFO to see whether the Bass Extension function is ena...

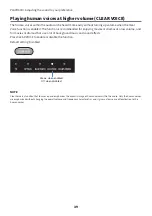
Page 39: ... lot of background music and sound effects Press CLEAR VOICE to enable or disable the function Default setting Disabled Glows when enabled Off when disabled NOTE Clear Voice is a function that focuses on and emphasizes the acoustic image of human voices within the audio Only the human voices are emphasized without changing the overall volume and frequency characteristics and it gives a clear sense...

Page 40: ...nd bass to a balance that suits your preferences This function can only be controlled via the smartphone app Sound Bar Remote The treble and bass can be separately adjusted from 6 to 6 Default setting 0 Related links Controlling the sound bar with the smartphone app Sound Bar Remote p 45 40 PLAYBACK Adjusting the sound to your preference ...

Page 41: ...hrough the sound bar Bluetooth device 1 Press BLUETOOTH to switch the input source to Bluetooth The sound bar enters the connection wait status and the BLUETOOTH indicator flashes Flashes 2 On the Bluetooth device enable the Bluetooth function 41 PLAYBACK Listening to audio from a Bluetooth device ...

Page 42: ...witched to Bluetooth The Bluetooth connection is terminated if one of the following operations is performed The Bluetooth function of the Bluetooth device is turned off BLUETOOTH on the sound bar s remote control is held down for at least five seconds An input source other than Bluetooth is selected on the sound bar The sound bar is turned off Adjust the volume level of the Bluetooth device if nec...

Page 43: ...ack 1 Stop playback on the Bluetooth device 2 Start playback on the other Bluetooth device Audio from the other Bluetooth device can be heard on the sound bar NOTE When connecting a new Bluetooth device disconnect the currently connected Bluetooth device and then connect the new device 43 PLAYBACK Listening to audio from a Bluetooth device ...

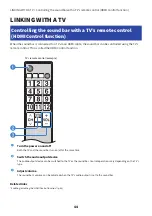
Page 44: ...the power on and off Both the TV and the sound bar turn on off at the same time b Switch the audio output device The audio output device can be switched to the TV or the sound bar Control operations vary depending on the TV s type c Adjust volume The sound bar s volume can be adjusted when the TV s audio output is set to the sound bar Related links Enabling disabling the HDMI Control function p 48...

Page 45: ...pp on the App Store or Google Play NOTE This sound bar supports Sound Bar Remote only This sound bar cannot be controlled using other apps such as Sound Bar Controller To control the sound bar using the app configure the settings of the smartphone as follows Enable the Bluetooth function For devices using the Android 11 OS or earlier configure the settings to allow location information to be obtai...

Page 46: ... for three seconds immediately after INFO is pressed a b c a Type of audio signal TV glows red Dolby Atmos TV glows white Dolby Audio Dolby Digital Dolby Digital Plus Dolby TrueHD OPTICAL glows white AAC TV and OPTICAL off PCM other signal or no input signal b Whether surround playback is enabled or disabled Glows Enabled Off Disabled stereo playback c Whether the Bass Extension function is enable...

Page 47: ...rightness is Dim by default 1 Turn on the sound bar 2 Press DIM button Press the button to change the brightness in the order of Off Bright and Dim NOTE Indicators glow brightly just after operation and then change to the specified brightness after a few seconds 47 CHANGING AND INITIALIZING THE SETTINGS Changing the brightness of the indicators Dimmer ...

Page 48: ...as follows and the sound bar turns on Glows when enabled Off when disabled NOTE When connected to a TV s ARC compatible HDMI input jack enable the HDMI Control function When you want to reduce standby power consumption disable the HDMI Control function In this case use the included remote control to control the sound bar Related links Connecting to a TV compatible with ARC p 23 The sound bar canno...

Page 49: ...model Models for U S A Canada Mexico Australia Mainland China Taiwan Indonesia New Zealand and India Disabled Models for Europe U K Korea and other areas Enabled 1 Turn off the sound bar 2 While holding down y on the sound bar press the power button for at least five seconds The Auto Power Standby function switches from enabled to disabled or from disabled to enabled The indicator shows the settin...

Page 50: ... the sound bar 2 Hold down O for at least five seconds The Child Lock function switches from enabled to disabled or from disabled to enabled The indicator shows the setting status for a few seconds as follows and the sound bar turns on Glows when enabled Child Lock Off when disabled no Child Lock 50 CHANGING AND INITIALIZING THE SETTINGS Enabling disabling the Child Lock function ...

Page 51: ...tting Enabled 1 Turn off the sound bar 2 Hold down BLUETOOTH for at least five seconds The Bluetooth Standby function switches from enabled to disabled or from disabled to enabled The indicator shows the setting status for a few seconds as follows and the sound bar turns on Glows when enabled Off when disabled 51 CHANGING AND INITIALIZING THE SETTINGS Enabling disabling the Bluetooth Standby funct...

Page 52: ...d down DIM for at least five seconds The Bluetooth function switches from enabled to disabled or from disabled to enabled The indicator shows the setting status for a few seconds as follows and the sound bar turns on Glows when enabled Off when disabled 52 CHANGING AND INITIALIZING THE SETTINGS Enabling disabling the Bluetooth function ...

Page 53: ...the sound bar 2 While holding down on the sound bar press the power button until all indicators flash Initialization is performed When initialization is complete the indicators will show the following Flash initialization complete 53 CHANGING AND INITIALIZING THE SETTINGS Initializing the sound bar ...

Page 54: ...ion properly The power cords of all the devices are connected to AC wall outlets securely The product TV and AV devices are turned on The connectors of each cable are securely inserted into the jacks on each device Related links List of support centers p 85 54 TROUBLESHOOTING Check the following first ...

Page 55: ... the sound bar again The Auto Power Standby function can be disabled Enabling disabling the Auto Power Standby function p 49 The TV indicator on the sound bar is flashing red The protection circuitry has been activated After confirming that all connections are made properly turn on the sound bar again If the power still turns off frequently unplug the power cord from the AC wall outlet and contact...

Page 56: ... turn on the sound bar the protection circuit was activated three times consecutively To protect the product the power cannot be turned on Unplug the power cord from the AC wall outlet and contact the nearest authorized Yamaha dealer or service center List of support centers p 85 56 TROUBLESHOOTING Power and overall functionality ...

Page 57: ...rols There is no response even when the controls on the sound bar are operated The controls of the sound bar may be locked Unlock the controls of the sound bar Enabling disabling the Child Lock function p 50 57 TROUBLESHOOTING Power and overall functionality ...

Page 58: ... off although the power is on the power appears to be off Indicator brightness is set to Off Change the brightness Changing the brightness of the indicators Dimmer p 47 58 TROUBLESHOOTING Power and overall functionality ...

Page 59: ... to a drop in the power supply voltage Press the power button on the sound bar for at least 15 seconds to force the sound bar to turn off and unplug the power cord of the subwoofer from the AC wall outlet Wait for at least 10 seconds then plug the power cord of the subwoofer back in and turn on the sound bar again 59 TROUBLESHOOTING Power and overall functionality ...

Page 60: ...ns on by itself Another Bluetooth device is being operated nearby Terminate the Bluetooth connection with the sound bar Listening to audio from a Bluetooth device p 41 60 TROUBLESHOOTING Power and overall functionality ...

Page 61: ... of the remote control p 14 Preparing the remote control p 29 The battery has run out Replace the battery with a new one How to replace the remote control battery p 73 The remote control sensor of the sound bar is exposed to direct sunlight or strong lighting Adjust the lighting angle or reposition the sound bar 61 TROUBLESHOOTING Power and overall functionality ...

Page 62: ...led with the TV s remote control perform the following Turn off the sound bar and the TV and then turn them back on again Unplug the power cord of the sound bar as well as the power cords of external devices connected to the sound bar via an HDMI cable from the AC wall outlet Plug them in again after about 30 seconds The TV does not support the sound bar s control functions Even if your TV support...

Page 63: ...nd bar cannot play is being input Change the digital audio output setting on the TV or AV device to a type of audio signal supported by the sound bar Supported digital audio signal formats p 81 The HDMI Control function is disabled When the sound bar is connected to a TV that supports ARC Audio Return Channel using an HDMI cable enable the HDMI Control function Connecting to a TV compatible with A...

Page 64: ...to the sound bar If metal furniture is placed between the sound bar and subwoofer change the layout or relocate the subwoofer If a device emitting electromagnetic waves such as a microwave oven or a wireless LAN device is located nearby place the subwoofer and sound bar farther away from it The subwoofer is waiting for pairing with the sound bar The STANDBY indicator on the subwoofer is flashing I...

Page 65: ...e loudness the sound bar is equipped with the Automatic Volume Adjustment function If the sound bar was turned off with the volume set high the volume is automatically adjusted to a safe listening level the next time the sound bar is turned on Turn up the volume if necessary Basic control during playback p 31 65 TROUBLESHOOTING Audio playback ...

Page 66: ... is set to output 2 channel audio such as PCM only Change the audio output setting on the TV or AV device to output Bitstream audio signals Sound is also heard from the TV s built in speakers Turn the TV s volume all the way down You are listening from a position that s extremely close to the sound bar You should listen at some distance from the sound bar 66 TROUBLESHOOTING Audio playback ...

Page 67: ...Noise is heard The sound bar is too close to another digital or high frequency device Move those devices away from the sound bar 67 TROUBLESHOOTING Audio playback ...

Page 68: ...ered in the Bluetooth device is not functioning correctly Delete the connection profile in the Bluetooth device and then connect the Bluetooth device to the sound bar The passkey for devices such as a Bluetooth adaptor is not 0000 Use a Bluetooth device with a passkey of 0000 The sound bar is already connected to another Bluetooth device when connecting a Bluetooth device for the first time Termin...

Page 69: ...tooth device is not set to the sound bar Select the sound bar as the audio output destination on the Bluetooth device The connection to the Bluetooth device was terminated Connect to the Bluetooth device again The sound bar is too far away from the Bluetooth device Move the Bluetooth device near the sound bar A device emitting electromagnetic waves such as a microwave oven or a wireless device is ...

Page 70: ... the smartphone On an Android device the function for obtaining location information is disabled The Sound Bar Remote app uses the location information of the Android device only to detect the sound bar According to your Android device OS change the settings as follows For devices using the Android 11 OS or earlier configure the settings to allow location information to be obtained For devices usi...

Page 71: ...DVD players and set top boxes to the TV s HDMI input jacks HDMI IN This sound bar AV devices When playing audio from a TV or AV device via the sound bar set the input sources as follows Sound bar s input source TV TV s input source AV device playing the content 71 TROUBLESHOOTING Other frequent actions ...

Page 72: ...n Change the settings as follows HDMI Control Disabled Bluetooth Standby Disabled Related links Enabling disabling the HDMI Control function p 48 Enabling disabling the Bluetooth Standby function p 51 72 TROUBLESHOOTING Other frequent actions ...

Page 73: ...r hands or in your eyes it can cause blindness or chemical burns If the battery fluid should come in contact with your eyes mouth or skin wash immediately with water and consult a doctor CAUTION Do not use a battery other than the specified one Doing so may cause fire or burns or result in fluid leakage that may cause skin inflammation Always make sure the battery is inserted in conformity with th...

Page 74: ... with holding these positions firmly 2 Remove the old battery and insert a new one CR2025 CR2025 Lithium battery CR2025 1 Pull the lever 3 Put the cover over the remote control as shown in the figure and slide the cover back into its original position in the direction of the arrow CR2025 Cover 74 TROUBLESHOOTING Other frequent actions ...

Page 75: ... SUBWOOFER on the remote control for at least five seconds The sound bar is turned on and the OPTICAL indicator on the sound bar flashes Flashes 3 Within 30 seconds press and hold PAIRING on the rear of the subwoofer for at least five seconds When the sound bar and subwoofer have been paired successfully the indicator glows If the indicator on the subwoofer does not glow after following the proced...

Page 76: ... are not obstructed from each other by metal furniture If a device emitting electromagnetic waves such as a microwave oven or a wireless LAN device is located nearby place the subwoofer and sound bar farther away from it 76 TROUBLESHOOTING Other frequent actions ...

Page 77: ... sound bar for at least 15 seconds Unplug the power cord of the subwoofer from the AC wall outlet Wait for at least 10 seconds then plug it in again n To initialize the sound bar Refer to the following explanation and reset the settings of the sound bar to the factory presets Initializing the sound bar p 53 77 TROUBLESHOOTING Other frequent actions ...

Page 78: ...coustic suspension type non magnetic shielding Driver 4 6 cm 1 3 4 cone 4 Frequency response 210 Hz to 22 kHz Impedance 4 Ω 8 Ω 2 Tweeter Type Acoustic suspension type magnetic shielding Driver 2 5 cm 1 dome 2 Frequency response 9 kHz to 22 kHz Impedance 4 Ω Input jack Digital optical 1 OPTICAL Output jack HDMI 1 HDMI OUT TV eARC ARC Other jack USB 1 UPDATE ONLY 78 SPECIFICATIONS AND SUPPORT Speci...

Page 79: ...V 50 60 Hz Power consumption 25 W Standby power consumption Models for U S A Canada Taiwan and Mexico HDMI Control Bluetooth Standby Off 0 3 W HDMI Control Bluetooth Standby On 0 6 W Models for U K Europe and other areas HDMI Control Bluetooth Standby Off 0 3 W HDMI Control Bluetooth Standby On 0 6 W Dimensions W x H x D Installing the Sound Bar in front of a TV etc 910 68 133 mm 35 7 8 2 5 8 5 1 ...

Page 80: ...frequency 2403 35 MHz to 2477 35 MHz Maximum output power EIRP 9 0 dBm 7 9 mW General Power supply Models for U S A Canada Taiwan and Mexico AC 100 to 120 V 50 60 Hz Models for U K Europe and other areas AC 100 to 240 V 50 60 Hz Power consumption 20 W Rated Standby power consumption 0 8 W Dimensions W x H x D 194 419 407 mm 7 5 8 16 1 2 16 Weight 8 1 kg 17 9 lb NOTE The contents of this User Guide...

Page 81: ... Digital Plus Dolby Atmos Signals from a TV s ARC compatible HDMI input jack Audio formats Details 2 channel Linear PCM 2 channels 32 44 1 48 88 2 96 kHz 16 20 24 bit Bitstream Dolby Digital Dolby Digital Plus Dolby Atmos n Audio input signals of the OPTICAL jack The following digital audio signals can be played on this product when they are input from the digital optical output jack on the TV or ...

Page 82: ...mal playback state c a b d e a TV Glowing Playing audio from the TV b OPTICAL Glowing Playing audio from the OPTICAL input jack c BLUETOOTH Glowing blue Bluetooth device connection established Flashing white Bluetooth device connection wait status d CLR VOICE Glowing Clear Voice function is enabled e DOLBY ATMOS Glowing green Dolby Atmos audio is playing in surround playback 82 SPECIFICATIONS AND ...

Page 83: ...back is enabled or disabled Glows Enabled Off Disabled stereo playback c Whether the Bass Extension function is enabled or disabled Glows Enabled Off Disabled Muted state An error occurred Flashes red NOTE When the brightness of the indicators is set to Off the indicators glow only during control operations See the description of each setting for what the indicators will show when the setting is c...

Page 84: ... glowing status as follows Off Glowing Flashing Power on state Power off state Standby Establishing a connection to the sound bar Waiting for pairing with the sound bar An error occurred and the protection circuitry has been activated 84 SPECIFICATIONS AND SUPPORT List of indicator displays ...

Page 85: ...Japan Please contact the store where you purchased this product or the Product Support Center as listed in the Safety Guide included with this product For customers outside of Japan Please contact your nearest authorized Yamaha dealer or service center https manual yamaha com av support 85 SPECIFICATIONS AND SUPPORT List of support centers ...

Page 86: ...ses third party software programs For the copyright and the license agreement terms and conditions of third party software programs that are used see the following website https manual yamaha com av cm sla 23 srb40a 86 SOFTWARE PROGRAMS AND TRADEMARKS About third party software programs ...

Page 87: ...ghts reserved The terms HDMI HDMI High Definition Multimedia Interface HDMI Trade Dress and the HDMI Logos are trademarks or registered trademarks of HDMI Licensing Administrator Inc The Bluetooth word mark and logos are registered trademarks owned by Bluetooth SIG Inc and any use of such marks by Yamaha Corporation is under license Other trademarks and trade names are those of their respective ow...

Page 88: ...ww yamaha com Yamaha Downloads https download yamaha com 2023 Yamaha Corporation Published 06 2023 NV A0 AV23 0002 Layout Folder YMH_PDF_Manual_A5_AV Stylesheet Name 01_YMH_PDF_Manual_A5_AV_En Multi Stylesheet Version 2022 12 12 ...

Reviews: