background image

11

SETTINGS

11-24

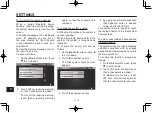
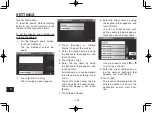
To register a recorded location as your 

home
If you have already searched for a 

destination for a route guidance, or 

saved the destination location, you 

can select and register it as your 

home.

1.  On the [Home] screen, touch 

[by Saved/Recent list].

2.  To select a location from the 

saved destination locations, 

touch [Saved].
To select a location from the list 

of locations recently searched 

for, touch [Recent].

3.  Touch the desired address.
4.  Touch [Set].

The selected address will be 

registered as your home.

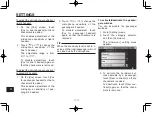
To change the destination search 

start position

When you try to fi nd your destination 

by categories, as described on page 

9-1, facilities situated within about 30 

miles (50 km) from the current location 

will be detected.

If you want to search for facilities 

situated out of this range, use the 

[Search near] function.

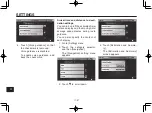
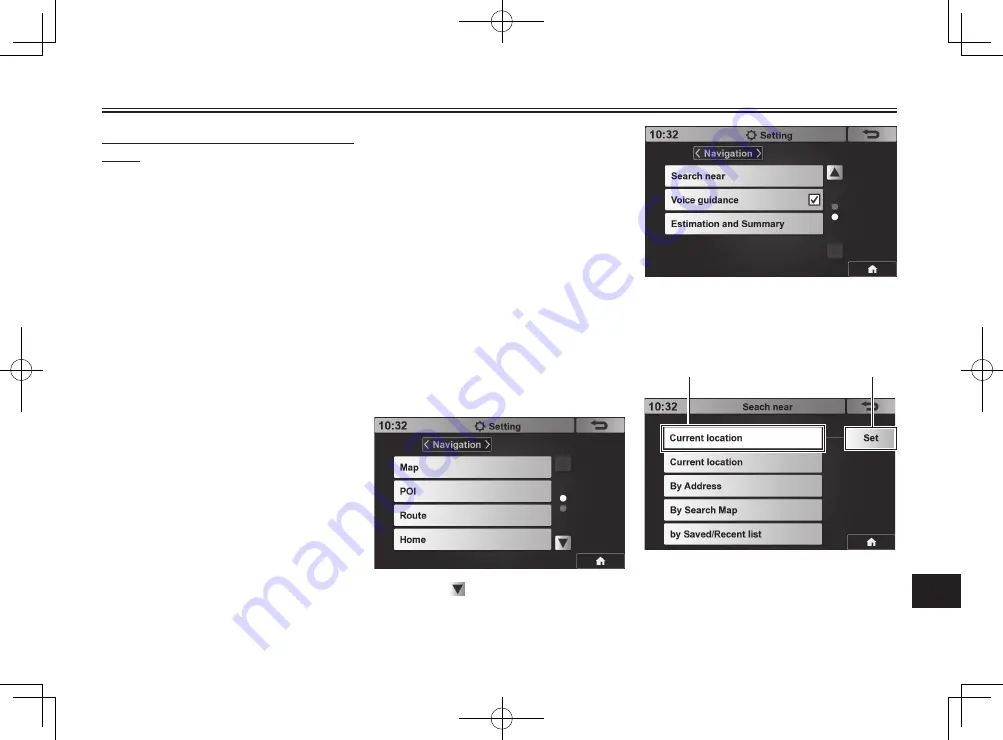
1.  Go to [Setting] menu.
2.  Touch the category selector, 

and then [Navigation].
The [Navigation] setting menu 

appears.

3.  Touch   to scroll down.

4.  Touch [Search near].

The [Search near] screen ap-

pears.

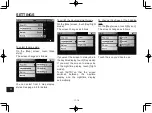
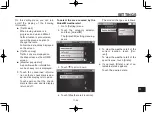
[Set] button

Current search method

The search method listed on top is the 

currently set search method (starting 

point). To change the search method 

(starting point), touch that button, and 

Summary of Contents for Star Venture 2018

Page 1: ...Read this manual carefully before operating the system LIT 11626 31 05 OWNER S MANUAL INFOTAINMENT SYSTEM 2DF 2819V 10 Star Venture Star Venture TC ...

Page 2: ...Read this manual carefully before operating the vehicle This manual should stay with this vehicle if it is sold ...

Page 3: ... that follow this symbol to avoid possible injury or death WARNING A WARNING indicates a hazardous situation which if not avoided could result in death or serious injury NOTICE A NOTICE indicates special precautions that must be taken to avoid damage to the unit or other property TIP A TIP provides additional related information or information for a better understanding of the system Product and s...

Page 4: ...ations within the manual However in general we assume you will use a smartphone Other devices such as a tablet can also be paired with the vehicle and related audio and phone functions can be used Audio A term enclosed in brackets indicates a button title or screen name used within the audio and navigation system Example Audio indicates Touch COMMS Phone The arrows represent button touch order to ...

Page 5: ...pe you will enjoy using the audio and navigation system This motorcycle was designed to be used with various option packages Therefore some functions of the audio and navigation system require accessory parts third party contracts compatible equipment such as a smartphone and head set and the navigation function requires registration before use Please contact your Yamaha dealer regarding the insta...

Page 6: ...IO PLAYBACK 6 1 Radio FM AM weather band 6 1 Media playback Bluetooth USB AUX 6 4 Pandora Music 6 8 SiriusXM Satellite Radio 6 9 To make audio settings 6 9 ENJOYING 2 ZONE AUDIO 7 1 2 zone audio 7 1 Turning 2 zone audio on off 7 1 COMMUNICATION 8 1 Communication system 8 1 Communication menu 8 1 Making a phone call 8 2 Creating a phone book 8 5 Using the intercom 8 5 CB citizens band radio 8 6 Rec...

Page 7: ...rd input are disabled when the vehicle is in motion Check vehicle messages and take corrective action as necessary See page 8 9 Set volume setting levels low enough that traffic noise sirens horns other vehicles can still be heard When using the navigation system always give precedence to current road and traffic conditions WARNING It is dangerous to operate the au dio and navigation system contro...

Page 8: ...e for compliance could void your authority to operate the equipment Industry Canada IC state ment This Class B digital apparatus complies with Canadian ICES 003 This device complies with Industry Canada license exempt RSS standard s Operation is subject to the following two conditions 1 this device may not cause interference and 2 this device must accept any interference including interference tha...

Page 9: ...button passenger page 3 3 7 Headset jack passenger 8 Headset jack rider 9 Volume switch page 3 1 10 Navigation controls page 3 1 11 Talk button rider page 3 2 DESCRIPTION 1 Touchscreen 2 Front speakers 3 USB 1 port page 3 3 4 AUX jack page 3 3 5 AM FM radio antenna ...

Page 10: ...2 DESCRIPTION 2 2 5 1 3 4 2 1 Rear speakers 2 CB antenna page 8 7 3 USB 2 port page 3 3 4 Storage compartment 5 Audio controls passenger page 3 4 ...

Page 11: ...herwise the battery may discharge Handlebar switches Navigation controls Press these buttons to change the currently highlighted object on the screen Press to rotate among the preset stations Press to perform seek function and search for the next receivable frequency Select button Press this button to select the currently highlighted object on the screen Press and hold this button to turn off the ...

Page 12: ...the button is held pressed you can have a conversation with the passenger via optional headset and microphone To end intercom release the button See Using the intercom on page 8 5 When a CB citizens band radio is connected and activated Pressing and holding starts CB radio communication Releasing the button ends CB radio communication See CB citizens band radio on page 8 6 TIP When a CB radio is c...

Page 13: ...s button to start intercom To end intercom press the button again When a CB citizens band radio is connected Press this button to start CB radio communication Press again to end CB radio communication Audio connectors One USB 2 0 connector and one 3 5 mm mini audio jack are supplied for the rider and one USB 2 0 connector for the passenger ...

Page 14: ... for the stations with higher frequencies When playing back music stored in a Bluetooth device Pressing starts playback of the previous track Pressing starts playback of the next track When playing back music stored in a USB device Pressing starts playback of the previous track Pressing starts playback of the next track When listening to Pandora Music Pressing starts streaming of the next track Wh...

Page 15: ...ation system WARNING Failure to pay attention while riding could result in death or serious in jury Always concentrate on riding by keeping your eyes and mind on the road HOME screen Icons on the HOME screen These icons appear when the relevant function is activated Passenger s seat heater Rider s seat heater Grip heater New vehicle message such as low tire air pressure Sound volume muted Voice co...

Page 16: ...tton Source button This button changes the audio source Additionally the passenger can press the SRC source button to change the audio source Info screen button Touch this button once to change the Information screen The following screens can be assigned as the HOME screen Information screen Audio screen Map screen You can cycle through the available HOME screens by pressing the home button To ass...

Page 17: ...ff see page 11 20 Current song or station etc Compass display When route guidance is activated turn by turn guidance will appear TIP Street names speed limits and route guidance related information will only appear for GPS equipped vehicles Vehicle information screen Vehicle information You can change the content of in formation shown here See page 11 6 Information on the Audio screen Name of the ...

Page 18: ...enu screen appears Using the handlebar switches Generally press the navigation controls so that the target object is highlighted yellow and then press the select button On the HOME screen Press so that the upper two buttons or the lower two buttons are highlighted When you want to call up the Menu screen for example the upper two buttons should be highlighted then press The upper two buttons are h...

Page 19: ...is button to return to the previously displayed screen Touch this button to return direct ly to the HOME screen Pressing the home button also returns you to the HOME screen Map screen TIP The navigation function requires a GPS antenna and must be activated prior to use Compass icon Touch this icon to change the map style The icon changes ac cordingly Heads up display the map rotates as you change ...

Page 20: ...le To expand and use the but tons touch one of the four partial ly visible portions of them or use the handlebar switches to select them When riding in the city parking garages tunnels or wherever else the system cannot receive GPS signals your location on the map may not be displayed prop erly Also repeated circling such as in a parking garage or parking lot may upset the navigation sys tem Shoul...

Page 21: ...scroll the map Touch your finger on the map to the desired direction A View map screen like the following appears You can search the surrounding area and set a destination For details see page 9 4 Going home using route guidance Once you have registered your home you can set a route from the current location to your home and then start route guidance A typical example is shown below 1 On the HOME ...

Page 22: ...Whenever you are required to input characters a keyboard like the following automatically appears on the screen Also when you are required to input numbers a numeric keyboard automatically appears Full keyboard Touch this button to toggle between uppercase and lowercase Touch this button to delete the character entered last Touch to confirm the entered characters and quit the keyboard ...

Page 23: ...ton and a symbol keyboard appears button changes to Touch to return to the alphabet keyboard Touch this button and a 9 key key board appears 9 key keyboard Touch this button to return to a full keyboard Touch this button and a 9 key al phabet keyboard appears Letter group change buttons ...

Page 24: ... pear when the vehicle is in mo tion If you start off with the keyboard displayed a pop up message will appear Stop the vehicle to oper ate the touchscreen Voice recognition function The voice recognition function allows you to control the system with your voice TIP You must have a compatible headset and microphone to use voice com mands To activate the voice recognition function First confirm tha...

Page 25: ... selected 5 Make sure your headset is con nected and turned on To start voice control 1 Press and release the talk but ton If Command list up has been selected on the Voice recogni tion screen the Teleprompter screen appears 2 To view the list of commands for a specific scene touch the de sired scene To view the list of all the com mands available touch All commands 38 If you touch for example Nav...

Page 26: ...rip heaters TIP The available functions will vary de pending on your vehicle s specifica tions Opening the Function screen On the HOME screen touch Function Alternatively touch on the HOME screen if set as the home right button The Function screen appears TIP When the main switch is in the ACC accessory position the Windscreen buttons will appear as normal but cannot be operated The Seat Heat er b...

Page 27: ...ture touch Seat Heater Each time you touch Seat Heat er the seat heater temperature will be set to low mid dle high or OFF To adjust the grip heater tem perature touch Grip Heater Each time you touch Grip Heat er the seat heater temperature will be set to low mid dle high or OFF TIP To fine tune the heater settings see page 11 8 ...

Page 28: ... For navigation equipped vehicles the clock can be set to synchronize with the GPS time Otherwise set the internal clock as follows 1 Go to Setting menu 2 On the General settings menu touch Clock The Clock screen appears 3 Touch 12h 24h The following screen appears Touch the desired notation 12h or 24h 4 Touch or for hour and minute to set the clock to the current time 5 Touch to return to the HOM...

Page 29: ...r home is described With your vehicle parked at your residence proceed as follows 1 Go to Setting menu Category selector 2 Touch the category selector and then Navigation The Navigation setting menu appears 3 Touch Home The Home screen appears 4 Touch Current location sec ond line Current location at the top is replaced with the actual address of the current location on the map i e your home addre...

Page 30: ...as follows 1 Go to Setting menu 2 On the General settings menu touch Maintenance The Maintenance screen ap pears 3 Touch My Dealer The My Dealer screen ap pears From the My Dealer screen you can register your Yamaha dealer in various ways Connecting a Bluetooth device You can use a Bluetooth device such as a smartphone with the audio and navigation system To use a Bluetooth device with the system ...

Page 31: ...or the stations with lower frequencies and with higher frequencies Repeat this operation until the desired station is received The passenger can search for the desired station by pressing the REV FWD buttons To preset stations While receiving the station to preset touch Add preset and then place it in the preset stations list where you want to add the station Frequency and name of the station are ...

Page 32: ... is set as the home right button The last used audio screen is displayed Audio source selector 2 Touch the audio source selector and then AM The AM reception screen ap pears Station name and frequency Add preset button and preset stations list To search for the desired station Use the button Touch to search for the stations with lower frequencies and with higher frequencies Repeat this operation u...

Page 33: ...anning starts and the detected stations will be shown To listen to a detected station touch the desired station on the list Weather band broadcast To call up the weather band reception screen 1 On the HOME screen touch Audio Alternatively touch on the HOME screen if it is set as the home right button The last used audio screen is displayed Audio source selector 2 Touch the audio source selec tor a...

Page 34: ...e notified when a weather alert is received For example Alert ON will be displayed on the audio screen or an audible message can be heard during route navigation To show the detected stations Touch List Scanning starts and the detected stations will be shown To listen to a detected station touch the desired station on the list Media playback Bluetooth USB AUX Bluetooth device TIP The Bluetooth dev...

Page 35: ...he repeat mode will be one of the following Album repeat artist repeat all tracks repeat one track repeat To stop repeat playback touch again The passenger can also control playback by pressing the REV FWD buttons To show the music list Touch List Depending on the current music menu or the arrangement in the Bluetooth device one of the following music list appears All music Music in the album Musi...

Page 36: ...uch on the HOME screen if it is set as the home right button The last used audio screen is displayed Audio source selector 2 Touch the audio source selec tor and then USB The USB playback screen ap pears To control playback To pause playback touch The button changes to To restart playback touch To go back to the previous track touch To go to the next track touch To play music in the playlist rando...

Page 37: ...Music menu A screen like the following appears Music menu To change the music menu touch the desired music menu Playlist Genre Album Artist or simply all songs If two USB memory devices are connected touch USB2 to activate the second USB memory device The button changes to USB1 To activate the first USB memory device touch USB1 Auxiliary device To call up the auxiliary device play back screen 1 On...

Page 38: ...g screen 1 On the HOME screen touch Audio Alternatively touch on the HOME screen if it is set as the home right button The last used audio screen is displayed Audio source selector 2 Touch the audio source selec tor and then pandora The Pandora Music streaming screen appears To control streaming To go to the next track touch To pause streaming touch The button changes to To restart streaming touch...

Page 39: ...the vehicle s Radio ID number to complete the subscription To find the Radio ID number You can find the Radio ID number by tuning to Channel 0 or by going to the SiriusXM subscription information screen See page 11 29 Find the SiriusXM Radio ID number on the screen as shown below Radio ID number TIP Visit www siriusxm com in the US or www siriusxm ca in Can ada for subscription information SiriusX...

Page 40: ...r source FM AM SiriusXM or media source USB Bluetooth Pandora Music than the passenger is listening to the passenger s source audio will also change Rider audio zone 1 can also be output to the front speakers and or rear speakers See page 11 11 Turning 2 zone audio on off 1 Go to Setting menu 2 Touch the category selector and then Communi 3 Touch to scroll down 4 Add a checkmark to turn on 2 zone ...

Page 41: ...nnected to the system via Bluetooth Voice communication between rider and passenger CB citizens band radio communication using a CB radio device connected to the vehicle Reception of SMS messages Reception of messages from the vehicle Communication menu Call up the Communication menu to perform communication related operations 1 On the HOME screen touch COMMS The Communication menu ap pears To mak...

Page 42: ... instead Pair a phone device with the vehicle before making a call To make a phone call by entering the other party s phone number 1 On the Phone screen touch Number 2 Enter the other party s phone number by using the numer ic keyboard that appears and touch Call The screen changes as follows The other party you are calling You can touch Cancel to cancel calling before the line is connected To mak...

Page 43: ...y referring to the recently made phone communi cation list 1 On the Phone screen touch Recent The Recent screen appears Call Received 2 Touch either Call or Re ceived To show the list of dispatched phone call touch Call To show the list of received phone call touch Received 3 Touch or if necessary and touch the other party s name you want to call To redial To redial the number you have called last...

Page 44: ...o turn on off the speaker system During phone call you can turn on or off the vehicle s speaker system by touching To enable disable the microphone During phone call you can enable or disable input of the headset s microphone by touching To enable disable hands free mode During phone call you can enable or disable the hands free mode by touching To terminate the phone call Touch End call Alternati...

Page 45: ...h device and the vehicle See page 11 13 2 Operate the Bluetooth device so that its phonebook content can be exported Using the intercom The intercom can be used to talk to the passenger and vice versa Both parties must have a headset and microphone To turn on the intercom 1 Open the Communication menu 2 Touch Intercom The Intercom screen appears 3 Touch ON to turn on intercom The ON button changes...

Page 46: ...s TIP You can also access this screen via Setting Communi For detailed communication set ting information see page 11 12 CB citizens band radio If a CB radio device is connected to the vehicle you can make CB radio communication To call up the CB radio screen 1 Open the Communication menu 2 Touch CB Radio The CB Radio screen appears CB radio communication status Add preset button and preset channe...

Page 47: ...adjust the squelch sensitivity to filter out weaker signals and white noise Touch or to adjust sensitivity The adjustable range is from 0 14 to 14 14 WARNING Adjust squelch level incrementally to avoid disruptive noise Safety Notice The antenna used for CB radio must be properly installed and maintained must provide a separation distance of at least 56 cm 22 Inches from all persons and must not be...

Page 48: ...TIP All channels except channel 9 may be used for communications between stations operating under different licenses Channel 9 has been reserved by the FCC for emergency commu nications involving the immediate safety of individuals or immediate protection of property Channel 9 may also be used to render as sistance to a motorist This is an FCC rule and applies to all opera tors of CB radios Receiv...

Page 49: ...pears when there is a message from the vehicle 1 Open the Communication menu 2 Touch Message The Message screen appears New indicates a message you have not yet read 3 To read a specific message touch the message you want to read You can delete the message by touching Delete TIP Touch Read all to make all mes sages read Touch Delete all to delete all messages ...

Page 50: ...You can add delete and move these buttons See page 9 11 To search by categories 1 Open the Destination menu 2 Touch Categories The Categories screen appears Categories screen sections The main categories screen has 3 sections Stop off Categories and Search tools Each section is explained in the following pages TIP After selecting your destination the map screen will appear with destination mark in...

Page 51: ...and touch the de sired category such as Restau rant 3 Touch All Categories and all the nearby facilities names and ad dresses included in the specified category are listed up 4 Continue searching for the de sired facility by touching and a style name Touch the desired category continue searching for the de sired facility if a subcategory screen appears TIP Touch Browse by Style if it is avail able...

Page 52: ...roceed as follows 1 Touch State Country 2 Touch Canada or United States to select the country 3 Enter the state name by using the keyboard that appears and touch Enter 4 Touch Spell City 5 Enter the city name by using the keyboard that appears and touch Enter 6 Touch Spell Intersection 7 Enter the intersection name by using the keyboard that ap pears and touch Enter 8 Touch the intersection name C...

Page 53: ...ection of the button To zoom out or zoom in touch or 4 Touch Info to show informa tion on the location if neces sary Touch Info off to hide the infor mation Touch Save to save the current location in memory Touch Go to start route guid ance destination mark points the location set as the destination You can now start route guidance To find your destination by entering the address 1 Open the Destin...

Page 54: ... find your destination from the destinations saved or recently set 1 Open the Destination menu See page 9 1 2 Touch Saved Recent The Saved screen appears as the default one 3 To show the list of destinations recently set touch Recent 4 Touch the desired location list ed on the Saved or Recent screen The map screen appears with destination mark indicating the selected location You can now start rou...

Page 55: ... location You can now start route guidance WPT type data Consists of location data RTE type data Consists of trip data including the destination location TRK type data Consists of trail data including the start point and end point 1 Open the Destination menu See page 9 1 2 Touch Import location The Import location screen ap pears To find your destination from gpx file logbook data stored in a USB ...

Page 56: ...tination You can now start route guidance If the imported destination could not be found on the map or if there were more than 6 destinations in the trip data a window appears to tell you that the data was not usable If only the TRK type data is available in the USB memory device A screen like the following appears You can confirm the start point and end point location on the map by touching View ...

Page 57: ...n appears with destination mark indicating the selected location You can now start route guidance To set the registered Yamaha dealer as the destination If you have already registered the location of a specific Yamaha dealer you can set it as the destination 1 Open the Destination menu See page 9 1 2 Touch My Dealer The map screen appears with destination mark indicating the dealer s location You ...

Page 58: ...uidance To show information of the current location 1 On the HOME screen touch NAVI 2 On the Navigation menu touch Location info 3 If you want to save the location in memory touch Save The saved location can be used when you set your destination by Saved Recent on the Des tination menu See page 9 5 The saved information stays available until you have saved over it or you have deleted all the perso...

Page 59: ...e Search near screen see page 11 24 TIP The currently set destination search start position is displayed to the right of the Search near button To call up screens for destination search directly from the map When the screen shows a map with the heading icon on it you can easily call up various screens for destination search Heading icon Touch the heading icon and the following screen appears Touch...

Page 60: ...e selected rest area You can now start route guidance To edit the Destination menu You can move a button to a different position delete a button or add a new button on the Destination menu Edit the Destination menu to your preference To move a button to a different position 1 Open the Destination menu See page 9 1 2 Touch Edit A screen like the following ap pears 3 Touch the button you want to mov...

Page 61: ...e and to edit the Destination menu If you start editing with these but tons Move and Delete buttons appear on the screen To move a button to a different po sition select Move To delete buttons select Delete To add a button You can add a button on the Destination menu for a frequently used screen A screen which you can add a button for is accompanied with Add shortcut When you touch for example Cat...

Page 62: ...city name are shown To view a ride s details On the Logbook screen touch the desired ride The screen changes to show the route ridden To show ride details touch Log info Touch Log info off to close the information window To confirm route details via the map touch View map The route traveled will be shown as a dotted line on the map You can scroll the map using the cross cursor and direction button...

Page 63: ...tion you can set a route from your current location to the destination A screen like the following appears with destination mark indicating the destination Destination mark On the Destination screen you can perform the following operations To view destination details Touch Info An information window opens To close the information window touch Info off To save the destination Touch Save The saved d...

Page 64: ...e Route select screen you can touch Route change to change the route type Each time you touch Route change the route type changes in the following order Shortest shown in blue Fastest shown in green Sport shown in orange Scenic shown in cyan TIP While the system is calculating the routes fastest shortest sport and scenic will appear in order as soon as each route s calculation is complete To start...

Page 65: ... turn off the speed limit display see page 11 20 Turning street name Indicates the name of the street you must turn at next Lane guidance Shows which lane you should be in Audio Shows the currently playing audio Estimation display This display shows estimated arrival time or distance to the next via point or final destination For setting details see page 11 28 TIP Touch the estimation display box ...

Page 66: ...he screen To add a destination During route guidance you can add a location and set it as the final destination or as a via point Proceed as follows 1 Touch one of the four partially visible portions of the HOME screen buttons 2 Touch NAVI Desti nation 3 Find another location by using the Destination menu 4 When destination mark ap pears touch Go A screen like the following ap pears Destination cu...

Page 67: ...on menu Route edit button Open the Navigation menu and then touch Route edit The Route edit screen appears Destination mark Via points Current position Destination final If you have not set any via points only the destination and your current position will be displayed If you have already passed through one or more via points when you open the Route edit screen these via points will not be shown I...

Page 68: ...buttons 2 Touch NAVI Quit guidance 3 On the confirmation window that appears touch Yes To show current location details You can see detailed information on your current location during route guidance Proceed as follows 1 Touch one of the four partially visible portions of the HOME screen buttons 2 Touch NAVI Loca tion info 3 If you want to save the location to memory touch Save This newly saved lo...

Page 69: ...earch for the previous channels and for the next channels Repeat this operation until the desired channel is received To preset channels While selecting the channel to preset touch Add preset and then a place in the preset channels list where you want to add the channel Number and name of the channel is added to the preset channels list To listen to a preset channel Scrollupanddownthepresetchannel...

Page 70: ...to the replay mode touch the progress bar or To add the current song or artist to the tag list Tagging a song or artist allows you to receive alerts when that song or artist is being played on another SiriusXM channel On the preset list screen or on the time shift screen proceed as follows 1 Touch Tag this 2 Touch either Artist or Song SiriusXM alerts audio If you have added a song or artist to th...

Page 71: ...m this menu you can use various functions of SiriusXM To activate deactivate TuneMixTM The TuneMix function allows you to listen to songs randomly one after another from the active preset bank 1 Touch TuneMix The TuneMix screen appears 2 Touch the desired channels so that a checkmark is added 3 Touch TuneMix On to activate TuneMix To cancel activating TuneMix touch TuneMix off 4 Touch When TuneMix...

Page 72: ...ategory list The Category screen appears 2 Touch the desired channel SiriusXM alerts sports If you want to be notified when games involving your favorite teams are on the air on other channels proceed as follows to activate the game notice function 1 On the Menu screen touch Game zone 2 Touch the desired league You can select NFL MLB NBA NHL CFB CBK and WCBK 3 Touch the desired team name A checkma...

Page 73: ...rmation 1 Open the SiriusXM info screen 2 Touch Weather The current weather is dis played To view other weather information On the weather screen touch On map The screen changes to the map with weather information displayed on it Touch Current state and the map changes to the one that covers the current state and the button changes to Whole country Touch Whole country to return to the map covering...

Page 74: ...ation for 5 days including today To check another location s weather On the weather screen touch Change location The screen changes as follows and you can specify a new location such as your destination TIP Touch Refresh to update the weath er traffic or fuel information screens Traffic information 1 Open the SiriusXM info screen 2 Touch Traffic The screen changes as follows 3 Touch Around me to v...

Page 75: ...ons with the distance and direction to it together with the fuel s brand name and price TIP Not all gas stations and brands may be listed To select a brand On the SiriusXM Fuel price screen touch Brand You can select a brand name on the screen that appears Select one or more brand names by adding a checkmark then only those selected brands will be displayed ...

Page 76: ...ume Unit Bluetooth Language 2 zone audio Delete all personal data External amp Camera Navigation Map External amp POI Audio tuning Route Inspection mode for dealer use Home System info Search near Communi Bluetooth Voice guidance Phone Estimation and Summary Vox SiriusXM Subscription info Rear controller Traffic alert 2 zone audio Traffic on map Audio output Weather popup alert Volume Weather aler...

Page 77: ...u select the Audio category for example the Audio setting menu appears Audio settings Use the Audio settings menu to make audio related setting changes such as the bass treble fade or SVC speed volume control adjustment The Audio settings menu also allows you to control Bluetooth settings To adjust bass treble fade SVC 1 Go to Setting menu 2 Touch the category selector and then Audio The Audio set...

Page 78: ...der s headset and the passenger s headset 1 On the Audio setting menu touch to scroll down 2 Touch Audio output The Audio output screen ap pears Audio output screen settings Touch the box you want to turn on so that a checkmark appears Touch again to turn off the sound for that area Media Radio broadcasts and audio sources items you can play back by touching on the HOME screen Navi Sounds and voic...

Page 79: ...anges as follows Use the four Volume screens to adjust the various volume settings How to adjust the volume Touch or to change the volume level within the available range or turn on off the sound by adding removing a checkmark Media Adjust the radio and audio source volumes Phone Adjust hands free phone call volume Intercom Adjust intercom volume CB Adjust Citizen s Band radio volume Adjust rider ...

Page 80: ... an external amplifier is connected you can specify which amplifier to use the internal amplifier the external amplifier or both 1 Go to Setting menu 2 Touch the category selector and then Audio The Audio setting menu ap pears 3 On the Audio setting menu touch twice to scroll down 4 Touch External amp The External amp screen ap pears 5 To use the internal amplifier touch Internal amp use so that a...

Page 81: ...el range AVG average Speed IG on ignition on timer Battery voltage Air temp temperature AVG Fuel AVG Speed and IG on timer are accompanied with the Reset button For these items you can reset the displayed value to zero by touching Reset To change the HOME screen and the home right button 1 Go to Setting menu 2 Touch Home screen The Home screen screen ap pears To assign a HOME screen You can assign...

Page 82: ...e the home right button touch Home right key and touch the desired button name The following example shows how to assign the Phone button as the home right button To set the display brightness 1 Go to Setting menu 2 Touch Display The Display screen appears To turn off the display Touch Display OFF and the entire screen turns off To turn on the display Touch any part of the screen and the HOME scre...

Page 83: ...ightness manually Touch to decrease the brightness and to increase the brightness To set the heater The system allows you to adjust the heater temperature of the handlebar grips rider s seat and passenger s seat TIP Depending on the model the passen ger can also adjust their seat heater temperature 1 Go to Setting menu 2 Touch Heater The Heater screen appears 3 Touch to scroll down as nec essary E...

Page 84: ...nput The following screen appears This screen allows you to update the maintenance date To copy the next maintenance date to the last maintenance date touch Copy Touch or to change the day month and year of the last maintenance date and the next maintenance date To set the parts list On the Maintenance screen touch Parts list The Parts list screen appears Proceed as follows to set the parts list 1...

Page 85: ...ouch Value reset and the mileage is reset to the set beginning value To set the clock See page 5 1 To change display units 1 Go to Setting menu 2 Touch Unit The Unit screen appears You can set the unit for the values of distance fuel consumption temperature and pressure Touch the item you want to change and then touch the unit to be displayed The following example shows that you select MPG as the ...

Page 86: ...TuneMix tag lists Destination shortcuts Bluetooth device list Registered home location Logbook content Dealer information Search settings Maintenance date parts list Preset data for CB communication Average fuel data Average speed data To turn the rear view camera on off See page 4 12 To set the speaker mode 1 Go to Setting menu 2 Touch twice Audio tun ing The Audio tuning screen ap pears 3 To use...

Page 87: ...nformation 1 Connect a USB memory device to the USB 1 port 2 Touch Export 3 Wait until the data transfer is finished and then remove the USB memory device Communication settings Use the Communi setting menu to make communication related setting changes such as the settings for Bluetooth the settings for phone communication etc To make settings for Bluetooth 1 Go to Setting menu 2 Touch the categor...

Page 88: ...ou to search for a nearby Bluetooth device such as a smartphone view the detected Bluetooth device name and establish connection with the Bluetooth device Proceed as follows 1 On the Bluetooth screen touch Search device If a Bluetooth device is detect ed its name will be displayed as shown in the following exam ple 2 Touch the Buetooth device name A confirmation window like the following appears 3...

Page 89: ...em discoverable 1 On the Bluetooth screen touch Make system discoverable The following confirmation win dow appears The system now allows a near by Bluetooth device to detect it 2 Operate the Bluetooth device to connect pair with the yama ha system within the indicated time To show the Paired device list screen On the Bluetooth screen touch Paired device list When you touch a paired Bluetooth devi...

Page 90: ...m is named yamaha When a Bluetooth device detects the system the system is recognised as yamaha To change the name proceed as follows 1 On the Bluetooth screen touch to scroll down 2 Touch Set system name The Set system name screen appears 3 Touch Set system name 4 By using the software keyboard that appears enter a desired name and touch Enter To reset the name to yamaha touch Set default name on...

Page 91: ... the Phone screen touch Select ringtone The screen changes as follows 2 To use the system s ringtone touch System ringtone To use the ringtone of the con nected phone device touch Phone ringtone To disable the ringtone touch No ringtone Vox voice communication settings You can adjust the microphone sensitivity of the rider s headset and the passenger s headset 1 Go to Setting menu 2 Touch the cate...

Page 92: ...eckmark is added This enables adjustment of the microphone sensitivity of pas senger s headset 2 Touch or to change the microphone sensitivity of the passenger s headset To disable adjustment touch Vox for passenger headset again so that the checkmark is removed TIP When the sensitivity level is set to 0 voices of the rider passenger will not be picked up by the microphone To activate deactivate t...

Page 93: ...roll down 4 Touch Volume The Volume screen appears TIP You can also access this screen via Setting Audio Volume For detailed volume setting infor mation see page 11 4 To make settings for the voice rec ognition function See page 4 10 Navigation mode settings Use the Navigation setting menu to make the various types of navigation related settings To select the map display mode 1 Go to Setting menu ...

Page 94: ... Night mode The screen changes as follows If you want the screen to always be in the daytime display touch Day mode If you want the screen to always be in the nighttime display touch Night mode Touch AUTO so that the screen switches between the daytime display and the nighttime display automatically To change the shape of the heading icon On the Map screen touch My icon The screen changes as follo...

Page 95: ... to scroll down and then touch Speed limit indication so that a checkmark is added The registered speed limit in the navigation system will be displayed Touch Speed limit indication again so that the checkmark is removed and the speed limit will not be displayed To show hide the lane guidance On the Map screen touch to scroll down and then touch Lane guidance so that a checkmark is added Lane guid...

Page 96: ... area Restaurant Everyday life Art Entertainment Attraction Recreation Medical care Transit Lodging Dealer YAMAHA Emergency Shopping To show hide the specific POI icons Touch the desired POI category such as Gas station so that a checkmark is added The corresponding POI icons will be displayed on the map Touch again so that the checkmark is removed and the corresponding POI icons will not be displ...

Page 97: ...eference settings You can adjust the type of route the navi computer will suggest first as well as one way or roundtrip and places to avoid 1 Go to Setting menu 2 Touch the category selector and then Navigation The Navigation setting menu appears 3 Touch Route The Route screen appears Type of route On the Route screen touch Route preference The screen changes as follows Touch the desired route typ...

Page 98: ...wn and touch the desired place name such as Highways to be avoided To register your home It is recommended to first register your home before you start using the system as a navigational tool From the Home screen you can register your home in various ways To register the current location on the map as your home See page 5 2 To register your home by entering the address 1 On the Home screen touch b...

Page 99: ...ered as your home To change the destination search start position When you try to find your destination by categories as described on page 9 1 facilities situated within about 30 miles 50 km from the current location will be detected If you want to search for facilities situated out of this range use the Search near function 1 Go to Setting menu 2 Touch the category selector and then Navigation Th...

Page 100: ...ity 6 Enter the city name by using the keyboard that appears and touch Enter Alternatively you can designate the city name by entering its zip code Touch Zip Code enter the zip code by using the numeric key board that appears and touch Enter 7 Touch Spell Street 8 Enter the street name by using the keyboard that appears and touch Enter If a list of street names such as the example below appears to...

Page 101: ...tion search start position 1 On the Search near screen touch by Saved Recent list A screen like the following ap pears 2 To select a location from the saved destination locations touch Saved To select a location from the list of locations recently searched for touch Recent 3 Touch the desired address 4 Touch Set The selected address will be set as the destination search start position To turn on o...

Page 102: ...ation settings You can turn on off the estimated time distance display and the moving time average speed display during route guidance You can also specify the content of each display 1 Go to Setting menu 2 Touch the category selector and then Navigation The Navigation setting menu appears 3 Touch to scroll down 4 Touch Estimation and Summa ry The Estimation and Summary screen appears ...

Page 103: ...ma ry screen touch Arrival est The screen changes as follows 2 Touch the desired content that will be displayed during route guidance You can select one from among the following four options Arrival time to Destination Distance to Destination Arrival time to Via point Distance to Via point TIP Arrival time to Via point and Distance to Via point are available only when one or more via points have b...

Page 104: ...riusXM The SiriusXM setting menu ap pears 3 Touch Subscription info A screen like the following one appears 4 Touch Next to go to the next window 5 Touch OK to close the informa tion window To turn on off the display of infor mation provided by SiriusXM When some specific information is provided by SiriusXM in addition to ordinary music news entertainment etc you can decide whether or not they are...

Page 105: ...vy rain is displayed 3 Touch the concerned informa tion so that a checkmark is add ed and its display is turned on Touch again so that the check mark is removed and its display is turned off To select the area covered by the SiriusXM weather alert 1 Go to Setting menu 2 Touch the category selector and then SiriusXM The SiriusXM setting menu ap pears 3 Touch to scroll down 4 Touch Weather alert loc...

Page 106: ...If necessary wash the screen with a moist cloth and pH neutral detergent Otherwise clean gently with a microfiber cloth to prevent scratching the screen NOTICE Do not use any abrasive or strong chemicals to clean the screen Updating the unit s software Occasional software updates may be released for the unit Periodically check Yamaha s homepage for details USA www yamaha motor com Canada www yamah...

Page 107: ... Star Venture Star Venture TC Size 7 0 inch Type Color Touch screen Standard Star Venture Star Venture TC Watts per channel 26 Speakers 2 4 P A upgrade 4 Speaker size 5 5 inch front 5 5 inch front 5 25 inch rear Standard P A upgrade Wired headset for rider Standard Wired headset for passenger Standard 16 64 ohms ...

Page 108: ... jack Standard Pandora Music Standard SiriusXM antenna P A upgrade Standard Star Venture Star Venture TC AM presets 5 FM presets 15 Weather Band presets 5 SiriusXM presets 20 Seek Scan Standard 2 zone audio Standard Speed Volume Control Standard Star Venture Star Venture TC Display English French Voice Recognition English French TTS Text to Speech English French ...

Page 109: ...DP AVRCP 1 3 1 4 HFP PBAP MAP SPP Grip Seat heater Standard Rear audio controller P A upgrade Standard Wind screen adjut Standard Star Venture Star Venture TC GPS antenna P A upgrade Standard GPS database USA Canada Navigation license P A upgrade Standard Star Venture Star Venture TC Rider Passenger Intercom Standard CB module P A upgrade Standard CB antenna P A upgrade Standard Hands free phone v...

Page 110: ...ark owned by the Bluetooth SIG Inc Pandora and the Music Genome Project are registered trademarks of Pandora Media Inc Sirius XM SiriusXM TuneMix and all related marks and logos are trademarks of Sirius XM Radio Inc iPod and iPhone are registered trademarks of Apple Inc ...

Page 111: ...the latitude longitude 9 8 By entering the phone number 9 8 Changing the start position 11 24 From saved or recently set 9 5 From the logbook 9 6 Display units changing 11 10 E Emergency phone call 8 4 Estimated arrival time 9 16 Estimation display settings 11 27 F Fade 11 2 FM broadcast 6 1 Full keyboard 4 8 Function screen 4 12 H Handlebar switches 3 1 Heads up map 4 6 Heater temperature Adjusti...

Page 112: ... 10 1 SiriusXM traffic weather 10 5 Subscription information 11 29 Traffic weather icons on map 11 29 TuneMix 10 3 TuneStart 10 4 SMS receiving text messages 8 8 Software keyboards 4 8 Sound turning on off 11 3 Speaker mode setting 11 11 Specifications 12 2 Speed limit indication 4 3 9 16 Showing hiding 11 20 Squelch sensitivity 8 7 System outline 3 1 T Talk button passenger 3 3 Talk button rider ...

Page 113: ...13 13 3 ...

Page 114: ...13 13 4 ...

Page 115: ......

Page 116: ...PRINTED IN JAPAN PRINTED ON RECYCLED PAPER ...

Reviews: