background image

SWP1 Owner’s Manual

14

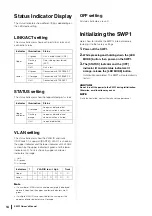
Status Indicator Display

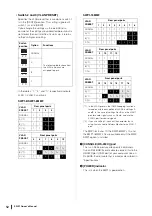
The status indicators show different things depending on 
the LED mode setting.

LINK/ACT setting

The status indicators show each port’s link status and 
connection status.

STATUS setting

The status indicators show the loop-related port’s status.

VLAN setting

The status indicators show the VLAN ID and trunk.
If DIP switch 1 is upward ([DANTE]), VLAN 1 is shown by 
the upper indicator and the lower indicator unlit. VLAN 2 
is shown by the upper indicator lit green and the lower 
indicator unlit. Trunk is shown by upper and lower 
indicators lit orange.

–: Unlit
G: Lit green
O: Lit orange

Note

• If a number of VLANs that cannot be completely displayed 

above is specified, the upper and lower indicators are lit 
green.

• If multiple VLAN IDs are specified for the same port, the 

upper and lower indicators are lit orange.

OFF setting

All status indicators are unlit.

Initializing the SWP1

Here’s how to initialize the SWP1’s internal memory, 
restoring it to the factory settings.

1.

Power-off the SWP1.

2.

While pressing and holding down the [LED 
MODE] button, then power-on the SWP1.

3.

The [STATUS] indicator and the [OFF] 
indicator lit and all status indicators lit 
orange, release the [LED MODE] button.

Initialization completed, The SWP1 will automatically 
restart.

CAUTION

Do not turn off the power to the SWP1 during initialization. 
Otherwise, a malfunction may occur.

NOTE

If initialization failed, contact Yamaha service personnel.

Indicator

Illumination

Status

Upper

Lit green

Link is established. (LINK)

Flashing 
green

Data is being transferred. 
(ACT)

Unlit

Link is lost.

Lower

Lit green

Connected with 1000BASE-T.

Lit orange

Connected with 100BASE-TX.

Unlit

Connected with 10BASE-T.

Indicator

Illumination

Status

Upper 
and lower

Lit orange

Loop was detected, but 
communication is not halted.

Flashing 
orange

Loop was detected, and 
communication is halted.

Unlit

Loop not detected.

Indicators

1

VLAN ID low 

 high

Trunk

Upper

G

O

G

O

O

Lower

G

O

O

G

O

Summary of Contents for SWP1-16MMF

Page 1: ...tuguês Italiano Русский 日本語 Owner s Manual Bedienungsanleitung Mode d emploi Manual de instrucciones Manual do Proprietário Manuale di istruzioni Руководство пользователя 取扱説明書 JA RU IT PT ES FR DE EN L2 SWITCH SWP1 8 SWP1 8MMF SWP1 16MMF ...

Page 2: ...r supply cord or plug is damaged liquid has been spilled or objects have fallen into the apparatus the apparatus has been exposed to rain or moisture does not operate normally or has been dropped 15 EXT DC INPUT Connector is intended to be supplied by UL Listed Power Supply marked Limited Power Source LPS or Class 2 and rated 24 Vdc PRÉCAUTIONS CONCER NANT LA SÉCURITÉ 1 Lire ces instructions 2 Con...

Page 3: ...equirements provides a reasonable level of assurance that your use of this product in a commercial environment will not result in harmful interference with other electronic devices However operation of this product in a commercial area is likely to cause interference in some form In this case you the user bear the responsibility of correcting this condition This product generates uses radio freque...

Page 4: ... modify them in any way If it should appear to be malfunctioning discontinue use immediately and have it inspected by qualified Yamaha service personnel Water warning Do not expose the device to rain use it near water or in damp or wet conditions or place on it any containers such as vases bottles or glasses containing liquids which might spill into any openings If any liquid such as water seeps i...

Page 5: ...onnected cables If the device is mounted in an EIA standard rack carefully read the section Precautions for Rack Mounting on page 9 Inadequate ventilation can result in overheating possibly causing damage to the device s malfunction or even fire Connections Before connecting the device to other devices turn off the power for all devices Also before turning the power of all devices on or off make s...

Page 6: ...llation of the device must comply with local and national electrical codes About this manual The illustrations as shown in this manual are for instructional purposes only Yamaha Corporation make no representations or warranties with regard to the use of the software and documentation and cannot be held responsible for the results of the use of this manual and the software Windows is a registered t...

Page 7: ... any other party handling or distributing the Software make no warranty neither explicit nor implicit regarding the merchantability or suitability of the Software for any particular purpose 2 Yamaha its subsidiaries their sales representatives and dealers and any other party handling or distributing the Software shall bear no responsibility for any damages including but not limited to lost profit ...

Page 8: ...ntrols and Functions 11 Front panel 11 Rear panel 13 Status Indicator Display 14 LINK ACT setting 14 STATUS setting 14 VLAN setting 14 OFF setting 14 Initializing the SWP1 14 VLAN Use Cases 15 Redundant Dante connections 15 Separating control signals from audio signals 15 Specifications 16 ...

Page 9: ...which closing the rear of the rack will produce a greater cooling effect Refer to the rack and or fan unit manual for details Features Recommended settings for Dante are provided Recommended settings such as QoS EEE and IGMP Snooping for stable operation of the Dante network can be specified with only DIP switch VLAN presets provided Three types of preset VLAN settings are provided allowing a more...

Page 10: ...requires a connection to communicate with another switch Since a tag VLAN can use a single trunk connection cable to communicate with other switches multiple tag VLANs can be connected together but the total amount of data must not exceed 1 Gbps By using two trunk cables with link aggregation the bandwidth of the trunk connection between two SWP1 units can be increased to 2 Gbps The VLAN presets o...

Page 11: ...ode fiber cables that have a core diameter of approximately 50 μm and cladding diameter of approximately 125 μm The maximum length between devices is 300 m Cleaning Correct communication might not be possible if debris and or dust has adhered to the ends of optical fiber cables or the ports Clean the equipment regularly by using commercially available optical fiber cleaning products 3 LED mode ind...

Page 12: ... the SWP1 16MMF s 18 are available only if the MMF SWP1 option is installed 7 CONSOLE RS 232C port This is an RJ 45 port used to specify commands Use an RJ 45 DB 9 serial cable to connect this to the RS 232C port COM port of your computer Use an RJ 45 DB 9 serial cable that is wired as described in Specifications 8 POWER indicator This is lit when the SWP1 is powered on Switch position Option Func...

Page 13: ...R 4 32 type jack for supplying an external power supply 24V as a backup for the SWP1 s internal power supply CAUTION Before connecting the external power supply you must turn off the external power supply Failing to do so may cause electrocution or malfunctions EXT DC INPUT connector is intended to be supplied by Power Supply certified with Limited Power Source or LPS and rated 24 Vdc NOTE If an e...

Page 14: ...icators are unlit Initializing the SWP1 Here s how to initialize the SWP1 s internal memory restoring it to the factory settings 1 Power off the SWP1 2 While pressing and holding down the LED MODE button then power on the SWP1 3 The STATUS indicator and the OFF indicator lit and all status indicators lit orange release the LED MODE button Initialization completed The SWP1 will automatically restar...

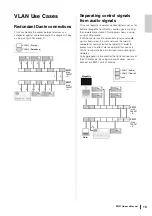
Page 15: ...ing VLAN preset B If VLANs are not used and control signals and audio signals flow across the same network the two will compete for communication bandwidth In order to prevent such an effect we recommend that you use VLANs to separate the control signal and audio signal networks Link aggregation is enabled for the trunk connections of the VLAN presets By using two trunk cables you can connect two ...

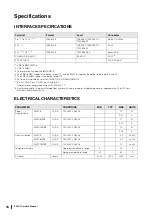
Page 16: ...gth 300 m ELECTRICAL CHARACTERISTICS Terminal Format Level Connector 1 8 1 1 8 13 16 2 3 IEEE802 3 10BASE T 100BASE TX 1000BASE T etherCON CAT5e 9 12 2 3 IEEE802 3 10BASE T 100BASE TX 1000BASE T RJ 45 9 10 4 17 18 5 8 IEEE802 3 1000BASE SX opticalCON CONSOLE RS 232C RS 232C RJ 45 6 EXT DC INPUT XLR 4 32 type 7 PARAMETER CONDITIONS MIN TYP MAX UNITS Power Requirements SWP1 8 J U C E 100 240V 50 60H...

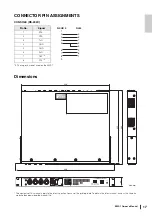
Page 17: ...ons The contents of this manual apply to the latest specifications as of the printing date To obtain the latest manual access the Yamaha website then download the manual file Pin No Signal 1 RTS 2 DTR 3 TxD 4 GND 5 GND 6 RxD 7 DSP 9 8 CTS 9 D SUB 9 RJ45 1 2 3 4 5 6 7 8 9 3 6 7 4 5 2 8 1 362 355 430 480 44 Unit mm ...

Page 18: ......

Page 19: ...blished 11 2015 MWHD A0 Printed in China 2015 Yamaha Corporation Manual Development Department ZR15950 Yamaha Downloads http download yamaha com Yamaha Pro Audio global website http www yamahaproaudio com ...

Reviews: