background image

English

SWR2310-28GT SWR2310-18GT SWR2310-10G

7

NOTICE

To avoid the possibility of malfunction/ damage 
to the product, damage to data, or damage to 
other property, follow the notices below.

Handling and maintenance

• Do not touch the interior of a port with your 

fingers or any metallic object. Doing so 
might cause malfunctions.

• Do not use the product in a location 

exposed to direct sunlight (such as in a car 
during the day), in a location of extreme 
heat such as near a stove, in a location of 
extreme cold, or in a location of excessive 
dust or vibration. Failure to observe this 
precaution could cause the product’s 
panel to deform, its interior components to 
malfunction, or its operation to become 
unstable.

• Do not place vinyl, plastic or rubber 

objects on the product, since this might 
cause alteration or discoloration of the 
panel.

• When cleaning the product, use a dry and 

soft cloth. Do not use paint thinners, 
solvents, cleaning fluids, or chemical-
impregnated wiping cloths, since this might 
cause alteration or discoloration.

• Condensation can occur in the product due 

to rapid, drastic changes in ambient 
temperature—when the product is moved 
from one location to another, or air 
conditioning is turned on or off, for example. 
Using the product while condensation is 
present can cause damage. If there is 
reason to believe that condensation might 
have occurred, leave the product for several 
hours without turning on the power until the 
condensation has completely dried out.

• Drain all static electricity from your 

clothing and body before handling this 
product. Static electricity can damage this 
product. Touch an exposed metal part of 
the host device or other grounded object 
beforehand.

• Do not install the product in a location 

where magnetic fields are strong. 
Otherwise, it might cause the product to 
malfunction.

• Do not connect any noise generating 

devices on the same power line as the 
product. Failure to observe this precaution 
could result in a malfunction or damage to 
the product.

• Do not locate any connected LAN cables 

close to the power cord. Otherwise, high 
voltage might be induced, resulting in 
malfunction.

• A 1000BASE-T connection will require an 

Enhanced Category 5 (CAT5e) or better 
LAN cable.

• Do not install any SFP module other than 

the separately sold SFP-SWRG-SX or 
SFP-SWRG-LX in an SFP port. Operation 
cannot be guaranteed if any SFP module 
other than the above is installed.

• Do not install any SFP+ module other than 

the separately sold SFP-SWRT-SR or 
SFP-SWRT-LR, any SFP module other 
than the SFP-SWRG-LX or 
SFP-SWRG-SX, or any direct attach cable 
other than the DAC-SWRT-3M or 
DAC-SWRT-1M in an SFP+ port. 
Operation cannot be guaranteed if any 
module or cable other than the above is 
installed.

• Attach the dust cover to SFP/SFP+ ports 

that are not in use. Failing to do so could 
allow foreign objects to enter, causing 
malfunctions. Keep the dust cover in a 
safe place so that it is not lost.

• The rubber feet included in this package 

can be attached to the product to prevent 
slippage when it is to be used on a 
slippery surface.

• Do not connect this product to public Wi-Fi 

and/or Internet directly. Only connect this 
product to the Internet through a router 
with strong password-protections. Consult 
your router manufacturer for information 
on security best practices.

Summary of Contents for SWR2310-28GT

Page 1: ...l Bedienungsanleitung Mode d emploi Manual de instrucciones Manual de instruções Manuale di istruzioni Руководство пользователя 使用说明书 칺푷컲졓컪 SWR2310 28GT SWR2310 18GT SWR2310 10G English Deutsch Français Español Português Italiano Italiano 中文 묻펂 Русский ...

Page 2: ... or moisture does not operate normally or has been dropped PRÉCAUTIONS CONCER NANT LA SÉCURITÉ 1 Lire ces instructions 2 Conserver ces instructions 3 Tenir compte de tous les avertissements 4 Suivre toutes les instructions 5 Ne pas utiliser ce produit à proximité d eau 6 Nettoyer uniquement avec un chiffon propre et sec 7 Ne pas bloquer les orifices de ventilation Installer l appareil conformément...

Page 3: ...rated in a commercial environment This equipment generates uses and can radiate radio frequency energy and if not installed and used in accordance with the instruction manual may cause harmful interference to radio communications Operation of this equipment in a residential area is likely to cause harmful interference in which case the user will be required to correct the interference at his own e...

Page 4: ...pply power cord Do not place the power cord near heat sources such as heaters or radiators and do not excessively bend or otherwise damage the cord place heavy objects on it or place it in a position where anyone could walk on trip over or roll anything over it Only use the voltage specified as correct for the product The required voltage is printed on the name plate of the product Use only the su...

Page 5: ...the internal temperature from becoming too high In particular do not place the product on its side or upside down Inadequate ventilation can result in overheating possibly causing damage to the product s or even fire When installing the product Do not cover it with any cloth Do not install it on a carpet or rug Make sure the top or side surface faces up do not install on its front rear or upside d...

Page 6: ...P SWRT SR SFP SWRT LR is installed The separately sold SFP SFP modules are class 1 laser devices They may emit laser beams invisible to the eye If the laser beam enters your eye your eyesight might be damaged Backup battery Do not replace the backup battery by yourself Doing so may cause an explosion and or damage to the product s When the backup battery needs to be replaced contact your Yamaha de...

Page 7: ...dling this product Static electricity can damage this product Touch an exposed metal part of the host device or other grounded object beforehand Do not install the product in a location where magnetic fields are strong Otherwise it might cause the product to malfunction Do not connect any noise generating devices on the same power line as the product Failure to observe this precaution could result...

Page 8: ...ames in this manual are the trademarks or registered trademarks of their respective companies Software may be revised and updated without prior notice Open source software used in this product Please refer to the Yamaha Pro Audio website for the licensing terms http www yamaha com proaudio Warning Fiber Optic Port Safety This product is intended to be installed in an UL certified Optical Transceiv...

Page 9: ...panel rear panel side panel top panel 14 Port indicators 19 Attaching the legs 20 Installation in a rack 20 Installation on a wall or ceiling 24 Settings 27 Make settings using the Web GUI 27 Making settings from the command line using the CONSOLE port 28 Connections 30 Initialization 34 Appendix 36 Hardware specifications 36 Dimensional diagram 38 RJ 45 DB 9 console cable pin configuration 39 Sof...

Page 10: ...on This product makes it easy to specify the recommended settings for stable operation of a Dante network such as QoS EEE and IGMP Snooping Multiple switches connected as a stack can be operated as a single virtual switch The SWR2310 28GT is equipped with stack functionality This product can ease your daily network maintenance and operation responsibilities You can use Yamaha LAN Monitor applicati...

Page 11: ...net system to be constructed inexpensively although with limited distance Yamaha LAN Monitor Yamaha LAN Monitor user guide This is a PC application used to monitor this unit s information and the entire network including all Dante devices on the Dante network and the user guide for this application Yamaha network device USB serial driver Yamaha network device USB serial driver installation guide T...

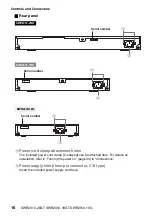
Page 12: ...ed and correctly install this unit so that its internal temperature is appropriate You can also check this from Yamaha LAN Monitor or the Web GUI Front Panel POWER indicator Status Unlit Power off Flashing green Power on starting up Lit green Power on normal Lit orange Power on error occurred SWR2310 28GT 2 4 6 8 10 12 14 16 26 1 3 5 7 9 11 13 15 18 17 20 19 22 21 24 23 25 28 27 1 23 45 6 7 8 2 4 ...

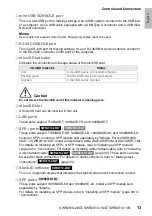
Page 13: ...0BASE SX and 1000BASE LX Install an SFP module or SFP module sold separately by Yamaha For the SWR2310 28GT or SWR2310 18GT install a direct attach cable DAC SWRT 3M or DAC SWRT 1M For details on installing an SFP or SFP module refer to Installing an SFP module page 30 in Connections For details on installing a direct attach cable refer to Installing a direct attach cable page 32 These ports can a...

Page 14: ...Controls and Connectors 14 SWR2310 28GT SWR2310 18GT SWR2310 10G Bottom panel Bottom panel rear panel side panel top panel SWR2310 28GT 0 SWR2310 18GT 0 B ...

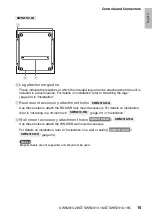
Page 15: ...unt accessory attachment holes Use these holes to attach the RK SWR rack mount accessory For details on installation refer to Installing in a 19 inch rack page 21 in Installation B Wall mount accessory attachment holes Use these holes to attach the WK SWR wall mount accessory For details on installation refer to Installation on a wall or ceiling page 24 Notice Magnet sheets are not supported and s...

Page 16: ...cluded power cord clamp C shaped can be attached here For details on installation refer to Turning the power on page 33 in Connections D Power supply inlet three pin connector C14 type Insert the included power supply cord here SWR2310 28GT D C Serial number SWR2310 18GT D C Serial number SWR2310 10G D C Serial number ...

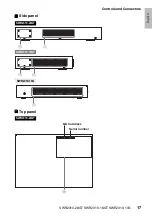
Page 17: ...English Controls and Connectors SWR2310 28GT SWR2310 18GT SWR2310 10G 17 Side panel Top panel SWR2310 28GT E G SWR2310 18GT E G SWR2310 10G G SWR2310 28GT F Serial number MAC address ...

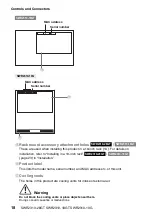
Page 18: ...ge 23 in Installation F Product label This lists the model name serial number and MAC address etc of this unit G Cooling vents The holes in this product are cooling vents for intake of external air Warning Do not block the cooling vents or place objects near them Doing so could cause fire or malfunctions SWR2310 18GT F Serial number MAC address SWR2310 10G F G Serial number MAC address SWR2310 28G...

Page 19: ...T Lit green A link is established available Lit orange Connected by 100BASE TX Flashing green Data is flowing Lit green Connected by 1000BASE T Left indicator Link status Right indicator Connection speed Unlit The link is lost unavailable Unlit Not connected Lit green A link is established available Lit green Connected by 1000BASE SX LX or 10GBASE SR LR If using the DAC SWRT 3M or DAC SWRT 1M conn...

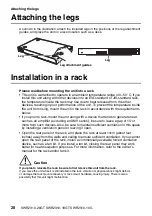
Page 20: ...series be sure to leave a gap of 1U or more from such devices Also be sure to maintain sufficient ventilation in this space by installing a ventilation panel or leaving it open Open the rear panel of the rack and place the rack at least 10cm about four inches away from the walls and ceiling to ensure sufficient ventilation If you cannot open the rear panel of the rack install a commercially availa...

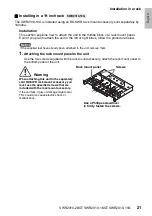
Page 21: ... the supplied feet have already been attached to the unit remove them 1 Attaching the rack mount panel to the unit Use the two screws supplied with the rack mount accessory attach the rack mount panel to the bottom panel of the unit SWR2310 10G Warning When attaching this unit to the separately sold RK SWR rack mount accessory you must use the specified screws that are included with the rack mount...

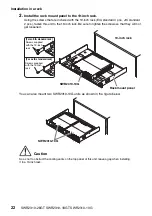
Page 22: ...sure to tighten the screws so that they will not get loosened You can also mount two SWR2310 10G units as shown in the figure below Caution So as not to obstruct the cooling vents on the top panel of this unit leave a gap when installing it in a 19 inch rack 10 9 19 inch rack Rack mount panel For an EIA standard rack For a JIS standard rack Screws supplied with the 19 inch rack Screws supplied wit...

Page 23: ...to obstruct the cooling vents on the side panels of this unit leave a gap when installing it in a 19 inch rack Memo Using the screws that are included with the 19 inch rack EIA standard 4 pcs JIS standard 2 pcs fasten this unit to the rack The rack mount hardware can be attached to this unit using either of the following two methods Method A Attach the rack mount hardware so that its rack screw su...

Page 24: ...use electrical shock or malfunctions Installation must be performed by a qualified installer During installation pay attention to the following points Choose hardware and a location that is well able to support the weight of this unit Avoid locations that are subject to sustained vibration You must use the specified installation accessory Perform periodic maintenance checks Notice The mounting acc...

Page 25: ...g room for the mounting accessory to engage the screws illustration at right Warning You must use screws that are appropriate for the material of the wall or ceiling If the unit falls injury or damage might occur 3 Align the unit with the mounting accessory illustration below Notice If the supplied feet have already been attached to the unit remove them WK SWR WK SWR A B C C D D D D B B C C B A A ...

Page 26: ...5 Engage the assembled mounting accessory onto the commercially available screws that you provisionally attached in step 2 and slide it to the side Warning Do not drop the unit If the unit falls injury or damage might occur Notice When installing the unit sideways engage the mounting accessory onto the commercially available screws and slide it either to the left or the right 6 Further tighten the...

Page 27: ...ha website http www yamaha com proaudio Here we explain the procedure for logging in to this unit using the Web GUI You will use Yamaha LAN Monitor to log in to the Web GUI so install Yamaha LAN Monitor before you continue Before you log in connect your computer to the same network For details on supported web browsers refer to the Yamaha website http www yamaha com proaudio Logging in to this uni...

Page 28: ... installing the USB serial driver refer to the Yamaha Network Device USB Serial Driver Installation Guide The Yamaha Network Device USB Serial Driver Installation Guide and the installer can be downloaded from the Yamaha website http www yamaha com proaudio Preparing the computer You will need terminal software that controls the serial COM port of the computer Set the parameters of the terminal so...

Page 29: ...on the power as described in Turning the power on page 33 When this unit powers on and the command line is usable a startup message appears in the console screen of the computer If the power is already on a startup message does not appear 3 Press the Enter key The system waits for a user name to be entered If a user name has already been specified enter the user name When the unit is shipped from ...

Page 30: ...amage or malfunction might occur Take care when making connections Installing an SFP module SFP ports SFP module SFP SWRG SX SFP SWRG LX SFP port SFP module SFP SWRT SR SFP SWRT LR SFP module SFP SWRG SX SFP SWRG LX Supported SFP modules and SFP modules are collectively referred to here as SFP modules 1 Remove the dust cover that is affixed to this unit s SFP SFP port and insert the SFP module Mem...

Page 31: ...er optic cable 2 If the SFP module is connected to the upper row of ports lower the SFP module s lever If it is connected to the lower row of ports raise the lever Caution Do not look into the optical emitter when the SFP module is installed The SFP modules separately sold by Yamaha are class 1 laser devices They may emit laser beams invisible to the eye If the laser beam enters your eye your eyes...

Page 32: ...module section inward use the other hand to pull the removal tab toward yourself disengaging the lock 2 When the lock disengages continue pulling the removal tab and slowly pull out the SFP module section Caution Do not grasp the cable of the direct attach cable when disconnecting it Doing so might cause malfunctions Do not disconnect the cable by pulling only the removal tab Doing so might cause ...

Page 33: ...wer supply cord If you use the clamp for other power cords they might be damaged or might not secure properly 2 Connect the included power cord to the power inlet and secure it with the clamp 3 Connect the power cord to an electrical outlet The POWER indicator flashes green and after startup is completed is lit green Caution If the POWER indicator is lit orange the temperature inside the unit is a...

Page 34: ...ngs from the Web GUI Log in to the Web GUI from Yamaha LAN Monitor 1 Choose Administration tab Maintenance Restart or Initialize The Restart or Initialize screen appears 2 In the Initialize section click the Proceed button The Initialize screen appears 3 Enter the administrative password and click Confirm The Confirm execution screen appears 4 Verify the content and click the Execute button The un...

Page 35: ... startup to restore the factory settings The unit can be restored to its factory settings by entering an uppercase I when the unit is starting up This explanation uses the method of disconnecting and reconnecting the power cord The procedure is also the same when using the reload command to restart this unit Notice Here we assume that you are logged in as described in Logging in from a computer co...

Page 36: ...requency AC100 240V 50 60 Hz Maximum power consumption 25 2 W 19 0 W 11 7 W CONSOLE port Standard RS 232C USB 2 0 Connector RJ 45 USB mini B 5 pin Data transmission speed 9600 bit s LAN ports Standard IEEE802 3 10BASE T 100BASE TX 1000BASE T Number of ports 24 16 8 Communicati on mode Auto negotiation Connector RJ 45 Polarity Automatic detection of straight cross or fixed at straight SFP ports Sta...

Page 37: ... ACT SPEED SFP port LINK ACT SPEED POWER microSD LAN port LINK ACT SPEED SFP port LINK ACT SPEED POWER microSD LAN port LINK ACT SPEED SFP port LINK ACT SPEED MAC address Indicated in product label on top panel of unit Operating environment conditions Ambient temperature 0 50 C Ambient humidity 15 80 non condensing Storage environment conditions Ambient temperature 20 60 C Ambient humidity 10 90 n...

Page 38: ...2310 10G Dimensional diagram SWR2310 28GT 2 4 6 8 10 12 14 16 26 1 3 5 7 9 11 13 15 18 17 20 19 22 21 24 23 25 28 27 440 47 2 44 3 2 300 2 3 Units mm SWR2310 18GT 2 4 6 8 10 12 14 16 18 1 3 5 7 9 11 13 15 17 330 46 7 43 5 3 2 200 2 3 Units mm ...

Page 39: ...onsole RS 232C Signal RTS DTR TxD GND GND RxD DSR CTS 1 2 3 4 5 6 7 8 8 6 9 2 5 3 7 4 1 RJ 45 D SUB 9 The model number serial number power requirements etc may be found on or near the name plate which is at the top of the unit You should note this serial number in the space provided below and retain this manual as a permanent record of your purchase to aid identification in the event of theft Mode...

Page 40: ...xpress or implied is hereby conveyed or granted by YAMAHA to you for any intellectual property of YAMAHA 2 OWNERSHIP AND COPYRIGHT The SOFTWARE is protected under the copyright laws and owned by YAMAHA You agree and acknowledge that YAMAHA transfers neither ownership interest nor intellectual property in the SOFTWARE to you under this AGREEMENT or otherwise 3 EXPORT RESTRICTIONS You agree to compl...

Page 41: ... expiration hereof 7 SEPARABILITY In the event that any provision of this AGREEMENT is declared or found to be illegal by any court or tribunal of competent jurisdiction such provision shall be null and void with respect to the jurisdiction of that court or tribunal and all the remaining provisions of this AGREEMENT shall remain in full force and effect 8 U S GOVERNMENT RESTRICTED RIGHTS NOTICE Th...

Page 42: ...CONSOLE port 13 28 P Password 27 Power cord clamp 33 Power cord clamp attachment holes 16 POWER indicator 12 Power supply inlet 16 Product label 18 R Rack mount accessory attachment holes 15 18 RJ 45 CONSOLE port 13 RK SWR 20 S SFP ports 13 SFP module 30 SFP ports 13 Stack connections 33 Stack ID indicator 13 U User name 27 W Wall mount accessory attachment holes 15 Web GUI 27 WK SWR 24 Y Yamaha L...

Page 43: ...English SWR2310 28GT SWR2310 18GT SWR2310 10G 43 Memo ...

Page 44: ...en mbouj dwg diegndat haenx ancienz sawjyungh ҙ䗖 Ѣ ᢨ 2000m ҹϟഄऎᅝܼՓ DŽ P ŢȓŤ ȋƍǨƍǪǽŷ ŭȤǩƨǫȏŲȓů ȄŨŷ ǝŨșŨȡ ƈȤƍƱ Ȍƒ šȜƍǷǩƨŷ njųȢŲǧǸŲǙƣ Ȍƒ dzů ȅƍǖŻȢŨƲŦ IJ ȄāŎŐǑŖŢāĻŬŜāřŜāŎņŬāŐŇāɥŢā2000ŎʼnāǼŢāŜāǶřāĸŬāʼnŘāĿŪʼnāŎŪŇāŌŪŇāɄŬŇāɎŜāŖȬŜă ĊĪØĪÛĜIJ ÜīýĢ 2000 ēØīĀĐÀ ĬāīõÈ āåī Ù È ÕīÀ ĶĪ ÙĶĈĐIJ Ù ć ğĘÈ ÚÉģĄ Dan hab yungh youq gij digih haijbaz 2 000m doxroengz haenx ancienz sawjyungh ѢѻકϞ᠔ ⱘ ˈ䇋ᣝ Ⳍᑨ ⱘϞ䗄䇈ᯢ䖯㸠 DŽ ƾƦȏƧǧųǫȏŲǩƨƱ ȊŲǧ...

Page 45: ...SWR2310 28GT SWR2310 18GT SWR2310 10G 45 ...

Page 46: ...aktierenSiebitteIhre örtliche Stadt oder Gemeindeverwaltung Ihren Abfallentsorgungsdienst oder die Verkaufsstelle der Artikel Information für geschäftliche Anwender in der Europäischen Union Wenn Sie Elektrogeräte ausrangieren möchten kontaktieren Sie bitte Ihren Händler oder Zulieferer für weitere Informationen Entsorgungsinformation für Länder außerhalb der Europäischen Union Dieses Symbol gilt ...

Page 47: ...desfavorables en la salud humana y en el entorno que de otro modo se producirían sise trataran los desperdicios de modo inapropiado Para obtener más información acerca dela recogida y el reciclaje de los productos antiguos póngase en contacto con las autoridades locales con el servicio de eliminación de basuras o con el punto de venta donde adquirió los artículos Para los usuarios empresariales de...

Page 48: ...reece Tel 30 210 6686168 SWEDEN FINLAND ICELAND Yamaha Music Europe GmbH Germany filial Scandinavia JA Wettergrensgata 1 400 43 Göteborg Sweden Tel 46 31 89 34 00 DENMARK Yamaha Music Denmark Fillial of Yamaha Music Europe GmbH Tyskland Generatorvej 8C ST TH 2860 Søborg Denmark Tel 45 44 92 49 00 NORWAY Yamaha Music Europe GmbH Germany Norwegian Branch Grini Næringspark 1 1332 Østerås Norway Tel 4...

Page 49: ...ем году Месяц изготовления указан последней буквой Месяцы с января по сентябрь обозначены буквами от H до P а месяцы с октября по декабрь обозначены буквами от X до Z Cooтветствует требованиям ТР ТС 004 2011 ТР ТС 020 2011 Срок хранения Срок хранения не установлен Условия для утилизации продуктов Следуйте местному органу правил утилизации отходов Условия для реализации продуктов Правила и условия ...

Page 50: ...2020 2020年1月 发行 IPOD B0 2020 Yamaha Corporation Manual Development Group Yamaha Downloads https download yamaha com Yamaha Pro Audio global website https www yamaha com proaudio 产品标准编号 GB 4943 1 GB T 9254 产品名称 二层交换机 ...

Reviews: