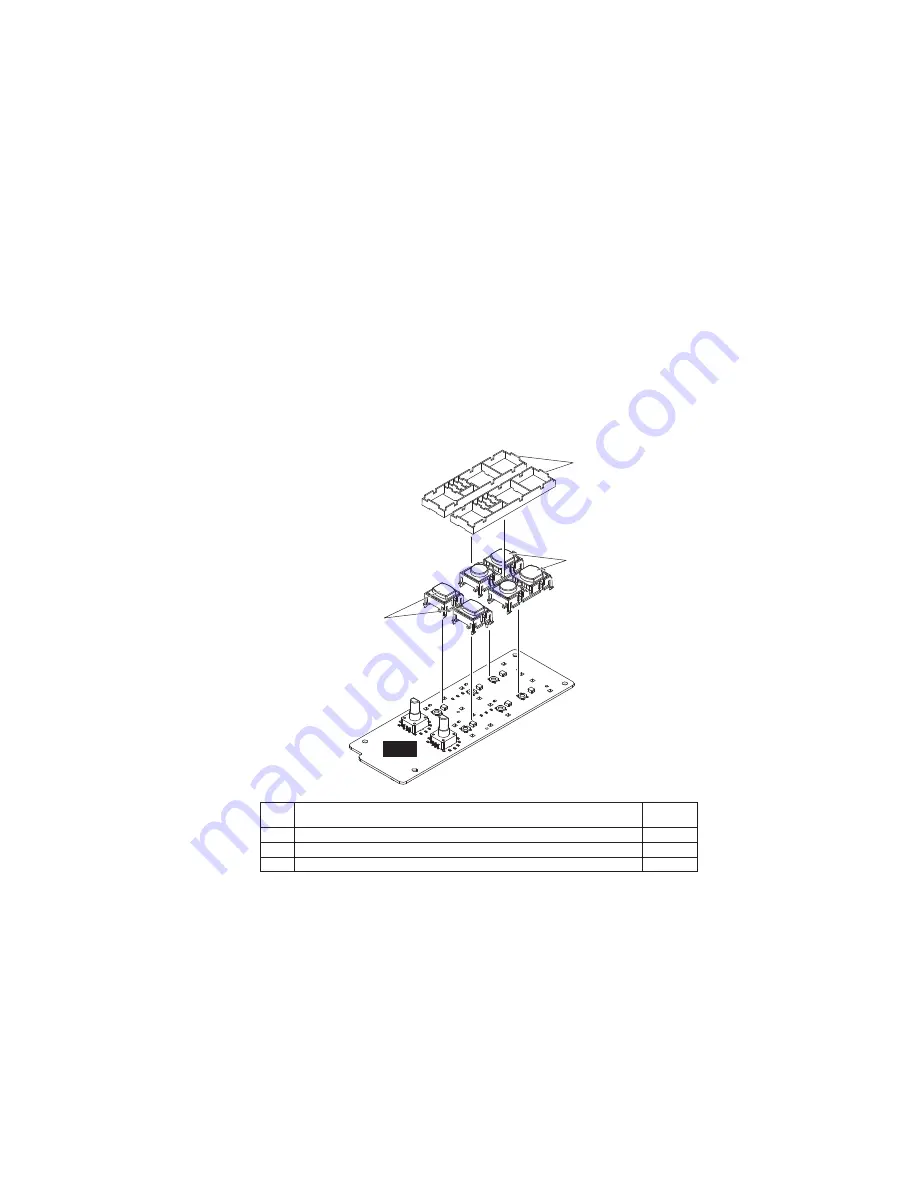
TF5/TF3/TF1
85
REF
NO.
Description
(部品名)
Quantity
(数量)
[460] BUTTON SEL CUE
(ボタン
SC
)
(ST IN 1 SEL/CUE, ST IN 2 SEL/CUE)
2
[470] BUTTON ON
(ボタン
ON
)
(ST IN 1 ON, ST IN 2 ON)
2
[480] BUTTON UNIT CASE
(ボタンユニットケース)
2
Fig. 20
(図20)
B-6.
PNL シート
(所要時間:約 6 分)
B-6-1 サイドパッド R アッセンブリとサイドパッド L
アッセンブリを外します。(1 項参照)
B-6-2 コンパネ Ass'y 16 を外します。(2 項参照)
B-6-3 コントロールパネル面より、[90B] のエンコーダ
2 個を外します。(図 18)
B-6-4 [490] のネジ 5 本を外して、PNL シートを外しま
す。(図 15)
※
PNL シートを取り付ける際は、図 15 に示す
a
、
b
の
順にネジを締めてから他のネジを締めてください。
※
図 20 の表にある部品は PNL シートの構成部品ではあ
りません。PNL シートを交換する際には、PNL シート
から取り外して、新しいシートに取り付けてください。
B-6.
PNL Circuit Board
(Time required: About 6 minutes)
B-6-1
Remove the side pad R assembly and side pad L
assembly. (See Procedure 1)
B-6-2
Remove the control panel assembly 16.
(See procedure 2)
B-6-3
Remove the two (2) encoders marked [90B] from the
control panel side. (Fig. 18)
B-6-4 Remove
the
fi
ve (5) screws marked [490]. The PNL
circuit board can then be removed. (Fig. 15)
*
When installing the PNL circuit board, tighten the
screws
a
to
b
shown in Fig. 15 in numerical order
and then tighten the other screws.
*
The parts on the table in Fig. 20 are not included in
the PNL circuit board components. When replacing
the PNL circuit board, remove the parts from the
PNL circuit board, and install it on the new circuit
board.
PNL
[480]
[460]
[470]
B-7.
USBR シート、USBL シート
B-7-1 サイドパッド R アッセンブリとサイドパッド L
アッセンブリを外します。(1 項参照)
B-7-2 コンパネ Ass'y 16 を外します。(2 項参照)
B-7-3
USBR シート(所要時間:約 5 分)
B-7-3-1 [510] のネジ 2 本を外して、USBR シートを外し
ます。(図 15)
B-7-4
USBL シート(所要時間:約 5 分)
B-7-4-1 [530] のネジ 2 本を外して、USBL シートを外し
ます。(図 15)
B-7.
USBR Circuit Board, USBL Circuit Board
B-7-1
Remove the side pad R assembly and side pad L
assembly. (See Procedure 1)
B-7-2
Remove the control panel assembly 16.
(See procedure 2)
B-7-3
USBR Circuit Board
(Time required: About 5 minutes)
B-7-3-1 Remove the two (2) screws marked [510]. The USBR
circuit board can then be removed. (Fig. 15)
B-7-4
USBL Circuit Board
(Time required: About 5 minutes)
B-7-4-1 Remove the two (2) screws marked [530]. The USBL
circuit board can then be removed. (Fig. 15)
Summary of Contents for TF5
Page 10: ...10 TF5 TF3 TF1 866 716 225 599 225 599 TF5 TF3 Unit mm Unit mm DIMENSIONS...
Page 11: ...11 TF5 TF3 TF1 225 510 599 TF1 Unit mm...
Page 110: ...B B MAIN MAINCOM Circuit Board 2NA0 ZJ06330 3 110 TF5 TF3 TF1...
Page 111: ...B B Scale 90 100 Pattern side 2NA0 ZJ06330 3 111 TF5 TF3 TF1...
Page 113: ...WR 1 WR 1 DA2 Circuit Board Scale 90 100 Component side 2NA ZJ06430 2 113 TF5 TF3 TF1...
Page 116: ...WR 1 WR 1 7 WR 32 5 6 C C PS Circuit Board 2NA ZJ06320 2 116 TF5 TF3 TF1...
Page 119: ...Component side D D Component side 2NA ZJ06380 4 119 TF5 TF3 TF1...
Page 166: ...TF5 TF3 TF1 166 q w e r PLAY q PASS FAIL w CLOSE USER DEFINED KEYS B...
Page 202: ...TF5 TF3 TF1 202 7 SYSTEM SETUP ABOUT 8 HOME Initialize All Memory CANCEL OK OK EXIT...


