4-22
VALVES AND VALVE SPRINGS
ENG
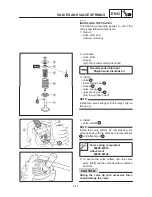
e. Apply a fine lapping compound to the valve
face and repeat the above steps.
f. After every lapping procedure, be sure to
clean off all of the lapping compound from
the valve face and valve seat.
g. Apply Mechanic’s blueing dye (Dykem)
b
onto the valve face.
h. Install the valve into the cylinder head.
i. Press the valve through the valve guide and
onto the valve seat to make a clear impres-
sion.
j. Measure the valve seat width
c
again. If the
valve seat width is out of specification, reface
and lap the valve seat.
EAS00241
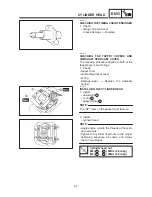
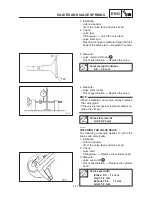
CHECKING THE VALVE SPRINGS
The following procedure applies to all of the
valve springs.
1. Measure:
S
valve spring free length
a
Out of specification
Replace the valve
spring.
Valve spring free length (intake
and exhaust)
Inner spring
35.5 mm Limit: 33.5 mm
Outer spring
37.2 mm Limit: 35.2 mm
2. Measure:
S
compressed spring force
a
Out of specification
Replace the valve
spring.
b Installed length
Compressed spring force
Intake and exhaust inner
spring
8.4
10.2 kg at 30.5 mm
Intake and exhaust outer
spring
16.6
20.4 kg at 32.0 mm
3. Measure:
S
valve spring tilt
a
Out of specification
Replace the valve
spring.
Spring tilt limit
Intake and exhaust inner spring
2.5
_
/ 1.5 mm
Intake and exhaust outer spring
2.5
_
/ 1.6 mm
Summary of Contents for TW125 1999
Page 1: ......
Page 2: ......
Page 8: ......
Page 9: ...GEN INFO 1 ...
Page 11: ......
Page 19: ...GEN INFO ...
Page 20: ...SPEC 2 ...
Page 22: ......
Page 47: ...CHK ADJ 3 ...
Page 49: ......
Page 89: ...CHK ADJ ...
Page 90: ...ENG 4 ...
Page 94: ......
Page 162: ...ENG ...
Page 163: ...CARB 5 ...
Page 165: ......
Page 174: ...CHAS 6 ...
Page 236: ...CHAS ...
Page 237: ...ELEC 7 ...
Page 239: ......
Page 274: ...TRBL SHTG 8 ...
Page 276: ......
Page 282: ...TRBL SHTG ...

