FI
7-15
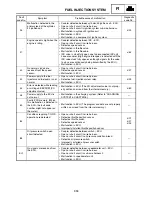
Diagnostic mode table
Switch the meter display from the regular mode to the diagnostic mode. To switch the display, refer
to “DIAGNOSTIC MODE”.
TIP
• Check the intake air temperature and coolant temperature as close as possible to the intake air
temperature sensor and the coolant temperature sensor respectively.
• If it is not possible to check the intake air temperature, use the ambient temperature as reference.
Diagnostic
code No.
Item
Description of action
Checking method
or meter display
d:01
Throttle angle
Displays the throttle angle.
• Check with throttle fully closed.
• Check with throttle fully open.
0 ~ 125 degrees
• Fully closed position (15 ~
18)
• Fully open position (94 ~
100)
d:03
Intake air pressure
sensor 1 (atmospheric
pressure and intake air
pressure)
Displays the intake air pressure for cylinders #1,
#2, and #3.
• Check the intake manifold pressure.
• Push the starter switch and check the change
in the intake air pressure.
• Not cranking: atmospheric
pressure
• Cranking: intake air pres-
sure decreases to less than
the atmospheric pressure.
d:04
Intake air pressure
sensor 2 (atmospheric
pressure and intake air
pressure)
Displays the intake air pressure for cylinder #1.
• Check the intake manifold pressure.
• Push the starter switch and check the change
in the intake air pressure.
• Not cranking: atmospheric
pressure
• Cranking: intake air pres-
sure decreases to less than
the atmospheric pressure.
d:05
Intake air temperature
Displays the intake air temperature.
• Check the temperature in the intake manifold.
Compare it to the value dis-
played on the meter. (Mini-
mum displayed value: –30
[°C])
d:06
Coolant temperature
Displays the coolant temperature.
• Check the temperature of the coolant.
Compare it to the value dis-
played on the meter. (Mini-
mum displayed value: –30
[°C])
d:07
Snowmobile speed
pulse
Displays the cumulative number of snowmobile
pulses that are generated when the track is
spun.
(0 ~ 999; resets to 0 after 999)
OK if the numbers appear on
the meter.
d:09
Fuel system voltage
(battery voltage)
Displays the fuel system voltage (battery volt-
age).
0 ~ 18.7 V
Normally, approximately 12.0 V
d:24
Throttle switch
Displays that the switch is on or off.
• Check the throttle switch.
Throttle open: on
Throttle closed: off
d:27
Thumb warmer opera-
tion
If the grip warmer side of the grip/thumb warmer
adjustment switch is pushed, actuates the thumb
warmer and displays the self-diagnosis warning
indicator for 120 seconds.
After pushing the switch,
check that the warmer
becomes warm.
d:30
Cylinder-#1 ignition coil If the grip warmer side of the grip/thumb warmer
adjustment switch is pushed, actuates the cylin-
der-#1 ignition coil and displays the self-diagno-
sis warning indicator (five times at one-second
intervals).
After pushing the switch,
check that a spark is produced
five times.
d:31
Cylinder-#2 ignition coil If the grip warmer side of the grip/thumb warmer
adjustment switch is pushed, actuates the cylin-
der-#2 ignition coil and displays the self-diagno-
sis warning indicator (five times at one-second
intervals).
After pushing the switch,
check that a spark is produced
five times.
FUEL INJECTION SYSTEM
Summary of Contents for Vector RS90GTZ
Page 1: ......
Page 74: ...INSP ADJ 2 51 Rear RST90GTZ Nipple Nipple both sides LUBRICATION ...
Page 329: ...FI 7 2 Passenger grip warmer relay RS90GTZ RS90LTGTZ RST90GTZ FUEL INJECTION SYSTEM ...
Page 330: ...FI 7 3 CIRCUIT DIAGRAM RS90GTZ RS90LTGTZ FUEL INJECTION SYSTEM ...
Page 332: ...FI 7 5 CIRCUIT DIAGRAM RST90GTZ FUEL INJECTION SYSTEM ...
Page 368: ...ELEC 8 2 IGNITION SYSTEM CIRCUIT DIAGRAM RS90GTZ RS90LTGTZ IGNITION SYSTEM ...
Page 370: ...ELEC 8 4 CIRCUIT DIAGRAM RST90GTZ IGNITION SYSTEM ...
Page 393: ...ELEC 8 27 CHARGING SYSTEM ...
Page 394: ...ELEC 8 28 LIGHTING SYSTEM CIRCUIT DIAGRAM RS90GTZ RS90LTGTZ LIGHTING SYSTEM ...
Page 396: ...ELEC 8 30 CIRCUIT DIAGRAM RST90GTZ LIGHTING SYSTEM ...
Page 404: ...ELEC 8 38 SIGNAL SYSTEM CIRCUIT DIAGRAM RS90GTZ RS90LTGTZ SIGNAL SYSTEM ...
Page 406: ...ELEC 8 40 CIRCUIT DIAGRAM RST90GTZ SIGNAL SYSTEM ...
Page 419: ...ELEC 8 53 SIGNAL SYSTEM ...
Page 420: ...ELEC 8 54 GRIP WARMER SYSTEM CIRCUIT DIAGRAM RS90GTZ RS90LTGTZ GRIP WARMER SYSTEM ...
Page 422: ...ELEC 8 56 CIRCUIT DIAGRAM RST90GTZ GRIP WARMER SYSTEM ...
Page 430: ...ELEC 8 64 COOLING SYSTEM CIRCUIT DIAGRAM RS90GTZ RS90LTGTZ COOLING SYSTEM ...
Page 458: ...SPEC 9 25 CABLE ROUTING CABLE ROUTING ...
Page 460: ...SPEC 9 27 CABLE ROUTING ...
Page 462: ...SPEC 9 29 RS90GTZ RS90LTGTZ CABLE ROUTING ...
Page 464: ...SPEC 9 31 RS90GTZ RS90LTGTZ CABLE ROUTING ...
Page 466: ...SPEC 9 33 RST90GTZ CABLE ROUTING ...
Page 468: ...SPEC 9 35 RST90GTZ CABLE ROUTING ...
Page 470: ...SPEC 9 37 RST90GTZ CABLE ROUTING ...
Page 472: ...SPEC 9 39 RS90GTZ RS90LTGTZ CABLE ROUTING ...
Page 474: ...SPEC 9 41 RS90GTZ RS90LTGTZ CABLE ROUTING ...
Page 476: ...SPEC 9 43 RST90GTZ CABLE ROUTING ...
Page 478: ...SPEC 9 45 RST90GTZ CABLE ROUTING ...
Page 480: ...SPEC 9 47 CABLE ROUTING ...
Page 482: ...SPEC 9 49 CABLE ROUTING ...
Page 484: ...SPEC 9 51 RS90GTZ RS90LTGTZ CABLE ROUTING ...
Page 486: ...SPEC 9 53 RST90GTZ CABLE ROUTING ...
Page 488: ...SPEC 9 55 RS90GTZ RS90LTGTZ CABLE ROUTING ...
Page 490: ...SPEC 9 57 RST90GTZ CABLE ROUTING ...
Page 492: ...SPEC 9 59 RST90GTZ CABLE ROUTING ...
Page 498: ......
Page 499: ......
Page 500: ......
Page 501: ...WIRING DIAGRAM 2010 RS90GTZ RS90LTGTZ 8JA 0F001 00 ...
Page 502: ...WIRING DIAGRAM 2010 RST90GTZ 8HF 0F001 00 ...
Page 503: ...WIRING DIAGRAM 2010 RS90GTZ RS90LTGTZ 8JA 0F001 00 ...


