FI
7-18
TROUBLESHOOTING DETAILS
This section describes the measures per fault code number displayed on the meter. Check and ser-
vice the items or components that are the probable cause of the malfunction following the order
given.
After the check and service of the malfunctioning part have been completed, reset the meter display
according to the reinstatement method.
Fault code No.:
Code number displayed on the meter when the engine failed to work normally. (Refer to “Fault
code table”.)
Diagnostic code No.:
Code number to be used when the diagnostic mode is operated. (Refer to “Diagnostic mode
table”.)
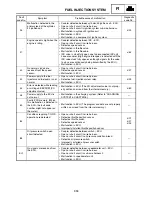
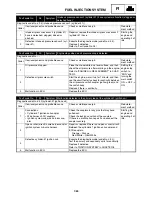
Fault code No.
12
Symptom No normal signals are received from the crankshaft position sensor.
Diagnostic code No. – –
Order
Item/components and probable cause
Check or maintenance job
Reinstate-
ment method
1
Installed condition of crankshaft position
sensor.
Check for looseness or pinching.
Cranking the
engine.
2
Connections
• Crankshaft position sensor coupler
• Wire harness ECU coupler
Check the couplers for any pins that may have
pulled out.
Check the locking condition of the couplers.
If there is a malfunction, repair it and connect the
coupler securely.
3
Open or short circuit in wire harness.
Repair or replace if there is an open or short circuit.
Between the crankshaft position sensor coupler
and ECU coupler.
Gray – Gray
Black/Blue – Black/Blue
4
Defective crankshaft position sensor.
Replace if defective.
Refer to “IGNITION SYSTEM” in CHAPTER 8.
5
Malfunction in ECU.
Replace the ECU.
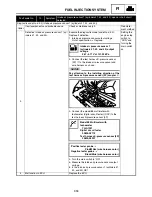
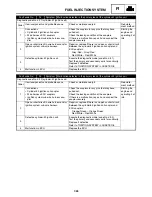
Fault code No.
13
Symptom
Intake air pressure sensor 1 (cylinders #1, #2, and #3): open or short circuit
detected.
Diagnostic code No. d:03 (intake air pressure sensor 1 (cylinders #1, #2, and #3))
Order
Item/components and probable cause
Check or maintenance job
Reinstate-
ment method
1
Connections
• Intake air pressure sensor 1 (cylinders
#1, #2, and #3) coupler
• Wire harness ECU coupler
Check the couplers for any pins that may have
pulled out.
Check the locking condition of the couplers.
If there is a malfunction, repair it and connect the
coupler securely.
Setting the
engine stop
switch to
“RUN” and
turning the
main switch
on.
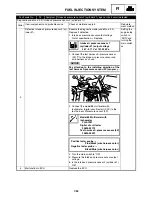
2
Open or short circuit in wire harness.
Repair or replace if there is an open or short circuit.
Between the intake air pressure sensor 1 (cylinders
#1, #2, and #3) coupler and ECU coupler.
Black/Blue – Black/Blue
Pink/White – Pink/White
Blue – Blue
FUEL INJECTION SYSTEM
Summary of Contents for Vector RS90GTZ
Page 1: ......
Page 74: ...INSP ADJ 2 51 Rear RST90GTZ Nipple Nipple both sides LUBRICATION ...
Page 329: ...FI 7 2 Passenger grip warmer relay RS90GTZ RS90LTGTZ RST90GTZ FUEL INJECTION SYSTEM ...
Page 330: ...FI 7 3 CIRCUIT DIAGRAM RS90GTZ RS90LTGTZ FUEL INJECTION SYSTEM ...
Page 332: ...FI 7 5 CIRCUIT DIAGRAM RST90GTZ FUEL INJECTION SYSTEM ...
Page 368: ...ELEC 8 2 IGNITION SYSTEM CIRCUIT DIAGRAM RS90GTZ RS90LTGTZ IGNITION SYSTEM ...
Page 370: ...ELEC 8 4 CIRCUIT DIAGRAM RST90GTZ IGNITION SYSTEM ...
Page 393: ...ELEC 8 27 CHARGING SYSTEM ...
Page 394: ...ELEC 8 28 LIGHTING SYSTEM CIRCUIT DIAGRAM RS90GTZ RS90LTGTZ LIGHTING SYSTEM ...
Page 396: ...ELEC 8 30 CIRCUIT DIAGRAM RST90GTZ LIGHTING SYSTEM ...
Page 404: ...ELEC 8 38 SIGNAL SYSTEM CIRCUIT DIAGRAM RS90GTZ RS90LTGTZ SIGNAL SYSTEM ...
Page 406: ...ELEC 8 40 CIRCUIT DIAGRAM RST90GTZ SIGNAL SYSTEM ...
Page 419: ...ELEC 8 53 SIGNAL SYSTEM ...
Page 420: ...ELEC 8 54 GRIP WARMER SYSTEM CIRCUIT DIAGRAM RS90GTZ RS90LTGTZ GRIP WARMER SYSTEM ...
Page 422: ...ELEC 8 56 CIRCUIT DIAGRAM RST90GTZ GRIP WARMER SYSTEM ...
Page 430: ...ELEC 8 64 COOLING SYSTEM CIRCUIT DIAGRAM RS90GTZ RS90LTGTZ COOLING SYSTEM ...
Page 458: ...SPEC 9 25 CABLE ROUTING CABLE ROUTING ...
Page 460: ...SPEC 9 27 CABLE ROUTING ...
Page 462: ...SPEC 9 29 RS90GTZ RS90LTGTZ CABLE ROUTING ...
Page 464: ...SPEC 9 31 RS90GTZ RS90LTGTZ CABLE ROUTING ...
Page 466: ...SPEC 9 33 RST90GTZ CABLE ROUTING ...
Page 468: ...SPEC 9 35 RST90GTZ CABLE ROUTING ...
Page 470: ...SPEC 9 37 RST90GTZ CABLE ROUTING ...
Page 472: ...SPEC 9 39 RS90GTZ RS90LTGTZ CABLE ROUTING ...
Page 474: ...SPEC 9 41 RS90GTZ RS90LTGTZ CABLE ROUTING ...
Page 476: ...SPEC 9 43 RST90GTZ CABLE ROUTING ...
Page 478: ...SPEC 9 45 RST90GTZ CABLE ROUTING ...
Page 480: ...SPEC 9 47 CABLE ROUTING ...
Page 482: ...SPEC 9 49 CABLE ROUTING ...
Page 484: ...SPEC 9 51 RS90GTZ RS90LTGTZ CABLE ROUTING ...
Page 486: ...SPEC 9 53 RST90GTZ CABLE ROUTING ...
Page 488: ...SPEC 9 55 RS90GTZ RS90LTGTZ CABLE ROUTING ...
Page 490: ...SPEC 9 57 RST90GTZ CABLE ROUTING ...
Page 492: ...SPEC 9 59 RST90GTZ CABLE ROUTING ...
Page 498: ......
Page 499: ......
Page 500: ......
Page 501: ...WIRING DIAGRAM 2010 RS90GTZ RS90LTGTZ 8JA 0F001 00 ...
Page 502: ...WIRING DIAGRAM 2010 RST90GTZ 8HF 0F001 00 ...
Page 503: ...WIRING DIAGRAM 2010 RS90GTZ RS90LTGTZ 8JA 0F001 00 ...


