SETUP
NOTE: Do not turn power On until all other connections
have been made.
Audio Output
The DX7 has a built in headphone amplifier, so
stereo headphones may be plugged into the front
panel jack. However, the instrument does not have a
built in power amplifier, and thus requires an exter-
nal amplifier/speaker system. The OUTPUT jack is
suitable for connection to any unbalanced, low line
level input. This includes the input of the self-pow-
ered speaker systems, and the 600 ohm or higher
impedance line inputs of any Yamaha mixer. Remem-
ber (hat the audio output level not only depends on
the VOLUME setting, but also on the selected voice,
the playing style, and the position of the foot control
if it is plugged into the VOLUME jack.
Use a single conductor shielded cable with a standard
1/4" (6.3 mm) tip/sleeve phone plug. Coiled guitar
cords are not recommended since they typically degrade
the high frequency response more than a straight cord.
Standard guitar cord, 20 feet maximum recommended
length.
The low impedance XLR inputs of Yamaha mixers
may be used with an adaptor cable or a "direct box," as
explained in the technical notes at the end of this sec-
tion.
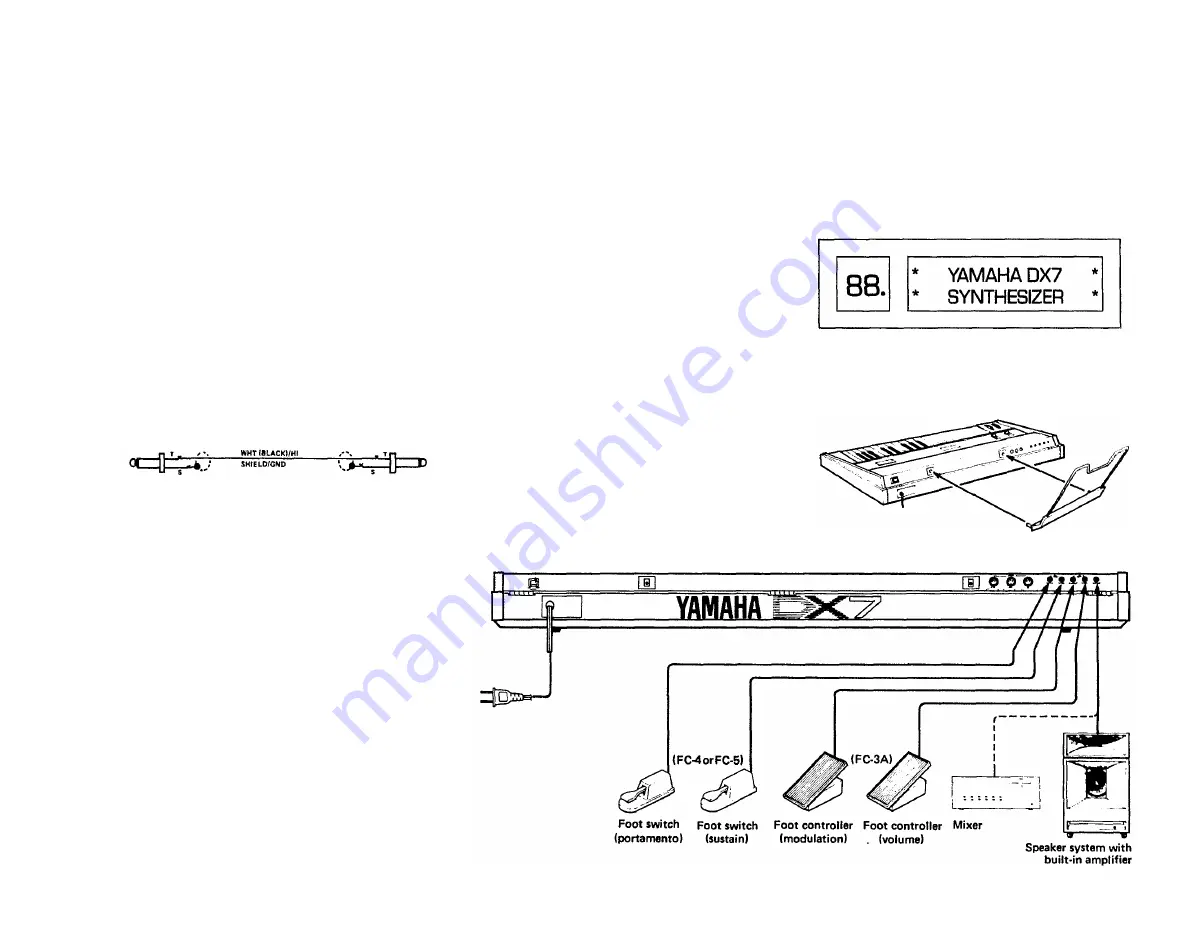
External Foot Controller Jacks
There are 4 phone jacks designed for use with exter-
nal foot controls. The VOLUME and MODULATION
jacks each accept a Yamaha FC-3A foot pedal, which has
a tip/ring/sleeve (stereo type) phone plug. The PORTA-
MENTO and SUSTAIN jacks each accept a Yamaha FC-4
or FC-5 foot switch, which has a tip/sleeve phone plug.
None of these jacks needs to be used for normal opera-
tion of the DX7, but if the foot controllers are used, be
sure you plug in the proper type of controller. The picto-
rial diagrams on the rear panel should make this clear.
Breath Controller
The optional Yamaha BC-1 Breath Controller is a
pressure transducer that is designed for use with this
synthesizer. Its miniature tip/ring/sleeve phone plug
goes into the BREATH CONT. jack on the front of the
DX7; DO NOT plug anything else into this jack.
MIDI Connectors
These multi-pin DIN connectors are for the Musical
Instrument Digital Interface system (MIDI), a standard
adopted by several leading synthesizer manufactur-
ers. MIDI allows the DX7 to remotely control (or be
controlled by) other keyboards, sequencers and com-
puter interfaces. See the "MIDI" section of this man-
ual for additional information.
AC Power
Plug the DX7 power cord into any 120 volt, 50 or 60
Hz grounded (3-prong) AC receptacle. It draws 40 watts
maximum. When using the DX7 with an amplifier or
mixer that has an unbalanced input, it is a good idea to
plug both units into the same AC receptacle box or the
same "leg" of the AC service. This will reduce the
chance of hum.
After all connections have been made, turn down the
mixer or amplifier volume as a precaution. Then turn
ON the POWER switch located at the rear of the instru-
ment (on the right side viewed from the keyboard). The
display panel will look like the illustration here for a few
seconds, and will then change to display the mode
which had been engaged before the DX7 was last turned
off.
Installation of Music Rack
The music rack which comes with the DX7 fits into
two sockets on the rear panel (see diagram).
12
Summary of Contents for Vintage DX7 Special Edition ROM
Page 1: ...YAMAHA AUTHORIZED PRODUCT MANUAL DX7 DIGITALPROGRAMMABLE ALGORITHMSYNTHESIZER...
Page 2: ...YAMAHA DigitalProgrammable Algorithm Synthesizer OPERATION MANUAL...
Page 5: ......
Page 70: ...YAMAHA VOICE DATA LIST...
Page 71: ...DX7 OM 5 20 99 19E0112 international Corp Box 6600 Buena Park Calif 90622...


