Basic components
16
EMU26400
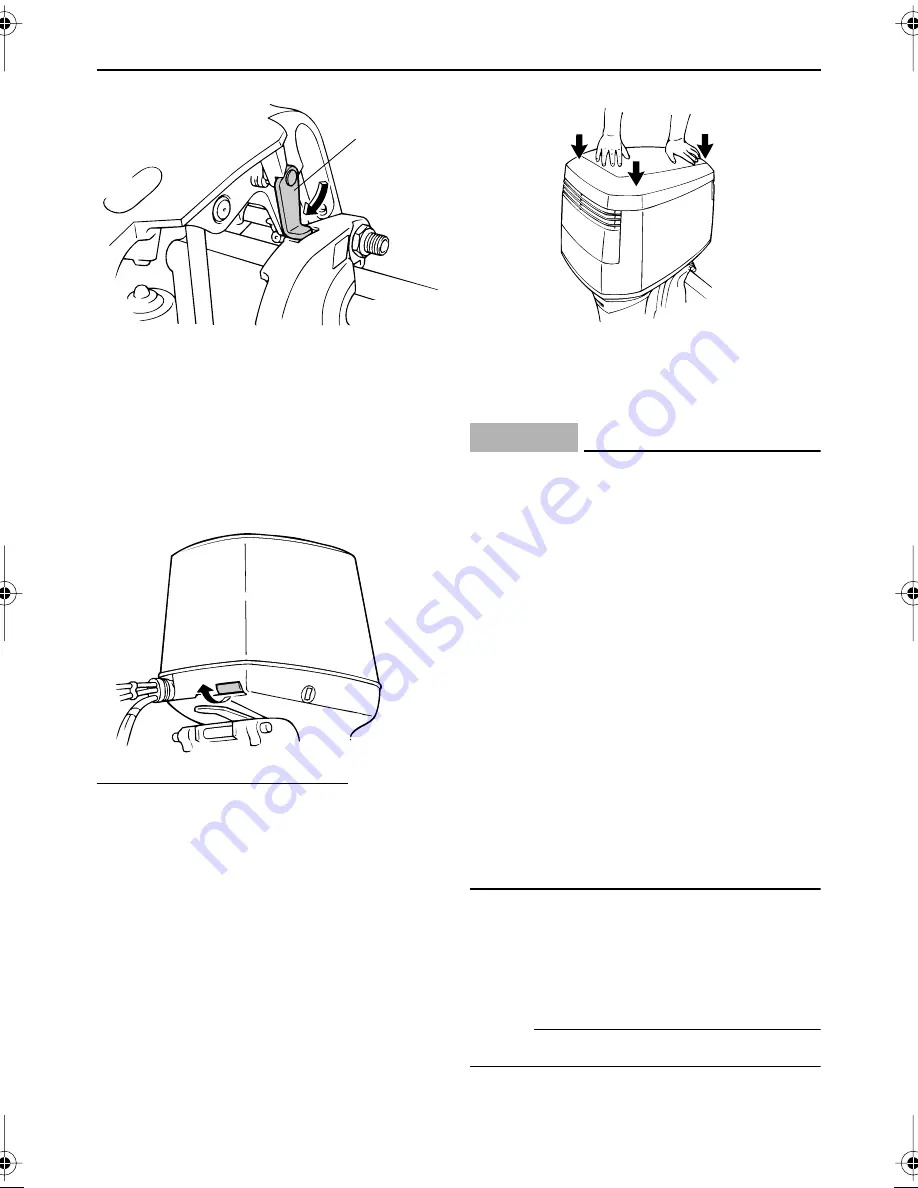
Top cowling release lever
The top cowling can be removed by operat-
ing the cowling release lever. Pulling the
front lever unlocks the top cowling for remov-
al.
When installing the top cowling:
1.
Set the top cowling straight down onto
the engine, being careful to avoid catch-
ing spark plug wires or other wires.
2.
Align the three cowling hooks with the
locks on the bottom cowling.
3.
Press down on the top of the cowling at
the front and both sides of the back until
the three locks click.
4.
To make sure the cowling is locked
properly push the cowling from each
side. If it lifts, repeat step 3.
CAUTION:
ECM00070
●
Make sure the cowling lock connection
cable is operating correctly before rein-
stalling the top cowling.
●
When the release lever is operated,
both the front and rear cowling hooks
should be released at the same time. If
not, adjust the rear clamp cable adjust-
ers.
●
Make sure the cable operates smoothly
and is free of corrosion.
●
Check that the cable is properly se-
cured in the holder.
●
When reinstalling the cowling, ensure
that both the front and rear locks have
operated properly. If the cowling has
not been locked properly, some parts
may be damaged by the top cowling
shaking during operation.
EMU26460
Flushing device
This device is used to clean the cooling wa-
ter passages of the motor using a garden
hose and tap water.
NOTE:
For details on usage, see page 43.
1. Tilt support lever
ZMU03979
1
ZMU03518
ZMU03519
✩✩✬✤✫✲✣ ✤✩
Summary of Contents for VX200D
Page 1: ...VX200D OWNER S MANUAL 66K 28199 18 U S A Edition LIT 18626 05 93 ...
Page 2: ...EMU25060 ZMU01690 Read this owner s manual carefully before operating your outboard motor ...
Page 63: ...Maintenance 58 ZMU01943 ...
Page 73: ...68 Consumer information EMU29811 Important warranty information for U S A and Canada ...
Page 74: ...Consumer information 69 ...
Page 76: ...Consumer information 71 ...
Page 77: ...Consumer information 72 ...
Page 79: ...Printed in Japan April 2004 0 2 1 Printed on recycled paper ...
Page 81: ...PLACE POSTAGE HERE ATTN WARRANTY DEPARTMENT Warranty card 2 27 02 11 47 AM Page 2 ...


