Editing Plug-Ins
181
DM2000 Version 2—Owner’s Manual
Editing Plug-Ins
Plug-Ins can be edited as follows. The settings of Waves Plug-Ins and User Defined Plug-In
banks can be stored to an external MIDI device, such as a MIDI data filer, by using MIDI
Bulk Dump (see page 220), or stored to SmartMedia (see page 271).
If you’ve installed a Y56K card into one of the Slots, display pages especially for the Waves
card are displayed when the corresponding Plug-In is selected. See the Waves documenta-
tion for more information. The following explanation applies only to User Defined
Plug-Ins.
1
Press the EFFECTS/PLUG INS [PLUG-INS] button.
2
Use the EFFECTS/PLUG INS [1–8] buttons to select the Plug-Ins.
3
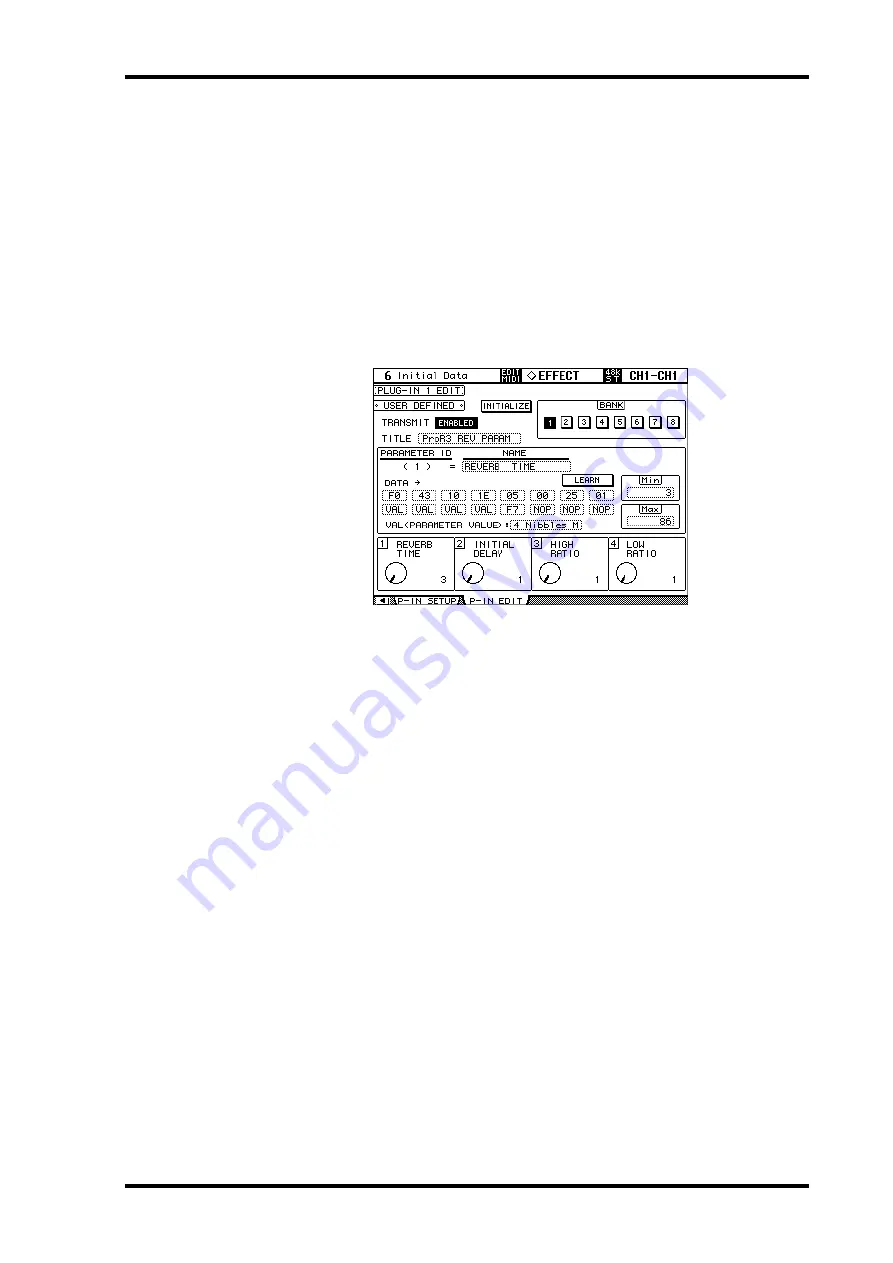
Use the EFFECTS/PLUG INS [DISPLAY] button to locate the Plug-In Edit page.
4
Use the cursor buttons to select the parameters, and use the Parameter
wheel, INC/DEC buttons, and [ENTER] button to set them.
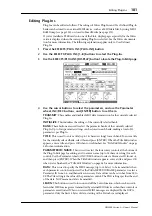
TRANSMIT:
This enables and disables MIDI data transmission for the currently selected
Plug-In.
INITIALIZE:
This initializes the settings of the currently selected bank.
BANK:
These buttons are used to select the parameter banks of the currently selected
Plug-In. Up to four parameter settings can be stored in each bank, making a total of 32
parameters per Plug-In.
TITLE:
This is used to enter a title (up to 16 characters long) for each bank. To enter a title
for the currently selected bank, select this and press [ENTER]. When the Title Edit window
appears, enter a title, and press OK when you’ve finished. See “Title Edit Window” on page
54 for more information.
PARAMETER ID/NAME:
This is used to select the four rotary controls at the bottom of
the Plug-In Edit page for editing, and to enter a name (up to 16 characters long) for each
control. Use the Parameter wheel or INC/DEC buttons to select a Parameter ID from 1–4,
and then press [ENTER]. When the Title Edit window appears, enter a title, and press OK
when you’ve finished. See “Title Edit Window” on page 54 for more information.
DATA:
This is used to specify the MIDI message (up to 16 bytes) to be transmitted when
each parameter control is adjusted. Use the PARAMETER ID/NAME parameter to select a
Parameter ID from 1–4, and then edit as necessary. Data values can be set in hex from 00 to
FF. The VAL setting is the value of the parameter control. The END setting specifies the end
of the data. NOP means no data is transmitted.
LEARN:
This button is used to turn on and off the Learn function, which can be used to
learn what MIDI messages are transmitted by external MIDI devices when their controls or
parameters are adjusted. When on, received MIDI messages are displayed by the DATA
parameter. Only the first 16 bytes of data, starting with a Status bit, are displayed.

