CHASSIS
3-25
Loose connection
Tighten the holder bolt.
3. Hold the vehicle upright and apply the rear
brake several times.
4. Check:
•
Brake hose
Brake fluid leakage
Replace the damaged
hose.
Refer to “REAR BRAKE” on page 4-27.
EAM30499
CHECKING THE BRAKE OPERATION
1. Check:
•
Brake operation
Brake not working properly
Check the
brake system.
Refer to “FRONT BRAKE” on page 4-16 and
“REAR BRAKE” on page 4-27.
TIP
Drive on the dry road, operate the front and rear
brakes separately and check to see if the brakes
are operating properly.
EAM30477
BLEEDING THE HYDRAULIC BRAKE
SYSTEM
WARNING
EWA19140
Bleed the brake system whenever:
• The system is disassembled.
• A brake hose is loosened, disconnected, or
replaced.
• The brake fluid level is very low.
• Brake operation is faulty.
1. Remove:
•
Brake master cylinder cap
•
Reservoir diaphragm
•
Reservoir float (front brake)
•
Protector (rear brake)
TIP
•
Be careful not to spill any brake fluid or allow
the reservoir to overflow.
•
Make sure that there is enough brake fluid be-
fore applying the brake. Ignoring this precau-
tion could allow air to enter the brake system,
considerably lengthening the bleeding proce-
dure.
•
If bleeding is difficult, it may be necessary to let
the brake fluid settle for a few hours. Repeat
the bleeding procedure when the tiny bubbles
in the hose have disappeared.
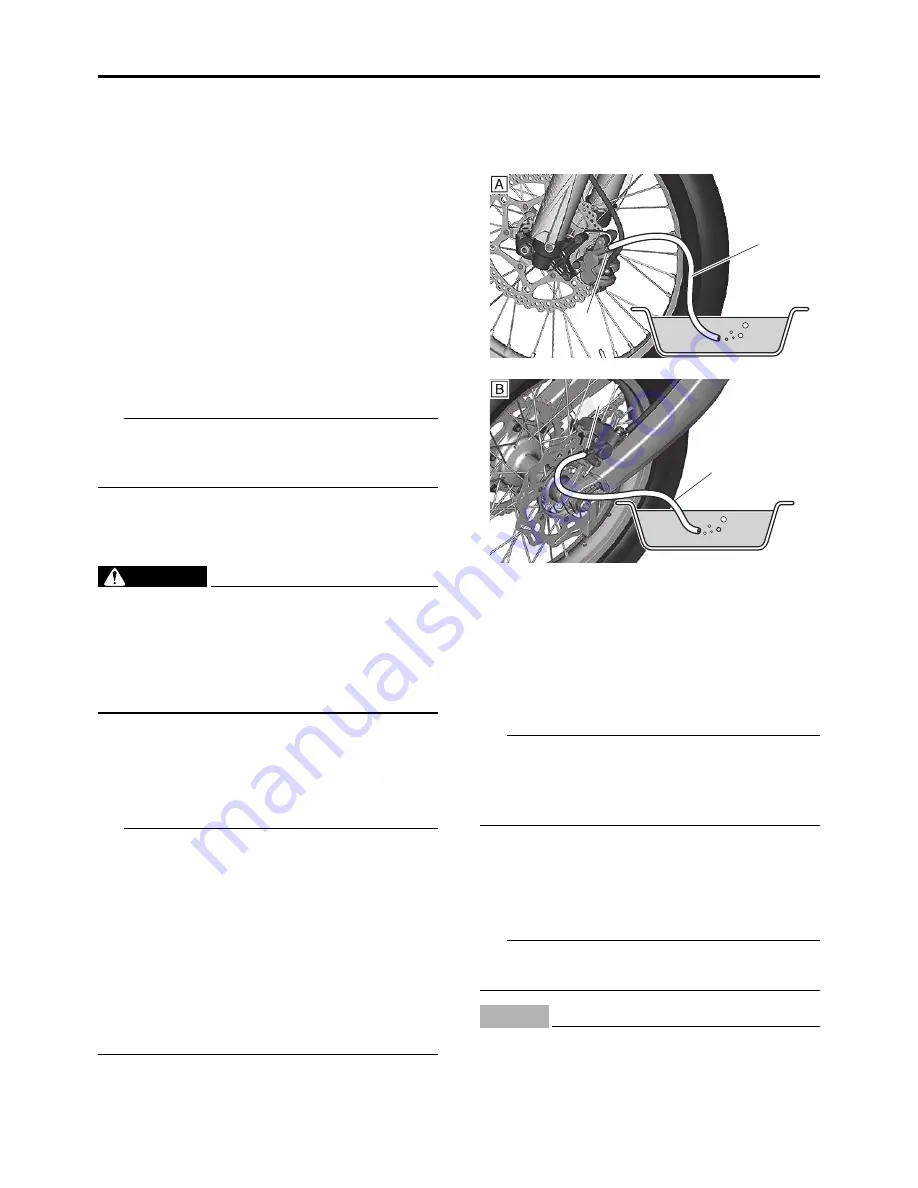
2. Bleed the brake system.
a. Fill the reservoir to the proper level with
the recommended brake fluid.
b. Install the reservoir diaphragm.
c. Connect the plastic hose “1” to the bleed
screw “2” securely, and place a container
under the end of the plastic hose.
d. Slowly apply the brake several times.
e. Fully pull the brake lever or fully press
down the brake pedal and hold it in posi-
tion.
f. Loosen the bleed screw.
TIP
Loosening the bleed screw will release the pres-
sure in the brake caliper and cause the brake le-
ver to contact the throttle grip or the brake pedal
to fully extend.
g. Tighten the bleed screw and then release
the brake lever or brake pedal.
h. Repeat steps (d) to (g) until all of the air
bubbles have disappeared from the brake
fluid in the plastic hose.
TIP
During the procedure, keep adding brake fluid to
the reservoir.
NOTICE
ECA24320
• Wipe off any brake fluid on the brake discs,
tires, wheels, etc.
• Brake fluid may erode painted surfaces or
plastic parts. Always clean up spilled fluid
A. Front
B. Rear
1
2
1
2
2
Summary of Contents for WR250F 2022
Page 5: ...EAM20093 YAMAHA MOTOR CORPORATION U S A WR MOTORCYCLE LIMITED WARRANTY...
Page 8: ......
Page 10: ......
Page 41: ...MULTI FUNCTION DISPLAY 1 29...
Page 62: ...ELECTRICAL SPECIFICATIONS 2 9 Radiator fan motor fuse 5 0 A Spare fuse 15 0 A...
Page 70: ...CABLE ROUTING DIAGRAM 2 17 EAM20152 CABLE ROUTING DIAGRAM Frame and engine left side view...
Page 72: ...CABLE ROUTING DIAGRAM 2 19 Frame and engine right side view...
Page 74: ...CABLE ROUTING DIAGRAM 2 21 Handlebar front view...
Page 76: ...CABLE ROUTING DIAGRAM 2 23 Frame and engine top view...
Page 78: ...CABLE ROUTING DIAGRAM 2 25 Frame and battery top view...
Page 80: ...CABLE ROUTING DIAGRAM 2 27 Rear brake right side view...
Page 82: ...CABLE ROUTING DIAGRAM 2 29 Front brake front view and right side view...
Page 84: ...CABLE ROUTING DIAGRAM 2 31 Taillight top view and right side view...
Page 86: ...CABLE ROUTING DIAGRAM 2 33...
Page 204: ...LUBRICATION SYSTEM CHART AND DIAGRAMS 5 3 1 Oil filter element 2 Oil pump...
Page 205: ...LUBRICATION SYSTEM CHART AND DIAGRAMS 5 4 1 Intake camshaft 2 Exhaust camshaft...
Page 278: ...TRANSMISSION 5 77...
Page 288: ...WATER PUMP 6 9...
Page 298: ...THROTTLE BODY 7 9...
Page 301: ......
Page 302: ...IGNITION SYSTEM 8 1 EAM20142 IGNITION SYSTEM EAM30277 CIRCUIT DIAGRAM...
Page 306: ...ELECTRIC STARTING SYSTEM 8 5 EAM20143 ELECTRIC STARTING SYSTEM EAM30279 CIRCUIT DIAGRAM...
Page 312: ...CHARGING SYSTEM 8 11 EAM20144 CHARGING SYSTEM EAM30282 CIRCUIT DIAGRAM...
Page 315: ...CHARGING SYSTEM 8 14...
Page 316: ...SIGNALING SYSTEM 8 15 EAM20154 SIGNALING SYSTEM EAM30348 CIRCUIT DIAGRAM...
Page 320: ...LIGHTING SYSTEM 8 19 EAM20153 LIGHTING SYSTEM EAM30346 CIRCUIT DIAGRAM...
Page 323: ...LIGHTING SYSTEM 8 22...
Page 324: ...COOLING SYSTEM 8 23 EAM20155 COOLING SYSTEM EAM30350 CIRCUIT DIAGRAM...
Page 327: ...COOLING SYSTEM 8 26...
Page 328: ...FUEL INJECTION SYSTEM 8 27 EAM20145 FUEL INJECTION SYSTEM EAM30284 CIRCUIT DIAGRAM...
Page 353: ...FUEL INJECTION SYSTEM 8 52...
Page 354: ...FUEL PUMP SYSTEM 8 53 EAM20146 FUEL PUMP SYSTEM EAM30287 CIRCUIT DIAGRAM...
Page 388: ...SELF DIAGNOSTIC FUNCTION AND DIAGNOSTIC CODE TABLE 9 15...
Page 398: ...CHASSIS 10 9...
Page 400: ......
Page 402: ......


