background image

EAA01024

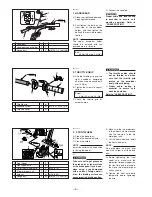
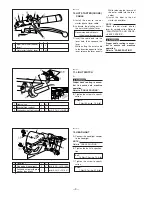
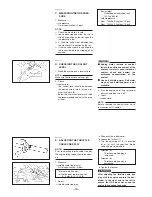
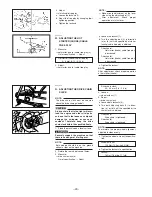
F. ADJUSTING THE  FRONT

BRAKE

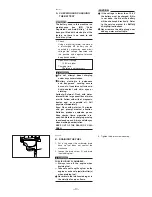
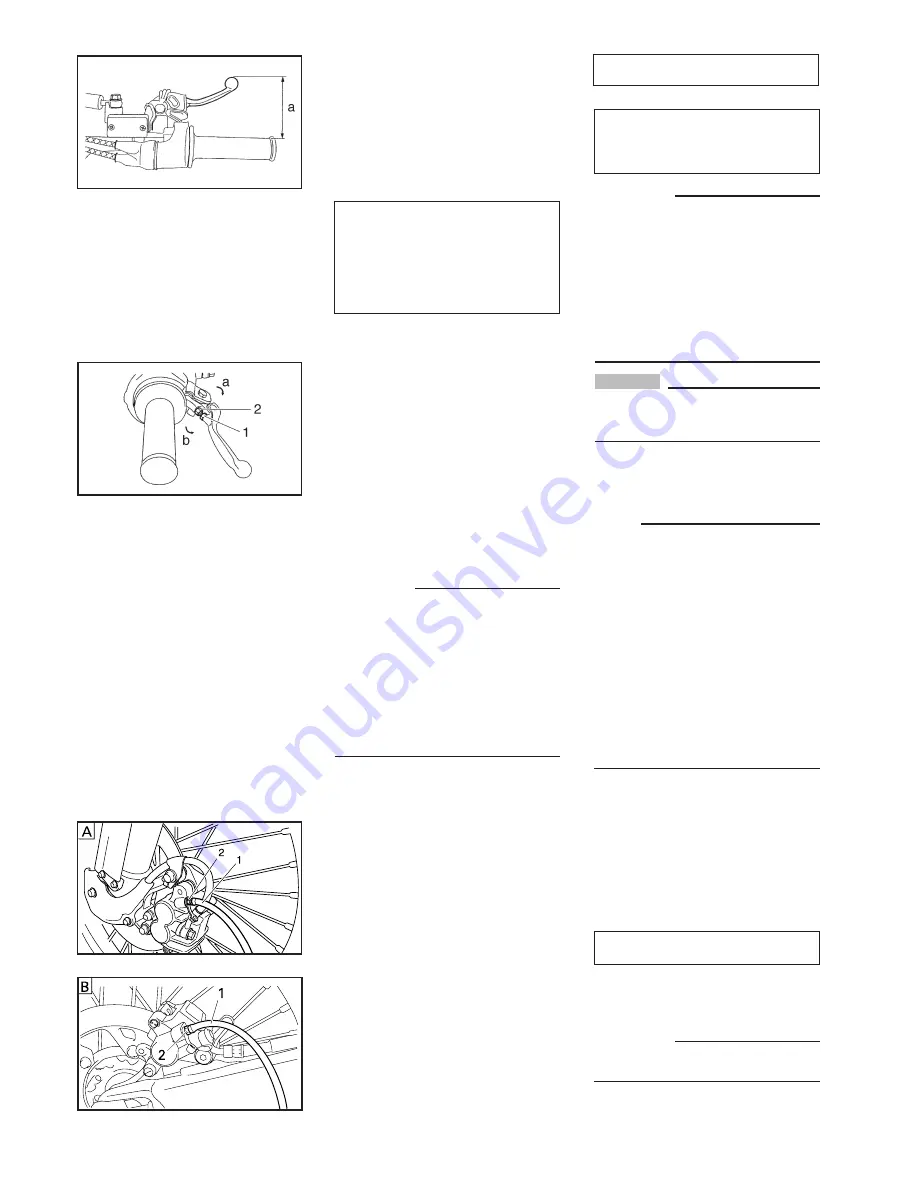
1. Measure:

D

brake lever position (a)
(distance (a) from the throttle grip to
the brake lever)
Out of specification

>

Adjust.

Brake lever position

(distance (a) from the throttle grip
to the brake lever)

Standard position:

95 mm (3.74 in)

Extent of adjustment:

76 ~ 97 mm (2.99 ~ 3.82 in)

2. Adjust:

D

brake lever position

(distance (a) from the throttle grip to
the brake lever)

a. Loosen the locknut (1).
b. Turn the adjusting bolt (2) in direction

(a) or (b) until the specified brake lever
position is obtained.

c. Tighten the locknut.

Direction (a):

Brake lever distance is increased.

Direction (b):

Brake lever distance is decreased.

W

A soft or spongy feeling in the brake
lever can indicate the presence of air in
the brake system. Before the vehicle is
operated, the air must be removed by
bleeding the brake system. Air in the
brake system will considerably reduce
braking performance and could result
in loss of control and possibly an acci-
dent. Therefore, check the brake sys-
tem and bleed if necessary.

CAUTION:

After adjusting the brake lever posi-
tion, make sure that there is no brake
drag.

EAA01034

G. BLEEDING THE  HYDRAULIC

BRAKE SYSTEM

W

Bleed the hydraulic brake system
whenever:

D

The system was disassembled,

D

A brake hose was loosened or
removed,

D

The brake fluid level is very low,

D

Brake operation is faulty.

A dangerous loss of braking perfor-
mance may occur if the brake system
is not properly bled.

1. Remove:

D

diaphragm

D

protector (rear brake)

NOTE:

D

Be careful not to spill any brake fluid or
allow the brake master cylinder reser-
voir to overflow.

D

When bleeding the hydraulic brake
system, make sure that there is always
enough brake fluid before applying the
brake. Ignoring this precaution could
allow air to enter the hydraulic brake
system, considerably lengthening the
bleeding procedure.

D

If bleeding is difficult, it may be neces-
sary to let the brake fluid settle for a
few hours. Repeat the bleeding proce-
dure when the tiny bubbles in the hose
have disappeared.

2. Bleed:

D

hydraulic brake system

a. Add the recommended brake fluid to

the proper level.

b. Install the brake master cylinder reser-

voir diaphragm.

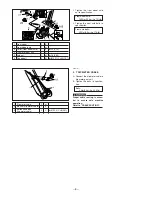
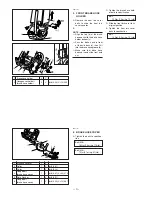
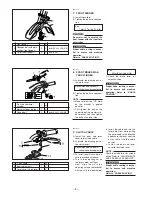
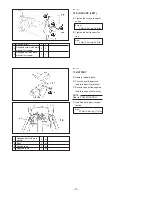
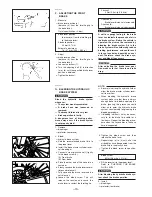
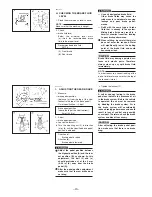
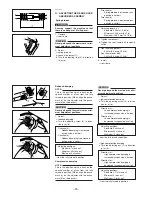
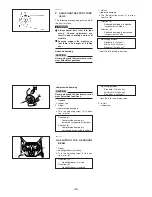
c. Connect a clear plastic hose (1) tightly

to the bleed screw (2).
(A) Front brake
(B) Rear brake

d. Place the other end of the hose into a

container.

e. Slowly squeeze the brake lever several

times and release it.

f. Fully squeeze the brake lever and do

not release it.

g. Loosen the bleed screw. This will

release the tension and cause the
brake lever to contact the throttle grip.

h. Tighten the bleed screw and then

release the brake lever.

i. Repeat steps (e) to (h) until all of the

air bubbles have disappeared from the
brake fluid in the plastic hose.

j. Tighten the bleed screw to specifica-

tion.

Bleed screw:

6 Nm (0.6 m

d

kg, 4.3 ft

d

lb)

k. Fill the reservoir to the proper level.

Refer to "CHECKING THE BRAKE
FLUID LEVEL".

W

After bleeding the hydraulic brake sys-
tem, check the brake operation.

3. Install:

D

diaphragm

D

protector (rear brake)

-19-

Locknut:

5 Nm (0.5 m

d

kg, 3.6 ft

d

lb)

Summary of Contents for WR250F(R)

Page 1: ......

Page 2: ......

Page 3: ...WR250FR 5UM 28107 10 ASSEMBLY MANUAL LIT 11666 16 48 ...

Page 4: ...continually striving to improve all of its model Modifications and signifi cant changes in specifications or procedures will be forwarded to all authorized Yamaha dealers and will appear in future editions of this manual where applicable The procedures below are described in the order that the procedures are carried out correctly and com pletely Failure to do so can result in poor performance and ...

Page 5: ...all so that the arrow mark faces upward 6 Apply a motor oil 7 Made of rubber or plastics 8 A Ref No indicating the order of operations B Part name C Quantity of parts per machine D Place where parts are held V Stored in vinyl bag C Stored in carton box S Fixed inside the steel frame and or contained in the styro foam tray upper or lower Temporarily installed or secured E Size or material of parts ...

Page 6: ...050 SYMBOLS USED ON CRATE CARTON 1 Contents of the transport package are fragile therefore the package must be handled with care 2 Indicates correct upright position of the transport package 3 Transport package must be kept away from rain 4 Insertion of the forklift arm from this side will cause damage 5 Do not step anywhere on the transport package 6 Up to 6 of the transport packages can be piled...

Page 7: ...acking frame bolt 4 and handlebar holder bolts 5 4 Remove the packing frames in order of sideways 6 upward 7 and front back 8 NOTE Hold the frame while removing the frame bolts 5 Remove the bolts 9 front axle fixed plate 10 NOTE Before starting the assembly check for damaged or missing parts Check the parts contained in the carton boxes and on the machine for damage scratches and other defects 1 ...

Page 8: ...EAA00070 PARTS LOCATION 1 Front wheel 2 Front fender 3 Carton Box 1 4 Carton Box 2 2 ...

Page 9: ...ver 20 Fuel tank breather hose 21 Spark plug wrench 22 Nipple wrench 23 Boot adjust nut 24 Handlebar clamp 25 Boot clutch lever 26 Hexagon bolt with plain washer front fender d 6 0 24 l 20 0 79 27 Collar front fender d 6 0 24 28 Flange bolt brake hose cover d 6 0 24 l 12 0 47 29 Plain washer brake hose cover d 8 0 31 30 Flange bolt brake hose cover d 8 0 31 l 20 0 79 31 Brake hose holder 32 Hexago...

Page 10: ...EAA00100 SETUP PROCEDURES Perform the setup procedures in the order indicated by the numbers Always follow the order as shown 4 ...

Page 11: ...ial to assure safe machine operation Refer to CABLE ROUTING EAA000205 3 FRONT WHEEL A Clean the brake disc B Clean the front wheel axle C Clean the collars NOTE Install the collars with its position a facing the wheel D W Take care not to get grease on the brake disc or inner surface of the brake pads If you do so clean using a rag dampened with a solvent Foreign materi al on the braking surface c...

Page 12: ...ip meter gear unit B Tighten the bolts to specifica tion Bolts 4 Nm 0 4 mdkg 2 9 ftdlb W Proper cable routing is essen tial to assure safe machine operation Refer to CABLE ROUTING 1 Trip meter cable 1 2 Bracket trip meter cable 1 V 3 Button head bolt trip meter cable 2 V d 5 0 20 l 8 0 31 1 Front wheel 1 S 2 Front wheel axle 1 3 Collar front wheel axle 1 V d 20 0 79 4 Trip meter gear unit 1 V 5 Ax...

Page 13: ...over bolts to slide the front fork cover upwards B NOTE D Align the top d of the brake hose neck with the brake hose holder bottom c D Pass the brake hose in front of the axle boss a then fit it into the brake hose groove b D Make sure that brake hose does not contact the front axle nut C Tighten the brake hose hold er bolts to specification Bolt 10 Nm 1 0 mdkg 7 2 ftdlb D Slide the front fork cov...

Page 14: ... with plain washer front fender 4 V d 6 0 24 l 20 0 79 3 Collar front fender 4 V d 6 0 24 1 Front brake master cylinder 1 2 Master cylinder bracket 1 V 3 Flange bolt 2 V d 6 0 24 l 22 0 87 EAA00049 9 CLUTCH CABLE A Install the boot and lever cover to the clutch cable B Lubricate the pivoting part of the clutch lever Recommended lubricants Lithium soap based grease C To install the clutch cable be ...

Page 15: ... cable routing is essen tial to assure safe machine operation Refer to CABLE ROUTING 1 Boot hot starter choke lever 1 V 2 Hot starter choke lever 1 EAA00037 11 LIGHT SWITCH A W Proper hose routing is essen tial to assure safe machine operation Refer to CABLE ROUTING B Tighten the screws to specifi cation Screws 2 Nm 0 2 mdkg 1 4 ftdlb EAA00212 12 HEADLIGHT A Connect the headlight coupler to the he...

Page 16: ...e NOTE Refer to CABLE ROUTING 1 Cable clamp 1 V EAA00071 15 FUEL TANK BREATHER HOSE A Install the steering shaft cap to the fuel tank breather hose B Connect one end of the breather hose to the fuel tank filler cap and insert the other end into the hole of the steer ing shaft NOTE Refer to CABLE ROUTING CAUTION Install the hose joint with its arrow mark facing the TANK side 1 Steering shaft cap 1 ...

Page 17: ...in washer air scoop 3 V 3 Hexagon bolt with plain washer air scoop 1 V EAA00189 17 BATTERY A Remove the bolts seat B First connect the positive lead to the positive terminal C Second connect the negative lead to the negative terminal NOTE Refer to CABLE ROUTING D Install the bolts seat to speci fication Bolt 23 Nm 2 3 mdkg 17 ftdlb 1 Hexagon bolt with plain 2 washer 2 Seat 1 3 Positive lead 1 4 Ne...

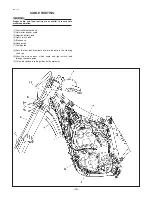
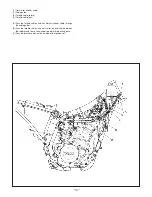
Page 18: ...e cable 3 Negative battery lead 4 Lights switch lead 5 Brake hose 6 Hose guide 7 Cable guide A Pass the fuel tank breather hose into the hole in the steering shaft cap B Pass the wire harness clutch cable and light switch lead through the cable guide C Fit the brake hose into the guides on the protector 12 EAA00900 CABLE ROUTING ...

Page 19: ...able pull A Pass the throttle cables and hot starter choke cable through the cable guides B Pass the throttle cables and hot starter choke cable between the radiator and frame then under the radiator mounting boss C Pass the throttle cables on the outside of the ignition coil 13 ...

Page 20: ... 1 Negative battery lead 2 Positive battery lead 3 Battery A Position the start motor lead negative battery lead and wire harness in the tank damper slit 14 ...

Page 21: ... switch lead to the handle bar with a plastic band B Fasten the ENGINE STOP button lead and clutch switch lead to the handlebar with the plastic bands C Pass the brake hose though the hose guide D Pass the start switch lead in front of the main switch lead E Fasten the start switch lead to the handlebar with a plastic band F Pass the hot starter cable clutch cable and lights switch lead between th...

Page 22: ...EAA01100 ADJUSTMENTS AND PREDELIVERY SERVICE Perform the predelivery service in the order indicated by the letters Always follow the order as shown 16 ...

Page 23: ...ive and negative terminals being disconnected Open circuit voltage 12 8 V or higher Charging time Charging is not necessary W D D Do not attempt boost charging under any circumstances D D Battery electrolyte is poisonous and dangerous causing severe burns etc It contains sulfuric acid Avoid contact with skin eyes or clothing Antidote External Flush with water Internal Drink large quantities of wat...

Page 24: ...he coolant If water is used instead of coolant check and correct the antifreeze concentration of the coolant D D Use only distilled water Soft water may be used if distilled water is not available 3 Start the engine warm it up for several minutes and then turn it off 4 Check Dcoolant level NOTE Before checking the coolant level wait a few minutes until it settles a Slide back the rubber cover b Lo...

Page 25: ...m is not properly bled 1 Remove Ddiaphragm Dprotector rear brake NOTE D Be careful not to spill any brake fluid or allow the brake master cylinder reser voir to overflow D When bleeding the hydraulic brake system make sure that there is always enough brake fluid before applying the brake Ignoring this precaution could allow air to enter the hydraulic brake system considerably lengthening the bleed...

Page 26: ... ADJUSTING THE REAR BRAKE 1 Measure Dbrake pedal position distance a from the top of the rider footrest to the top of the brake pedal Out of specification Adjust Brake pedal position above the top of the rider footrest 5 mm 0 20 in 2 Adjust Dbrake pedal position a Loosen the locknut 1 b Turn the adjusting nut 2 in direction a or b until the specified brake pedal position is obtained Direction a Br...

Page 27: ... At 5mC 40mF or higher A Yamalube 4 20W 40 or SAE 20W 40 type SG motor oil Non Friction modified At 15mC 60mF or lower B Yamalube 4 10W 30 or SAE 10W 30 type SG motor oil Non Friction modified or Yamalube 4 R 15W 50 Non Friction modified W D D Do not add any chemical additives or use oils with a grade of CD a or higher D D Do not use oils labeled ENERGY CONSERVING II b or higher Engine oil also lu...

Page 28: ... and other vital parts and one that is too loose can skip and damage the swingarm or cause an accident Therefore keep the drive chain slack within the specified limits 1 Stand the machine on a level surface W Securely support the machine so that there is no danger of it falling over NOTE Both wheels should be on the ground without a rider on the machine 2 Rotate the rear wheel several times 3 Meas...

Page 29: ...rn the adjusting screw 3 in direc tion a or b Direction a Rebound damping is increased suspension is harder Direction b Rebound damping is decreased suspension is softer Adjusting positions Standard 7 clicks out Minimum 20 clicks out Maximum 0 clicks out from the fully turned in position Compression damping NOTE This is the position which is back by the specific number of clicks from the fully tur...

Page 30: ...er Adjusting positions Standard 9 clicks out Minimum 20 clicks out Maximum 0 clicks out from the fully turned in position Compression damping CAUTION Never go beyond the maximum or mini mum adjustment positions 1 Remove Drubber cap 2 Adjust Dcompression damping a Turn the adjusting screw 2 in direc tion a or b Direction a Compression damping is increased suspension is harder Direction b Compressio...

Page 31: ... with a research octane number of 95 or higher Fuel tank capacity 10L 2 2 lmp gal 2 64 US gal Valve clearance cold IN 0 10 0 15 mm 0 0039 0 0059 in EX 0 17 0 22 mm 0 0067 0 0087 in Tire air pressure Front 100 kPa 1 0kgf cm2 15 psi measured on cold tires Rear 100 kPa 1 0kgf cm2 15 psi EAA10100 STANDARD EQUIPMENT Owner s service manual X 1 25 EAA10200 OWNER S TOOL KIT Nipple wrench X 1 Spark plug wr...

Page 32: ...ting bolt M 6x1 0 6 0 6 4 3 Brake lever mounting nut M 6x1 0 6 0 6 4 3 Brake lever position locknut M 6x1 0 5 0 5 3 6 Cable guide front brake hose and guide stay M 5x0 8 4 0 4 2 9 Front brake hose union bolt master cylinder M10x1 25 30 3 0 22 Front brake hose union bolt caliper M10x1 25 30 3 0 22 Front brake caliper and front fork M 8x1 25 23 2 3 17 Brake caliper front and rear and pad pin plug M1...

Page 33: ...1 25 32 3 2 23 Rear frame and frame lower M 8x1 25 29 2 9 21 Swingarm and brake hose holder M 5x0 8 1 0 1 0 7 Swingarm and patch M 4x0 7 2 0 2 1 4 Drive chain tensioner mounting upper M 8x1 25 19 1 9 13 Drive chain tensioner mounting lower M 8x1 25 20 2 0 14 Chain support and swingarm M 6x1 0 7 0 7 5 1 Seal guard and swingarm M 5x0 8 6 0 6 4 3 Fuel tank mounting M 6x1 0 10 1 0 7 2 Fuel tank and fu...

Page 34: ...PRINTED IN U S A ...

Reviews: