background image

EAU16760

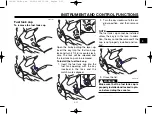
Starting off

NOTE:

Before starting off, allow the engine to
warm up.

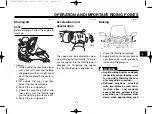
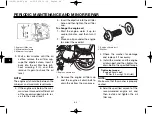
1. Grab bar

1. While pulling the rear brake lever

with your left hand and holding
the grab bar with your right hand,
push the scooter off the centers-
tand.

2. Sit astride the seat, and then

adjust the rear view mirrors.

3. Switch the turn signal on.
4. Check for oncoming traffic, and

then slowly turn the throttle grip
(on the right) in order to take off.

5. Switch the turn signal off.

EAU16780

Acceleration and
deceleration

The speed can be adjusted by ope-
ning and closing the throttle. To incre-
ase the speed, turn the throttle grip in
direction (a). To reduce the speed,
turn the throttle grip in direction (b).

EAU16791

Braking

1. Close the throttle completely.
2. Apply both front and rear brakes

simultaneously while gradually
increasing the pressure.

EWA10300

s

s

WARNING

Avoid braking hard or suddenly
(especially when leaning over
to one side), otherwise the sco-
oter may skid or overturn.

Railroad crossings, streetcar
rails, iron plates on road cons-
truction sites, and manhole
covers become extremely slip-
pery when wet. Therefore, slow
down when approaching such

(b)

(a)

ZAUM0199

1

5

OPERATION AND IMPORTANT RIDING POINTS

5-2

1C0-F8199-E2.qxd  06/03/2006 13:08  Página 37

Summary of Contents for Xmax 250

Page 1: ...1C0 F8199 E2 YP250R OWNER S MANUAL 1C0 F8199 E2 qxd 06 03 2006 13 08 Página 1 ...

Page 2: ...1C0 F8199 E2 qxd 06 03 2006 13 08 Página 2 ...

Page 3: ...joy all advantages of your YP250R The owner s manual does not only instruct you in how to operate inspect and maintain your scooter but also in how to safeguard yourself and others from trouble and injury In addition the many tips given in this manual will help keep your scooter in the best possible condition If you have any further questions do not hesitate to contact your Yamaha dealer The Yamah...

Page 4: ...efore while this manual contains the most current product information available at the time of printing there may be minor discrepancies between your scooter and this manual If you have any questions concerning this manual please consult your Yamaha dealer EWA12410 s s WARNING PLEASE READ THIS MANUAL CAREFULLY AND COMPLETELY BEFORE OPERATING THIS SCOOTER Product and specifications are subject to c...

Page 5: ...UAL 2006 by YAMAHA MOTOR ESPAÑA S A 1st edition February 2006 All rights reserved Any reprinting or unauthorized use without the written permission of YAMAHA MOTOR ESPAÑA S A is expressly prohibited Printed in Spain 1C0 F8199 E2 qxd 06 03 2006 13 08 Página 3 ...

Page 6: ...chart 6 3 Removing and installing cowlings and panels 6 6 Checking the spark plug 6 7 Engine oil 6 8 Final transmission oil 6 10 Coolant 6 11 Air filter and V belt case air filter elements 6 12 Adjusting the carburetor 6 14 Adjusting the throttle cable free play 6 14 Valve clearance 6 15 Tires 6 15 Cast wheels 6 17 Front and rear brake lever free play 6 17 Checking the front and rear brake pads 6 ...

Page 7: ...f this type of accident Therefore Wear a brightly colored jacket Use extra caution when appro aching and passing through intersections since intersec tions are the most likely places for scooter accidents to occur Ride where other motorists can see you Avoid riding in anot her motorist s blind spot Many accidents involve inexpe rienced operators In fact many operators who have been invol ved in ac...

Page 8: ...otherwise they could catch on the control levers or wheels and cause injury or an accident Never touch the engine or exhaust system during or after operation They become very hot and can cause burns Always wear protective clothing that covers your legs ankles and feet Passengers should also observe the above precautions Modifications Modifications made to this scooter not approved by Yamaha or the...

Page 9: ... limit suspension tra vel steering travel or control ope ration or obscure lights or reflec tors Accessories fitted to the hand lebar or the front fork area can create instability due to impro per weight distribution or aerodynamic changes If accessories are added to the handlebar or front fork area they must be as lightweight as possible and should be kept to a minimum Bulky or large accessories ...

Page 10: ...lot of gasoline vapor or allow gasoline to get into your eyes see your doctor immedia tely If any gasoline spills on your skin or clothing immediately wash the affected area with soap and water and change your clot hes EAU10371 Further safe riding points Be sure to signal clearly when making turns Braking can be extremely difficult on a wet road Avoid hard bra king because the scooter could slide ...

Page 11: ...sers tapered around the cuff and ankle so they do not flap and a bright colored jacket Do not carry too much luggage on the scooter An overloaded scooter is unstable 1 SAFETY INFORMATION 1 5 1C0 F8199 E2 qxd 06 03 2006 13 08 Página 11 ...

Page 12: ...5 2 Fuel tank cap page 3 11 3 Owner s tool kit page 6 1 4 V belt case air filter page 6 12 5 Storage compartment page 3 14 6 Air filter element page 6 12 7 Centerstand page 6 21 8 Sidestand page 6 21 1 2 3 4 5 6 7 8 1C0 F8199 E2 qxd 06 03 2006 13 08 Página 12 ...

Page 13: ... 2 2 2 1 Grab bar page 5 2 2 Battery page 6 23 3 Fuses page 6 24 4 Radiator 5 Coolant level window page 6 11 6 Coolant reservoir cap page 6 11 7 Engine oil filler cap page 6 8 1 2 3 4 5 6 7 1C0 F8199 E2 qxd 06 03 2006 13 08 Página 13 ...

Page 14: ...witches page 3 9 3 Speedometer page 3 5 4 Multi function display page 3 6 5 Right handlebar switch page 3 9 6 Front brake lever page 3 10 7 Throttle grip page 5 2 8 Main switch Steering lock page 3 2 9 Front storage compartement page 3 14 1 2 3 4 5 6 7 9 8 1C0 F8199 E2 qxd 06 03 2006 13 08 Página 14 ...

Page 15: ...red bow for driving It should only be used for re registering the standard keys Always use a stan dard key for driving ECA11820 CAUTION DO NOT LOSE THE CODE RE REGISTERING KEY CONTACT YOUR DEALER IMMEDIATELY IF IT IS LOST If the code re registering key is lost registe ring new codes in the standard keys is impossible The stan dard keys can still be used to start the vehicle however if code re regi...

Page 16: ...stering key red bow keep it in a safe place and only use it for code re registering EAU10640 ON All electrical circuits are supplied with power and the engine can be started The key cannot be removed NOTE The headlight meter lighting and tai llight come on automatically when the engine is started EAU10660 OFF All electrical systems are off The key can be removed EAU10680 LOCK The steering is locke...

Page 17: ...vel warning light This warning light comes on when the fuel level drops below approximately 2 L 0 53 US gal 0 44 Imp gal When this occurs refuel as soon as possi ble The electrical circuit of the warning light can be checked by turning the key to ON If the warning light does not come on for a few seconds then go off have a Yamaha dealer check the electrical circuit EAU27020 Immobilizer system indi...

Page 18: ...switch and do not keep more than one immobilizer key on the same key ring Immobilizer system keys may cause signal interference which may pre vent the engine from starting 2 If the engine starts turn it off and try starting the engine with the standard keys 3 If one or both of the standard keys do not start the engine take the vehicle the code re registe ring key and both standard keys to a Yamaha...

Page 19: ...weather and engine load If the needle reaches or enters the red zone stop the vehicle and let the engine cool See page 6 30 ECA10020 CAUTION Do not operate the engine if it is overheated EAUS1340 Speedometer 1 Speedometer 2 Red zone The speedometer shows the riding speed ECAS0010 CAUTION Do not operate the scooter in the speedometer red zone Red zone 150 km h 93 mph and above c d j x 1 2 d y 1 2 3...

Page 20: ...nan ce and lubrication is necessary NOTE For the UK the distance traveled is displayed in miles and the tem perature reading is displayed in F For other countries the distance traveled is displayed in kilome ters and the temperature reading is displayed in C 1 Total 2 Trip 1 2 Trip 2 4 Trip Fuel Odometer and tripmeter modes Pushing the MODE button switches the display between the odometer mode Tot...

Page 21: ...pmeter select it by pus hing the MODE button and then push the SET button for at least one second If you do not reset the fuel reserve tripmeter manually it will reset itself automatically and the dis play will return to the prior mode after refueling and traveling 5 km Clock mode To set the clock 1 When the display is in the Total mode push the SET button for at least two seconds 2 When the hour ...

Page 22: ...N 2 Hold the MODE and SET but ton pushed for two to five seconds 3 Release the buttons and the ser vice indicator will go off NOTE The service indicator will come on at the initial 1000 km and every 3000 km thereafter If periodic maintenance and lubrication is performed before the service indicator comes on the indicator must be reset as soon as possible so that it comes for the next periodic main...

Page 23: ...500 Horn switch a Press this switch to sound the horn EAU12720 Start switch g With the sidestand up push this switch while applying the front or rear brake to crank the engine with the starter ECA10050 CAUTION See page 5 1 for starting instruc tions prior to starting the engine EAUM1990 Hazard switch h With the key in the ON position set this switch to to turn on the hazard lighting simultaneous f...

Page 24: ...discharge EAU12900 Front brake lever 1 Front brake lever The front brake lever is located on the right handlebar grip To apply the front brake pull this lever toward the handlebar grip EAU12950 Rear brake lever 1 Rear brake lever The rear brake lever is located on the left handlebar grip To apply the rear brake pull this lever toward the hand lebar grip 1 1 3 INSTRUMENT AND CONTROL FUNCTIONS 3 10 ...

Page 25: ...with the key inserted in the lock and the match marks aligned 2 Turn the key clockwise to the ori ginal position and then remove it NOTE The fuel tank cap cannot be installed unless the key is in the lock In addi tion the key cannot be removed if the cap is not properly installed and loc ked 3 Close the lid EWA11260 s s WARNING Make sure that the fuel tank cap is properly installed and locked in p...

Page 26: ... painted surfa ces or plastic parts EAU33500 ECA11400 CAUTION Use only unleaded gasoline The use of leaded gasoline will cause severe damage to internal engine parts such as the valves and piston rings as well as to the exhaust sys tem Your Yamaha engine has been desig ned to use regular unleaded gasoline with a research octane number of 91 or higher If knocking or pinging occurs use a gasoline of...

Page 27: ... Never park the vehicle near possible fire hazards such as grass or other materials that easily burn Do not allow the engine to idle too long EAU13932 Seat To open the seat 1 Place the scooter on the centers tand 2 Insert the key into the main switch and then turn it counter clockwise to OPEN NOTE Do not push inward when turning the key 3 Fold the seat up To close the seat 1 Fold the seat down and...

Page 28: ...oad limit of 1 kg 2 205 lb for the storage compartment Do not exceed the maximum load of 181 kg 399 1 lb for the vehicle EAUT1060 Storage compartment 1 Storage compartment There is a storage compartment under the seat EWA10960 s s WARNING Do not exceed the load limit of 5 kg 11 02 lb for the storage compartment Do not exceed the maximum load of 181 kg 399 1 lb for the vehicle ECA10080 CAUTION Keep...

Page 29: ...e compartment place the helmets as shown NOTE Some helmets cannot be stored in the storage compartment because of their size or shape Do not leave your scooter unat tended with the seat open EAU14890 Adjusting the shock absorber assemblies Each shock absorber assembly is equip ped with a spring preload adjusting ring ECA10100 CAUTION Never attempt to turn an adjusting mechanism beyond the maximum ...

Page 30: ...estand switch is part of the ignition circuit cut off system which cuts the ignition in certain situations See further down for an explanation of the ignition circuit cut off system EWA10240 s s WARNING The vehicle must not be ridden with the sidestand down or if the sides tand cannot be properly moved up or does not stay up otherwise the sidestand could contact the ground and distract the operato...

Page 31: ...rake is applied but the sides tand is still down It cuts the running engine when the sidestand is moved down Periodically check the operation of the ignition circuit cut off system according to the following procedure EWA10260 s s WARNING The vehicle must be placed on the centerstand during this ins pection If a malfunction is noted have a Yamaha dealer check the system before riding 3 INSTRUMENT ...

Page 32: ...ine start With the engine still running 9 Move the sidestand down Does the engine stall The system is OK The scooter can be ridden This check is most reliable if performed with a warmed up engine The sidestand switch may be defective The scooter should not be ridden until checked by a Yamaha dealer The brake switch may be defective The scooter should not be ridden until checked by a Yamaha dealer ...

Page 33: ...ry important in addition to a thorough visual inspection to check the follo wing points before each ride NOTE Pre operation checks should be made each time the vehicle is used Such an inspection can be accom plished in a very short time and the added safety it assures is more than worth the time involved EWA11150 s s WARNING If any item in the Pre operation check list is not working properly have ...

Page 34: ...nt brake Replace if necessary 3 10 6 17 6 18 6 19 Check fluid level in reservoir If necessary add recommended brake fluid to specified level Check hydraulic system for leakage Check operation If soft or spongy have Yamaha dealer bleed hydraulic system Check brake pads for wear Rear brake Replace if necessary 3 10 6 17 6 18 6 19 Check fluid level in reservoir If necessary add recommended brake flui...

Page 35: ...cessary 6 21 Chassis fasteners Make sure that all nuts bolts and screws are properly tightened Tighten if necessary Instruments lights signals Check operation and switches Correct if necessary Check operation of ignition circuit cut off system Sidestand switch If system is defective have Yamaha dealer check vehicle 3 16 If system is defective have Yamaha dealer check vehicle 1C0 F8199 E2 qxd 06 03...

Page 36: ...stand down EAUM1210 Starting a cold engine ECA10250 CAUTION See page 5 3 for engine break in instructions prior to operating the vehicle for the first time 1 Turn the key to ON 2 Close the throttle completely 3 Start the engine by pushing the start switch while applying the front or rear brake NOTE If the engine fails to start release the start switch wait a few seconds and then try again Each sta...

Page 37: ...ted by ope ning and closing the throttle To incre ase the speed turn the throttle grip in direction a To reduce the speed turn the throttle grip in direction b EAU16791 Braking 1 Close the throttle completely 2 Apply both front and rear brakes simultaneously while gradually increasing the pressure EWA10300 s s WARNING Avoid braking hard or suddenly especially when leaning over to one side otherwis...

Page 38: ...rtant period in the life of your engine than the period between 0 and 1600 km 1000 mi For this reason you should read the following material carefully Since the engine is brand new do not put an excessive load on it for the first 1600 km 1000 mi The various parts in the engine wear and polish them selves to the correct operating clea rances During this period prolonged full throttle operation or a...

Page 39: ...EAU17200 Parking When parking stop the engine and then remove the key from the main switch EWA10310 s s WARNING Since the engine and exhaust system can become very hot park in a place where pedes trians or children are not likely to touch them Do not park on a slope or on soft ground otherwise the vehicle may overturn 5 OPERATION AND IMPORTANT RIDING POINTS 5 4 1C0 F8199 E2 qxd 06 03 2006 13 08 Pá...

Page 40: ...s WARNING This scooter is designed for use on paved roads only If this scooter is operated in abnormally dusty muddy or wet conditions the air fil ter element should be cleaned or replaced more frequently otherwi se rapid engine wear may result Consult a Yamaha dealer for proper maintenance intervals EAU17380 Owner s tool kit 1 Owner s tool kit The owner s tool kit is located under the seat See pa...

Page 41: ...ARNING Modifications not approved by Yamaha may cause loss of perfor mance and render the vehicle unsafe for use Consult a Yamaha dealer before attempting any chan ges 6 PERIODIC MAINTENANCE AND MINOR REPAIR 6 2 1C0 F8199 E2 qxd 06 03 2006 13 08 Página 41 ...

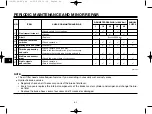
Page 42: ...cal skills ODOMETER READING x 1000 Km ANNUAL NO ITEM CHECK OR MAINTENANCE JOB CHECK 1 10 20 30 40 1 Fuel line Check fuel hoses for cracks or damage Check condition 2 Spark plug Clean and regap Replace 3 Valves Check valve clearance Adjust 4 Air filter element Replace 5 V belt case air filter Clean elements Replace 6 Front brake Check operation fluid level and vehicle for fluid leakage Replace brak...

Page 43: ... lithium soap based grease Every 20000 km 13 Chassis fasteners Make sure that all nuts bolts and screws are properly tightened 14 Sidestand centerstand Check operation Lubricate 15 Sidestand switch Check operation 16 Front fork Check operation and for oil leakage 17 Shock absorber assemblies Check operation and shock absorbers for oil leakage 18 Carburetor Adjust engine idling speed Change See pag...

Page 44: ...ry and cable Lubricate the throttle grip housing and cable 26 Mufflers and exhaust pipes Check the screw clamps for looseness 27 Lights signals Check operation and switches Adjust headlight beam EAU18660 NOTE The air filter needs more frequent service if you are riding in unusually wet or dusty areas Hydraulic brake service Regularly check and if necessary correct the brake fluid level Every two y...

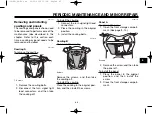
Page 45: ...ignal light lead connectors 2 Place the cowling in the original position 3 Install the cowling bolts EAU18790 Cowling B To remove the cowling Screws Remove the screws and then take the cowling off To install the cowling Place the cowling in the original posi tion and then install the screws EAUM1250 Panel A To remove the panel 1 Open the front storage compart ment See page 3 14 Screws 2 Remove the...

Page 46: ... 4 Remove the spark plug as shown with the spark plug wrench included in the owner s tool kit To check the spark plug 1 Check that the porcelain insula tor around the center electrode of the spark plug is a medium to light tan the ideal color when the motorcycle is ridden normally NOTE If the spark plug shows a distinctly different color the engine could be defective Do not attempt to diagnose suc...

Page 47: ...cap 5 Install the storage compartment by installing the bolts 6 Close the seat EAUM1550 Engine oil The engine oil level should be chec ked before each ride In addition the oil must be changed at the intervals specified in the periodic maintenance and lubrication chart and when the service indicator light comes on To check the engine oil level 1 Place the scooter on the centers tand NOTE Make sure ...

Page 48: ...ne oil 1 Start the engine warm it up for several minutes and then turn it off 2 Place an oil pan under the engine to collect the used oil 1 Engine oil drain bolt 3 Remove the engine oil filler cap and the engine oil drain bolt to drain the oil from the crankcase 1 Engine oil drain bolt 2 Washer 4 Check the washer for damage and replace it if necessary 5 Install the washer and the engine oil drain ...

Page 49: ...oter In addition the final trans mission oil must be changed as follows at the intervals specified in the periodic maintenance and lubrication chart 1 Start the engine warm up the final transmission oil by riding the scooter for several minutes and then stop the engine 2 Place the scooter on the centers tand 3 Place an oil pan under the final transmission case to collect the used oil 1 Final trans...

Page 50: ...n NOTE The coolant level must be chec ked on a cold engine since the level varies with engine tempera ture Make sure that the vehicle is positioned straight up when checking the coolant level A slight tilt to the side can result in a false reading 2 Check the coolant level through the check window 1 Maximum level mark 2 Minimum level mark NOTE The coolant should be between the minimum and maximum ...

Page 51: ...t downward to secure it EAU33030 Changing the coolant EWA10380 s s WARNING Never attempt to remove the radia tor cap when the engine is hot The coolant must be changed at the intervals specified in the periodic maintenance and lubrication chart Have a Yamaha dealer change the coolant EAUS1332 Air filter and V belt case air filter elements The air filter element should be repla ced and the V belt c...

Page 52: ...y removing the screws 2 Remove the air filter element and then blow out the dirt with com pressed air as shown 3 Check the air filter element for damage and replace it if neces sary 4 Install the air filter element with the colored side facing outward 5 Install the V belt case air filter cover by installing the screws 6 PERIODIC MAINTENANCE AND MINOR REPAIR 6 13 1C0 F8199 E2 qxd 06 03 2006 13 08 P...

Page 53: ...hould be left to a Yamaha dealer who has the neces sary professional knowledge and experience EAUS1290 Adjusting the throttle cable free play 1 Throttle cable free play The throttle cable free play should measure 3 5 mm 0 11 0 19 in at the throttle grip Periodically check the throttle cable free play and if necessary adjust it as follows NOTE The engine idling speed must be correctly adjusted befo...

Page 54: ...ls specified in the periodic maintenance and lubrication chart EAU21870 Tires To maximize the performance durabi lity and safe operation of your motorcycle note the following points regarding the specified tires Tire air pressure The tire air pressure should be chec ked and if necessary adjusted befo re each ride EWA10500 s s WARNING The tire air pressure must be checked and adjusted on cold tires...

Page 55: ...sion and tire air pressure with regard to the load Check the tire condition and air pressure before each ride 1 Tire tread depth Tire inspection The tires must be checked before each ride If the center tread depth reaches the specified limit if the tire has a nail or glass fragments in it or if the sidewall is cracked have a Yama ha dealer replace the tire immediately NOTE The tire tread depth lim...

Page 56: ... cracks bends or warpage before each ride If any damage is found have a Yamaha dealer replace the wheel Do not attempt even the smallest repair to the wheel A deformed or crac ked wheel must be replaced The wheel should be balanced whenever either the tire or wheel has been changed or replaced An unbalanced wheel can result in poor performance adverse handling characteristics and a shortened tire ...

Page 57: ...ust be checked for wear at the intervals specified in the periodic maintenance and lubrication chart EAU22400 Front brake pads 1 Lining thickeness Check each front brake pad for damage and measure the lining thick ness If a brake pad is damaged or if the lining thickness is less than 0 5 mm 0 02 in have a Yamaha dealer replace the brake pads as a set EAU22510 Rear brake pads 1 Brake pad wear indic...

Page 58: ...luid otherwise the rub ber seals may deteriorate cau sing leakage and poor braking performance Refill with the same type of brake fluid Mixing fluids may result in a harmful chemical reaction and lead to poor braking performan ce Be careful that water does not enter the brake fluid reservoir when refilling Water will signifi cantly lower the boiling point of the fluid and may result in vapor lock ...

Page 59: ... four years EAU23111 Checking and lubricating the throttle grip and cable The operation of the throttle grip should be checked before each ride In addition the cable should be lubri cated at the intervals specified in the periodic maintenance chart EAU23170 Lubricating the front and rear brake levers The pivoting points of the front and rear brake levers must be lubricated at the intervals specifi...

Page 60: ...he condition and operation of the front fork must be checked as follows at the intervals specified in the perio dic maintenance and lubrication chart To check the condition EWA10750 s s WARNING Securely support the motorcycle so that there is no danger of it falling over Check the inner tubes for scratches damage and excessive oil leakage To check the operation 1 Place the motorcycle on a level su...

Page 61: ... stand under the engine to raise the front wheel off the ground EWA10750 s s WARNING Securely support the motorcycle so that there is no danger of it falling over 2 Hold the lower ends of the front fork legs and try to move them for ward and backward If any free play can be felt have a Yamaha dealer check or repair the steering EAU23290 Checking the wheel bearings The front and rear wheel bearings...

Page 62: ...n atteries produce explosive hydrogen gas Therefore keep sparks flames cigarettes etc away from the battery and pro vide sufficient ventilation when charging it in an enclosed spa ce EEP THIS AND ALL BATTERIES OUT OF THE REACH OF CHIL DREN To charge the battery Have a Yamaha dealer charge the battery as soon as possible if it seems to have discharged Keep in mind that the battery tends to discharg...

Page 63: ...ual circuits are located behind cowling B See page 6 6 If a fuse is blown replace it as follows 1 Turn the key to OFF and turn off the electrical circuit in question 2 Remove the blown fuse and then install a new fuse of the specified amperage ECA10640 CAUTION Do not use a fuse of a higher ampe rage rating than recommended to avoid causing extensive damage to the electrical system and possibly a f...

Page 64: ...move the headlight bulb cover 1 Headlight coupler 3 Remove the headlight bulb hol der according to the following illustration and then remove the defective bulb 1 Headlight bulb cover NOTE The removal procedure depends on the type of bulb holder installed on your vehicle EWA10790 s s WARNING Headlight bulbs get very hot The refore keep flammable products away from a lit headlight bulb and do not t...

Page 65: ...ight beam if necessary EAUT1260 Replacing a front turn signal light bulb ECA10670 CAUTION It is advisable to have a Yamaha dealer perform this job 1 Place the scooter on the centers tand 2 Remove cowling A See page 6 6 3 Remove the socket together with the bulb by turning it coun terclockwise 4 Remove the defective bulb by pushing it in and turning it coun terclockwise 5 Insert a new bulb into the...

Page 66: ...defective bulb by pushing it in and turning it coun terclockwise 4 Insert a new bulb into the socket push it in and then turn it clock wise until it stops 5 Install the turn signal light bulb lens by installing the screw 6 Install the tail brake light bulb lens by installing the screw ECA10680 CAUTION Do not overtighten the screws otherwise the lens may break EAUS1150 Replacing the license plate l...

Page 67: ... may occur during operation Any problem in the fuel compression or ignition sys tems for example can cause poor starting and loss of power The following troubleshooting charts represent quick and easy procedures for checking these vital systems your self However should your scooter require any repair take it to a Yamaha dealer whose skilled technicians have the necessary tools experience and know ...

Page 68: ...is no compression Check the ignition Have a Yamaha dealer check the vehicle Remove the spark plug and check the electrodes 3 Ignition Wipe off with a dry cloth and correct the spark plug gap or replace the spark plug Have a Yamaha dealer check the vehicle The engine does not start Have a Yamaha dealer check the vehicle The engine does not start Check the battery Operate the electric starter 4 Batt...

Page 69: ...n the cap while turning it counterclockwise and then remove the cap 6 PERIODIC MAINTENANCE AND MINOR REPAIR 6 30 Wait until the engine has cooled Check the coolant level in the reservoir and radiator The coolant level is OK The coolant level is low Check the cooling system for leakage Have a Yamaha dealer check and repair the cooling system Add coolant See NOTE Start the engine If the engine overh...

Page 70: ...area any longer than instructed Also tho roughly rinse the area off with water immediately dry it and then apply a corrosion protec tion spray Improper cleaning can damage windshields cowlings panels and other plastic parts Use only a soft clean cloth or spon ge with mild detergent and water to clean plastic Do not use any harsh chemical products on plastic parts Be sure to avoid using cloths or s...

Page 71: ...th 2 Use a chrome polish to shine chrome aluminum and stainless steel parts including the exhaust system Even the thermally indu ced discoloring of stainless steel exhaust systems can be removed through polishing 3 To prevent corrosion it is recom mended to apply a corrosion pro tection spray on all metal inclu ding chrome and nickel plated surfaces 4 Use spray oil as a universal clea ner to remov...

Page 72: ...drai ned fuel into the fuel tank 3 Fill up the fuel tank and add fuel stabilizer if available to prevent the fuel tank from rusting and the fuel from deteriorating 4 Perform the following steps to protect the cylinder piston rings etc from corrosion a Remove the spark plug cap and spark plug b Pour a teaspoonful of engine oil into the spark plug bore c Install the spark plug cap onto the spark plu...

Page 73: ...he tires from becoming degra ded in one spot 7 Cover the muffler outlet with a plastic bag to prevent moisture from entering it 8 Remove the battery and fully charge it Store it in a cool dry place and charge it once a month Do not store the battery in an excessively cold or warm pla ce less than 0 C 30 F or more than 30 C 90 F For more information on storing the bat tery see page 6 23 NOTE Make a...

Page 74: ...nt 1 4 L 1 48 US qt 1 23 Imp qt Final transmission oil Type YAMALUBE 4 10W30 of SAE10W30 type SE motorolie Quantity 0 25 L 0 26 US qt 0 22 Imp qt Cooling system Radiator capacity including all routes 0 34 L 0 36 US qt 0 30 Imp qt Coolant reservoir capacity up to the maxi mum level mark 0 46 L 0 49 US qt 0 40 Imp qt Air filter Air filter element Oil coated paper element Recommended fuel Recommended...

Page 75: ...ium wheel Rim size 15 x MT3 5 Rear wheel Wheel type Aluminium wheel Rim size 14 x MT3 75 Front brake Type Single disc brake Operation Right hand operation Recommended fluid DOT 4 Rear brake Type Single disc brake Operation Left hand operation Recommended fluid DOT 4 Front suspension Type Telescopic fork Spring shock absorber type Coil spring oil damper Wheel travel 110 mm 4 33 in Rear suspension T...

Page 76: ... light LED Turn signal indicator light LED x 2 Immobilizer light LED Fuses Main fuse 30 A Headlight fuse 15 A Signaling system fuse 15 A Ignition fuse 5 A Radiator fan fuse 10 A ECU fuse 5 A Backup fuse 5 A Reserve fuse 5 A Reserve fuse 10 A Reserve fuse 15 A Reserve fuse 30 A 8 SPECIFICATIONS 8 3 1C0 F8199 E2 qxd 06 03 2006 13 08 Página 76 ...

Page 77: ... EAU26381 Key identification number 1 Key tag 2 Master key 3 Keys The key identification number is stamped into the key tag Record this number in the space provided and use it for reference when ordering a new key EAU26410 Vehicle identification number The vehicle identification number is stamped into the frame NOTE The vehicle identification number is used to identify your motorcycle and may be u...

Page 78: ...fixed to the bot tom of the seat See page 3 13 Record the information on this label in the space provided This information will be needed when ordering spare parts from a Yamaha dealer 1 9 CONSUMER INFORMATION 9 2 1C0 F8199 E2 qxd 06 03 2006 13 08 Página 9 2 ...

Page 79: ...mbers 9 1 Ignition circuit cut off system 3 17 Immobilizer system 3 1 Immobilizer system indicator light 3 3 Indicators indicator lights and warning light 3 3 K Key identification number 9 1 L License plate light bulb replacing 6 27 M Main switch steering lock 3 2 Model label 9 2 P Parking 5 4 Part locations 2 1 Pass switch 3 9 Periodic maintenance and lubrication chart 6 3 Pre operation check lis...

Page 80: ...Wheels 6 17 INDEX 1C0 F8199 E2 qxd 06 03 2006 13 08 Página 9 4 ...

Page 81: ...1C0 F8199 E2 qxd 06 03 2006 13 08 Página 9 5 ...

Page 82: ...YAMAHA MOTOR ESPAÑA S A PRINTED IN SPAIN 2006 02 NOVOPRINT S A E 1C0 F8199 E2 qxd 06 03 2006 13 08 Página 9 6 ...

Reviews: