HANDLEBAR
4-37
c. Clean the excessive rubber adhesive with a
clean cloth. rubber adhesive
WARNING
EWA13700
Do not touch the handlebar grip until the rub-
ber adhesive has fully dried.
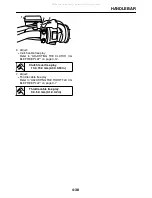
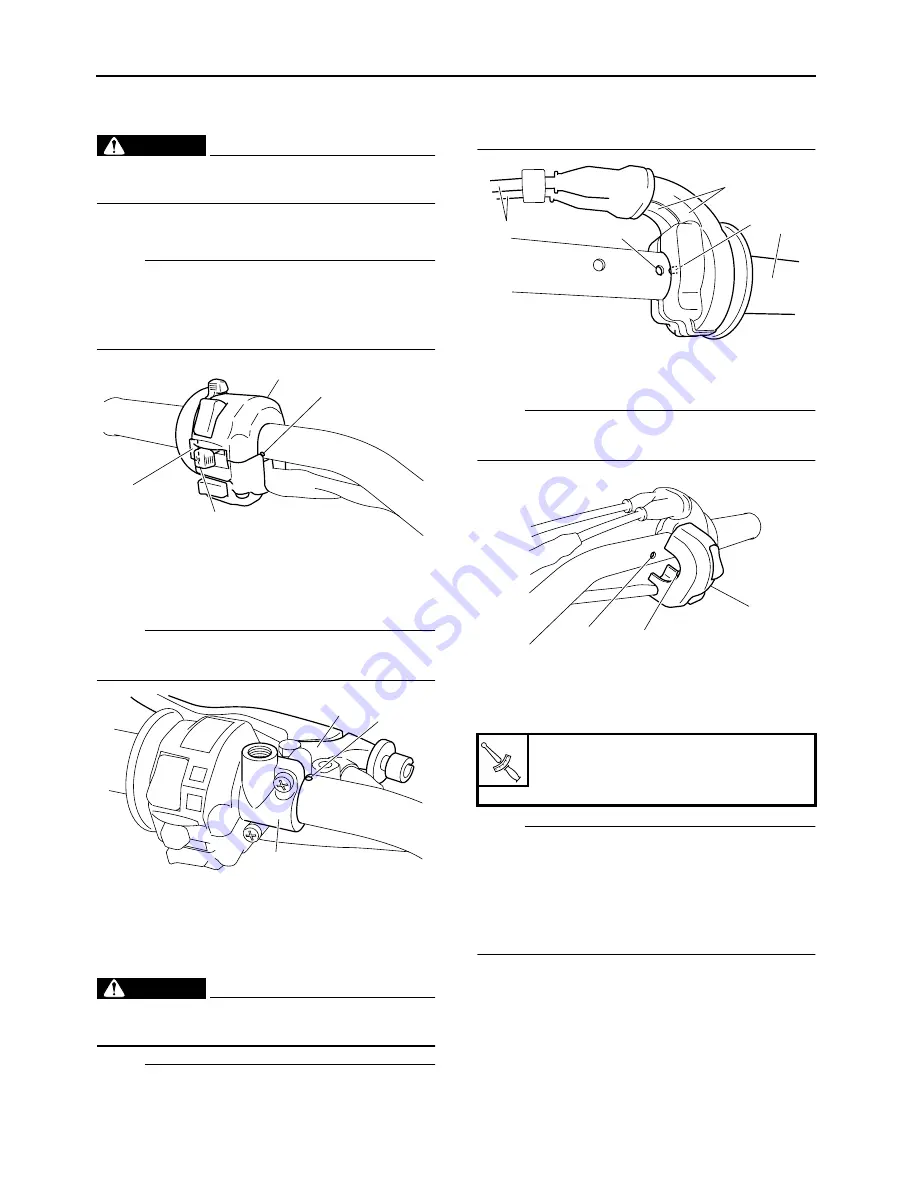
1. Install:
●
Left handlebar switch “1”
NOTE:
●
Align tab “a” of special washer with slot “b” of
left handlebar switch.
●
Align the matching surface of left handlebar
switch with mark “c” of the handlebar.
2. Install:
●
Clutch lever assembly “1”
●
Clutch lever holder “2”
NOTE:
Align the mating surfaces of the clutch lever
holder with the punch mark “a” on the handlebar.
3. Install:
●
Throttle grip “1”
●
Throttle cables “2”
●
Throttle cable housing “3”
WARNING
EWA13720
Make sure the throttle grip operates smooth-
ly.
NOTE:
●
Align projection “a” of slot cable housing with
hole “b” of the handlebar.
●
Slightly coat the end of slot cable and inside of
throttle grip with Yamaha Grease B. Then,
mount the throttle grip onto the handlebar.
4. Install:
●
Right handlebar switch “1”
NOTE:
Align projection “a” of the right handlebar switch
with hole “b” of the handlebar.
5. Install:
●
Front brake master cylinder assembly “1”
●
Front brake master cylinder holder “2”
NOTE:
●
Install the brake master cylinder holder with the
“UP” mark facing up.
●
Align the matching surface of brake master cyl-
inder holder with mark “a” of handlebar.
●
Tighten the upper bolt first, and then tighten
the lower bolt.
1
a
b
c
1
a
2
Front brake master cylinder as-
sembly
7 Nm (0.7 m•kg, 5.1 ft•lb)
b
3
a
1
2
b
a
1
T
R
.
.
All manuals and user guides at all-guides.com
all-guides.com
Summary of Contents for XT250X 2008
Page 2: ...All manuals and user guides at all guides com...
Page 8: ...All manuals and user guides at all guides com...
Page 54: ...CABLE ROUTING 2 35 All manuals and user guides at all guides com...
Page 82: ...ELECTRICAL SYSTEM 3 27 a b All manuals and user guides at all guides com...
Page 170: ...VALVES AND VALVE SPRINGS 5 24 All manuals and user guides at all guides com...
Page 224: ...AIR INDUCTION SYSTEM 6 13 All manuals and user guides at all guides com...
Page 239: ...CHARGING SYSTEM 7 14 All manuals and user guides at all guides com...
Page 243: ...LIGHTING SYSTEM 7 18 All manuals and user guides at all guides com...
Page 249: ...SIGNALING SYSTEM 7 24 All manuals and user guides at all guides com...
Page 253: ...CARBURETOR HEATING SYSTEM 7 28 All manuals and user guides at all guides com...
Page 279: ...All manuals and user guides at all guides com...

