CRANKSHAFT ASSEMBLY
5-60
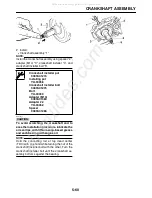
2. Install:
●
Crankshaft assembly “1”
NOTE:
Install the crankshaft assembly using spacer “2”,
adapter (M10) “3”, crankshaft installer “4”, and
crankshaft installer bolt “5”.
CAUTION:
ECA13970
To avoid scratching the crankshaft and to
ease the installation procedure, lubricate the
oil seal lips with lithium-soap-based grease
and each bearing with engine oil.
NOTE:
Hold the connecting rod at top dead center
(TDC) with one hand while turning the nut of the
crankshaft installer bolt with the other. Turn the
crankshaft installer bolt until the crankshaft as-
sembly bottoms against the bearing.
Crankshaft installer pot
90890-01274
Installing pot
YU-90058
Crankshaft installer bolt
90890-01275
Bolt
YU-90060
Adapter (M10)
90890-01383
Adapter #2
YU-90062
Spacer
90890-01288
All manuals and user guides at all-guides.com
all-guides.com
Summary of Contents for XT250X 2008
Page 2: ...All manuals and user guides at all guides com...
Page 8: ...All manuals and user guides at all guides com...
Page 54: ...CABLE ROUTING 2 35 All manuals and user guides at all guides com...
Page 82: ...ELECTRICAL SYSTEM 3 27 a b All manuals and user guides at all guides com...
Page 170: ...VALVES AND VALVE SPRINGS 5 24 All manuals and user guides at all guides com...
Page 224: ...AIR INDUCTION SYSTEM 6 13 All manuals and user guides at all guides com...
Page 239: ...CHARGING SYSTEM 7 14 All manuals and user guides at all guides com...
Page 243: ...LIGHTING SYSTEM 7 18 All manuals and user guides at all guides com...
Page 249: ...SIGNALING SYSTEM 7 24 All manuals and user guides at all guides com...
Page 253: ...CARBURETOR HEATING SYSTEM 7 28 All manuals and user guides at all guides com...
Page 279: ...All manuals and user guides at all guides com...

