background image

Enabling/disabling touch panel control
(child lock function)

Disable touch panel control to prevent children from accidentally
operating the unit. When touch panel control is disabled, operations
can be performed only via the remote control or dedicated free
“HOME THEATER CONTROLLER” app.
This function is enabled by default.

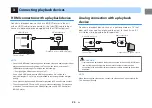
1

7XUQRIIWKHXQLW

2

3UHVVDQGKROGWKH,1)2NH\DWOHDVWWKUHH
VHFRQGV

  The touch panel control is enabled or disabled, and the

unit is turned on. The indicator shows touch panel
control status for several seconds immediately after the
unit is turned on.

Glows (enabled; default)
Off (disabled)


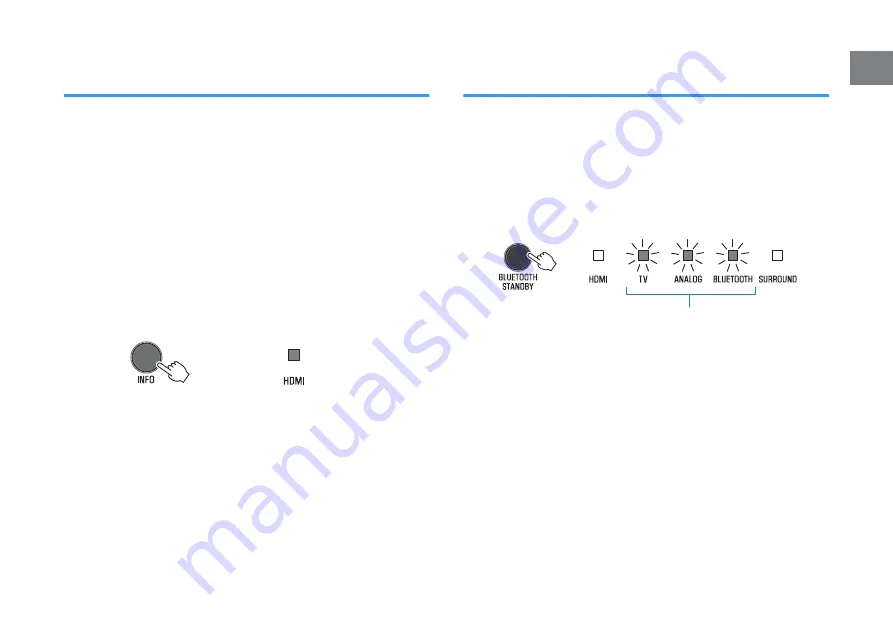
Configuring the Bluetooth standby
function

If the Bluetooth standby function is enabled, the unit will be turned
on and will be ready to play sound from the Bluetooth device when
Bluetooth connection is made on a Bluetooth device. This function
is enabled by default.

Press and hold BLUETOOTH STANDBY at least three seconds to
switch function status between enabled and disabled.

The indicators on the unit show Bluetooth standby function status
for several seconds immediately after switching function status.

Flash 3 times (enabled; default)
Flash once (disabled)


En

39

Summary of Contents for YAS-108

Page 1: ...C Front Surround System Système Surround Frontal Owner s Manual Mode d emploi English Français FR EN ...

Page 2: ... external subwoofer 26 5 Connecting the power cord 26 Connecting the power cord 26 PLAYBACK 27 Basic operations 27 Basic procedure for playback 27 Enjoying your favorite sound 29 Playback with 3D surround sound 29 Playback with surround sound 29 Playback with 2 channel stereo sound 29 Playback of human voices clearly clear voice 30 Enjoying enhanced bass sound bass extension 30 Use of a Bluetooth ...

Page 3: ...d lock function 39 Configuring the Bluetooth standby function 39 Initializing the unit 40 APPENDIX 41 When any problem appears General 41 When any problem appears Power and system function 41 When any problem appears Audio 44 When any problem appears Bluetooth 46 Specifications 48 Specifications 48 Supported HDMI audio and video formats 49 Supported digital audio formats 50 Information for qualifi...

Page 4: ... wide blade or the third prong are provided for your safety If the provided plug does not fit into your outlet consult an electrician for replacement of the obsolete outlet 10 Protect the power cord from being walked on or pinched particularly at plugs convenience receptacles and the point where they exit from the apparatus 11 Only use attachments accessories specified by the manufacturer 12 Use o...

Page 5: ... it is desirable that it should be installed and operated with at least 20 cm and more between the radiator and person s body This device complies with Part 15 of FCC Rules and Industry Canada license exempt RSS standard s Operation is subject to the following two conditions 1 this device may not cause interference and 2 this device must accept any interference including interference that may caus...

Page 6: ...ately turn off the power and disconnect the power plug If you are using batteries remove the batteries from this unit The power cord plug is damaged An unusual smell unusual sound or smoke is emitted from the unit Foreign material or water gets into the interior of the unit There is a loss of sound during use There is a crack or damage in the unit Continued use could cause electric shocks a fire o...

Page 7: ...y this unit Failure to observe this may cause a fire electric shocks injury or malfunctions Water warning ƒ Do not expose the unit to rain use it near water or in damp or wet conditions or place on it any containers such as vases bottles or glasses containing liquids which might spill into any openings or places where water may drop A liquid such as water getting into the unit may cause a fire ele...

Page 8: ...firmly all the way into the AC outlet Using the unit when it is not plugged in sufficiently can cause dust to accumulate on the plug causing a fire or burns Installation ƒ Do not place the unit in an unstable position where it might accidentally drop or fall over and cause injuries ƒ When installing this unit do not obstruct heat dissipation Do not cover it with any cloth Do not install it on a ca...

Page 9: ...the equipment lean against the equipment Failure to observe this may cause injuries or damage to the equipment ƒ Avoid pulling the connected cables to prevent injuries or damage to the unit by causing it to fall Battery use ƒ Do not use batteries other than specified batteries Doing so cause fire burns or inflammation due to leakage ƒ Keep batteries away from children A child could accidentally sw...

Page 10: ...ess network devices Obstructions could shorten the transmission distance Connections If connecting external units be sure to thoroughly read the manual for each unit and connect them in accordance with the instructions Failure to properly handle a unit in accordance with the instructions could cause malfunctions Do not connect this unit to industrial units Digital audio interface standards for con...

Page 11: ...s benzine or thinner cleaning agents or chemical scrubbing cloths can cause discoloration or deformation Speakers Do not touch the speaker units Failure to observe this may damage the speaker units About disposal Be sure to discard used batteries in accordance with local regulations En 11 ...

Page 12: ...oratories For DTS patents see http patents dts com Manufactured under license from DTS Inc DTS the Symbol DTS and the Symbol together DTS Digital Surround and DTS Virtual X are registered trademarks or trademarks of DTS Inc in the United States and or other countries DTS Inc All Rights Reserved SS 6WRUH60 App Store is a service mark of Apple Inc The terms HDMI the HDMI Logo and High Definition Mul...

Page 13: ...ury 127 Indicates points that you must observe in order to prevent product failure damage or malfunction and data loss as well as to protect the environment 127 Indicates notes on instructions restrictions on functions and additional information that may be helpful The illustrations and screens in this manual are for instructional purposes only The company names and product names in this manual ar...

Page 14: ... This front surround system with its built in subwoofers allows for the enjoyment of dynamic sound with video played on a TV Play audio from a TV or BD DVD player in surround sound Play audio from a Bluetooth device with excellent quality En 14 ...

Page 15: ...of Bluetooth devices Easily play content from a Bluetooth compatible smartphone tablet or PC In addition the unit supports multipoint connection and can switch between two Bluetooth devices for playback Our exclusive Compressed Music Enhancer technology improves sound quality and characteristics and can be used to enjoy realistic and impressive sound For details see the following Connecting the un...

Page 16: ...been inserted into the remote control Optical digital audio cable Mounting template Use when mounting the unit on awall Spacers x 2 sheet Use when mounting the unit on a wall Owner s Manual this booklet Using the remote control Preparing the remote control Remove the battery s insulating strip before attempting to use the remote control Battery s insulating strip En 16 ...

Page 17: ...ÊÈÅÂ Ê Ê È ÃÅÊ ÅÄÊÈÅÂ É ÄÉÅÈ ÅÄ Ê ÊÅÆ Æ Ä ÂƔ ÅÈ º Ê ÂÉƑ É Ê ÅÂÂÅÍ Ä Ɠ ϰ ơ ÈÊ Ä Ã É Äº ËÄ Ê ÅÄÉ Å Ê ÈÅÄÊƭÊÅÆ Æ Ä ÂƢ ƺÆƔʸʿƻ ϰ ơ ÅËÄÊ Ä Ê ËÄ Ê ÅÄ Í ÂÂƢ ƺÆƔʼʸƻ Replacing the battery in the remote control Press and hold the release tab firmly in the direction indicated by A and slowly slide the battery holder out in the direction indicated by B Battery holder Release tab CR2025 Lithium battery En 17 ...

Page 18: ...shing are shown as the illustrations below Off Glows Flashes È ÊÄ ÉÉ Å Ê Äº ÊÅÈÉ Ä Ä º ËÉ Ä ÅÄ Ê È ÃÅÊ ÅÄÊÈÅÂƔ ÅÈ º Ê ÂÉƑ É Ê ÅÂÂÅÍ Ä Ɠ ϰ ơ Ä Ä Ê È ÊÄ ÉÉ Å Ê Äº ÊÅÈÉ ƺ ƻƢ ƺÆƔʺʾƻ LQSXW Select an input source to be played back p 27 PXWH Mute the audio output p 27 Touch again to unmute _ YROXPH Adjust the volume p 27 SRZHU Turn on or off the unit ËÄ Ê Ã Ï ËÊÅÃ Ê ÂÂÏ ÊËÈÄ Å Í Ä Ê ËÊÅ ÆÅÍ È ÉÊ Äº Ï ËÄ ...

Page 19: ...ËÈ Ä È ÊÅ ÅÄÊÈÅ ËÄ Ê ÅÄÉƔ ϰ Å ÄÅÊ Æ ÄÏ Å À ÊÉ ÅÄ Ê ÊÅË Æ Ä Â É ºÅ Ä ÉÅ Ã Ï È ÉËÂÊ Ä ËÄ ÄÊ Äº º ÅÆ È Ê ÅÄÉƔ ϰ Ä ÊÅË Æ Ä Â ÅÄÊÈÅÂ É º É Â ºƑ ÄÅ ÅÆ È Ê ÅÄÉ Ä Æ È ÅÈà º ËÉ Ä Ê ËÄ ÊƠÉ ÊÅË Æ Ä ÂƔ É ÆÈ Ì ÄÊÉ º ÄÊ Â ÅÆ È Ê ÅÄ Å Ê ËÄ ÊƔ ÅÈ º Ê ÂÉƑ È È ÊÅ Ê ÅÂÂÅÍ Ä Ɠ Ư ơ Ä Â Ä ƭº É Â Ä ÊÅË Æ Ä Â ÅÄÊÈÅ ƺ º ÂÅ Á ËÄ Ê ÅÄƻƢ ƺÆƔʺˀƻ En 19 ...

Page 20: ...necting to an external device with a 3 5 mm stereo mini plug cable and inputting audio signals p 25 79 LQSXW MDFN For connecting to a TV with an optical digital audio cable and inputting audio signals p 24 68 22 5 287 MDFN For connecting to an external subwoofer with an RCA mono cable p 26 0 1 MDFN For connecting to an HDMI compatible playback device such as a BD DVD player a satellite and cable T...

Page 21: ...33 6855281 EXWWRQ Switch to surround playback p 29 6855281 EXWWRQ Switch to 3D surround playback p 29 1 2 EXWWRQ Indicate audio signal information of the input source being played or bass extension setting p 35 8 7227 67 1 EXWWRQ Hold down the key for more than 3 seconds to enable disable the Bluetooth standby function p 39 68 22 5 EXWWRQ Adjust the volume of the subwoofer p 27 087 EXWWRQ Mute the...

Page 22: ...ÅÄÉƔ ϰ ÌÅ º ÊÅË Ä Ƒ ĺ Ä Ì È Æ ÄÏ Í Ê ÅÈ ÆÈ ÉÉËÈ ÅÄ Ê ÉÆ Á ÈÉ ƺÆÅÈÊ ÅÄ ÅÌ È º Í Ê È ƻ ÅÄ Ê ÊÅÆ Å Ê ËÄ ÊƔ Å Ä ÉÅ Ã Ï º Ã Ê ÉÆ Á ÈÉƔ ϰ ËÄ Ê ÅÄÊ ÄÉ ÄÅÄƖÃ Ä Ê É Âº Ä ÉÆ Á ÈÉƔ Å ÄÅÊ ÆÂ Ã Ä Ê ÂÂÏ É ÄÉ Ê Ì Ê ÃÉ ƺ Ⱥ º ÉÁ ºÈ Ì Ƒ Ê Ɣƻ Ä È Ê ËÄ ÊƔ ËÄ Ê Ä ÂÉÅ ÃÅËÄÊ º ÅÄ Í ÂÂƔ Åà ÁÄÅÍ º Å Ë Âº Ä ÅÄÉÊÈË Ê ÅÄ É È ÇË È º ÅÈ É ÄÉÊ ÂÂ Ê ÅÄƔ Â É Ì ÇË Â º ÅÄÊÈ ÊÅÈ ÅÈ º Â È ÄÉÊ ÂÂ Ê ËÄ Ê ÅÄ Í ÂÂƔ ÅÈ º Ê ÂÉƑ È È ÊÅ ...

Page 23: ... Ê Â Ê Ê ÅËÊÆËÊÉ Ì º Å É Ä ÂÉ ÈÅÃ Ê ËÄ Ê ÊÅ Ê Ɣ ϰ ÅÄÄ Ê Ä Â ÊÅ Ê Ëº Å È ÊËÈÄ ÄÄ Â ÉËÆÆÅÈÊ º À Á ƺÊ À Á Í Ê ơ Ƣ ĺ Ê ºƻ ÅÄ Ɣ ϰ Ä Â Ê ÅÄÊÈÅ ËÄ Ê ÅÄ Å Ê ËÄ Ê ÊÅ Ê Ì Ê Ê Ëº Å ÊËÈÄ ÄÄ Â ƺ ƻƔ ÅÈ º Ê ÂÉƑ É Ê ÅÂÂÅÍ Ä Ɠ Ư ơ ÅÄ ËÈ Ä Ê ÅÄÊÈÅ ËÄ Ê ÅÄƢ ƺÆƔʺʾƻ ϰ É ʸˀƖÆ Ä Â Í Ê Ê ÂÅ Å ÆÈ ÄÊ º ÅÄ ÊƔ Â Í Ê Ã Î ÃËÃ Â Ä Ê Å ʼ à ƺʸʽ Êƻ É È ÅÃà ĺ º ÊÅ ÆÈ Ì ÄÊ º È º Ê ÅÄ Å É Ä Â ÇË Â ÊÏƔ ϰ É ÆÈ Ã Ëà ƖÉÆ º  ÅÈ ÆÂ Ï ...

Page 24: ...ÅÄ ÊƔ Â Í Ê Ã Î ÃËÃ Â Ä Ê Å ʼ à ƺʸʽ Êƻ É È ÅÃà ĺ º ÊÅ ÆÈ Ì ÄÊ º È º Ê ÅÄ Å É Ä Â ÇË Â ÊÏƔ ϰ É ÆÈ Ã Ëà ƖÉÆ º  ÅÈ ÆÂ Ï Á Å ʺ ĺ ʻ Ì º Å ÅÄÊ ÄÊƔ ϰ ËÄ Ê ÉËÆÆÅÈÊÉ Ì ÈÉ ÅÄ ʹƔʹƑ ÅÆÏ ÆÈÅÊ Ê ÅÄ Ê ÄÅÂÅ ÏƔ ÅÈ ÆÂ Ï Á Å ʻ Ì º ÅƑ ÅÄÄ Ê Ê ËÄ Ê ÊÅ Ê ÄÆËÊ À Á ƺÅÄ ÅÃÆ Ê Â Í Ê ʹƔʹƻ ÅÄ Ä ʹƔʹƖ ÅÃÆ ÄÊ Ɣ ϰ Ä ÅÄÄ Ê Ä Ê ÉËÆÆ º ÅÆÊ Â º Ê Â Ëº Å Â Ƒ ÉËÈ ÊÅ È ÃÅÌ Ê Æ Äº Á Ê ÆÂË ƠÉ ÅÈ ÄÊ Ê ÅÄ ÅÈ ÅÄÄ Ê Ä ÊƔ ϰ Ê É ÄÅ ÅÆÊ Â ...

Page 25: ... ƺʸʽ Êƻ É È ÅÃà ĺ º ÊÅ ÆÈ Ì ÄÊ º È º Ê ÅÄ Å É Ä Â ÇË Â ÊÏƔ ϰ É ÆÈ Ã Ëà ƖÉÆ º  ÅÈ ÆÂ Ï Á Å ʺ ĺ ʻ Ì º Å ÅÄÊ ÄÊƔ ϰ ËÄ Ê ÉËÆÆÅÈÊÉ Ì ÈÉ ÅÄ ʹƔʹƑ ÅÆÏ ÆÈÅÊ Ê ÅÄ Ê ÄÅÂÅ ÏƔ ÅÈ ÆÂ Ï Á Å ʻ Ì º ÅƑ ÅÄÄ Ê Ê ËÄ Ê ÊÅ Ê ÅËÊÆËÊ À Á ÅÄ ʹƔʹƖ ÅÃÆ ÄÊ ƭ ÆÂ Ï ÈƔ Analog connection with a playback device Connect a playback device such as a game console or a TV that does not have an optical digital audio output to the un...

Page 26: ...fer to the unit via an RCA mono cable sold separately MONO IN SUBWOOFER OUT jack The unit rear Input jack Subwoofer quipped with built in amplifier ÅËĺ É ÅËÊÆËÊ ÈÅà ÅÊ Ê Ë ÂÊƖ Ä ÉË ÍÅÅ ÈÉ Äº ÎÊ ÈÄ Â ÉË ÍÅÅ ÈƔ 5 Connecting the power cord Connecting the power cord After all connections are complete connect the supplied power cord to the AC IN jack on the unit and plug the power cord into an AC wall...

Page 27: ... 9 SOD HU JDPH FRQVROH FRQQHFWHG WR WKH XQLW 3 8VH WKH LQSXW EXWWRQV WR VHOHFW DQ LQSXW VRXUFH WR EH SOD HG EDFN HDMI Sound from a device connected to the HDMI IN jack TV TV audio ANALOG Sound from a device connected to the ANALOG input jack BLUETOOTH Sound from a Bluetooth device The indicator for the selected input source glows Glows When TV is selected 4 6WDUW SOD EDFN RQ WKH H WHUQDO GHYLFH VH...

Page 28: ...Ï ƺ Â È ÌÅ ƻƢ ƺÆƔʺʷƻ Ư ơ ÄÀÅÏ Ä Ä Ä º ÉÉ ÉÅËĺ ƺ ÉÉ ÎÊ ÄÉ ÅÄƻƢ ƺÆƔʺʷƻ ϰ ÅÈ º Ê ÂÉ ÅÄ ÆÂ Ï Á ÃËÉ Â É ÉÊÅÈ º ÅÄ ÂË ÊÅÅÊ º Ì Ƒ É Ê ÅÂÂÅÍ Ä Ɠ Ư ơ ÉÊ Ä Ä ÊÅ ÃËÉ ÉÊÅÈ º ÅÄ ÂË ÊÅÅÊ ʞ º Ì Ƣ ƺÆƔʺʸƻ ϰ Å ÃËÊ Ê ÉÅËĺƑ ÆÈ ÉÉ Ɣ È ÉÉ Ä ÊÅ ËÄÃËÊ Ɣ Flash on mute ϰ Ä ÉÅËĺ ÄÆËÊ ÊÅ Ê À Á É ÅËÊÆËÊ ÈÅÃ Ê Ƒ Ê ÌÅÂËÃ Â Ì Â ºÅ É ÄÅÊ Ä Ì Ä ÏÅË ÆÈ ÉÉ ƺ ƭƖƻ ÅÈ Ɣ ϰ Å ºÀËÉÊ Ê ÉË ÍÅÅ È ÌÅÂËà Ƒ ÆÈ ÉÉ ƺ ƭƖƻƔ ÉË ÍÅÅ È ÌÅÂËÃ Ä ºÀËÉ...

Page 29: ...ÈÊÉ Ê ÂË ÊÅÅÊ ËÄ Ê ÅÄƔ ÅÈ º Ê ÂÉƑ É Ê ÅÂÂÅÍ Ä Ɠ ϰ ơ Æ È Ê Ä Ê ËÄ Ê Í Ê Ê ÆÆƢ ƺÆƔʺʽƻ Playback with surround sound Press SURROUND to switch to surround playback according to the input source or your individual preference The SURROUND indicator glows white Glows white ÈÅ È ÃƑ ÅÌ Ƒ ËÉ Ƒ ÆÅÈÊÉƑ ÅÈ Ã ÉËÈÈÅËĺ Ãź Ä É Â Ê º ËÉ Ä Ê ÆÆ ÄÉÊ Â º ÅÄ Éà ÈÊÆ ÅÄ Ê Ê ÉËÆÆÅÈÊÉ Ê ÂË ÊÅÅÊ ËÄ Ê ÅÄƔ ÅÈ º Ê ÂÉƑ É Ê ÅÂ...

Page 30: ...È Ê Â È ÌÅ ËÄ Ê ÅÄ É Ä Â º ÅÈ º É Â ºƔ ÅÈ º Ê ÂÉƑ È È ÊÅ Ê ÅÂÂÅÍ Ä Ɠ ϰ ơ ÅÍ Ä Ëº Å Ä ÅÈÃ Ê ÅÄ Í Ê ÆÂ Ï ÁƢ ƺÆƔʺʼƻ Enjoying enhanced bass sound bass extension Press BASS EXTENSION to turn on the bass extension function You can enjoy enhanced bass sound and more powerful sound Press the button again to disable the function Flash three times enabled Flash once disabled È ÉÉ ÊÅ ÅÄ ÈÃ Í Ê È Ê ÉÉ ÎÊ ÄÉ Å...

Page 31: ...evice ÂË ÊÅÅÊ ÉÊ Äº Ï ËÄ Ê ÅÄ É Ä Â º Ï º ËÂÊƔ Ä ÂË ÊÅÅÊ º Ì É ÅÄÄ Ê º ÊÅ Ê É ËÄ Ê Í Â Ê ËÄ Ê É Å Ƒ Ê ËÄ Ê Í Â ÊËÈÄ º ÅÄ Äº Í Â Ãà º Ê ÂÏ È ºÏ ÊÅ ÆÂ Ï ÉÅËĺ ÈÅÃ Ê ÂË ÊÅÅÊ º Ì Ɣ ÅÈ º Ê ÂÉƑ È È ÊÅ Ê ÅÂÂÅÍ Ä Ɠ ϰ ơ ÅÄ ËÈ Ä Ê ÂË ÊÅÅÊ ÉÊ Äº Ï ËÄ Ê ÅÄƢ ƺÆƔʺˀƻ 1 3UHVV 8 7227 WR VHOHFW o OXHWRRWKp DV WKH LQSXW VRXUFH The BLUETOOTH indicator on the unit flashes Flashes ÂË ÊÅÅÊ º Ì É Ì Ä ÅÄÄ Ê º ÅÈ Ƒ Ê ËÄ ...

Page 32: ...will begin playing audio from the Bluetooth device ϰ Å Ê ÈÃ Ä Ê Ê ÂË ÊÅÅÊ ÅÄÄ Ê ÅÄƑ Æ È ÅÈà ÅÄ Å Ê ÅÂÂÅÍ Ä ÅÆ È Ê ÅÄÉƔ Ư ËÈÄ Å Ê ÂË ÊÅÅÊ ËÄ Ê ÅÄ ÅÄ Ê ÂË ÊÅÅÊ º Ì Ɣ Ư ź ºÅÍÄ ÅÈ ÃÅÈ Ê Ä ʺ É ÅĺÉƔ Ư Â Ê Ä ÄÆËÊ ÉÅËÈ ÅÊ È Ê Ä ÂË ÊÅÅÊ ËÉ Ä Ê ÄÆËÊ ËÊÊÅÄÉ ÅÄ Ê ËÄ ÊƔ Ư ËÈÄ Å Ê ËÄ ÊƔ ϰ Ê ÂË ÊÅÅÊ ÅÄÄ Ê ÅÄ É Ê ÈÃ Ä Ê º Í Ä Ê ËÄ ÊƠÉ ÄÆËÊ É Ƒ Ê Äº ÊÅÈ Â É É Äº Ê ËÄ Ê ÄÊ ÈÉ Ê ÅÄÄ Ê ÅÄ Í Ê ÉÊ ÊËÉƔ ϰ ºÀËÉÊ Ê ÌÅÂ...

Page 33: ... between the Bluetooth devices for playback 1 6WRS SOD EDFN RQ WKH OXHWRRWK GHYLFH IURP ZKLFK DXGLR LV FXUUHQWO EHLQJ SOD HG 2 6WDUW SOD EDFN RQ WKH RWKHU OXHWRRWK GHYLFH The unit will begin playing audio from the other Bluetooth device Ä ÅÄÄ Ê Ä ÂË ÊÅÅÊ º Ì Ê Ê É ÄÅÊ ÆÈ Ì ÅËÉÂÏ Ä ÅÄÄ Ê º ÊÅ Ê ËÄ ÊƑ º É ÅÄÄ Ê Ê ÂË ÊÅÅÊ º Ì ËÈÈ ÄÊÂÏ ÅÄÄ Ê º ÊÅ Ê ËÄ Ê Äº ÅÄÄ Ê Ê Ä Í ÂË ÊÅÅÊ º Ì Ɣ En 33 ...

Page 34: ...mple when a TV program is selected on the TV the unit s audio input source is switched to the HDMI OUT ARC jack using the ARC function or TV input jack And also when a BD DVD player is connected to the HDMI IN jack on the unit the unit s input source switches to HDMI when the BD DVD player is selected with the TV s remote control 6ZLWFK WKH DXGLR RXWSXW GHYLFH You can switch the audio output devic...

Page 35: ...ation for three seconds immediately after INFO is pressed a b c d 6KRZ WKH W SH RI DXGLR VLJQDO HDMI glows white Dolby Digital HDMI glows red DTS TV glows white AAC HDMI and TV off PCM analog input no input 6KRZ ZKHWKHU ROE 3UR RJLF LV HQDEOHG RU GLVDEOHG ROE 3UR RJLF LV HQDEOHG DXWRPDWLFDOO ZKHQ FKDQQHO VWHUHR VLJQDOV DUH SOD HG LQ VXUURXQG VRXQG Glows Enabled Off Disabled 6KRZ WKH EDVV H WHQVLRQ...

Page 36: ...e the unit can be operated using the mobile device In addition to basic unit operation various functions including surround mode selection and tone adjustment can be more precisely configured using the app than is possible using the remote control For details on the HOME THEATER CONTROLLER app see the product information on the Yamaha website En 36 ...

Page 37: ...nabled by default 1 7XUQ RII WKH XQLW 2 3UHVV DQG KROG 0 DW OHDVW WKUHH VHFRQGV The HDMI control function is enabled or disabled and the unit turns on The indicator shows HDMI control function status for several seconds immediately after the unit is turned on Glows enabled default Off disabled ϰ Ä Â Ê ÅÄÊÈÅ ËÄ Ê ÅÄ Í Ä ÅÄÄ Ê Ä Ê Ê ÉËÆÆÅÈÊÉ Ëº Å ÊËÈÄ ÄÄ Â ƺ ƻƑ ÅÈ Í Ä ËÉ Ä É Ä Â Æ ÉÉƖÊ ÈÅË Ɣ ÅÈ º Ê...

Page 38: ...È Ä Ê ÅÄÊÈÅ ËÄ Ê ÅÄƢ ƺÆƔʺʾƻ ϰ Å ÅÄ ËÈ Ëº Å ÅËÊÆËÊ Í Ê Ê ÅÄÊÈÅ ËÄ Ê ÅÄ Ä Â ºƑ É Â Ê Ê Ëº Å ÅËÊÆËÊ º Ì ÅÄ ËÈ º ÅÈ Ê ÅÄÄ Ê º ÊÅ Ê ËÄ ÊƔ ϰ Ì º Å É Ä ÂÉ ÄÆËÊ ÊÅ Ê À Á Å Ê É ËÄ Ê È ÂÍ ÏÉ ÅËÊÆËÊ ÈÅÃ Ê ƺ ƻ À Á Å Ê ËÄ ÊƔ Setting the auto power standby function Enabling the auto power standby function prevents the unit from remaining on when not in use When the auto power standby function is enabled the u...

Page 39: ... touch panel control status for several seconds immediately after the unit is turned on Glows enabled default Off disabled Configuring the Bluetooth standby function If the Bluetooth standby function is enabled the unit will be turned on and will be ready to play sound from the Bluetooth device when Bluetooth connection is made on a Bluetooth device This function is enabled by default Press and ho...

Page 40: ...Initializing the unit Reset the settings of the unit to the factory presets 1 7XUQ RII WKH XQLW 2 7RXFK DQG KROG DQG RQ WKH XQLW XQWLO DOO LQGLFDWRUV IODVK Flash initialized En 40 ...

Page 41: ...Yamaha dealer or service center When any problem appears Power and system function The power turns off suddenly z z 7KH DXWR SRZHU VWDQGE IXQFWLRQ DFWLYDWHG When the auto power standby function is enabled the unit automatically turns off in any of the following situations No operations have been performed for 8 hours BLUETOOTH or HDMI is selected as the input source but no audio has been input to ...

Page 42: ...Changing the brightness of the indicators DIMMER p 37 The unit does not function correctly z 7KH LQWHUQDO PLFURFRPSXWHU LV IUR HQ GXH WR DQ H WHUQDO HOHFWULF VKRFN VXFK DV OLJKWQLQJ RU H FHVVLYH VWDWLF HOHFWULFLW RU WR D GURS LQ WKH SRZHU VXSSO YROWDJH Unplug the power cord from the AC wall outlet and plug it again The unit turns on by itself z QRWKHU OXHWRRWK GHYLFH LV EHLQJ RSHUDWHG QHDUE Termin...

Page 43: ...O VHQVRU Position the unit so that it does not obstruct the TV s remote control sensor The unit cannot be operated using the TV s remote control z 7KH 0 FRQWURO IXQFWLRQ LV LQFRUUHFW Confirm the settings are properly configured as follows The HDMI control function of the unit is enabled The HDMI control function is enabled on the TV Set audio output to any option other than TV If the unit cannot b...

Page 44: ...nit so that HDMI audio input signals are output from the unit For details see the following Configuring HDMI audio output p 38 z 7KH 0 FRQWURO IXQFWLRQ LV GLVDEOHG When connecting a TV that supports ARC Audio Return Channel to the unit using an HDMI cable only enable the HDMI control function To output audio signals from the unit with the HDMI control function disabled connect the TV s audio outpu...

Page 45: ... 29 Playback with surround sound p 29 z 7KH YROXPH LV WRR ORZ Turn up the volume For details see the following Basic procedure for playback p 27 z 7KH 79 RU SOD EDFN GHYLFH LV VHW WR RXWSXW FKDQQHO DXGLR VXFK DV 3 0 RQO Change the digital audio output setting on the TV or playback device to Bitstream z 6RXQG LV DOVR KHDUG IURP WKH 79 EXLOW LQ VSHDNHUV Set the TV volume to minimum For details see t...

Page 46: ... 7KH XQLW LV DOUHDG FRQQHFWHG WR DQRWKHU OXHWRRWK GHYLFH 8VLQJ D OXHWRRWK GHYLFH WKDW KDV QHYHU EHHQ FRQQHFWHG WR WKH XQLW Terminate the current Bluetooth connection and then connect to the new device z 7KH XQLW LV DOUHDG FRQQHFWHG WR WZR OXHWRRWK GHYLFHV 8VLQJ D OXHWRRWK GHYLFH WKDW KDV EHHQ FRQQHFWHG WR WKH XQLW Terminate one of the Bluetooth connections and then connect to the new device No sou...

Page 47: ...YLFH DQG VR RQ PD EH ORFDWHG QHDUE Do not use the unit near devices that emit electromagnetic waves z XGLR IURP DQRWKHU OXHWRRWK GHYLFH LV SOD LQJ Stop playback on the Bluetooth device from which audio is currently being played and start playback on the other Bluetooth device En 47 ...

Page 48: ...Response 4 kHz to 23 kHz Impedance 6 ȍ Subwoofer Type Bass reflex type non magnetic shielding Driver 7 5 cm 3 cone 2 Frequency Response 60 Hz to 160 Hz Impedance 3 ȍ 6 ȍ 2 HFRGHU Supported audio signal PCM up to 5 1ch Dolby Digital up to 5 1ch DTS Digital Surround up to 5 1ch QSXW DFNV HDMI 1 HDMI IN Digital Optical 1 TV Analog 3 5 mm stereo mini 1 ANALOG 2XWSXW DFNV HDMI 1 HDMI OUT ARC Analog RCA...

Page 49: ...her models HDMI Control Off 0 4 W HDMI Control On 1 2 W Dimensions W x H x D Installing the unit in front of a TV etc 890 53 131 mm 35 2 1 8 5 1 8 Mounting the unit on a wall with spacers 890 131 62 mm 35 5 1 8 2 1 2 Weight 3 2 kg 7 1 lbs ÅÄÊ ÄÊÉ Å Ê É Ã ÄË Â ÆÆÂÏ ÊÅ Ê Â Ê ÉÊ ÉÆ Ê ÅÄÉ É Å Ê ÆË Â É Ä º Ê Ɣ Å Å Ê Ä Ê Â Ê ÉÊ Ã ÄË ÂƑ ÉÉ Ê Ã Í É Ê Ê Ä ºÅÍÄÂÅ º Ê Ã ÄË Â Â Ɣ Supported HDMI audio and vide...

Page 50: ...ÅÊ º ź Ê ÊÉÊÈ Ã É Ä ÂÉ ÅÄ Ê º Ì ƻƔ È ÊÅ ºÅ Ëà ÄÊ Ê ÅÄ ÉËÆÆ º Í Ê Ê º Ì ÅÈ º Ê ÂÉƔ ϰ È ÉÅÂËÊ ÅÄ Å ÊÈ ÄÉà ÊÊ º Ì º Å É Ä Â Ì È É ÅȺ Ä ÊÅ ÉÆ Ê ÅÄÉ Å Ê ÅÄÄ Ê º ÊÅ Ê ËÄ ÊƔ ϰ ÅÄÊ ÄÊÉ Å Ê É Ã ÄË Â ÆÆÂÏ ÊÅ Ê Â Ê ÉÊ ÉÆ Ê ÅÄÉ É Å Ê ÆË Â É Ä º Ê Ɣ Å Å Ê Ä Ê Â Ê ÉÊ Ã ÄË ÂƑ ÉÉ Ê Ã Í É Ê Ê Ä ºÅÍÄÂÅ º Ê Ã ÄË Â Â Ɣ Supported digital audio formats The following digital audio formats can be used by the unit 2SWL...

Page 51: ... Ä Â ÃÆÉ ÅÊ È Ê Ä ÉÆ º É È ÍÉƑ ÉË É É ÅÈÊ É È ÍÉƑ Ä ÂÉƑ ĺ ÊÍÅƖÉ º º Ê Æ Ƒ Ã Ï ËÉ Ê ËÄ Ê ÊÅ ÂÂƔ ϰ Î Ê Â É Ä ÆÂ Í È Ê Ï Í Â ÄÅÊ Åà ÂÅÅÉ Ɣ ÏÅËÈ ÅÅÊ ÅÈ Äº º ÄÊ ÂÂÏ ÊÉ Ë Ê ÅÄ ÂÅÅÉ Â Ƒ Ê ËÄ Ê Ã Ï ÂÂƔ ϰ Å ÄÅÊ Â Ä ÅÄ Ê ËÄ Ê ÅÈ ÆÆÂÏ Î ÉÉ Ì ÅÈ ÊÅ Ê ÊÅÆ Å Ê ËÄ ÊƔ Å Ä ÉÅ Ã Ï ËÉ Ê ËÄ Ê ÊÅ ÂÂƔ ϰ Á Ê Ê Ê ËÄ Ê É Î º É ËÈ ÂÏ Ê È Ê ÄÉÊ ÂÂ Ê ÅÄƔ Ã Í ÂÂ È ÄÅ È ÉÆÅÄÉ Â ÊÏ ÅÈ ÄÏ º ÄÊÉ ËÉ º Ï ÃÆÈÅÆ È ÄÉÊ ÂÂ Ê ÅÄÉƔ 1 W...

Page 52: ...RQ WKH ZDOO 7 to 9 mm 1 4 to 3 8 13 to 15 mm 1 2 to 5 8 4 to 5 mm 8 to 10 20 mm 3 4 or more 457 mm 18 3 3HHO RII WKH EDFNLQJ SDSHU IURP WKH VSDFHUV VXSSOLHG DQG DWWDFK WKH DGKHVLYH IDFH WR WKH ERWWRP RI WKH XQLW Spacers 4 DQJ WKH XQLW RQ WKH VFUHZV Mounting holes on the bottom of the unit Touch panel En 52 ...

Page 53: ...aisson de graves externe 27 5 Branchement du cordon d alimentation 27 Branchement du cordon d alimentation 27 LECTURE 28 Fonctionnement de base 28 Procédure de base pour la lecture 28 Écoute de votre son préféré 30 Lecture avec un son Surround 3D 30 Lecture avec un son surround 30 Lecture avec un son stéréo 2 canaux 30 Lecture claire des voix humaines Clear Voice 31 Profiter de sons graves de meil...

Page 54: ...e verrouillage enfant 40 Configuration de la fonction de veille Bluetooth 40 Réinitialisation de l unité 41 ANNEXE 42 En cas de problème Généralités 42 En cas de problèmes alimentation et fonction du système 42 En cas de problème Audio 45 En cas de problème Bluetooth 47 Caractéristiques techniques 48 Caractéristiques techniques 48 Formats audio et vidéo HDMI pris en charge 49 Formats audio numériq...

Page 55: ...t à la terre La broche la plus large ou troisième broche permet de sécuriser l installation électrique Si vous ne pouvez pas brancher le cordon d alimentation dans la prise d alimentation demandez à un électricien de la remplacer 10 Protégez le cordon d alimentation Cela permet d éviter de marcher dessus ou de le tordre au niveau de la fiche de la prise d alimentation et des points de contact sur ...

Page 56: ...itable qu il devrait être installé et utilisé en gardant une distance de 20 cm ou plus entre le radiateur et le corps humain Le présent appareil est conforme à la partie 15 des règles de la FCC et aux normes des CNR d Industrie Canada applicables aux appareils radio exempts de licence L exploitation est autorisée aux deux conditions suivantes 1 l appareil ne doit pas produire de brouillage et 2 l ...

Page 57: ...oblèmes suivants se produit coupez immédiatement l alimentation et retirez la fiche d alimentation Si l appareil fonctionne sur piles retirez en toutes les piles Le cordon la fiche d alimentation est endommagé e Une odeur inhabituelle un bruit bizarre ou de la fumée se dégage de l appareil Un corps étranger ou de l eau a pénétré à l intérieur de l appareil Une brusque perte de son est survenue dur...

Page 58: ...ournies dans le manuel La chute ou le renversement du produit peut entraîner des blessures ou des dommages matériels ƒ Confirmez que l installation une fois finie est sûre et solide De plus procédez périodiquement à des inspections de sécurité Le non respect de cette consigne pour provoquer la chute des appareils et entraîner des blessures Démontage interdit ƒ Ne tentez pas de démonter ou de modif...

Page 59: ...lisez pas cet appareil à moins de 15 cm des personnes disposant d un stimulateur cardiaque ou d un défibrillateur Les ondes radio émanant de cette unité peuvent affecter le fonctionnement des équipements électro médicaux tels que les stimulateurs cardiaques ou les défibrillateurs cardiaques ATTENTION Ce contenu indique un risque de blessures Alimentation ƒ N utilisez pas une prise secteur dans laq...

Page 60: ... vous entendez des sifflements consultez un médecin ƒ Avant de raccorder l appareil à d autres dispositifs mettez tous les dispositifs concernés hors tension Le non respect de ces mesures peut provoquer une perte d acuité auditive entraîner un risque d électrocution ou endommager l équipement Entretien et soins ƒ Retirez la fiche d alimentation de la prise secteur avant de procéder au nettoyage de...

Page 61: ...es brûlures ou l apparition de flammes en raison d une fuite du liquide des piles ƒ Lorsque les piles sont déchargées ou que vous n utilisez pas l appareil pendant une longue période retirez les piles de la télécommande pour éviter toute fuite du liquide des piles ƒ Avant de procéder au stockage ou à la mise au rebut des piles veillez à isoler la zone des bornes en appliquant dessus un ruban adhés...

Page 62: ...dispositifs de réseau sans fil Les obstructions pourraient raccourcir la distance de transmission Connexions En cas de connexion d unités externes assurez vous de lire attentivement le mode d emploi de l appareil concerné et reliez le conformément aux instructions fournies La non conformité aux instructions de manipulation peut provoquer le dysfonctionnement de l appareil Ne connectez pas l appare...

Page 63: ...roduits d entretien ou de chiffons de lavage chimique peut causer la décoloration ou la déformation de l appareil Enceintes Ne touchez pas les unités de haut parleur Le non respect de cette consigne peut endommager les unités de haut parleur À propos de la mise au rebut Veillez à mettre au rebus les piles usagées selon la réglementation locale en vigueur Fr 12 ...

Page 64: ...ouble D sont des marques déposées de Dolby Laboratories Pour les brevets DTS reportez vous à l adresse http patents dts com Fabriqué sous licence de DTS Inc DTS le symbole DTS et le symbole ensemble DTS Digital Surround et DTS Virtual X sont des marques déposées ou des marques de DTS Inc aux États Unis et ou dans d autres pays DTS Inc Tous droits réservés SS 6WRUH60 App Store est une marque de ser...

Page 65: ...d empêcher la panne le dommage ou le dysfonctionnement du produit et la perte des données ainsi qu afin de protéger l environnement 127 Indique des remarques sur les instructions les restrictions de fonction et des informations supplémentaires qui pourraient s avérer utiles Les illustrations et les captures d écran figurant dans ce manuel servent uniquement à expliciter les instructions Les noms d...

Page 66: ... surround frontal avec ses caissons de graves intégrés procure un son dynamique avec les vidéos lues sur un téléviseur Lisez le son depuis un téléviseur ou un lecteur BD DVD en son surround Lisez le son depuis un dispositif Bluetooth avec une excellente qualité Fr 15 ...

Page 67: ...sitifs Bluetooth Lisez facilement les contenus depuis un smartphone une tablette ou un ordinateur compatibles Bluetooth De plus l unité prend en charge la connexion multipoint et peut permuter la lecture entre deux dispositifs Bluetooth Notre technologie exclusive Compressed Music Enhancer améliore la qualité et les caractéristiques sonores et permet de délivrer un son réaliste et impressionnant P...

Page 68: ... la télécommande Câble audio numérique optique Gabarit de fixation À utiliser lors de la fixation de l unité au mur Entretoises x 2 feuille À utiliser lors de la fixation de l unité à un mur Mode d emploi ce livret Utilisation de la télécommande Préparation de la télécommande Retirez la languette isolante de la pile avant d essayer d utiliser la télécommande Languette isolante de la pile Fr 17 ...

Page 69: ... ÅÃà ĺ ÉËÈ Â ÉËÆóÈ ËÈ Ɣ ÅËÈ ÆÂËÉ ºƠ Ä ÅÈÃ Ê ÅÄÉƑ È ÆÅÈÊ ÐƖÌÅËÉ Ñ Ɠ ϰ Ʃ ÅÃÉ º É Æ ò É Ê ÅÄ Ê ÅÄÉ º Â Ì ÄÊƭÉËÆóÈ ËÈ ƪ ƺÆƔʸˀƻ ϰ Ʃ Î Ê ÅÄ º ÂƠËÄ Êó Ñ ËÄ ÃËÈ ƪ ƺÆƔʼʸƻ Remplacement de la pile dans la télécommande Maintenez enfoncée la patte de dégagement dans le sens indiqué par A et sortez le porte pile en le faisant glisser dans le sens indiqué par B Porte pile Patte de dégagement Pile au lithium CR2...

Page 70: ...teint Allumé Clignotant ÂËà ÄÅÉ Êó º É ÊóÃÅ ÄÉ Æ ËÊ ôÊÈ Ãź ó Ë ÃÅÏ Ä º ÉËÈ Â ÊóÂó ÅÃà ĺ Ɣ ÅËÈ ÆÂËÉ ºƠ Ä ÅÈÃ Ê ÅÄÉƑ È ÆÅÈÊ ÐƖÌÅËÉ Ñ Ɠ ϰ Ʃ ź Ê ÅÄ º  ÂËà ÄÅÉ Êó º É ÊóÃÅ ÄÉ ƺ ƻ ƪ ƺÆƔʺʿƻ HQWUÃH Pour sélectionner une source d entrée à lire p 28 VRXUGLQH Pour mettre la sortie audio en sourdine p 28 Touchez la de nouveau pour remettre le son _ YROXPH Pour régler le volume p 28 DOLPHQWDWLRQ Pour allum...

Page 71: ...Ä Ê ÅÄÉƔ ϰ ÆÂ Ð Æ É ºƠÅ À ÊÉ ÉËÈ ÂƠó È Ä Ê Ê Â ÉÅËÉ Æ Ä º ÆÈÅÌÅÇË È º É ÅÃà ĺ É ÃÆÈóÌË ÉƔ ϰ ÅÈÉÇË Â ÅÃà ĺ º ÂƠó È Ä Ê Ê Â ÉÊ ºóÉ Ê Ìó Ƒ Ë ËÄ ÅÆóÈ Ê ÅÄ Ä Æ ËÊ ôÊÈ ÊËó Ë ÃÅÏ Ä º ÂƠó È Ä Ê Ê Â º ÂƠËÄ ÊóƔ  ÃÆô  ÅÄ Ê ÅÄÄ Ã ÄÊ º ÄÊ Â º ÂƠËÄ ÊóƔ ÅËÈ ÆÂËÉ ºƠ Ä ÅÈÃ Ê ÅÄÉƑ È ÆÅÈÊ ÐƖÌÅËÉ Ñ Ɠ Ư Ʃ Ê Ì Ê ÅÄƭºóÉ Ê Ì Ê ÅÄ º  ÅÃà ĺ º ÂƠó È Ä Ê Ê Â ƺ ÅÄ Ê ÅÄ º Ì ÈÈÅË ÂÂ Ä ÄÊƻ ƪ ƺÆƔʻʷƻ Fr 20 ...

Page 72: ...der un appareil externe avec un câble stéréo à mini fiche de 3 5 mm et de recevoir des signaux audio p 26 3ULVH GnHQWUÃH 79 Cette prise permet de raccorder un téléviseur avec un câble audio numérique optique et de recevoir des signaux audio p 25 3ULVH 68 22 5 287 Cette prise permet de raccorder un caisson de graves externe avec un câble mono RCA p 27 3ULVH 0 1 Cette prise permet de raccorder un ap...

Page 73: ...H 6855281 Cette touche permet de sélectionner la lecture Surround 3D p 30 7RXFKH 1 2 Indique les informations de signal audio de la source d entrée actuellement lue ou le réglage d accentuation des graves p 36 7RXFKH 8 7227 67 1 Maintenez enfoncée la touche pendant plus de 3 secondes pour activer ou désactiver la fonction de veille Bluetooth p 40 7RXFKH 68 22 5 Cette touche permet de régler le vol...

Page 74: ...Ä ÄÊ É ƺÆÅÈÊ ÅÄ ÅËÌ ÈÊ º Ê ÉÉËƻ ÉËÈ Â ËÊ º ÂƠËÄ Êó Ê Ä Æ РÀ Ã É º ÆÅ ºÉ ÅË ÄƠ Î È Ð º ÆÈ ÉÉ ÅÄ º ÉÉËÉƔ ÅËÉ È ÉÇË È Ð ºƠ ĺÅÃÃ È Â É Ä ÄÊ ÉƔ ϰ ƠËÄ Êó ÉÊ ÆÅËÈÌË ºƠ Ä ÄÊ É Ñ Â Äº ÄÅÄ Ã ÄóÊ ÇË Ɣ ÆÂ Ð Æ É ºƠÅ À ÊÉ Ã ÄóÊ ÇË Ã ÄÊ É ÄÉ Â É ƺº ÉÇË ºËÈƑ Â Ê ËÈƑ Ê Ɣƻ ÆÈòÉ º ÂƠËÄ ÊóƔ ƠËÄ Êó Æ ËÊ ó  à ÄÊ ôÊÈ ÃÅÄÊó ÉËÈ ËÄ ÃËÈƔ É ÅÄÄ ÉÉ Ä É Ä ÅÄÉÊÈË Ê ÅÄ ÉÅÄÊ Äó ÉÉ È É ÆÅËÈ ËÄ ÄÉÊ ÂÂ Ê ÅÄ ÉŌÈ Ɣ ÅÄ Ð ÂƠ ÄÉÊ ÂÂ...

Page 75: ... É É Ä ËÎ Ì ºóÅ º ÆË É ÂƠËÄ Êó Ì ÈÉ Â ÊóÂóÌ É ËÈƔ ϰ ÅȺ Ð ËÄ Ó Â Ñ Â ÆÈ É ÅÃÆ Ê Â Ì Â Ä Â º È ÊÅËÈ Ëº Å ƺÆÈ É ÆÅÈÊ ÄÊ Â Ã ÄÊ ÅÄ ƻ ºË ÊóÂóÌ É ËÈƔ ϰ Ê Ì Ð Â ÅÄ Ê ÅÄ º ÅÄÊÈĥ º ÂƠËÄ Êó Ä ºƠ Ê Ì È Ëº Å ÊËÈÄ ÄÄ Â ƺ ƻƔ ÅËÈ ÆÂËÉ ºƠ Ä ÅÈÃ Ê ÅÄÉƑ È ÆÅÈÊ ÐƖÌÅËÉ Ñ Ɠ Ư Ʃ ÅÄ ËÈ Ê ÅÄ º  ÅÄ Ê ÅÄ º ÅÄÊÈĥ ƪ ƺÆƔʺʿƻ ϰ Ê Â É Ð ËÄ Ó Â Ñ ʸˀ ÈÅ É Ì Â ÂÅ Å È ÌóƔ Ä Ó Â ºƠËÄ ÂÅÄ Ë ËÈ Ã Î ÃËà º ʼ à ÉÊ È ÅÃà ĺó ÆÅËÈ óÌ Ê ...

Page 76: ... ĺó ÆÅËÈ óÌ Ê È Â ºóÊóÈ ÅÈ Ê ÅÄ º  ÇË Â Êó ºË É Ä ÂƔ ϰ Ê Â É Ð ËÄ Ó Â È Äº Ì Ê ÉÉ ËÊ º Ãà ÆÅËÈ Â Â ÊËÈ º É ÅÄÊ ÄËÉ Ì ºóÅÉ ʺ Ê ʻ Ɣ ϰ ƠËÄ Êó ÆÈ Äº Ä È Ì ÈÉ ÅÄ ʹƔʹƑ ËÄ Ê ÄÅÂÅ º ÆÈÅÊ Ê ÅÄ ÅÄÊÈ Â ÅÆ Ɣ ÅËÈ Â È Â É Ì ºóÅÉ ʻ Ƒ È ÅȺ Ð ÂƠËÄ Êó Ñ Â ÆÈ É ºƠ ÄÊÈó ƺ ÅÃÆ Ê Â Ì ʹƔʹƻ ÉËÈ ËÄ ÊóÂóÌ É ËÈ ÅÄ ÅÈà ʹƔʹƔ ϰ ÅÈÉÇË ÌÅËÉ È ÅȺ Ð Â Ó Â Ëº Å ÄËÃóÈ ÇË ÅÆÊ ÇË ÅËÈÄ Ƒ Ì ÂÂ Ð Ñ È Ê È È Â ÆË ÅÄ Ê ÌóÈ Ð Â É ÄÉ º  ...

Page 77: ...à ĺó ÆÅËÈ óÌ Ê È Â ºóÊóÈ ÅÈ Ê ÅÄ º  ÇË Â Êó ºË É Ä ÂƔ ϰ Ê Â É Ð ËÄ Ó Â È Äº Ì Ê ÉÉ ËÊ º Ãà ÆÅËÈ Â Â ÊËÈ º É ÅÄÊ ÄËÉ Ì ºóÅÉ ʺ Ê ʻ Ɣ ϰ ƠËÄ Êó ÆÈ Äº Ä È Ì ÈÉ ÅÄ ʹƔʹƑ ËÄ Ê ÄÅÂÅ º ÆÈÅÊ Ê ÅÄ ÅÄÊÈ Â ÅÆ Ɣ ÅËÈ Â Â ÊËÈ º Ì ºóÅÉ ʻ Ƒ È ÅȺ Ð ÂƠËÄ Êó Ñ Â ÆÈ É º ÉÅÈÊ ÉËÈ ËÄ Â Ê ËÈ ƭ ÅÄ ÅÈà ʹƔʹƔ Connexion analogique avec un appareil de lecture Raccordez un appareil de lecture comme une console de jeux ou un té...

Page 78: ...via un câble mono RCA vendu séparément MONO IN Prise SUBWOOFER OUT L unité arrière Prise d entrée Caisson de graves pourvu d un amplificateur intégré ÉÅÄ ÉÊ óÃ É º ÆË É Â É ÉÉÅÄÉ º È Ì É ÄÊó ÈóÉ Ê Â ÉÉÅÄ º È Ì É ÎÊ ÈÄ Ɣ 5 Branchement du cordon d alimentation Branchement du cordon d alimentation Une fois que tous les raccordements sont terminés branchez le cordon d alimentation fourni sur la prise ...

Page 79: ...OÃYLVHXU RX OHFWHXU 9 FRQVROH GH MHX UDFFRUGÃV º OnXQLWÃ 3 8WLOLVH OHV WRXFKHV GnHQWUÃH SRXU VÃOHFWLRQQHU XQH VRXUFH GnHQWUÃH º OLUH HDMI Son d un dispositif raccordé à la prise HDMI IN TV Son du téléviseur ANALOG Son d un dispositif raccordé à la prise d entrée ANALOG BLUETOOTH Son d un dispositif Bluetooth Le témoin de la source d entrée sélectionnée s allume Allumé Lorsque TV est sélectionné 4 ...

Page 80: ... ƺÆƔʺʸƻ ϰ ÅËÈ ÆÂËÉ ºƠ Ä ÅÈÃ Ê ÅÄÉ ÉËÈ Â Â ÊËÈ º ÈÉ º ÃËÉ ÇË ÉÊÅ ÁóÉ ÉËÈ ËÄ º ÉÆÅÉ Ê ÂË ÊÅÅÊ Ƒ È ÆÅÈÊ ÐƖÌÅËÉ Ñ Ɠ Ư Ʃ ÅËÊ º ÃËÉ ÇË ÉÊÅ Áó ÉËÈ ËÄ º ÉÆÅÉ Ê ÂË ÊÅÅÊ ʞ ƪ ƺÆƔʺʹƻ ϰ ÅËÈ Ã ÊÊÈ Â ÉÅÄ Ä ÉÅËȺ Ä Ƒ ÆÆËÏ Ð ÉËÈ Ɣ ÆÆËÏ Ð Ñ ÄÅËÌ Ë ÉËÈ ÆÅËÈ ÈóÊ Â È Â ÉÅÄƔ Clignote en sourdine ϰ ÅÈÉÇË Â ÉÅÄ È îË Æ È Â ÆÈ É ÉÊ óÃ É Æ È Â ÊóÂóÌ É ËÈƑ Â Ä Ì Ë º ÌÅÂËÃ Ä Ä Æ ÉƑ ÃôÃ É ÌÅËÉ ÆÆËÏ Ð ÉËÈ Â ÊÅË ƺ ƭƖƻ ÅË Ɣ ϰ ÅËÈ...

Page 81: ...Ä ÅÈÃ Ê ÅÄÉƑ È ÆÅÈÊ ÐƖÌÅËÉ Ñ Ɠ ϰ Ʃ ÅÃà ĺ º ÂƠ ÆÆ È Â Ì ÂƠ ÆÆÂ Ê ÅÄ ƪ ƺÆƔʺʾƻ Lecture avec un son surround Appuyez sur SURROUND pour basculer sur la lecture surround selon la source d entrée ou votre préférence individuelle Le témoin SURROUND s allume en blanc Allumé blanc Ãź ÉËÈÈÅËĺ Ƒ Ƒ Ƒ ÅË Æ ËÊ ôÊÈ ÉóÂ Ê ÅÄÄó Ë ÃÅÏ Ä º ÂƠ ÆÆÂ Ê ÅÄ ÄÉÊ ÂÂó ÉËÈ ËÄ Éà ÈÊÆ ÅÄ ÆÈ Ä ÄÊ Ä È Â ÅÄ Ê ÅÄ ÂË ÊÅÅÊ Ɣ ÅËÈ ÆÂ...

Page 82: ...ó Ɣ ÅËÈ ÆÂËÉ ºƠ Ä ÅÈÃ Ê ÅÄÉƑ È ÆÅÈÊ ÐƖÌÅËÉ Ñ Ɠ ϰ Ʃ º É Ä ÅÈÃ Ê ÅÄÉ Ëº Å Ì Â Â ÊËÈ ƪ ƺÆƔʺʽƻ Profiter de sons graves de meilleure qualité accentuation des graves Appuyez sur BASS EXTENSION pour activer la fonction d accentuation des graves Vous pouvez profiter de sons graves de meilleure qualité et d un son plus puissant Appuyez à nouveau sur la touche pour désactiver la fonction Clignote 3 fois act...

Page 83: ... Ì Â ÂË ÊÅÅÊ ÉÊ Ê Ìó Æ È ºó ËÊƔ ÅÈÉÇËƠËÄ º ÉÆÅÉ Ê ÂË ÊÅÅÊ ÉÊ ÅÄÄ Êó Ñ ÊÊ ËÄ Êó ÂÅÈÉ ÇËƠ  ÉÊ óÊ ÄÊ Ƒ  Ɩ ÉƠ ÂÂËÃ Ê Â º ÉÆÅÉ Ê ÂË ÊÅÅÊ ÉÊ ÃÃóº Ê Ã ÄÊ ÆÈôÊ ÆÅËÈ Â Â ÊËÈ ºË ÃÅÈ ËƔ ÅËÈ ÆÂËÉ ºƠ Ä ÅÈÃ Ê ÅÄÉƑ È ÆÅÈÊ ÐƖÌÅËÉ Ñ Ɠ ϰ Ʃ ÅÄ ËÈ Ê ÅÄ º  ÅÄ Ê ÅÄ º Ì Â ÂË ÊÅÅÊ ƪ ƺÆƔʻʷƻ 1 SSX H VXU 8 7227 SRXU VÃOHFWLRQQHU OXHWRRWK HQ WDQW TXH VRXUFH GnHQWUÃH Le témoin BLUETOOTH sur l unité clignote Clignotant ...

Page 84: ...Bluetooth ϰ ÅËÈ ÈÈôÊ È Â ÅÄÄ Î ÅÄ ÂË ÊÅÅÊ Ƒ ÊË Ð ÂƠËÄ º É ÅÆóÈ Ê ÅÄÉ ÉË Ì ÄÊ ÉƔ Ư óÉ Ê Ì Ð Â ÅÄ Ê ÅÄ ÂË ÊÅÅÊ º ÌÅÊÈ º ÉÆÅÉ Ê ÂË ÊÅÅÊ Ɣ Ư ÄÊ Ä Ð Â ÊÅË Ä ÅÄ ó Æ Äº ÄÊ ÆÂËÉ º ʺ É Åĺ ÉƔ Ư óÂ Ê ÅÄÄ Ð ËÄ ÉÅËÈ ºƠ ÄÊÈó ËÊÈ ÇË ÂË ÊÅÅÊ Ë ÃÅÏ Ä º É ÊÅË É ºƠ ÄÊÈó ÉËÈ ÂƠËÄ ÊóƔ Ư Ê Ä Ð ÂƠ ÆÆ È ÂƔ ϰ  ÅÄÄ Î ÅÄ ÂË ÊÅÅÊ ÉÊ Ê Èà Äó ÂÅÈÉÇË ÂƠ ÄÊÈó º ÂƠËÄ Êó ÉÊ Ƒ  ÊóÃÅ Ä Â ÄÅÊ Ê ÂƠËÄ Êó Æ ÉÉ Ñ ÂƠóÊ Ê ºƠ ÊÊ ÄÊ º ÅÄÄ...

Page 85: ...uetooth utilisés pour la lecture 1 UUÄWH OD OHFWXUH VXU OH GLVSRVLWLI OXHWRRWK º SDUWLU GXTXHO OH VRQ HVW DFWXHOOHPHQW OX 2 DQFH OD OHFWXUH VXU OnDXWUH GLVSRVLWLI OXHWRRWK L unité se met à lire le son depuis l autre dispositif Bluetooth ÅÈÉÇË ÌÅËÉ ÅÄÄ Ê Ð ËÄ º ÉÆÅÉ Ê ÂË ÊÅÅÊ ÄƠ Ï ÄÊ Æ É ºóÀÑ óÊó ÅÄÄ Êó Ñ ÂƠËÄ ÊóƑ ºó ÅÄÄ Ê Ð Â º ÉÆÅÉ Ê ÂË ÊÅÅÊ ÊË ÂÂ Ã ÄÊ ÅÄÄ Êó Ñ ÂƠËÄ Êó Ê ÅÄÄ Ê Ð Â ÄÅËÌ Ë º ÉÆÅÉ Ê...

Page 86: ...électionné sur le téléviseur la source d entrée audio de l unité bascule sur la prise HDMI OUT ARC au moyen de la fonction ARC ou de la prise d entrée TV Et également lorsqu un lecteur BD DVD est raccordé à la prise HDMI IN sur l unité la source d entrée de l unité bascule sur HDMI lorsque le lecteur BD DVD est sélectionné avec la télécommande du téléviseur KDQJHU GnDSSDUHLO GH VRUWLH DXGLR Vous p...

Page 87: ...des immédiatement après avoir enfoncé INFO a b c d QGLTXHU OH W SH GH VLJQDO DXGLR HDMI allumé blanc Dolby Digital HDMI allumé rouge DTS TV allumé blanc AAC HDMI et TV éteints PCM entrée analogique pas d entrée QGLTXHU VL ROE 3UR RJLF HVW DFWLYÃ RX GÃVDFWLYÃ ROE 3UR RJLF HVW DXWRPDWLTXHPHQW DFWLYÃ ORUVTXH GHV VLJQDX VWÃUÃR FDQDX VRQW OXV HQ VXUURXQG Allumé Activé Éteint Désactivé QGLTXHU OH UÃJODJ...

Page 88: ...mmandée au moyen de ce dispositif mobile Outre les opérations de base de l unité différentes fonctions notamment la sélection du mode surround et le réglage de la tonalité peuvent être configurées plus précisément au moyen de l application qu avec la télécommande Pour en savoir plus sur l application HOME THEATER CONTROLLER consultez les informations sur le produit sur le site Yamaha Fr 37 ...

Page 89: ... DX PRLQV WURLV VHFRQGHV La fonction de contrôle HDMI est activée ou désactivée et l unité s allume Le témoin indique le statut de la fonction de contrôle HDMI pendant plusieurs secondes immédiatement après la mise sous tension de l unité Allumé activée par défaut Éteint désactivée ϰ Ê Ì Ð Â ÅÄ Ê ÅÄ º ÅÄÊÈĥ ÂÅÈÉÇË ÌÅËÉ È ÅȺ Ð ËÄ ÊóÂóÌ É ËÈ ÆÈ Ä ÄÊ Ä È Ëº Å ÊËÈÄ ÄÄ Â ƺ ƻ ÅË É ÌÅËÉ ËÊ Â É Ð Â ÅÄ Ê...

Page 90: ...Ä ËÈ Ê ÅÄ º  ÅÄ Ê ÅÄ º ÅÄÊÈĥ ƪ ƺÆƔʺʿƻ ϰ ÅËÈ ÅÄ ËÈ È Â ÉÅÈÊ Ëº Å Ì Â ÅÄ Ê ÅÄ º ÅÄÊÈĥÂ Ê Ìó Ƒ ÉóÂ Ê ÅÄÄ Ð Â ÆóÈ Æ óÈ ÇË º ÉÅÈÊ Ëº Å ÅÄ ËÈó ÆÅËÈ Â ÊóÂóÌ É ËÈ È ÅȺó Ñ ÂƠËÄ ÊóƔ ϰ É É Ä ËÎ Ì ºóÅ È îËÉ Ì Â ÆÈ É º ÂƠËÄ Êó ÉÅÄÊ ÊÅËÀÅËÈÉ óÃ É Æ È Â ÆÈ É ƺ ƻ º ÂƠËÄ ÊóƔ Réglage de la fonction de veille automatique En activant la fonction de veille automatique vous empêchez l unité de rester allumée lorsqu ...

Page 91: ... de la commande de l écran tactile pendant plusieurs secondes immédiatement après la mise sous tension de l unité Allumé activée par défaut Éteint désactivée Configuration de la fonction de veille Bluetooth Si la fonction de veille Bluetooth est activée l unité s allumera et sera prête à lire le son depuis le dispositif Bluetooth une fois qu une connexion Bluetooth a été établie sur un dispositif ...

Page 92: ...alisation de l unité Les réglages de l unité sont ramenés aux préréglages en usine 1 WHLJQH OnDSSDUHLO 2 0DLQWHQH HQIRQFÃV HW VXU OnXQLWÃ MXVTXnº FH TXH WRXV OHV WÃPRLQV FOLJQRWHQW Clignote réinitialisé Fr 41 ...

Page 93: ...e revendeur ou le service après vente agréé Yamaha le plus proche En cas de problèmes alimentation et fonction du système L unité s éteint brusquement z z D IRQFWLRQ GH YHLOOH DXWRPDWLTXH HVW DFWLYÃH Lorsque la fonction de veille automatique est activée l unité se met automatiquement hors tension dans l un des cas suivants Aucune opération n a été exécutée pendant 8 heures BLUETOOTH ou HDMI est sé...

Page 94: ...ation de la luminosité des témoins DIMMER p 38 L unité ne fonctionne pas correctement z H PLFURSURFHVVHXU LQWHUQH VnHVW ILJÃ HQ UDLVRQ GnXQH GÃFKDUJH ÃOHFWULTXH H WHUQH SURYRTXÃH SDU XQ RUDJH RX XQH GÃFKDUJH GnÃOHFWULFLWÃ VWDWLTXH RX GnXQH EDLVVH LPSRUWDQWH GH OD WHQVLRQ GnDOLPHQWDWLRQ Débranchez le cordon d alimentation de l unité de la prise secteur et rebranchez le L unité s allume toute seule ...

Page 95: ...écommande du téléviseur L unité ne peut pas être commandée avec la télécommande du téléviseur z D IRQFWLRQ GH FRQWUÎOH 0 HVW LQFRUUHFWH Confirmez que les réglages sont correctement configurés comme suit La fonction de contrôle HDMI de l unité est activée La fonction de contrôle HDMI est activée sur le téléviseur Réglez la sortie audio sur toute autre option que TV Si l unité ne peut pas être comma...

Page 96: ...o HDMI soient émis depuis l unité Pour plus d informations reportez vous à Configuration de la sortie audio HDMI audio p 39 z D IRQFWLRQ GH FRQWUÎOH 0 HVW GÃVDFWLYÃH Lorsque vous raccordez un téléviseur prenant en charge ARC Audio Return Channel à l unité au moyen d un câble HDMI uniquement activez la fonction de contrôle HDMI Pour émettre des signaux audio depuis l unité avec la fonction de contr...

Page 97: ...p 30 z H QLYHDX VRQRUH HVW WURS EDV Augmentez le niveau de volume Pour plus d informations reportez vous à Procédure de base pour la lecture p 28 z H WÃOÃYLVHXU RX OnDSSDUHLO GH OHFWXUH HVW UÃJOÃ SRXU ÃPHWWUH XQLTXHPHQW OnDXGLR FDQDX 3 0 SDU H HPSOH Changez le réglage de sortie audio numérique sur le téléviseur ou l appareil de lecture à BitStream z H VRQ HVW ÃJDOHPHQW HQWHQGX GHV HQFHLQWHV LQWÃJU...

Page 98: ...tez vous au nouveau dispositif z nXQLWÃ HVW GÃMº FRQQHFWÃH º GHX GLVSRVLWLIV OXHWRRWK 8WLOLVHU XQ GLVSRVLWLI OXHWRRWK TXL D GÃMº ÃWÃ FRQQHFWÃ º OnXQLWÃ Mettez fin à l une des connexions Bluetooth puis connectez vous au nouveau dispositif Aucun son n est restitué ou le son est saccadé depuis un dispositif Bluetooth z H YROXPH VXU OH GLVSRVLWLI OXHWRRWK SHXW ÄWUH WURS IDLEOH Augmentez le volume sur ...

Page 99: ...nce 4 kHz à 23 kHz Impédance 6 ȍ Caisson de graves Type Type bass reflex blindage non magnétique Excitateur Membrane conique de 7 5 cm 2 Réponse en fréquence 60 Hz à 160 Hz Impédance 3 ȍ 6 ȍ 2 ÃFRGHXU Signal audio pris en charge PCM jusqu à 5 1 canaux Dolby Digital jusqu à 5 1 canaux DTS Digital Surround jusqu à 5 1 canaux 3ULVHV GnHQWUÃH HDMI 1 HDMI IN Numérique Optique 1 TV Analogique mini stéré...

Page 100: ...Contrôle HDMI activé 1 2 W Dimensions L x H x P Installation de l unité devant un téléviseur etc 890 53 131 mm Fixation de l unité à un mur avec des entretoises 890 131 62 mm Poids 3 2 kg ÅÄÊ ÄË º Ãź ºƠ ÃÆÂÅ ÉƠ ÆÆ ÇË ËÎ º ÈÄ òÈ É È ÊóÈ ÉÊ ÇË É Ê Ä ÇË É ÅÄÄË É Ñ Â º Ê º ÆË Â Ê ÅÄ ºË à ÄË ÂƔ ÅËÈ Å Ê Ä È Â Ì ÈÉ ÅÄ Â ÆÂËÉ Èó ÄÊ ºË à ÄË ÂƑ óº Ð Ë É Ê º à ÆË É ÊóÂó È Ð Â È ºË à ÄË Â ÅÄ ÈÄóƔ Formats au...

Page 101: ...Ë É Ä Â Ì ºóÅ óÃ É Ì È É ÂÅÄ Â É ÉÆó Ê ÅÄÉ ºË ÊóÂóÌ É ËÈ È ÅȺó Ñ ÂƠËÄ ÊóƔ ϰ ÅÄÊ ÄË º Ãź ºƠ ÃÆÂÅ ÉƠ ÆÆ ÇË ËÎ º ÈÄ òÈ É È ÊóÈ ÉÊ ÇË É Ê Ä ÇË É ÅÄÄË É Ñ Â º Ê º ÆË Â Ê ÅÄ ºË à ÄË ÂƔ ÅËÈ Å Ê Ä È Â Ì ÈÉ ÅÄ Â ÆÂËÉ Èó ÄÊ ºË à ÄË ÂƑ óº Ð Ë É Ê º à ÆË É ÊóÂó È Ð Â È ºË à ÄË Â ÅÄ ÈÄóƔ Formats audio numériques pris en charge Les formats audio numériques suivants peuvent être utilisés par l unité 2SWLTXH 7...

Page 102: ...Â É Ì É ÉÆó ó ÉƑ ÅÃà º É Ì É ÅËÈÊ ÉƑ º É ÂÅËÉ ÅË ºË ÈË Ä º óÉ ºÅË Â Ƒ ÂƠËÄ Êó È ÉÇË º ÊÅà ÈƔ ϰ Î Ð Â É Ó Â É º Ã Ä òÈ Ñ ÇËƠ ÂÉ Ä É ºóÊ ÄÊ Æ ÉƔ ÌÅËÉ ÊÈó Ë Ð º ÄÊ Â à ÄÊ ÉËÈ ËÄ Ó Â ÂÓ ÅË ÌÅËÉ ÆÈ Ä Ð Â Ã Ä º º ÄÉƑ ÂƠËÄ Êó È ÉÇË º ÊÅà ÈƔ ϰ ÌÅËÉ ÆÆËÏ Ð Æ É ÉËÈ ÂƠËÄ ÊóƑ Ä ÄƠ Î È Ð ËÄ ÅÈ Î ÉÉ Ì ÉËÈ Â ËÊ º ÂƠ ÆÆ È ÂƑ ÉÅËÉ Æ Ä º Â È ÊÅà ÈƔ ϰ óÈ Ð ÇË ÂƠËÄ Êó ÉÊ ÉÅ º à ÄÊ Îó ÆÈòÉ ÂƠ ÄÉÊ ÂÂ Ê ÅÄƔ à ÄƠ ÉÉËà ...

Page 103: ...HQW VXU OHV SRLQWV PDUTXÃV VXU OH PXU 7 à 9 mm 13 à 15 mm 4 à 5 mm 20 mm ou plus 457 mm 3 ÃFROOH OH SDSLHU VXSSRUW GHV HQWUHWRLVHV IRXUQLHV HW FROOH OD IDFH DGKÃVLYH DX EDV GH OnXQLWÃ Entretoises 4 FFURFKH OnXQLWÃ DX YLV Orifices de montage au bas de l unité Écran tactile Fr 52 ...

Page 104: ...o Naka ku Hamamatsu 430 8650 Japan Published 04 2017 ODNV A0 Printed in China Manual Development Group 2018 Yamaha Corporation AV17 0066 Yamaha Global Site http www yamaha com Yamaha Downloads http download yamaha com ...

Reviews: