background image

5

En

Installation

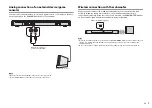
Place the sound bar on a flat surface such as on top of a 
TV cabinet.
Place the subwoofer to the outside of the sound bar. 
To avoid echoes from the wall, face the front side of the 
subwoofer slightly inward.

HINT

• If it is difficult to operate the TV, use the TV Remote Repeater 

function (p.14) to transmit the TV’s remote control signal via sound 
bar.

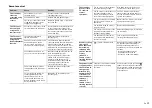
• When placing the sound bar across the bases of the TV, or when 

changing the height of the sound bar, attach the supplied stands 
with the stand attachment screws.

Attaching the sound bar to a wall

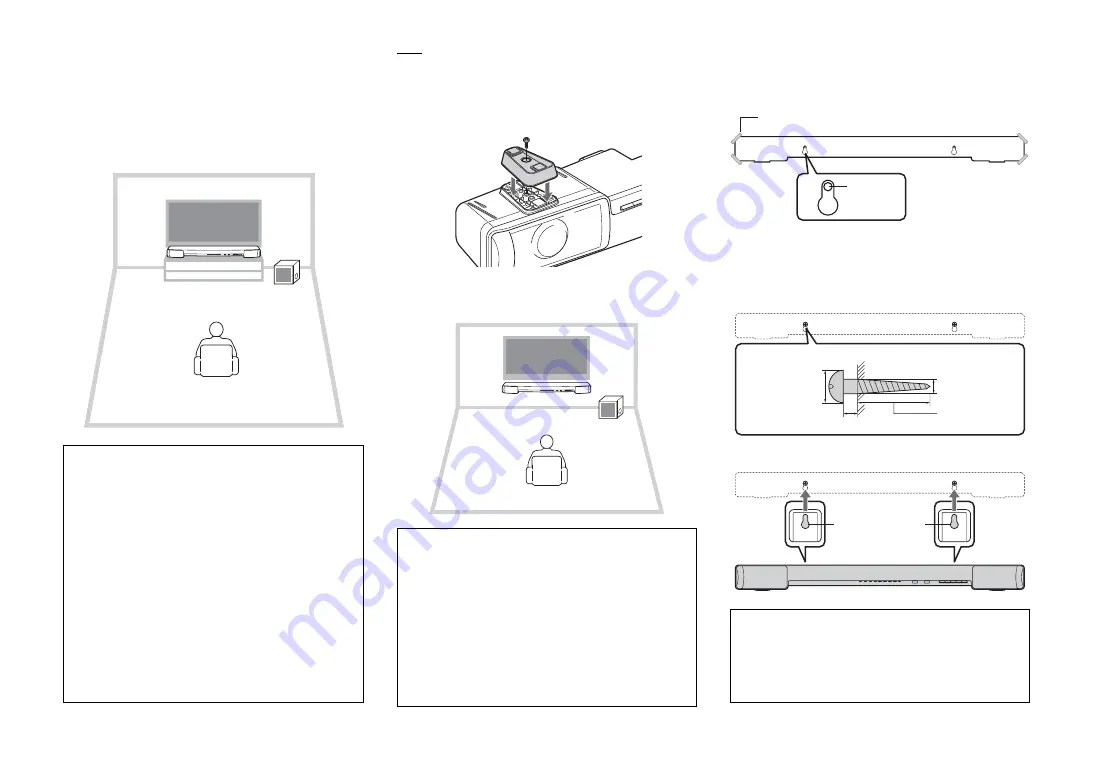
How to install on the wall

1 Attach the mounting template on a wall and mark 

for the screw holes.

2 Remove the mounting template from the wall, 

then install commercially available screws (as 
illustrated below) at the points marked on the 
wall.

3 Hang the sound bar on the screws.

Cautions

• Do not stack the sound bar/subwoofer and a BD player or other 

device directly on each other. Doing so may cause a malfunction 
due to vibrations.

• Do not hold the speaker portion (fabric part) on the front of the 

subwoofer when moving it.

• The sound bar contains non-magnetic shielding speakers. Do not 

place magnetically sensitive items (hard disk drive, etc.) near the 
sound bar.

• Depending on your installation environment, it may be better to 

connect the sound bar and external devices (such as a TV) 
before installing the sound bar.

• Do not place the sound bar within 50 mm (2") of the TV. 
• The subwoofer and sound bar communicate wirelessly. Do not 

place objects that block wireless signals, such as metallic 
furniture and devices, between the subwoofer and sound bar as 
the wireless communication may be adversely affected.

• If the subwoofer is covered with a cloth or other object, the sound 

volume is reduced. Install the subwoofer so that it is not hidden 
behind a thick curtain, etc.

Cautions

• When installing the sound bar on a wall, all installation work must 

be performed by a qualified contractor or dealer. The customer 
must never attempt to perform this installation work. Improper or 
inadequate installation could cause the sound bar to fall, 
resulting in personal injury.

• Do not attach the sound bar to a wall that is made of weak 

materials such as plaster or veneered woods. Doing so may 
cause the sound bar to fall.

• Make sure you use commercially available screws that can 

support the weight of the installation (specified in Step 2 on the 
right). Using clamps other than specified screws, such as short 
screws, nails, and two-sided tape, may cause the sound bar to 
fall.

Cautions

• Fix the cables in place where they will not become loose. If your 

foot or hand accidentally gets caught on a loose cable, the sound 
bar may fall.

• Check that the sound bar is fixed securely after the installation. 

Yamaha will bear no responsibility for any accidents caused by 
improper installations.

Tapes or thumbtacks

Mounting template (supplied)

Screw 
holes

7 to 8.5 mm

(1/4" to 5/16")

3 to 4 mm (1/8" to 3/16")

4 mm (#8)

20 mm (3/4") 
or more

Mounting holes 

on rear of sound bar

Summary of Contents for YAS-CU203

Page 1: ...mote control TV s remote control learning function 12 Sending the TV s remote signalthrough the sound bar TV RemoteRepeater function 14 Setting the auto power standby function 14 Initializing the sound bar 14 Troubleshooting 15 Specifications 20 Front Surround System YAS CU203 NS WSW41 Owner s Manual About this manual NOTE This indicates precautions for use of the product and its feature limitatio...

Page 2: ...the party responsible for compliance could void the user s authority to operate the equipment NOTICE This equipment has been tested and found to comply with the limits for a Class B digital device pursuant to part 15 of the FCC Rules These limits are designed to provide reasonable protection against harmful interference in aresidential installation This equipment generates uses and can radiate rad...

Page 3: ...ce a fragile object near the port of the subwoofer If the object falls as a result of the air pressure it may cause personal injury and or damage to the subwoofer and the object Keep the product out of reach of children to avoid them swallowing small parts Notes on remote controls and batteries Do not spill water or other liquids on the remote control Do not drop the remote control Do not leave or...

Page 4: ...ating range of the remote control Remain within the operating range shown below Remote control Sound bar YAS CU203 Wireless subwoofer NS WSW41 Optical cable 1 5 m 4 9 ft Mounting template Using when attaching the sound bar to a wall Stand x 2 For sound bar Battery x 2 AAA R03 UM4 Screw x 2 For attaching the stand Owner s Manual This manual Remote control sensor Within 6 m 20 ft ...

Page 5: ...TV s remote control learning function Operate the sound bar with the TV s remote control p 12 TV Remote Repeater function Enables the TV s remote signal to pass through the sound bar If the installed sound bar blocks the TV s remote sensor the TV s remote will not work This function provides a convenient solution p 14 Clear voice Makes voice sound such as dialogues and narrations clear p 9 UniVolu...

Page 6: ... Press the key again to unmute p 9 F VOLUME keys Adjust the volume p 8 G power key Turns on or off standby the sound bar p 9 HINT The sound bar may automatically turn off when the auto power standby function is enabled p 14 H Speakers Sound bar rear panel A TV input jack For connecting to a TV with an optical cable p 6 B BD DVD input jack For connecting to a playback device such as a Blu ray Disc ...

Page 7: ...sound bar within 50 mm 2 of the TV The subwoofer and sound bar communicate wirelessly Do not place objects that block wireless signals such as metallic furniture and devices between the subwoofer and sound bar as the wireless communication may be adversely affected If the subwoofer is covered with a cloth or other object the sound volume is reduced Install the subwoofer so that it is not hidden be...

Page 8: ...efer to the manuals of the TV The TV and BD DVD input jacks support the following audio signals PCM 2 channel Dolby Digital up to 5 1 channel DTS Digital Surround up to 5 1 channel Cautions Make sure that the power cables of the sound bar and subwoofer are not connected to AC wall outlets when you start making connections Do not use excessive force when inserting the cable plug Doing so may damage...

Page 9: ...d to AC wall outlets p 6 and the sound bar is turned on the sound bar and subwoofer are connected automatically When the connection is complete the SUBWOOFER indicator on the sound bar lights up and the sound bar is ready for playback HINT When the sound bar is turned on for the first time if the SUBWOOFER indicator on the sound bar does not light up see Pairing the sound bar and subwoofer manuall...

Page 10: ...cted input source lights up Example when TV is selected HINT To play audio of the playback device connected to the TV or to watch videos of the playback device set the TV s input source to the playback device For details on Bluetooth connection refer to Listening to the sound from a Bluetooth device p 10 SUBWOOFER keys Adjust the volume of the subwoofer VOLUME keys Adjust the volume of the sound b...

Page 11: ...R VOICE key Enables disables the clear voice function When this function is enabled you can enjoy clear voice sounds while watching movies TV dramas news programs or sports programs UNIVOLUME key Enables disables the UniVolume function When this function is enabled consistent volume is maintained when inputs or sound sources switch HINT The UniVolume function is automatically disabled when BLUETOO...

Page 12: ... manual of the device 3 Select YAS 203 Yamaha in the Bluetooth device list on the device If a passkey PIN is required enter the number 0000 When pairing is completed or a completion message appears on the device NOTE Perform pairing with the Bluetooth device and sound bar within 10 meters 33 ft of each other Up to eight Bluetooth devices can be paired with the sound bar If a ninth device is paired...

Page 13: ... 3 seconds The sound bar is turned off Using the Bluetooth standby mode The Bluetooth standby mode allows you to turn on or off the sound bar automatically that interlocked by the operation of the Bluetooth device 1 With the sound bar turned on hold down the BLUETOOTH STANDBY key on the sound bar s remote control for more than 3 seconds Holding down the BLUETOOTH STANDBY key for 3 seconds each tim...

Page 14: ...ice or three times 5 Teach the sound bar the Volume code of the TV s remote control 5 1 Press VOLUME on the front panel of the sound bar 5 2 While pointing your TV s remote control at the remote control sensor hold down the volume key for more than 1 second twice or three times Programming the sound bar with the TV s remote control TV s remote control learning function This function is available o...

Page 15: ... the TV volume to minimum When you turn up the volume of the sound bar with the TV s remote control the volume of the TV may be turned up at the same time In this case follow Step 3 in Connections p 6 to change the TV setting You can press the power key on the sound bar s remote control to finish learning mode Clearing all programmed functions 1 With the sound bar turned off hold down the LEARN ke...

Page 16: ...n the sound bar By enabling the auto power standby function you can avoid forgetting to turn off the sound bar after use or if you fall asleep while watching TV NOTE When the auto power standby function is enabled and one of the following conditions is met the sound bar will automatically turn off No operation for 8 hours No audio input and no operations for 20 minutes when BLUETOOTH is selected a...

Page 17: ...etooth connection is terminated on a Bluetooth device when the Bluetooth standby mode is enabled Disable the Bluetooth standby mode p 11 The power cannot be turned on The protection circuitry has been activated three times consecutively If you try to turn on the power in this condition the STATUS indicator on the front panel of the sound bar flashes To protect the product the power cannot be turne...

Page 18: ...n the sound is interrupted Move the subwoofer closer to the sound bar If the situation does not improve move the subwoofer to a location with better communication If the communication between the sound bar and subwoofer is obstructed by a metallic object or another object change the position of the sound bar and subwoofer or change the installation location of the subwoofer If there is a device mi...

Page 19: ...ote control and IR flasher for TV Remote Repeater of the sound bar are interfering Disable the TV Remote Repeater function p 14 The sound bar does not learn TV s remote control operations The TV s remote control key was not held down long enough Hold down the key for more than 1 second twice or three times p 12 The TV s remote control does not use infrared signals Some remote controls may not work...

Page 20: ...rent Bluetooth connection and make connection for the desired device More than nine devices are paired and the oldest pairing information is deleted Perform pairing again The sound bar can retain pairing information for up to eight devices When pairing a ninth device the oldest pairing information will be deleted No sound is produced or the sound is interrupted during playback The Bluetooth connec...

Page 21: ...f the subwoofer for more than 3 seconds with a tapered object such as a hairpin The STATUS indicator on the rear panel of the subwoofer flashes rapidly in green When pairing is complete and the sound bar and subwoofer are connected the SUBWOOFER indicator on the front panel of the sound bar lights up If the SUBWOOFER indicator on the sound bar does not light up even after performing the above oper...

Page 22: ... Class 2 Maximum communication distance 10 m 33 ft without obstructions Supported content protection method SCMS T General Power Supply U S A and Canada models AC 120 V 60 Hz Taiwan model AC 110 120 V 50 60 Hz China model AC 220 V 50 Hz Other models AC 220 240 V 50 60 Hz U S A and Canada models AC 120 V 60 Hz U K and Europe models AC 230 V 50 Hz Taiwan model AC 110 V 60 Hz Korea model AC 220 V 60 ...

Page 23: ... of signal transfer and the distance at which communications is possible differs according to the distance between the communicating devices the presence of obstacles radio wave conditions and type of equipment Yamaha does not guarantee all wireless connections between this unit and devices compatible with Bluetooth function Information for Users on Collection and Disposal of Old Equipment and Use...

Page 24: ...information about this Yamaha product and Pan EEA and Switzerland warranty service please either visit the website address below Printable file is available at our website or contact the Yamaha representative office for your country EEA European Economic Area English AVEEA11102A 2014 Yamaha Corporation Printed in Indonesia ZM98580 ...

Reviews: