PREPARATION
➤
Connecting the unit to a TV and set-top box
En
13
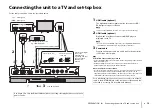
Connecting the unit to a TV and set-top box
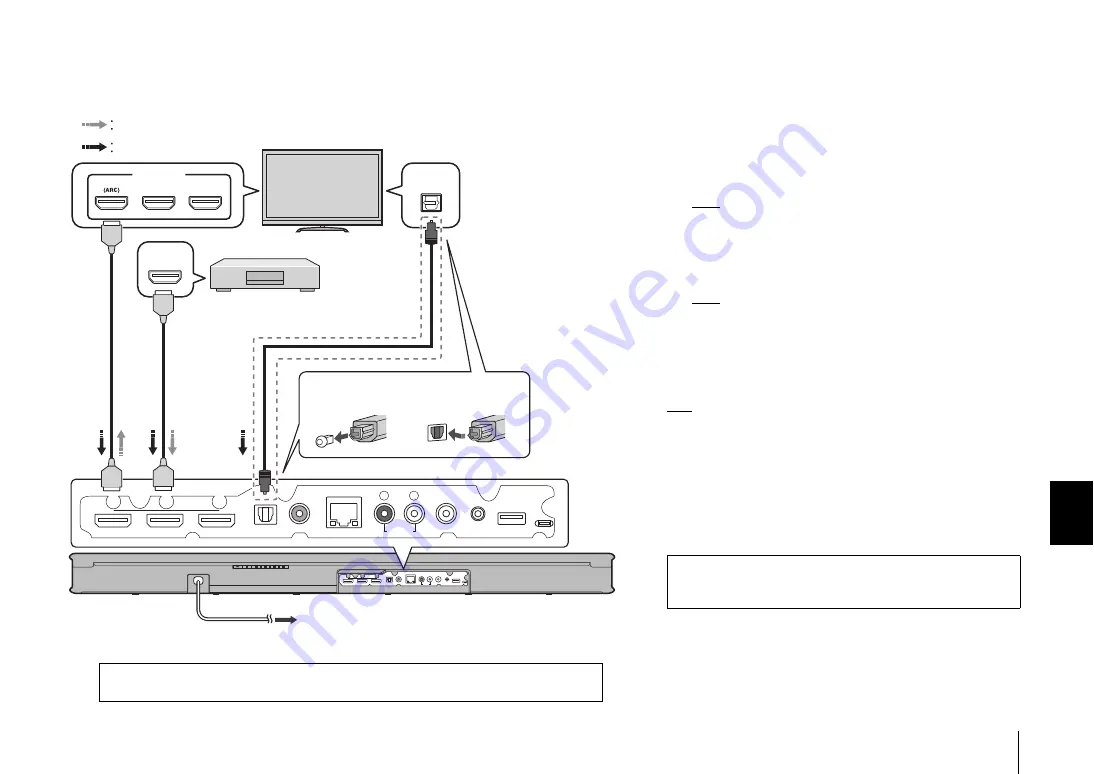
For the cable connection, follow the procedure below.
HDMI
IN 2
IN 1
OUT (ARC)
TV
COAXIAL
NETWORK
ANALOG
R
SUBWOOFER
OUT
SYSTEM
CONNECTOR UPDATE ONLY
L
HDMI INPUT
1
2
3
OPTICAL
OUTPUT
HDMI
OUTPUT
Cable, satellite or network set-top
box, or BD/DVD player
TV
1.Remove the cap
2.Check the direction
of the plug
Video signals
Audio signals
1
Use the optical digital
audio cable
(supplied) when
connecting a TV that
does not support
Audio Return
Channel.
1
HDMI cable (optional)
The digital audio/video signals from the set-top box or BD/
DVD player are input to this unit.
NOTE
• This unit supports HDCP version 2.2, a copy protection technology.
2
HDMI cable (optional)
Digital video from the set-top box or BD/DVD player is
displayed on the TV.
NOTE
• Connect the unit to the HDMI input jack (one compatible with HDCP 2.2)
on an HDCP 2.2-compliant TV to enjoy playback of 4K video.
3
Power cable
Plug the unit’s power cable into an AC wall outlet after all the
connections are complete.
HINT
Audio Return Channel (ARC) supported TV
• Connect an HDMI cable to the audio return channel supported jack (the jack with
“ARC” indicated) on TV.
• Enable the HDMI control function of this unit to activate the Audio Return
Channel (ARC). See page 46 in the Owner’s Manual.
What is Audio Return Channel (ARC)?
• In order for the unit to play audio from a TV, the TV must usually be connected to
the unit via an audio cable as well as an HDMI cable. If, however, the TV
supports Audio Return Channel (ARC), TV audio signals can be input to the unit
via the HDMI cable that outputs video signals from the unit to the TV.
For a wired network connection, connect one end of the network
cable to the NETWORK jack on the rear panel of the unit and the
other end to a router (p. 26 in the Owner’s Manual).
See pages 13 to 14 in the Owner’s Manual when connecting other playback devices such as a
game console.
3
To an AC wall outlet
2

