


7-8
7
WARNING! Operating this ATV with improper
modifications may cause changes in handling
which in some situations could lead to an acci-
dent.
[EWB01491]
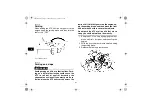
Exhaust system
WARNING
EWB01501
●
Dry grass or brush or other combustible ma-
terial accumulated around the engine area
could catch fire. Do not operate, idle, or park
the ATV in dry grass or other dry ground cov-
er. Keep the engine area free of dry grass,
brush, or other combustible material.
●
Someone touching the exhaust system dur-
ing or after operation could be burned. Do
not touch the hot exhaust system. Do not
park the ATV in a place where others might
be likely to touch it.
The muffler and other engine parts become ex-
tremely hot during operation and remain hot after
the engine has stopped. To reduce the risk of fire
during operation or after leaving the ATV, do not let
brush, grass and other materials collect under the
vehicle, near the muffler or exhaust pipe, or next to
other hot parts. Check under the vehicle after op-
erating in areas where combustible materials may
have collected. Do not idle or park the vehicle in
long dry grass or other dry ground cover.
To prevent burns, avoid touching the exhaust sys-
tem. Park the ATV in a place where pedestrians or
children are not likely to touch it.
U1BS60E0.book Page 8 Thursday, April 16, 2009 4:11 PM
Summary of Contents for YFM350RZ
Page 12: ...1 2 1 4D3 2816L 20 43P 2816R 00 1 2 3 U1BS60E0 book Page 2 Thursday April 16 2009 4 11 PM ...
Page 17: ...1 7 1 For Oceania 1 2 3 4 5 U1BS60E0 book Page 7 Thursday April 16 2009 4 11 PM ...
Page 57: ...7 1 7 EBU21141 RIDING YOUR ATV U1BS60E0 book Page 1 Thursday April 16 2009 4 11 PM ...
Page 135: ...11 3 11 1 Model label U1BS60E0 book Page 3 Thursday April 16 2009 4 11 PM ...


